基于骨骼关键点的动作识别(OpenMMlab学习笔记,附PYSKL相关代码演示)
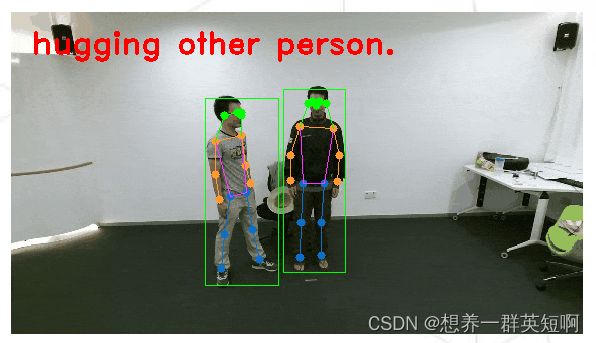
一、骨骼动作识别
- 骨骼动作识别是视频理解领域的一项任务
1.1 视频数据的多种模态
-
RGB:使用最广,包含信息最多,从RGB可以得到Flow、Skeleton。但是处理需要较大的计算量
-
Flow:光流,主要包含运动信息,处理方式与RGB相同,一般用3D卷积
-
Audio:使用不多
-
Skeleton:骨骼关键点序列数据,即人体关键点坐标。与动作识别密切相关,信息密度大。
1.2 骨骼动作识别含义、条件、适用场景与优点
- 关键点:通过关键点坐标进行动作识别,例如用Face Landmarks来识别表情,用Hand Landmarks来识别手势。
- 骨骼动作识别前提条件:
动作可以仅通过Skeleton序列来识别。
(1)动作类型要有合适的定义。不适合Skeleton识别的例子:有许多个动作类别为eating sth,那就只能通过识别sth来进行动作识别,此时与Skeleton无关。、
(2)视频中要存在质量比较好的骨骼数据。不适合Skeleton识别的例子:视频中没有人,或者只出现人的一小部分。
- 适用于骨骼动作识别的场景:
(1)训练数据稀缺、训练数据与测试数据存在较大bias的情况下,比如背景颜色或者环境等因素会导致RGB模型质量不佳。此时如果训练骨骼动作模型的话,就会有更好地泛化性。因为骨骼模型的话就只基于关键点坐标,从而进行动作识别。
(2)轻量型。可以用较小的计算量来进行Action Recognition的任务。
- 骨骼动作识别的轻量型
使用Skeleton的计算量 < 使用RGB的计算量
这里的RGB(3D-CNN)方法可见MMAction2
1.3 如何获得Skeleton序列,作为骨骼动作识别模型的输入
(1)Kinect Sensor(RGBD)
在构建RGBD数据集时,用带有RGBD深度相机的Kinect传感器,来估计3D的Skeleton。但是得到的关键点坐标噪声较多,质量较差。
(2)★2D的人体姿态估计
通过估计出2D人体姿态关键点,来预测动作。
(3)3D的人体姿态估计——Motion Capture
使用动捕设备。这种情况一般使用的网络较少。
二、基于GCN的技术路线——ST-GCN++
2.1 GCN——Key Points
(1)GCN以骨骼关键点序列作为输入,输入形状为T × V × C
T:序列长度
V:一个Skeleton里关键点的个数
C: 维度。2D或者3D。
(2)存在多个人时,GCN取所有人特征的平均作为特征,如图所示
(3)GCN网络由多个GCN Block堆叠而成。类似于Bottleneck→ResNet。
2.2 ST-GCN结构
随着网络的加深,特征的通道数(C)不断加深,时序维度(T)上不断地降采样。
最后一层的输出会经过一个global average pooling得到输出特征。
最后,经过线性层分类器,得到分类结果。
- 关于GCN Block的设计
GCN Block的组成:1个GCN Layer和1个TCN Layer
GCN Layer:使用系数矩阵A,对同一帧内部的关键点进行特征融合
TCN Layer: 使用1D卷积为每个关键点进行时序建模
(1)GCN Block的forward函数:
def forward(self, x, A = None):
    x = self.tcn(self.gcn(x, A)) + self.residual(x)  # GCN Layer和TCN Layer
    return self.relu(x)
(2)TCN Layer:是由时序维度上的1D卷积和一个bn组成
选择了size为9的大kernel,大量增加了计算量的消耗,增加了参数量。
class unit_tcn(nn.Module):
    def __init__(self,
                in_channels,
                out_channels,
                kernel_size = 9,
                stride = 1):
        super(unit_tcn, self).__init__()
        pad = (kernel_size - 1) // 2
        self.conv = nn.Conv2d(
        	in_channels,
        	out_channels,
            kernel_size = (kernel_size, 1),
            padding = (pad, 0),
            stride = (stride, 1))
        self.bn = nn.BatchNorm2d(out_channels)

    def forward(self, x):
        x = self.bn(self.conv(x))
        return x
(3)GCN Layer:
使用系数矩阵A对不同关键点进行特征融合。
系数矩阵A的来源:预定义的系数矩阵 × 数据驱动的稀疏mask
class unit_gcn(nn.Module):
    def __init__(self,
                in_channels,
                out_channels,
                s_kernel = 3):
        super().__init__()

        self.s_kernel = s_kernel
        self.conv = nn.Conv2d(
        	in_channels,
            out_channles * s_kernel,
            kernel_size = 1)

	def forward(self, x, A):
        # the shape of A is (s_kernel, V, V)
        assert A.size(0) == self.s_kernel     # 使用系数矩阵A对不同关键点进行特征融合
        x = self.conv(x)

        n, kc, t, v = x.size()
        x = x.view(n, self.s_kernel, kc // self.s_kernel, t, v)
        x = torch.einsum('nkctv, kvw->nctw', (x. A))
        return x.contiguous()
2.3 ST-GCN++
- 在此基础上对GCN再进行改进的空间不大
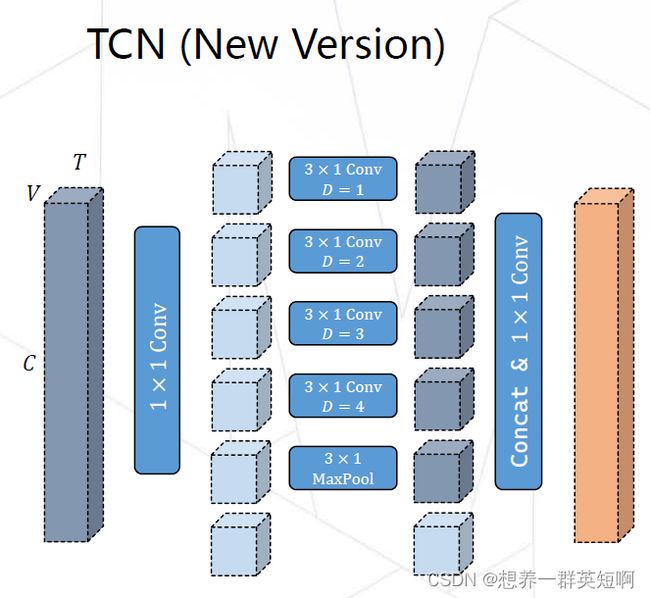
(1)TCN的改进
舍弃的单个大kernel的1D卷积,换成使用多分支的时域卷积。采用多分支的结构可以增强网络的时序建模能力,同时还会节省计算量和参数量。
(2)GCN的改进
-
老版本的GCN是用预定义的系数矩阵 × 数据驱动的稀疏mask得到系数矩阵A,通过A来进行不同关键点的特征融合。但是这种稀疏的结构不利于关键点的建模,因为只局限于相邻的关键点进行连接。
-
GCN改进后,使用预训练的系数矩阵A作为初始化,在训练过程中不断地训练和更新A。同时,在GCN中添加residual结构。
(3)数据预处理及超参的改进
-
在ST-GCN中,构建输入过程中,将所有样本进行zeropad(0填充)到最长的长度(300帧),
-
在ST-GCN++中,对每个骨骼的关键点序列进行了归一化操作,对于skeleton减去首帧的中心点,再将skeleton旋转至固定角度,得到更干净的输入。在构建输入的过程中,对每一个样本进行uniformsample(均匀采样)得到长为100帧的输入,节省了计算量,也会有较强的数据驱动。
-
在超参设置方面,ST-GCN++使用了CosineAnnEaling Scheduler,及通过cos函数来调节学习率。此外,还使用了Large Weight Decay(更大的权重衰减),防止模型过拟合。
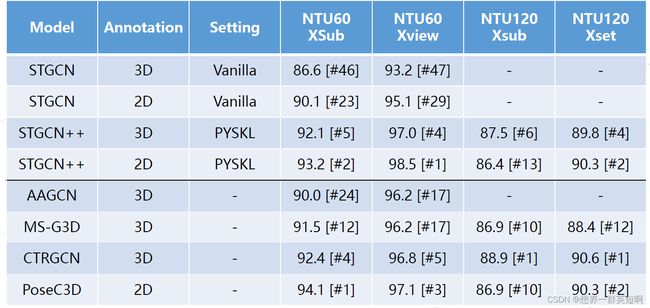
2.4 基于骨骼的动作识别模型精度对比
2.5 GCN的缺点
(1)鲁棒性:输入的扰动容易对 GCN 造成较大影响,使其难以处理关键点缺失或训练测试时使用骨骼数据存在分布差异(例如出自不同姿态提取器)等情形。
(2)兼容性:GCN 使用图序列表示骨架序列,这一表示很难与其他基于 3D-CNN 的模态(RGB, Flow 等)进行特征融合。
(3)可扩展性:GCN 所需计算量随视频中人数线性增长,很难被用于群体动作识别等应用
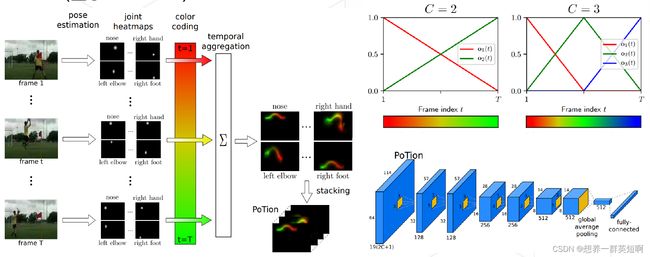
三、基于2D-CNN的技术路线——PoTion
将多张heatmap图以color coding算法压缩为一张图片。再用2D-CNN进行处理。尽管color coding在一定形式上保留运动的形式,但在编码过程中会存在一定的信息损失
四、基于3D-CNN的解决方案——PoseC3D
-
PoseC3D 是一种基于 3D-CNN 的骨骼行为识别框架。不同于传统的基于人体 3 维骨架的 GCN 方法,PoseC3D 仅使用 2 维人体骨架热图堆叠作为输入,就能达到更好的识别效果。
-
项目地址:posec3d
-
相关论文:Revisiting Skeleton-based Action Recognition
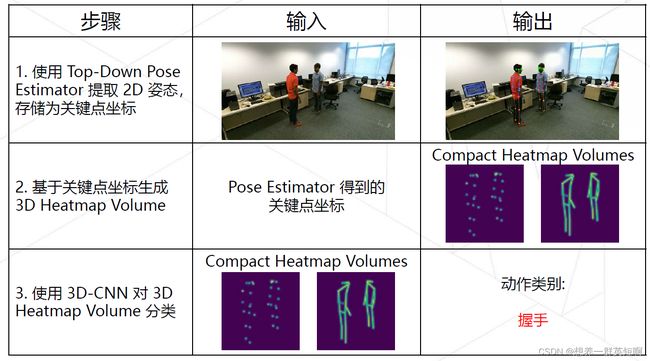
(1)提取2D Skeleton
- 通过Top-Down进行2D人体姿态估计,获取关键点坐标(x, y, c),其中,c是置信度。直接存储关键点热图会消耗大量磁盘空间,因此将每个 2D 关键点存储为坐标。
- 提取2D关键点的质量通常优于3D关键点的质量。所以PoseC3D采用2D关键点作为输入。即使基于轻量主干网络(MobileNetV2)所预测的二维姿态,用于动作识别时,效果也好于任何来源的三维人体姿态。
(2)生成3D heatmap volume(热图堆叠)
- 基于获取的2D关键点坐标,生成3D的heatmap volume
- 一张heatmap(K × H × W),K 为关键点个数
- 3D heatmap volume(K × T × H × W),K为关键点个数。T为时序维度,即连续帧heatmap的张数。
- 在空间上,采用subject-centered cropping;在时间上,使用uniform sampling,以建模更长的视频。
(3)用3D-CNN对获取的3D heatmap volume进行分类,得到动作类别
设计了两种3D-CNN
- Pose-SlowOnly:仅以骨骼模态作为输入
- RGBPose-SlowFast:骨骼 + RGB 模态
五、各模型的比较
5.1 PoseC3D的优势
(1)鲁棒性
每帧去drop一个关键点,p表示drop关键点的概率。可以看到3D-CNN在这种情况下几乎没受影响。
(2)可扩展性
随着视频中人数的增多,3D-CNN并不需要额外的计算量与参数量。但GCN每多一个人就会多一份计算量。
5.2 PoseC3D与2D-CNN的比较
PoseC3D计算量与参数量更小,准确率更高。在使用Kinetic-400预训练后,PoseC3D优势更显著。
5.3 3D-CNN与GCN比较
- 其中,PoseC3D的输入大小17 * 48 * 56 *56 (K * T * H * W)
- 所有模型都使用HRNet提取出的2D skeleton
- 3D-CNN在性能,计算量,参数量方面都略优于GCN
六、PYSKL(附相关代码演示)
-
如果应用的话,推荐用ST-GCN++模型。如果想做一些改进,用PoseConv3D模型。
-
PYSKL是一个开源项目。是使用pytorch基于骨骼关键点的数据进行动作识别。
-
项目地址:PYSKL
6.1 可视化skeleton
(1)下载依赖库
import glob
from pyskl.smp import *
from pyskl.utils.visualize import Vis3DPose, Vis2DPose
from mmcv import load, dump
(2) Download annotations
download_file('http://download.openmmlab.com/mmaction/pyskl/demo/annotations/ntu60_samples_hrnet.pkl', 'ntu60_2d.pkl')
download_file('http://download.openmmlab.com/mmaction/pyskl/demo/annotations/ntu60_samples_3danno.pkl', 'ntu60_3d.pkl')
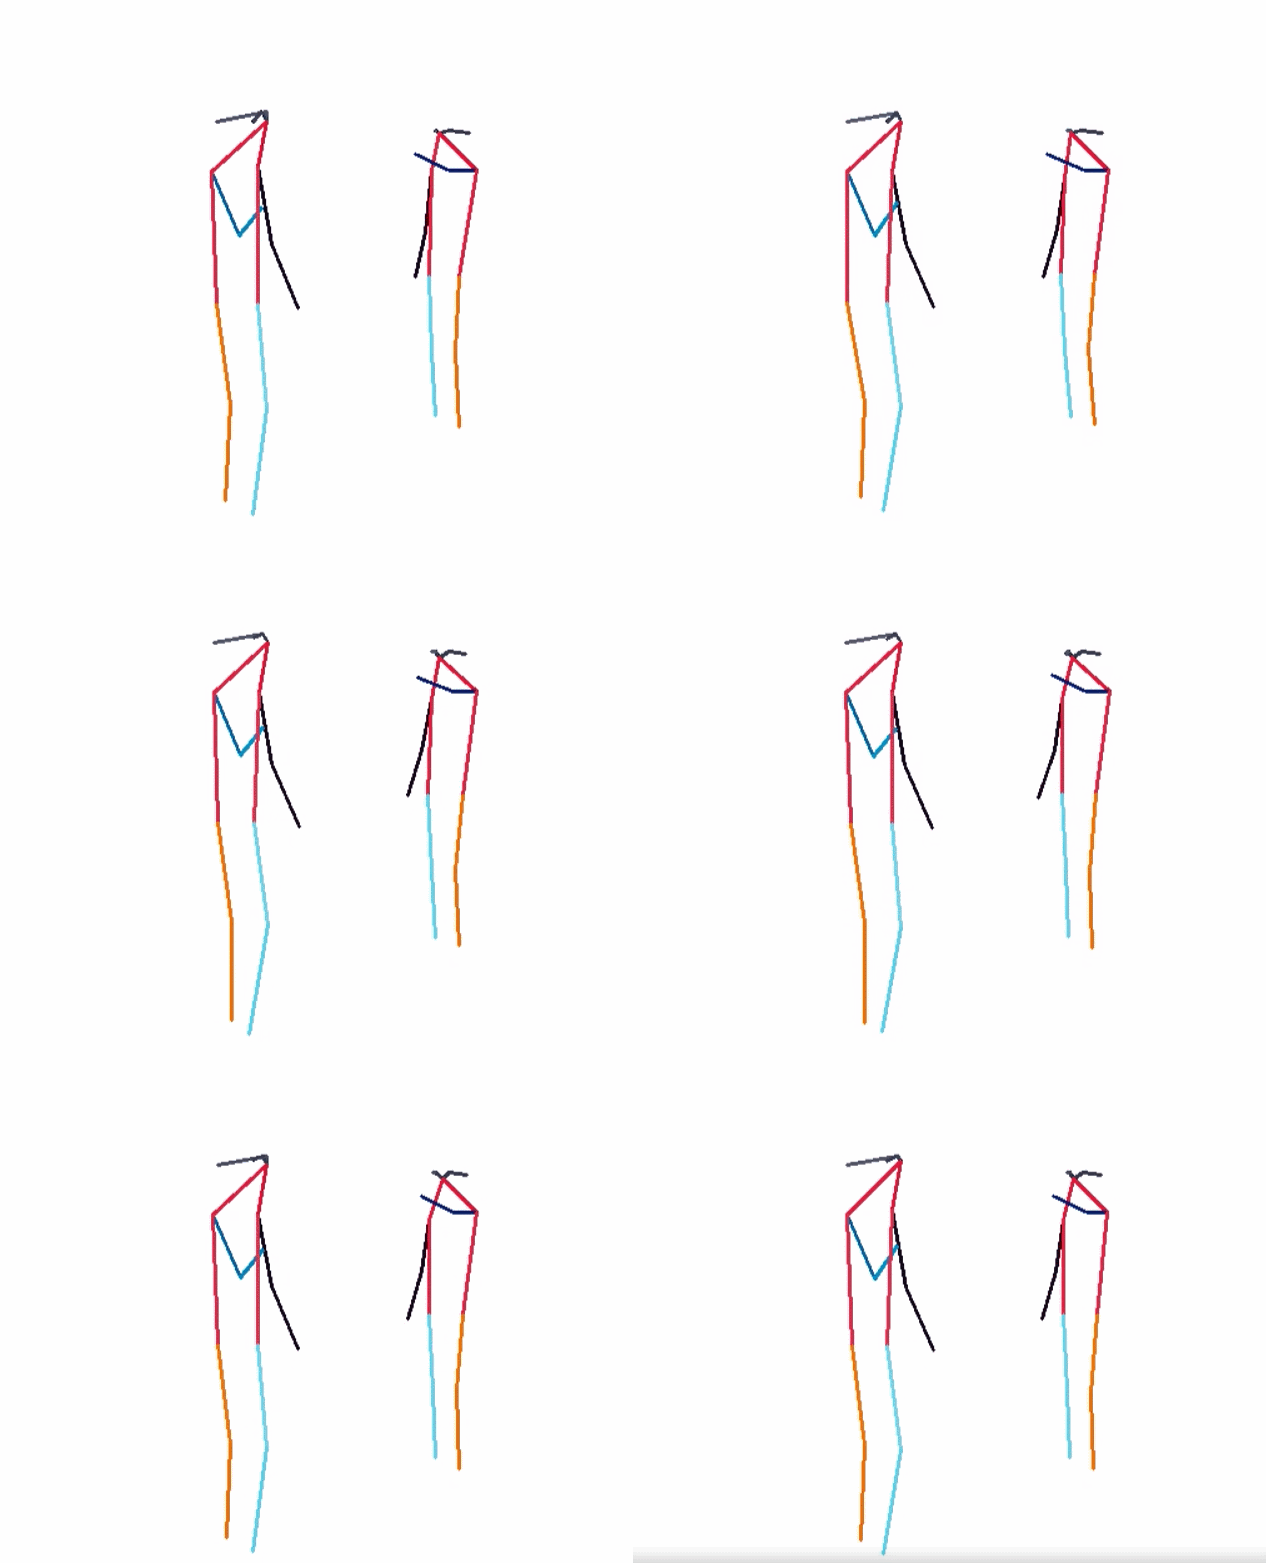
(3)可视化2D skeleton
annotations = load('ntu60_2d.pkl')
index = 0
anno = annotations[index]
vid = Vis2DPose(anno, thre=0.2, out_shape=(540, 960), layout='coco', fps=12, video=None)
vid.ipython_display()
(4)可视化2D skeleton融合RGB video
annotations = load('ntu60_2d.pkl')
index = 0
anno = annotations[index]
frame_dir = anno['frame_dir']
video_url = f"http://download.openmmlab.com/mmaction/pyskl/demo/nturgbd/{frame_dir}.avi"
download_file(video_url, frame_dir + '.avi')
vid = Vis2DPose(anno, thre=0.2, out_shape=(540, 960), layout='coco', fps=12, video=frame_dir + '.avi')
vid.ipython_display()
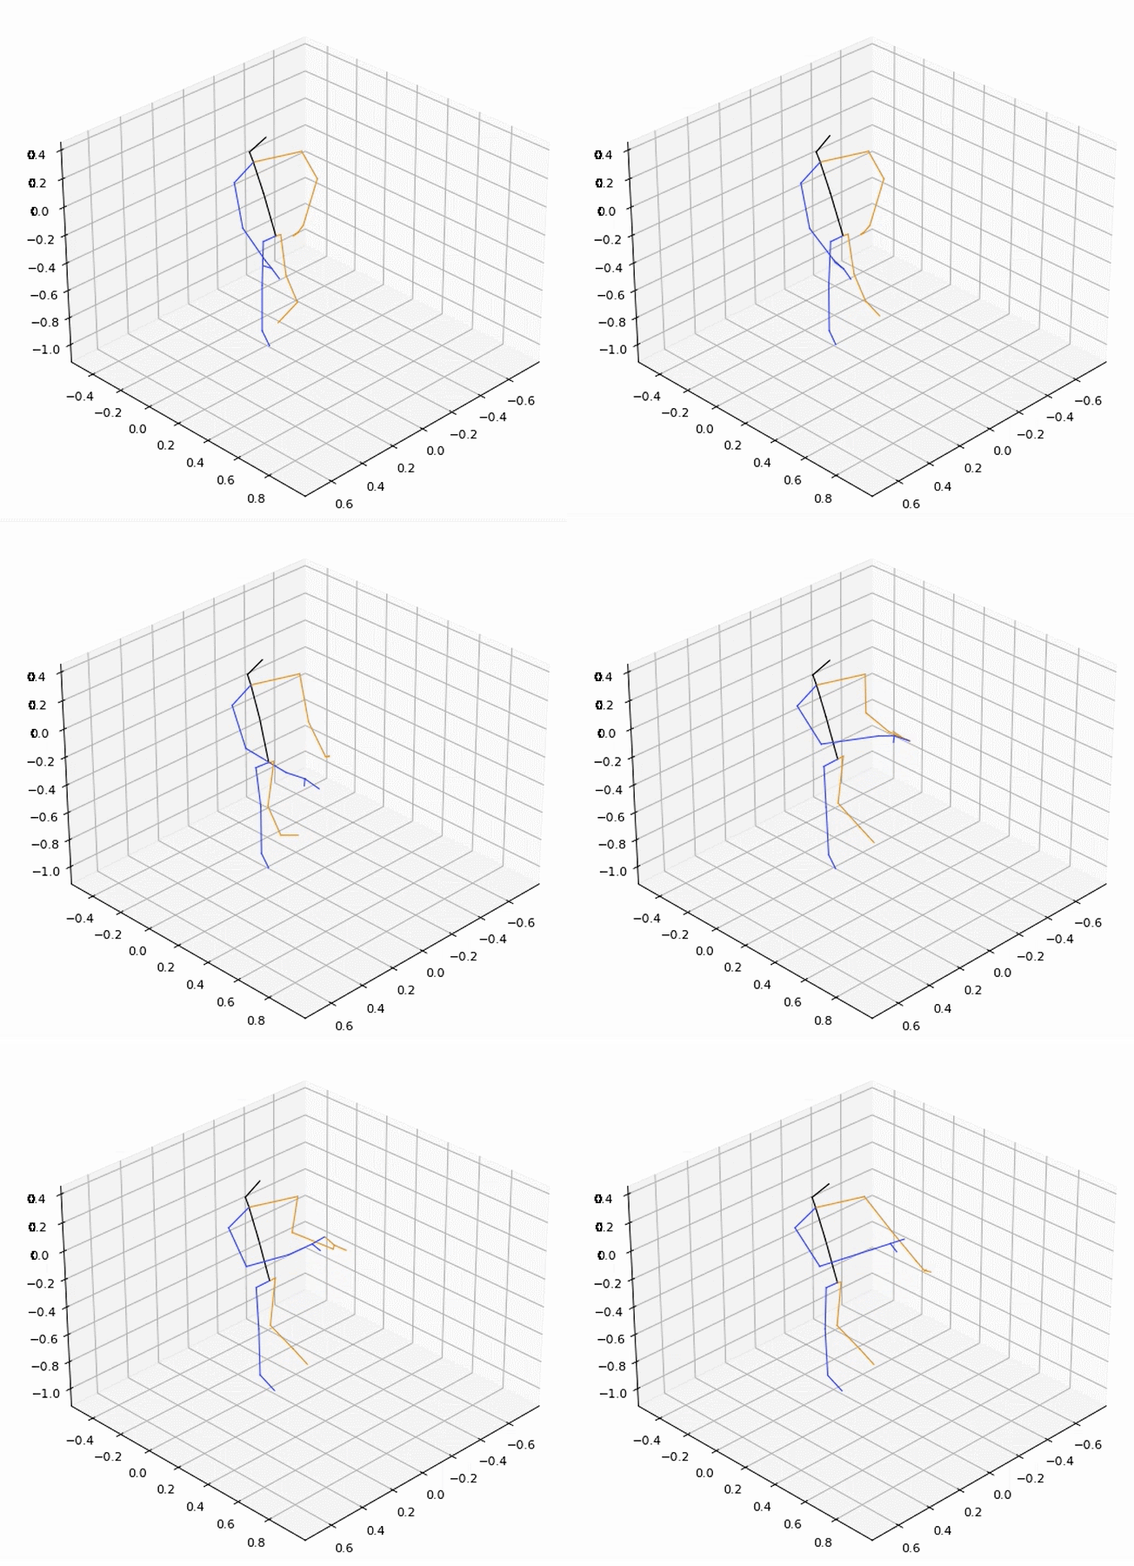
(5)可视化 3D Skeletons
from pyskl.datasets.pipelines import PreNormalize3D
annotations = load('ntu60_3d.pkl')
index = 0
anno = annotations[index]
anno = PreNormalize3D()(anno)  # * Need Pre-Normalization before Visualization
vid = Vis3DPose(anno, layout='nturgb+d', fps=12, angle=(30, 45), fig_size=(8, 8), dpi=80)
vid = vid.vis()
vid.ipython_display()
6.2 可视化skeleton+ heatmap + 行为识别
(1)安装依赖项
-
mmpose安装文档见MMPose安装,我安装的版本是0.28.1
-
pyskl安装说明见PYSKL
import os
import cv2
import os.path as osp
import decord
import numpy as np
import matplotlib.pyplot as plt
import urllib
import moviepy.editor as mpy
import random as rd
from pyskl.smp import *
from mmpose.apis import vis_pose_result
from mmpose.models import TopDown
from mmcv import load, dump
(2)准备经过预处理的注释文件
-
关于相关预处理的annotation文件地址:annotations
-
经过预处理的骨架annotation链接:
-
GYM [2D Skeleton]: https://download.openmmlab.com/mmaction/pyskl/data/gym/gym_hrnet.pkl
-
NTURGB+D [2D Skeleton]: https://download.openmmlab.com/mmaction/pyskl/data/nturgbd/ntu60_hrnet.pkl
- 关于pickle文件的格式:
每个pickle文件对应于一个动作识别数据集。pickle文件的内容是一个字典,由两个字段组成:split、annotations。
-
split:该字段的值是一个字典。key是split的名称,value是属于特定片段的视频标识列表。
-
annotations:该字段的值是骨架标注列表。每个骨架标注是一个字典,包含以下字段:
-
frame_dir(str): 对应视频的标识符 -
total_frames(int): 该视频的总帧数 -
img_shape(tuple[int]): (针对于2D骨架)视频帧的shape,即(H,W) -
original_shape(tuple[int]): 同上 -
label(int): 动作标签 -
keypoint(np.ndarray, with shape [M x T x V x C]): M代表人数。T代表帧数。V代表关键点个数。C代表关键点坐标维度数(2D or 3D) -
keypoint_score(np.ndarray, with shape [M x T x V]): (针对于2D骨架)关键点的置信度得分
-
# 准备经过预处理的 annotation
gym_ann_file = './data/gym/gym_hrnet.pkl'
ntu60_ann_file = './data/nturgbd/ntu60_hrnet.pkl'
(3)定义可视化效果(包括动作标签可视化、skeleton可视化)
# 设置字体与线条
FONTFACE = cv2.FONT_HERSHEY_DUPLEX
FONTSCALE = 0.6
FONTCOLOR = (255, 255, 255)
BGBLUE = (0, 119, 182)
THICKNESS = 1
LINETYPE = 1
# 定义可视化动作标签函数
def add_label(frame, label, BGCOLOR=BGBLUE):
    threshold = 30
    def split_label(label):
        label = label.split()
        lines, cline = [], ''
        for word in label:
            if len(cline) + len(word) < threshold:
                cline = cline + ' ' + word
            else:
                lines.append(cline)
                cline = word
        if cline != '':
            lines += [cline]
        return lines

    if len(label) > 30:
        label = split_label(label)
    else:
        label = [label]
    label = ['Action: '] + label

    sizes = []
    for line in label:
        sizes.append(cv2.getTextSize(line, FONTFACE, FONTSCALE, THICKNESS)[0])
    box_width = max([x[0] for x in sizes]) + 10
    text_height = sizes[0][1]
    box_height = len(sizes) * (text_height + 6)

    cv2.rectangle(frame, (0, 0), (box_width, box_height), BGCOLOR, -1)
    for i, line in enumerate(label):
        location = (5, (text_height + 6) * i + text_height + 3)
        cv2.putText(frame, line, location, FONTFACE, FONTSCALE, FONTCOLOR, THICKNESS, LINETYPE)
    return frame

# 定义可视化skeleton函数
def vis_skeleton(vid_path, anno, category_name=None, ratio=0.5):
    vid = decord.VideoReader(vid_path)
    frames = [x.asnumpy() for x in vid]

    h, w, _ = frames[0].shape
    new_shape = (int(w * ratio), int(h * ratio))
    frames = [cv2.resize(f, new_shape) for f in frames]

    assert len(frames) == anno['total_frames']
    # The shape is N x T x K x 3
    kps = np.concatenate([anno['keypoint'], anno['keypoint_score'][..., None]], axis=-1)
    kps[..., :2] *= ratio
    # 转换为 T x N x K x 3
    kps = kps.transpose([1, 0, 2, 3])
    vis_frames = []

    # 我们需要一个Topdown模型的实例,所以构建一个最小的实例
    model = TopDown(backbone=dict(type='ShuffleNetV1'))

    for f, kp in zip(frames, kps):
        bbox = np.zeros([0, 4], dtype=np.float32)
        result = [dict(keypoints=k) for k in kp]

        vis_frame = vis_pose_result(model, f, result)

        if category_name is not None:
            vis_frame = add_label(vis_frame, category_name)

        vis_frames.append(vis_frame)
    return vis_frames
(4)定义获取heatmap
keypoint_pipeline = [
    dict(type='PoseDecode'),
    dict(type='PoseCompact', hw_ratio=1., allow_imgpad=True),
    dict(type='Resize', scale=(-1, 64)),
    dict(type='CenterCrop', crop_size=64),
    dict(type='GeneratePoseTarget', with_kp=True, with_limb=False)
]

limb_pipeline = [
    dict(type='PoseDecode'),
    dict(type='PoseCompact', hw_ratio=1., allow_imgpad=True),
    dict(type='Resize', scale=(-1, 64)),
    dict(type='CenterCrop', crop_size=64),
    dict(type='GeneratePoseTarget', with_kp=False, with_limb=True)
]

from pyskl.datasets.pipelines import Compose
def get_pseudo_heatmap(anno, flag='keypoint'):
    assert flag in ['keypoint', 'limb']
    pipeline = Compose(keypoint_pipeline if flag == 'keypoint' else limb_pipeline)
    return pipeline(anno)['imgs']

def vis_heatmaps(heatmaps, channel=-1, ratio=8):
    # 如果通道为-1,则在同一张图上绘制所有关键点
    import matplotlib.cm as cm
    heatmaps = [x.transpose(1, 2, 0) for x in heatmaps]
    h, w, _ = heatmaps[0].shape
    newh, neww = int(h * ratio), int(w * ratio)

    if channel == -1:
        heatmaps = [np.max(x, axis=-1) for x in heatmaps]
    cmap = cm.viridis
    heatmaps = [(cmap(x)[..., :3] * 255).astype(np.uint8) for x in heatmaps]
    heatmaps = [cv2.resize(x, (neww, newh)) for x in heatmaps]
    return heatmaps
(5)进行动作识别与可视化(gym与ntu60数据集)
- gym.txt标签文件地址:https://github.com/kennymckormick/pyskl/blob/main/tools/data/label_map/gym.txt
首先是GYM数据集
# Load GYM annotations
lines = mrlines('./tools/data/label_map/gym.txt')    # 加载动作标签txt文件
gym_categories = [x.strip().split('; ')[-1] for x in lines]
gym_annos = load(gym_ann_file)['annotations']
# download sample videos of GYM
!wget https://download.openmmlab.com/mmaction/posec3d/gym_samples.tar
!tar -xf gym_samples.tar
gym_root = 'gym_samples/'    # 50个体操视频
gym_vids = os.listdir(gym_root)
#  index in 0 - 49.
# 这里选择文件夹中第3个视频
idx = 2
vid = gym_vids[idx]

frame_dir = vid.split('.')[0]
vid_path = osp.join(gym_root, vid)
anno = [x for x in gym_annos if x['frame_dir'] == frame_dir][0]
# 可视化 Skeleton,并且进行动作识别,可视化动作标签
vis_frames = vis_skeleton(vid_path, anno, gym_categories[anno['label']])
vid = mpy.ImageSequenceClip(vis_frames, fps=24)
vid.ipython_display()
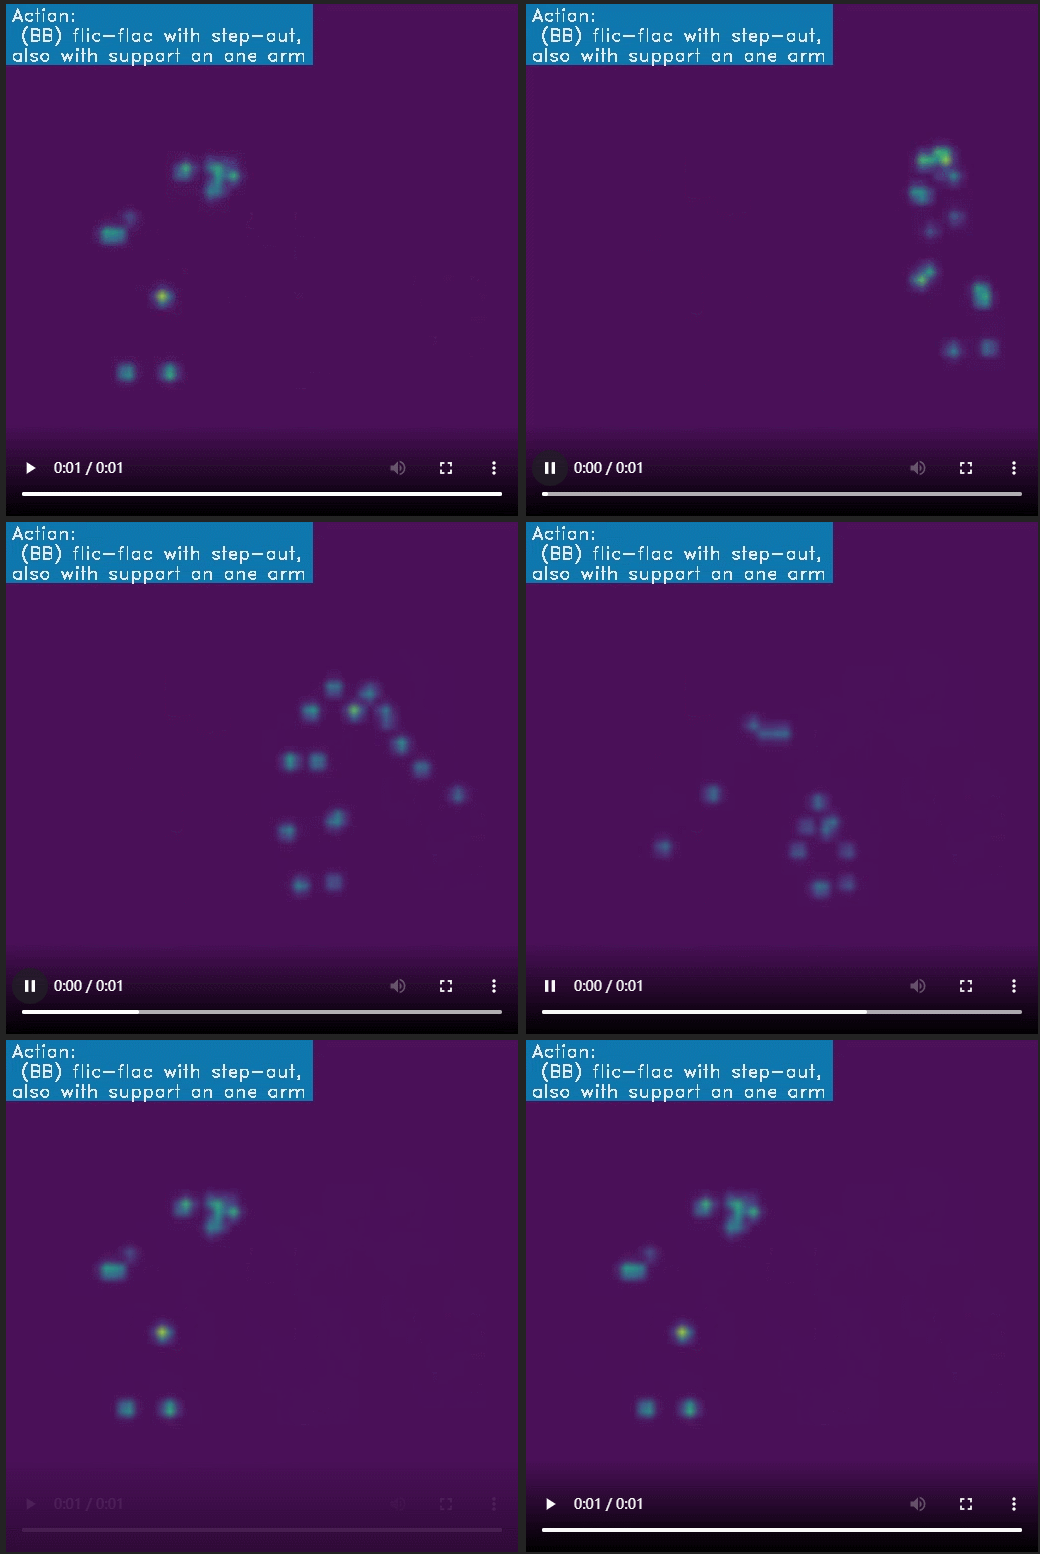
# 可视化 heatmap keypoint
keypoint_heatmap = get_pseudo_heatmap(anno)
keypoint_mapvis = vis_heatmaps(keypoint_heatmap)
keypoint_mapvis = [add_label(f, gym_categories[anno['label']]) for f in keypoint_mapvis]
vid = mpy.ImageSequenceClip(keypoint_mapvis, fps=24)
vid.ipython_display()
# 可视化 heatmap limb
limb_heatmap = get_pseudo_heatmap(anno, 'limb')
limb_mapvis = vis_heatmaps(limb_heatmap)
limb_mapvis = [add_label(f, gym_categories[anno['label']]) for f in limb_mapvis]
vid = mpy.ImageSequenceClip(limb_mapvis, fps=24)
vid.ipython_display()
接下来是NTU60数据集
# ntu_60数据集的标签
ntu_categories = ['drink water', 'eat meal/snack', 'brushing teeth', 'brushing hair', 'drop', 'pickup',
                  'throw', 'sitting down', 'standing up (from sitting position)', 'clapping', 'reading',
                  'writing', 'tear up paper', 'wear jacket', 'take off jacket', 'wear a shoe',
                  'take off a shoe', 'wear on glasses', 'take off glasses', 'put on a hat/cap',
                  'take off a hat/cap', 'cheer up', 'hand waving', 'kicking something',
                  'reach into pocket', 'hopping (one foot jumping)', 'jump up',
                  'make a phone call/answer phone', 'playing with phone/tablet', 'typing on a keyboard',
                  'pointing to something with finger', 'taking a selfie', 'check time (from watch)',
                  'rub two hands together', 'nod head/bow', 'shake head', 'wipe face', 'salute',
                  'put the palms together', 'cross hands in front (say stop)', 'sneeze/cough',
                  'staggering', 'falling', 'touch head (headache)', 'touch chest (stomachache/heart pain)',
                  'touch back (backache)', 'touch neck (neckache)', 'nausea or vomiting condition',
                  'use a fan (with hand or paper)/feeling warm', 'punching/slapping other person',
                  'kicking other person', 'pushing other person', 'pat on back of other person',
                  'point finger at the other person', 'hugging other person',
                  'giving something to other person', "touch other person's pocket", 'handshaking',
                  'walking towards each other', 'walking apart from each other']
# Load ntu60 annotations
ntu_annos = load(ntu60_ann_file)['annotations']
# download sample videos of NTU-60
!wget https://download.openmmlab.com/mmaction/posec3d/ntu_samples.tar
!tar -xf ntu_samples.tar
# !rm ntu_samples.tar
ntu_root = 'ntu_samples/'       # 50个室内动作视频
ntu_vids = os.listdir(ntu_root)
# index in 0 - 49.
# 这里选择文件夹中第42个视频
idx = 41
vid = ntu_vids[idx]

frame_dir = vid.split('.')[0]
vid_path = osp.join(ntu_root, vid)
anno = [x for x in ntu_annos if x['frame_dir'] == frame_dir.split('_')[0]][0]
# 可视化 Skeleton,并且进行动作识别,可视化动作标签
vis_frames = vis_skeleton(vid_path, anno, ntu_categories[anno['label']])
vid = mpy.ImageSequenceClip(vis_frames, fps=24)
vid.ipython_display()
# 可视化 heatmap keypoint
keypoint_heatmap = get_pseudo_heatmap(anno)
keypoint_mapvis = vis_heatmaps(keypoint_heatmap)
keypoint_mapvis = [add_label(f, ntu_categories[anno['label']]) for f in keypoint_mapvis]
vid = mpy.ImageSequenceClip(keypoint_mapvis, fps=24)
vid.ipython_display()
# 可视化 heatmap limb
limb_heatmap = get_pseudo_heatmap(anno, 'limb')
limb_mapvis = vis_heatmaps(limb_heatmap)
limb_mapvis = [add_label(f, ntu_categories[anno['label']]) for f in limb_mapvis]
vid = mpy.ImageSequenceClip(limb_mapvis, fps=24)
vid.ipython_display()
七、相关参考地址
- 关于PoseC3D更详细的解释参考:PoseC3D: 基于人体姿态的动作识别新范式
- PoseC3D项目地址:posec3d
- PoseC3D相关论文: Revisiting Skeleton-based Action Recognition
- PYSKL项目地址:PYSKL
- MMPose安装文档:MMPose安装
- 关于相关预处理的annotation文件地址:annotations
- GYM的annotation文件:GYM_annotation
- NTU60的annotation文件:NTU60_annotation
- gym.txt标签文件地址:gym.txt


