1.Softmax回归模型实现MNIST手写数字分类(python代码详解)
Softmax回归模型实现MNIST手写数字分类(python代码详解)
关键点:
- Softmax回归处理多分类问题,其是Logistic回归在多分类问题上的推广
- softmax回归使用交叉熵损失函数来学习最优的参数矩阵W,对样本进行分类
- Softmax回归是有监督的。
STEP 1:读取数据
'''读取数据'''
from tensorflow.keras.datasets import mnist
from __future__ import division
import tensorflow as tf
import numpy as np

data = mnist.load_data()
(x_train, y_train), (x_test,y_test) = data# x_train.shape=(60000, 28, 28)
x_train, x_test = np.array(x_train, np.float32), np.array(x_test, np.float32)
# reshape中值等于-1的话,那么Numpy会根据剩下的维度计算出数组的另外一个shape属性值。
x_train, x_test = x_train.reshape([-1,28*28]),x_test.reshape([-1,28*28]) # x_train.shape=(60000, 784)
STEP 2:特征缩放
该步骤可以让数据处于同一数值量级,也可以加快算法的收敛速度
- 特征缩放包含数据标准化、数据归一化
- 数据归一化:X = (X-Xmin)/(Xmax-Xmin)
- 归一化意义:让数据处于0-1之间,让不同维度之间的特征在数值上有一定比较性,可以大大提高分类器的准确性
- 归一化缺点:当有新数据加入时,可能导致max和min的变化,需要重新定义。另外,最大值与最小值非常容易受异常点影响,所以这种方法鲁棒性较差,只适合传统精确小数据场景
- 标准化公式:X = (X-μ)/σ
- 最好选择标准化
- 标准化最大的注意事项:就是先拆分出test集,不要在整个数据集上做标准化,因为那样会将test集的信息引入到训练集中
- sklearn.preprocessing.scale(X, axis=0, with_mean=True, with_std=True, copy=True)可以直接实现标准化, 其中 X:数组或者矩阵;axis:int类型,初始值为0,如果是0,则单独的标准化每列,如果是1,则标准化每行。with_mean:boolean类型,默认为True,表示将数据均值规范到0。with_std:boolean类型,默认为True,表示将数据方差规范到1。
from sklearn import preprocessing
x_train = preprocessing.scale(x_train)
STEP 3:初始化参数
- W是随机生成了符合高斯分布的数,再*0.001,使得W很小,W很小是因为,可以参照激活函数sigmoid和tanh,当W很大,用W * X+b=a得到的a很大,再用对a用激活函数如sigmoid(a),由于a很大了,sigmoid(a)中的a会趋向正无穷或负无穷,则函数值sigmoid(a)趋向于一个平缓的趋势,在梯度下降的时候计算的梯度很小,会导致学习的很慢,故使得W取一个很小的值。
- 设置batch_size的原因是如果一次加载所有数据,那么单次迭代耗时太久,而一次加载一个数据,那么会失去所有向量化给算法带来的加速,所以取中选择batchsize。
- 后续根据输出结果效果调整该部分参数,主要调整学习率。
import numpy as np
w = tf.Variable(tf.cast(np.random.randn(784,10)*0.001,tf.float32),name="weight")
b = tf.Variable(tf.cast(np.random.randn(10),tf.float32),name="bias")
learning_rate = 0.1
step = 2000
batch_size = 256
STEP 4:数据配对并洗牌
该步骤打乱数据,这样可以保证每批次训练的时候所用到的数据集是不一样的,可以提高模型训练效果
train_data = tf.data.Dataset.from_tensor_slices((x_train, y_train))
train_data = train_data.repeat().shuffle(5000).batch(batch_size).prefetch(1)
STEP 5:定义逻辑方程
- tf.nn.softmax把向量归一化为(0,1)之间的值
- softmax的输出向量就是概率,该样本属于各个类的概率!
def logistic_f(x):
    z = x@w+b
    y = tf.nn.softmax(z)
    return y
STEP 5:交叉熵损失
- 损失函数 = -∑ylogy’
- one_hot(indices, #输入的tensor,
depth #用于定义一个 one hot 维度的深度) - reduce_sum( ) 是求和函数
def loss_f(y_pred, y_true):
    y_true = tf.one_hot(y_true, depth=10)
    term1 = -y_true*tf.math.log(y_pred)
    loss = tf.reduce_mean(tf.reduce_sum(term1,1))
    return loss
STEP 6:梯度下降
'''定义随机梯度下降优化器'''
optimizer = tf.optimizers.SGD(learning_rate)
def run_optimizer(x,y):
    with tf.GradientTape() as g:
        pred = logistic_f(x)
        loss = loss_f(pred,y)

    gradients = g.gradient(loss, [w, b])
    optimizer.apply_gradients(zip(gradients,[w,b]))
STEP 7:计算准确度
- tf.argmax(input,axis)根据axis取值的不同返回每行或者每列最大值的索引
- tf.cast()函数的作用是执行 tensorflow 中张量数据类型转换
def accuracy(y_pred,y_true):
    y_pred = tf.argmax(y_pred,1)
    y_true = tf.cast(y_true, y_pred.dtype)
    correct = tf.equal(y_pred, y_true)
    correct = tf.cast(correct, tf.float32)
    accuracy = tf.reduce_mean(correct)
    return accuracy
STEP 8:模型训练
'''迭代执行优化器计算出w,b'''
all_loss = []
all_acc = []
for i, (batch_x, batch_y) in enumerate(train_data.take(step), 1):
    run_optimizer(batch_x, batch_y)

    if i % 50 == 0:
        pred = logistic_f(batch_x)
        loss = loss_f(pred, batch_y)
        all_loss.append(loss)
        acc = accuracy(pred, batch_y)
        all_acc.append(acc)
        print("step: %i, loss: %f, accuracy: %f" % (i, loss, acc))
第2000次迭代结果
step: 2000, loss: 0.308024, accuracy: 0.929688
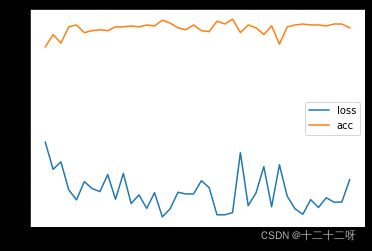
STEP 9:可视化损失函数
'''可视化损失函数'''
import numpy as np
import matplotlib.pyplot as plt
step_list = np.linspace(0,2000,40)
plt.plot(step_list,all_loss,label="loss")
plt.plot(step_list,all_acc,label="acc")
plt.legend()
plt.show()
import matplotlib.pyplot as plt
n_images = 5
test = x_test[:n_images]
predictions = logistic_f(test_images)

for i in range(n_images):
    plt.imshow(np.reshape(test_images[i], [28, 28]), cmap='gray')
    plt.show()
    print("Model prediction: %i" % np.argmax(predictions.numpy()[i]))
