基于PaddleOCR开发Auto.js Pro文字识别插件
目录
目的
准备工作
插件开发
1、项目结构对比
2、插件SDK集成
3、调整assets资源
4、删除无用的Activity文件
5、修改AndroidManifest.xml
6、修改Predictor文件
7、修改包名
8、新建OCRPluginRegistry注册类
9、新建OCRPlugin插件类
10、新建OCRApi接口类
11、在新建index.js中编写api
12、打包插件
13、在auto.js Pro应用中编写js代码
总结
目的
AutoJS 类似于按键精灵,它是 Android 平台上的一款自动化工具,它通过编写 JavaScript 脚本,结合系统的「 无障碍服务 」对 App 进行自动化操作。在文字识别方面它提供的有一款OCR识别插件,但是其中有识别速度慢,插件大的缺点,所以这里将讲解一下如何集成基于PaddleOCR文字识别开发的插件,阅读本篇文字需要对PaddleOCR有个基本的了解,还需要有一点Android开发基础,文章最后有相关插件下载地址。
准备工作
1、android studio最新版本即可
下载地址:Download Android Studio and SDK tools | Android Developers
2、下载PaddleOCR提供的安卓版文字识别demo
下载地址:https://github.com/PaddlePaddle/PaddleOCR/tree/dygraph/deploy/android_demo
3、导入Android studio并成功运行
以上三步工作完成后,将开始我们的Auto.js Pro文字识别插件开发。
插件开发
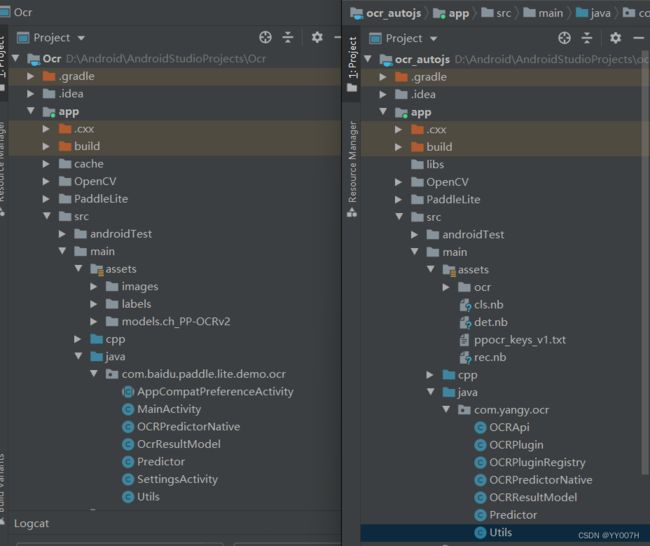
1、项目结构对比
修改前 VS 修改后,调整了一些文件,去除了Activity入口。
2、插件SDK集成
在项目的build.gradle文件中添加:
allprojects {
    repositories {
        // ...
        maven { url 'https://jitpack.io' }
    }
}
在app的build.gradle文件中添加:
dependencies {
    // ...
    implementation 'com.alibaba:fastjson:1.1.46.android'
    implementation 'com.github.hyb1996:Auto.js-Plugin-SDK:0.2'
}
3、调整assets资源
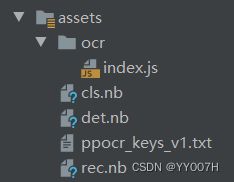
新建ocr目录,并添加index.js文件,nb模型和txt文件如下图放置,注这里名字我修改了下。
4、删除无用的Activity文件

5、修改AndroidManifest.xml
两处包名替换成自己的包名,其他地方如下代码不动。
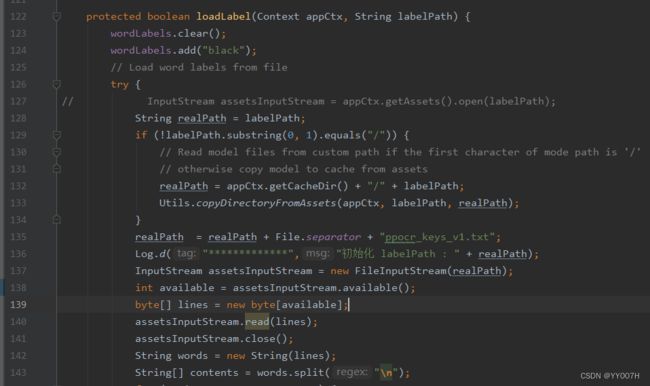
6、修改Predictor文件
添加这两行文件:


调整loadLabel代码如下:
7、修改包名
修改native.cpp文件,将官方的_com_baidu_paddle_lite_demo_ocr_替换成我们自己的包名,如_com_yangy_ocr_,如下截图:


8、新建OCRPluginRegistry注册类
package com.yangy.ocr;

import android.content.Context;

import org.autojs.plugin.sdk.Plugin;
import org.autojs.plugin.sdk.PluginLoader;
import org.autojs.plugin.sdk.PluginRegistry;

public class OCRPluginRegistry extends PluginRegistry {
    static {
        // 注册默认插件
        registerDefaultPlugin(new PluginLoader() {
            @Override
            public Plugin load(Context context, Context selfContext, Object runtime, Object topLevelScope) {
                return new OCRPlugin(context, selfContext, runtime, topLevelScope);
            }
        });
    }
}
9、新建OCRPlugin插件类
ckage com.yangy.ocr;

import android.content.Context;
import android.util.Log;

import org.autojs.plugin.sdk.Plugin;

import java.io.File;
import java.io.FileOutputStream;
import java.io.IOException;
import java.io.InputStream;

public class OCRPlugin extends Plugin {

    public OCRPlugin(Context context, Context selfContext, Object runtime, Object topLevelScope) {
        super(context, selfContext, runtime, topLevelScope);
    }

    @Override
    public String getAssetsScriptDir() {
        return "ocr";
    }

    public OCRApi createApi() throws IOException {
        Log.d("OCR",getPathForDefaultData());
        return new OCRApi(this.getContext());
    }


    public String getPathForDefaultData() throws IOException {
        final Context context = this.getContext();
        final Context selfContext = this.getSelfContext();
        final File obbDir = context.getCacheDir();
        final File file = new File(obbDir, "ocr");
        final File file1 = new File(file, "ppocr_keys_v1.txt");
        final File file2 = new File(file, "det.nb");
        final File file3 = new File(file, "cls.nb");
        final File file4 = new File(file, "rec.nb");
        if (!file1.exists()) {
            file.mkdirs();
            copy(selfContext.getAssets().open("ppocr_keys_v1.txt"), new FileOutputStream(file1));
            copy(selfContext.getAssets().open("det.nb"), new FileOutputStream(file2));
            copy(selfContext.getAssets().open("cls.nb"), new FileOutputStream(file3));
            copy(selfContext.getAssets().open("rec.nb"), new FileOutputStream(file4));
        }
        return obbDir.getPath();
    }

    private static void copy(final InputStream inputStream, final FileOutputStream fileOutputStream) throws IOException {
        final byte[] array = new byte[4096];
        while (true) {
            final int read = inputStream.read(array);
            if (read <= 0) {
                break;
            }
            fileOutputStream.write(array, 0, read);
        }
        inputStream.close();
        fileOutputStream.close();
    }

}
10、新建OCRApi接口类
package com.yangy.ocr;

import android.content.Context;
import android.graphics.Bitmap;
import android.graphics.BitmapFactory;
import android.media.ExifInterface;
import android.util.Log;

import com.alibaba.fastjson.JSONObject;

import java.io.File;
import java.io.IOException;

public class OCRApi {

    private final int useOpencl = 0;
    private final int cpuThreadNum = 1;
    private final String cpuPowerMode = "LITE_POWER_HIGH";
    private final int detLongSize = 960;
    private final float scoreThreshold = 0.1f;

    // 检测
    protected int run_det = 1;
    // 分类
    protected int run_cls = 1;
    // 识别
    protected int run_rec = 1;

    private final String assetModelDirPath = "ocr";
//    private final String assetlabelFilePath = "ocr/ppocr_keys_v1.txt";
    private final String assetlabelFilePath = "ocr";

    private final Context mContext;
    private final Predictor mPredictor;

    public OCRApi(final Context mContext) {
        this.mPredictor = new Predictor();
        this.mContext = mContext;
        boolean flag = this.mPredictor.init(mContext, assetModelDirPath, assetlabelFilePath, useOpencl, cpuThreadNum,
                cpuPowerMode,
                detLongSize, scoreThreshold);
        if (!flag){
            Log.d("*************","初始化失败");
        } else {
            Log.d("*************","初始化成功");
        }
    }

    public void end() {
        this.mPredictor.releaseModel();
    }

    public String ocrFile(final String imagePath) {
        File file = new File(imagePath);
        Log.d("****************", imagePath);
        try {
            ExifInterface exif = null;
            exif = new ExifInterface(imagePath);
            int orientation = exif.getAttributeInt(ExifInterface.TAG_ORIENTATION,
                    ExifInterface.ORIENTATION_UNDEFINED);
            Bitmap image = BitmapFactory.decodeFile(imagePath);
            image = Utils.rotateBitmap(image, orientation);

            this.mPredictor.setInputImage(image);
            boolean flag = this.mPredictor.runModel(run_det, run_cls, run_rec);
            if (!flag){
                Log.d("****************", "无法运行!");
                return "";
            }
//            return this.mPredictor.outputResultList;
            return JSONObject.toJSONString(this.mPredictor.outputResultList);
        } catch (IOException e) {
            e.printStackTrace();
        }
        return "";
    }

    public String ocrBitmap(Bitmap bitmap){
        this.mPredictor.setInputImage(bitmap);
        boolean flag = this.mPredictor.runModel(run_det, run_cls, run_rec);
        if (!flag){
            Log.d("****************", "无法运行!");
            return "";
        }
        return JSONObject.toJSONString(this.mPredictor.outputResultList);
    }

}
11、在新建index.js中编写api
module.exports = function (plugin) {

    function Ocr(){
        this.api = plugin.createApi()
    }

    Ocr.prototype.ocrFile = function(path){
        return this.api.ocrFile(path);
    }

    Ocr.prototype.ocrBitmap = function(bitmap){
            return this.api.ocrBitmap(bitmap);
    }

    Ocr.prototype.end = function(){
        return this.api.end();
    }

    return Ocr;
}
12、打包插件
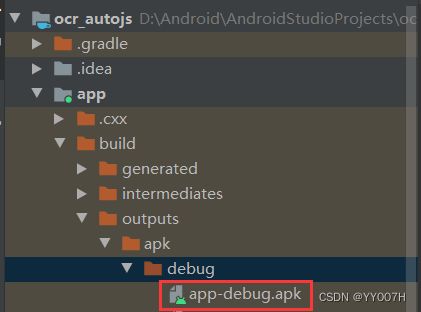
执行:Build->Build Bundle(s)/APKS->Build APK(S)
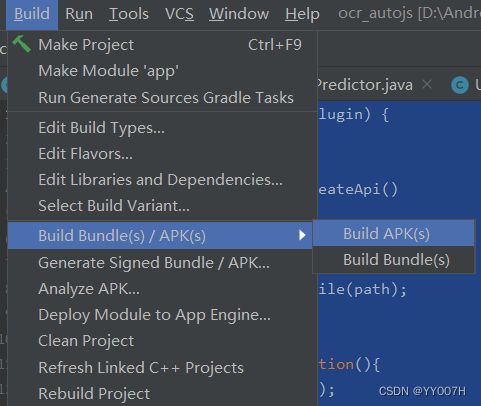
一个10M以下的插件就完成了,然后安装到手机中。
13、在auto.js Pro应用中编写js代码
let OCR = $plugins.load('com.yangy.ocr');
let ocr = new OCR();
let result = ocr.ocrFile("/storage/emulated/0/0.jpg");
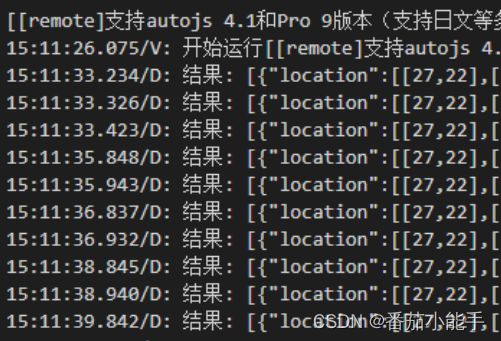
console.log(result);点击运行后,在日志中可以看到识别结果。

完毕!!!
总结
相对来说,在熟悉PaddleOCR和Android开发的情况下,进行auto.js Pro插件开发还是比较容易的,而且通过自己开发插件的形式可以集成更多的功能,比如只进行文本检测、其他语言识别模型、身份识别模型等等,相对来说比较自由,这是官方提供不了的。今天就分享到这里,感谢支持!
插件下载地址:山月记分享
下面的插件支持autojs4、autojs9、autoxjs等其他基于autojs魔改版,采用最新的识别模型,优化小图识别,插件目前只支持中英文和日文,更多语言可与作者联系。
链接一:https://download.csdn.net/download/YY007H/86310214
链接二:https://pan.baidu.com/s/1Hr-P7QEwAq9Z3RaexccgVw?pwd=f2yb