SpringBoot中的Security简单入门实现
1 目录
-
理解什么是权限
-
学习Spring Security框架的基本概练和用法
-
能够使用Spring Security写一个入门级的安全应用
2 怎么在SpringBoot应用Security
为了让我们的接口能够根据用户的权限进行一定限制,我们引入了Security,通过权限,我们能让其在登陆后一段时间,能自由访问权限内的接口,但是不能访问权限外的接口方法。
为此我们需要对之前的项目进行改造,具体内容在以下几个部分;
2.1 导入maven依赖
org.springframework.boot
spring-boot-starter
org.projectlombok
lombok
true
org.springframework.boot
spring-boot-starter-test
test
org.springframework.boot
spring-boot-starter-web
org.mybatis.spring.boot
mybatis-spring-boot-starter
${mybatis.springboot.version}
mysql
mysql-connector-java
${mysql.version}
com.github.pagehelper
pagehelper-spring-boot-starter
1.4.3
com.github.pagehelper
pagehelper
5.3.1
org.springframework.boot
spring-boot-starter-data-jpa
mysql
mysql-connector-java
io.springfox
springfox-swagger2
2.9.2
io.springfox
springfox-swagger-ui
2.9.2
net.minidev
json-smart
org.springframework.boot
spring-boot-starter-data-redis
org.aspectj
aspectjweaver
1.9.7
compile
org.springframework.boot
spring-boot-starter-security
2.2 创建一个index门户接口
当前接口用于测试我们的权限认证和授权
import lombok.extern.slf4j.Slf4j;
import org.springframework.security.access.prepost.PreAuthorize;
import org.springframework.security.core.Authentication;
import org.springframework.security.core.context.SecurityContext;
import org.springframework.security.core.context.SecurityContextHolder;
import org.springframework.web.bind.annotation.RequestMapping;
import org.springframework.web.bind.annotation.RestController;
@RestController
@Slf4j
public class IndexController {
//test 1 : anyone could access
@RequestMapping("/index")
public String getAllUsers() {
log.info("访问 index..");
return "访问 index....";
}
//test 2 : someone has the Authority:'cx:updates_user' could access
@RequestMapping("/users")
@PreAuthorize("hasAuthority('cx:updates_user')")// 授权:有cx:updates_user权限才能做该操作 否则报错403
public String update() {
//获取上下文
SecurityContext securityContext = SecurityContextHolder.getContext();
Authentication authentication = securityContext.getAuthentication();
//在页面返回当前登录用户的所有权限
return authentication.toString();
}
}2.3 创建Security配置类WebSecurityConfigure
import org.springframework.beans.factory.annotation.Autowired;
import org.springframework.context.annotation.Bean;
import org.springframework.context.annotation.Configuration;
import org.springframework.security.config.annotation.method.configuration.EnableGlobalMethodSecurity;
import org.springframework.security.config.annotation.web.builders.HttpSecurity;
import org.springframework.security.config.annotation.web.configuration.EnableWebSecurity;
import org.springframework.security.config.annotation.web.configuration.WebSecurityConfigurerAdapter;
import org.springframework.security.core.userdetails.UserDetailsService;
import org.springframework.security.crypto.bcrypt.BCryptPasswordEncoder;
import org.springframework.security.crypto.password.PasswordEncoder;
// 这个有了以下任何一个注解都可以不用这个注解
// @Configuration
// 这个表示启用Web安全的注解,如果你已经是是一个web 项目,不需要使用此注解,
// @EnableWebSecurity //Springboot的自动配置机制WebSecurityEnablerConfiguration已经引入了该注解
//开启这个来判断用户对某个控制层的方法是否具有访问权限(见ProductController的@PreAuthorize)
// 这个注解很重要,如果没有这个注解,那么Controller里的方法将不受约束,只要登录成功就能访问。
@EnableGlobalMethodSecurity(prePostEnabled = true) //至关重要的注解,缺失导致验证不起效
@EnableWebSecurity
public class WebSecurityConfigure extends WebSecurityConfigurerAdapter {
@Autowired
private UserDetailsService userDetailsService;
// 参数: HttpSecurity http
//**http.authorizeRequests()**
// 下添加了多个匹配器,每个匹配器用来控制不同的URL接受不同的用户访问。
// 简单讲,http.authorizeRequests()就是在进行请求的权限配置。
@Override
protected void configure(HttpSecurity http) throws Exception {
//第二步:我们用我们自己的数据库数据来完成权限验证
http.authorizeRequests()
.antMatchers("/index").permitAll()//放行
.anyRequest().authenticated()
.and()
.formLogin()
}
//这里配置密码为 BCrypt 加密方式,这样创建用户时,会对密码进行加密。而不是明文存储。
@Bean
public PasswordEncoder passwordEncoder() {
return new BCryptPasswordEncoder();
}
}2.4 配置yml文件
spring中加入security(注意层级)
spring:
  security:
    user:
      name: jing
      password: 1234
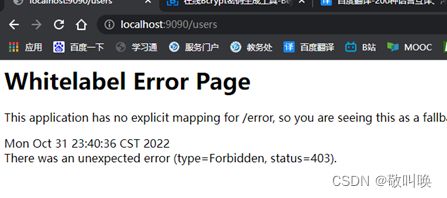
完成到这里,我们已经能够对无权访问的接口进行限制了。
尝试访问接口
http://localhost:8080/users
接下来进一步完善我们的security
2.5 创建UserDetails
使用之前的User实体类 实现UserDetails接口并实现其方法
package com.wanxi.springboot1018.entity;

import com.fasterxml.jackson.annotation.JsonIgnoreProperties;
import io.swagger.annotations.ApiModel;
import io.swagger.annotations.ApiModelProperty;
import lombok.Data;
import org.springframework.security.core.GrantedAuthority;
import org.springframework.security.core.userdetails.UserDetails;
import org.springframework.stereotype.Component;
import java.io.Serializable;
import java.util.Collection;
import java.util.HashSet;
import java.util.Set;

@Data
@Component
@ApiModel(value = "用户",description = "用于描述用户对象")
@JsonIgnoreProperties({"enabled","accountNonExpired", "accountNonLocked", "credentialsNonExpired", "authorities"}) //避免把userdetail接口的方法序列化
public class User extends Base implements UserDetails {

    @ApiModelProperty(value = "用户ID",example = "123")
    private int id=0;
    @ApiModelProperty(value = "用户密码",example = "abc")
    private String password="";
    @ApiModelProperty(value = "用户姓名",example = "jing")
    private String username="";
    @ApiModelProperty(value = "用户电话",example = "180****8963")
    private String tel="";
    @ApiModelProperty(value = "生产日期",example = "2000-08-13")
    private String birthday="";
    @ApiModelProperty(value = "性别",example = "男")
    private String sex="";
    @ApiModelProperty(value = "授权变量",example = "")
    private Set authorities=  new HashSet<>();

    private Boolean A ;
    private Boolean B ;

    public Boolean getA() {
        return A;
    }

    public void setA(Boolean a) {
        A = a;
    }

    public Boolean getB() {
        return B;
    }

    public void setB(Boolean b) {
        B = b;
    }

    @Override
    public Collection getAuthorities() {
        return authorities;
    }

    //账号是否过期  count has expired
    @Override
    public boolean isAccountNonExpired() {
        return true;
    }

    //账号是否上锁 count has locked
    @Override
    public boolean isAccountNonLocked() {
        return true;
    }

    //令牌是否过期 报错:credentials have expired
    @Override
    public boolean isCredentialsNonExpired() {
        return true;
    }

    //是否启用  报错:User is disabled 由于没有status状态这个字段,默认启用。
    @Override
    public boolean isEnabled() {
        return true;
    }

    @Override
    public String toString() {
        return "User{" +
                "id=" + id +
                ", password='" + password + '\'' +
                ", name='" + username + '\'' +
                '}';
    }

    @Override
    public String getPassword() {
        return this.password;
    }

    @Override
    public String getUsername() {
        return this.username;
    }

}
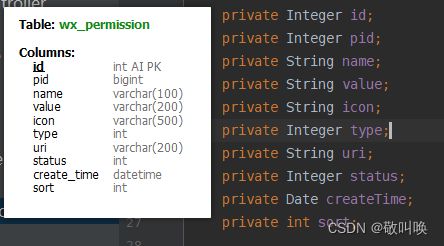
2.6 创建GrantedAuthority
新建一个类:Permission 表示用户的一个权限
并实现GrantedAuthority接口
(注意,这个实体类的成员一定要和数据库的字段相对应)
import lombok.Data;
import org.springframework.security.core.GrantedAuthority;
import java.util.Date;
/**
*@description: 授予的权限信息,要实现GrantedAuthority
*/
@Data
// 不使用@Builder时以下@AllArgsConstructor和@NoArgsConstructor都可以不要,使用了就要需要,不然mybatis构建对象时会出错。
//@Builder
//@AllArgsConstructor
//@NoArgsConstructor
public class Permission implements GrantedAuthority {
private Integer id;
private Integer pid;
private String name;
private String value;
private String icon;
private Integer type;
private String uri;
private Integer status;
private Date createTime;
private String sort;
//获取权限
@Override
public String getAuthority() {
// 这里返回的内容要和Controller里的@PreAuthorize("hasAuthority('wx:product:read')")匹配
return this.value;
}
}
2.7 创建UserDetailsService
不同与之前的UserService,这个接口实现类会调用userService的方法,并被Security调用
import com.wanxi.springboot1018.entity.Permission;
import com.wanxi.springboot1018.entity.User;
import com.wanxi.springboot1018.service.UserService;
import org.springframework.security.core.userdetails.UserDetails;
import org.springframework.security.core.userdetails.UserDetailsService;
import org.springframework.security.core.userdetails.UsernameNotFoundException;
import org.springframework.stereotype.Service;
import javax.annotation.Resource;
import java.util.HashSet;
import java.util.List;
/**
*@description: UserDetailsService的实现类,Security 安全框架会调用这个接口的loadUserByUsername。
* 这个类是Security 框架定义的接口,不是我们自己业务定义的接口,
* 要想Security 按照我们的逻辑起作用,我们需要实现它
*/
@Service("userDetailsService")
public class UserDetailServiceImpl implements UserDetailsService {
@Resource
UserService userService;
@Override
public UserDetails loadUserByUsername(String username) throws UsernameNotFoundException {
//通过用户名 访问数据库拿到 当前用户对象
User user= userService.getUserByName(username);
//一定要设置为加密后的密码
//user.setName(username);
user.setName("jing");
user.setPassword("$2a$10$1M8F40YGBvgZrp0/UYtGxOTTFjiWxdXik1x1b.qliRk2tnOyWBv2i");
// 紧接着 调用getPermissionsByUserId 方法 获取当前用户的 权限(用户->角色->权限)
List permissionList= userService.getPermissionsByUserId(user.getId());
// 创建 HashSet 取代 List
HashSet permissions = new HashSet<>(permissionList);
// 存入user对象
user.setAuthorities(permissions);
// 返回对象,包含该用户的所有权限
return user;
}
} 2.8 修改Config配置类

 http.authorizeRequests()
                .antMatchers("/index").permitAll()//放行
                .anyRequest().authenticated()
                .and()
                .formLogin()
                .and()
                // 这一步,告诉Security 框架,我们要用自己的UserDetailsService实现类
                // 来传递UserDetails对象给框架,框架会把这些信息生成Authorization对象使用
                .userDetailsService(userDetailsService);
在这里加上后面的userDetailsService。
@PreAuthorize("hasAuthority('cx:updates_user')")// 授权:有cx:updates_user权限才能做该操作 否则报错403
这里的注解已经加上了
所以直接访问测试即可
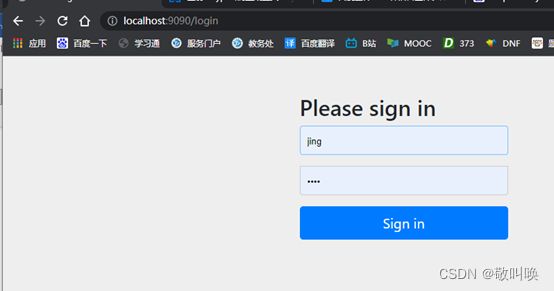
2.10 访问测试
登录

报错403:权限不够
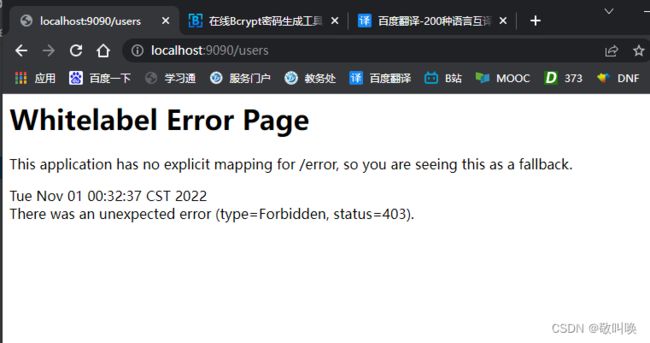
证明了我们的权限能够正常生效。并且拦截正确
2.11 其他验证:
一、把@PreAuthorize("hasAuthority('wx:product:read')") 这个值改一改,改成没有的试试
如果有注解但是没有权限:
如果没有注解:能够拿到数据

二、 把Config 类的@EnableGlobalMethodSecurity注解去掉,看看权限是否生效
恢复上面的注解
我们吧@EnableGlobalMethodSecurity去掉后,
尝试直接跨过登录访问无权限限制的接口:

尝试直接跨过登录访问无权限限制的接口:回到了登录界面
登录后再进行无权访问的接口:
可以看到,只要能登陆进来,就能访问,权限就是摆设

3
3.1
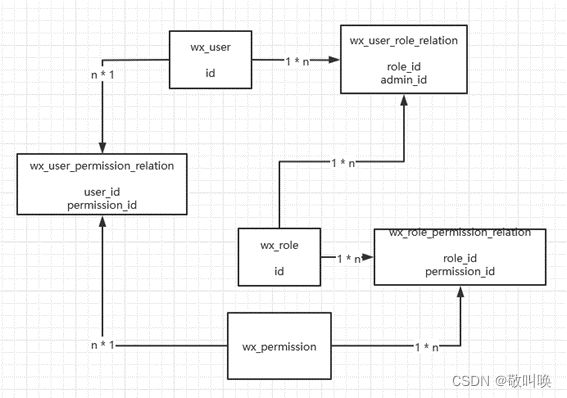
4 概念图
这些图需要在看完代码构成后,才能真正去的立体化去理解流程。
4.1 权限六表概念图
4.2 Secutity 流程图

4.3 Secutity 构成

以上是10月31日对29日的Security学习进行日常总结。