springboot中的多数据源配置方案
多数据源可以理解为多数据库,甚至可以是多个不同类型的数据库,比如一个是MySql,一个是Oracle。随着项目的扩大,有时需要数据库的拆分或者引入另一个数据库,这时就需要配置多个数据源。
SpringBoot中使用多数据源还是比较简单的,为了演示方便,我们在MySql中创建两个数据库:ds1、ds2,并在ds1数据库中创建student表,在ds2数据库中创建teacher表。数据库脚本如下:
SET NAMES utf8mb4;
SET FOREIGN_KEY_CHECKS = 0;

-- ----------------------------

-- Table structure for student

-- ----------------------------

DROP TABLE IF EXISTS `student`;
CREATE TABLE `student`  (
  `id` varchar(16) CHARACTER SET utf8 COLLATE utf8_bin NOT NULL,
  `name` varchar(64) CHARACTER SET utf8 COLLATE utf8_bin NULL DEFAULT NULL,
  `class` varchar(255) CHARACTER SET utf8 COLLATE utf8_bin NULL DEFAULT NULL,
  PRIMARY KEY (`id`) USING BTREE
) ENGINE = InnoDB CHARACTER SET = utf8 COLLATE = utf8_bin ROW_FORMAT = Dynamic;

-- ----------------------------

-- Records of student

-- ----------------------------

INSERT INTO `student` VALUES ('123456', 'zhangsan', '北京');
INSERT INTO `student` VALUES ('123457', 'lisi', '上海');

SET FOREIGN_KEY_CHECKS = 1;
SET NAMES utf8mb4;
SET FOREIGN_KEY_CHECKS = 0;

-- ----------------------------

-- Table structure for teacher

-- ----------------------------

DROP TABLE IF EXISTS `teacher`;
CREATE TABLE `teacher`  (
  `id` varchar(16) CHARACTER SET utf8 COLLATE utf8_bin NOT NULL,
  `name` varchar(32) CHARACTER SET utf8 COLLATE utf8_bin NULL DEFAULT NULL,
  `class` varchar(255) CHARACTER SET utf8 COLLATE utf8_bin NULL DEFAULT NULL,
  PRIMARY KEY (`id`) USING BTREE
) ENGINE = InnoDB CHARACTER SET = utf8 COLLATE = utf8_bin ROW_FORMAT = Dynamic;

-- ----------------------------

-- Records of teacher

-- ----------------------------

INSERT INTO `teacher` VALUES ('0000001', 'wangwu', '上海');

SET FOREIGN_KEY_CHECKS = 1;
基于MyBatis的多数据源实现
首先创建一个MyBatis项目,项目结构如下:
这里有一点需要注意,StudentMapper接口和TeacherMapper接口是分开的,它们位于不同子目录下,这个后面会提到。
数据库连接配置
既然是多数据源,数据库连接的信息就有可能存在不同,所以需要在配置文件中配置各个数据源的连接信息(这里使用了druid数据库连接池)。
spring:
  datasource:
    ds1: #数据源1,默认数据源
      url: jdbc:mysql://localhost:3306/ds1?serverTimezone=GMT&useSSL=false&useUnicode=true&characterEncoding=utf8
      username: root
      password: root
      typ: com.alibaba.druid.pool.DruidDataSource
      driver-class-name: com.mysql.cj.jdbc.Driver
      filters: stat
      maxActive: 2
      initialSize: 1
      maxWait: 60000
      minIdle: 1
      timeBetweenEvictionRunsMillis: 60000
      minEvictableIdleTimeMillis: 300000
      validationQuery: SELECT 1
      testWhileIdle: true
      testOnBorrow: false
      testOnReturn: false
      poolPreparedStatements: true
      maxOpenPreparedStatements: 20

    ds2: #数据源2
      url: jdbc:mysql://localhost:3306/ds2?serverTimezone=GMT&useSSL=false&useUnicode=true&characterEncoding=utf8
      username: root
      password: root
      typ: com.alibaba.druid.pool.DruidDataSource
      driver-class-name: com.mysql.cj.jdbc.Driver
      filters: stat
      maxActive: 2
      initialSize: 1
      maxWait: 60000
      minIdle: 1
      timeBetweenEvictionRunsMillis: 60000
      minEvictableIdleTimeMillis: 300000
      validationQuery: SELECT 1
      testWhileIdle: true
      testOnBorrow: false
      testOnReturn: false
      poolPreparedStatements: true
      maxOpenPreparedStatements: 20
注意不同的数据源要用不同的属性名区分。
重写SpringBoot的数据源配置
1、数据源1的配置
@Configuration
@MapperScan(basePackages = {"com.chou.easyspringboot.multipledatasource.mapper.ds1"}, sqlSessionFactoryRef = "sqlSessionFactory1")
public class Datasource1Configuration {
    @Value("${mybatis.mapper-locations}")
    private String mapperLocation;
    @Value("${spring.datasource.ds1.url}")
    private String jdbcUrl;
    @Value("${spring.datasource.ds1.driver-class-name}")
    private String driverClassName;
    @Value("${spring.datasource.ds1.username}")
    private String username;
    @Value("${spring.datasource.ds1.password}")
    private String password;
    @Value("${spring.datasource.ds1.initialSize}")
    private int initialSize;
    @Value("${spring.datasource.ds1.minIdle}")
    private int minIdle;
    @Value("${spring.datasource.ds1.maxActive}")
    private int maxActive;

    @Bean(name = "dataSource1")
    @Primary
    public DataSource dataSource() {
        DruidDataSource dataSource = new DruidDataSource();
        dataSource.setUrl(jdbcUrl);
        dataSource.setDriverClassName(driverClassName);
        dataSource.setUsername(username);
        dataSource.setPassword(password);
        dataSource.setInitialSize(initialSize);
        dataSource.setMinIdle(minIdle);
        dataSource.setMaxActive(maxActive);

        return dataSource;
    }

    @Bean("sqlSessionFactory1")
    public SqlSessionFactory sqlSessionFactory(@Qualifier("dataSource1") DataSource dataSource) throws Exception {
        SqlSessionFactoryBean sqlSessionFactoryBean = new SqlSessionFactoryBean();
        sqlSessionFactoryBean.setDataSource(dataSource);
        sqlSessionFactoryBean.setMapperLocations(
                new PathMatchingResourcePatternResolver().getResources(mapperLocation));

        return sqlSessionFactoryBean.getObject();
    }

    @Bean("sqlSessionTemplate1")
    public SqlSessionTemplate sqlSessionTemplate(@Qualifier("sqlSessionFactory1") SqlSessionFactory sqlSessionFactory) {
        return new SqlSessionTemplate(sqlSessionFactory);
    }

    @Bean("transactionManager1")
    public DataSourceTransactionManager transactionManager(@Qualifier("dataSource1")DataSource dataSource) {
        return new DataSourceTransactionManager(dataSource);
    }
}
2、数据源2的配置
@Configuration
@MapperScan(basePackages = {"com.chou.easyspringboot.multipledatasource.mapper.ds2"}, sqlSessionFactoryRef = "sqlSessionFactory2")
public class Datasource2Configuration {
    @Value("${mybatis.mapper-locations}")
    private String mapperLocation;
    @Value("${spring.datasource.ds2.url}")
    private String jdbcUrl;
    @Value("${spring.datasource.ds2.driver-class-name}")
    private String driverClassName;
    @Value("${spring.datasource.ds2.username}")
    private String username;
    @Value("${spring.datasource.ds2.password}")
    private String password;
    @Value("${spring.datasource.ds2.initialSize}")
    private int initialSize;
    @Value("${spring.datasource.ds2.minIdle}")
    private int minIdle;
    @Value("${spring.datasource.ds2.maxActive}")
    private int maxActive;

    @Bean(name = "dataSource2")
    public DataSource dataSource() {
        DruidDataSource dataSource = new DruidDataSource();
        dataSource.setUrl(jdbcUrl);
        dataSource.setDriverClassName(driverClassName);
        dataSource.setUsername(username);
        dataSource.setPassword(password);
        dataSource.setInitialSize(initialSize);
        dataSource.setMinIdle(minIdle);
        dataSource.setMaxActive(maxActive);

        return dataSource;
    }

    @Bean("sqlSessionFactory2")
    public SqlSessionFactory sqlSessionFactory(@Qualifier("dataSource2") DataSource dataSource) throws Exception {
        SqlSessionFactoryBean sqlSessionFactoryBean = new SqlSessionFactoryBean();
        sqlSessionFactoryBean.setDataSource(dataSource);
        sqlSessionFactoryBean.setMapperLocations(
                new PathMatchingResourcePatternResolver().getResources(mapperLocation));

        return sqlSessionFactoryBean.getObject();
    }

    @Bean("sqlSessionTemplate2")
    public SqlSessionTemplate sqlSessionTemplate(@Qualifier("sqlSessionFactory2") SqlSessionFactory sqlSessionFactory) {
        return new SqlSessionTemplate(sqlSessionFactory);
    }

    @Bean("transactionManager2")
    public DataSourceTransactionManager transactionManager(@Qualifier("dataSource2") DataSource dataSource) {
        return new DataSourceTransactionManager(dataSource);
    }
}
这里和但数据源不同的地方在于对dataSource、sqlSessionFactory、sqlSessionTemplate、transactionManager都进行了单独的配置。另外,数据源1和数据源2主要存在两点不同:
@MapperScan中的包扫描路径不一样,数据源1只扫描com.chou.easyspringboot.multipledatasource.mapper.ds1路径下的Mapper,数据源2负责com.chou.easyspringboot.multipledatasource.mapper.ds2下Mapper,所以在前面创建的时候我们要把StudentMapper和TeacherMapper分开。因为在这里已经配置了@MapperScan,所以在启动类中必须不能在存在@MapperScan注解- 数据源1中多一个
@Primary注解,这是告诉Spring我们使用的默认数据源,也是多数据源项目中必不可少的。
测试
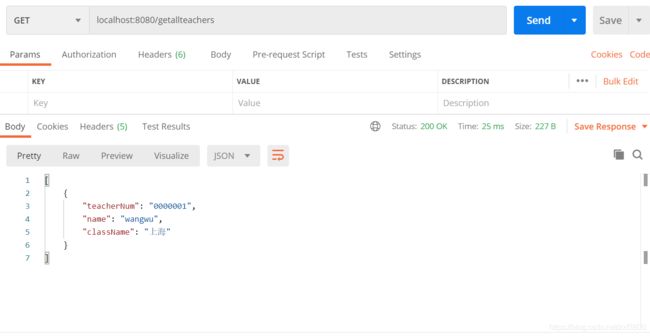
编写相应的Controller和Service层代码,查询所有的Student和Teacher信息,并使用postman模拟发送请求,会有如下的运行结果:
- 查询所有的Student
- 查询所有Teacher
我们连续发送两个不同的请求,都得出了想要的结果,说明MyBatis自动帮我们切换到了对应的数据源上。
基于自定义注解实现多数据源
上面我们提高到数据源自动切换主要依靠MyBatis,如果项目中没有使用MyBatis该如何做呢?
多数据源自动切换原理
这里介绍一种基于自定义注解的方法实现多数据源的动态切换。SpringBoot中有一个AbstractRoutingDataSource抽象类,我们可以实现其抽象方法determineCurrentLookupKey()去指定数据源。并通过AOP编写自定义注解处理类,在sql语句执行前,切换到自定义注解中设置的数据源以实现数据源的自动切换。
数据库连接配置
同上配置两个数据库连接信息。
创建数据源存放类
DataSource是和线程绑在一起的,因此,我们需要一个线程安全的类来存放DataSource,在determineCurrentLookupKey()中通过该类获取数据源。
AbstractRoutingDataSource类中,DataSource以键值对的形式保存,可以使用ThreadLocal来保存key,从而实现多数据源的自动切换。
public class DataSourceContextHolder {
    private static Logger logger = LoggerFactory.getLogger(DataSourceContextHolder.class);

    // 使用ThreadLocal线程安全的使用变量副本
    private static final ThreadLocal CONTEXT_HOLDER = new ThreadLocal();

    /**
     * 设置数据源
     * */
    public static void setDataSource(String dataSource) {
        logger.info("切换到数据源:{}", dataSource);
        CONTEXT_HOLDER.set(dataSource);
    }

    /**
     * 获取数据源
     * */
    public static String getDataSource() {
        return CONTEXT_HOLDER.get();
    }

    /**
     * 清空数据源
     * */
    public static void clearDataSource() {
        CONTEXT_HOLDER.remove();
    }
}
数据源持有类定义了三个方法,分别用于数据源的设置、获取和清除。
创建数据源枚举类
public enum DataSourceEnum {
    PRIMARY, //默认数据源
    DATASOURCE1
}
实现 determineCurrentLookupKey 方法指定数据源
public class DynamicDataSource extends AbstractRoutingDataSource {
    @Override
    protected Object determineCurrentLookupKey() {
        return DataSourceContextHolder.getDataSource();
    }
}
配置数据源
@Configuration
public class DynamicDataSourceConfiguration {
    @Bean(name = "primaryDataSource")
    @ConfigurationProperties(prefix = "spring.datasource.ds1")
    public DataSource primaryDataSource(){
        return new DruidDataSource();
    }

    @Bean(name = "dataSource1")
    @ConfigurationProperties(prefix = "spring.datasource.ds2")
    public DataSource dataSource1(){
        return new DruidDataSource();
    }

    @Bean("dynamicDataSource")
    @Primary
    public DataSource dynamicDataSource() {
        DynamicDataSource dynamicDataSource = new DynamicDataSource();
        //配置默认数据源
        dynamicDataSource.setDefaultTargetDataSource(primaryDataSource());

        //配置多数据源
        HashMap dataSourceMap = new HashMap();
        dataSourceMap.put(DataSourceEnum.PRIMARY.name(),primaryDataSource());
        dataSourceMap.put(DataSourceEnum.DATASOURCE1.name(),dataSource1());
        dynamicDataSource.setTargetDataSources(dataSourceMap);
        return dynamicDataSource;

    }
}
自定义注解
@Target(ElementType.METHOD)
@Retention(RetentionPolicy.RUNTIME)
@Documented
public @interface DataSource {
    DataSourceEnum value() default DataSourceEnum.PRIMARY;
}
自定义注解指定作用于方法上并在运行期生效(可以在网上查下如何自定义注解,这里不在讲述)。
AOP拦截
通过AOP在执行sql语句前拦截,并切换到自定义注解指定的数据源上。有一点需要注意,自定义数据源注解与@Transaction注解同一个方法时会先执行@Transaction,即获取数据源在切换数据源之前,所以会导致自定义注解失效,因此需要使用@Order(@Order的value越小,就越先执行),保证该AOP在@Transactional之前执行。
@Aspect
@Component
@Order(-1)
public class DataSourceAspect {
    @Pointcut("@annotation(com.chou.easyspringboot.multipledatasource.annotation.DataSource)")
    public void dataSourcePointCut() {

    }

    @Around("dataSourcePointCut()")
    public Object dataSourceArround(ProceedingJoinPoint proceed) throws Throwable {
        MethodSignature methodSignature = (MethodSignature) proceed.getSignature();
        Method method = methodSignature.getMethod();
        DataSource dataSource = method.getAnnotation(DataSource.class);
        if(dataSource != null) {
            DataSourceContextHolder.setDataSource(dataSource.value().name());
        }

        try {
            return proceed.proceed();
        } finally {
            // 方法执行后销毁数据源
            DataSourceContextHolder.clearDataSource();
        }
    }
}
创建启动类,编写Controller、Service层代码
需要在启动类的@SpringBootApplication注解中移除DataSource自动配置类,否则会默认自动配置,而不会使用我们自定义的DataSource,并且启动会有循环依赖的错误。
@SpringBootApplication(exclude = DataSourceAutoConfiguration.class)
public class EasyspringbootMultipledatasourceApplication {

   public static void main(String[] args) {
      SpringApplication.run(EasyspringbootMultipledatasourceApplication.class, args);
   }

}
测试
- 查询所有Student
- 查询所有Teacher
我们得到了正确的结果,数据源自动切换了。
项目完整代码:https://github.com/Mark-Chou20/easy-springboot


