Zhang-Suen细化算法提取中轴线(Python)
骨架
表示一个平面区域的结构形状的一种重要方法是将它简化为图形,这种简化可以通过一种细化(也称为骨架化)算法得到该区域的骨架来实现。细化是一种形态学变形,在提取中轴线的图像处理问题中,细化起着核心作用。为了产生一个区域的中轴的表示,提出了许多典型的算法,这些算法都是通过迭代一个区域的边界点的细化过程,删除这些点时需要服从如下约束条件:(1)不能删除端点,(2)不能破坏连接性,(3)不能导致区域的过度腐蚀。
因此,细化算法的一次迭代由如下步骤组成:(1)标记将被删除的边界点;(2)删除做了标记的点;(3)继续标记将被删除的剩余的边界点;(4)删除标记过的点。反复应用这个基本过程,直到再也没有被删除的点为止,此时算法终止,生成了该区域的骨架。
Zhang-Suen细化算法
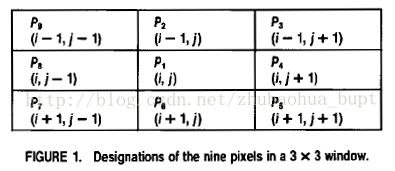
首先定义像素点的8邻域如下图(前景为1,背景为0):
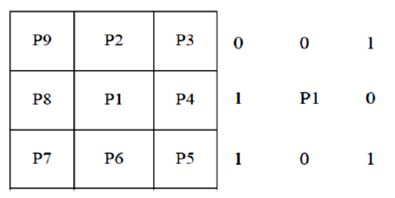
# 定义像素点周围的8邻域
#                P9 P2 P3
#                P8 P1 P4
#                P7 P6 P5

def neighbours(x,y,image):
    img = image
    x_1, y_1, x1, y1 = x-1, y-1, x+1, y+1
    return [ img[x_1][y],img[x_1][y1],img[x][y1],img[x1][y1],         # P2,P3,P4,P5
            img[x1][y], img[x1][y_1], img[x][y_1], img[x_1][y_1] ]    # P6,P7,P8,P9
N(p1)表示与1相邻的8个像素点中,为前景像素点的个数。
for x in range(1, rows - 1):
    for y in range(1, columns - 1):
        P2,P3,P4,P5,P6,P7,P8,P9 = n = neighbours(x, y, Image_Thinned)
S(P1)表示从P2 ~ P9中出现0~1的累计次数,其中0表示背景,1表示前景。
# 计算邻域像素从0变化到1的次数

def transitions(neighbours):
    n = neighbours + neighbours[0:1]      # P2,P3,...,P8,P9,P2
    return sum( (n1, n2) == (0, 1) for n1, n2 in zip(n, n[1:]) )  # (P2,P3),(P3,P4),...,(P8,P9),(P9,P2)
Zhang-Suen细化算法的整个迭代过程分为两步:
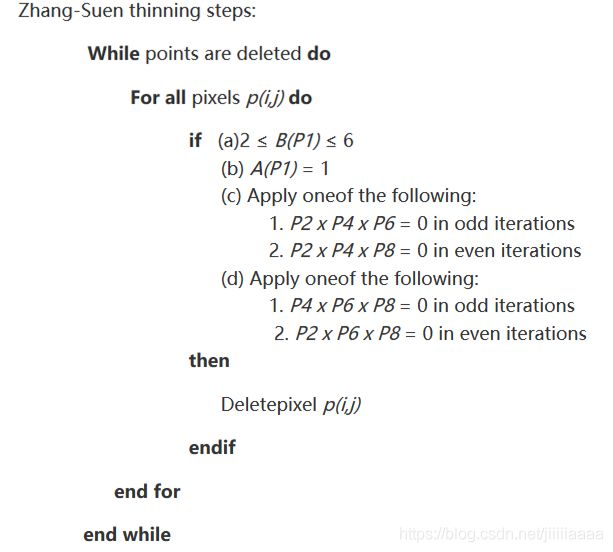
Step One:循环所有前景像素点,对符合如下条件的像素点标记为删除:
1. 2 <= N(p1) <=6,中心像素p1周围的目标像素(二值中的1)的个数在2~6之间;
2. S(P1) = 1,8邻域像素中,按顺时针方向,相邻两个像素出现0→1的次数;
3. P2 * P4 * P6 = 0
4. P4 * P6 * P8 = 0
# Step 1
changing1 = []
rows, columns = Image_Thinned.shape
for x in range(1, rows - 1):
    for y in range(1, columns - 1):
        P2,P3,P4,P5,P6,P7,P8,P9 = n = neighbours(x, y, Image_Thinned)
        if (Image_Thinned[x][y] == 1     and    # Condition 0: Point P1 in the object regions
            2 <= sum(n) <= 6   and    # Condition 1: 2<= N(P1) <= 6
            transitions(n) == 1 and   # Condition 2: S(P1)=1
            P2 * P4 * P6 == 0  and    # Condition 3
            P4 * P6 * P8 == 0):       # Condition 4
Step Two:跟Step One很类似,条件1、2完全一致,只是条件3、4稍微不同,满足如下条件的像素P1则标记为删除,条件如下:
1. 2 <= N(p1) <=6
2. S(P1) = 1
3. P2 * P4 * P8 = 0
4. P2 * P6 * P8 = 0
循环上述两步骤,直到两步中都没有像素被标记为删除为止,输出的结果即为二值图像细化后的骨架。
# Step 2
changing2 = []
for x in range(1, rows - 1):
    for y in range(1, columns - 1):
        P2,P3,P4,P5,P6,P7,P8,P9 = n = neighbours(x, y, Image_Thinned)
        if (Image_Thinned[x][y] == 1   and        # Condition 0
            2 <= sum(n) <= 6  and       # Condition 1
            transitions(n) == 1 and      # Condition 2
            P2 * P4 * P8 == 0 and       # Condition 3
            P2 * P6 * P8 == 0):            # Condition 4
            changing2.append((x,y))
for x, y in changing2:
    Image_Thinned[x][y] = 0
伪代码
算法完整代码
# 导入库
import matplotlib
import matplotlib.pyplot as plt
import skimage.io as io

# 将图像转为灰度图像
from PIL import Image
img = Image.open("E://straight//3.png").convert('L')
img.save('E://straight//3 greyscale.png')

# 读取灰度图像
Img_Original = io.imread('E://straight//3 greyscale.png')

# 对图像进行预处理,二值化
from skimage import filters
from skimage.morphology import disk
# 中值滤波
Img_Original = filters.median(Img_Original,disk(5))
# 二值化
BW_Original = Img_Original < 235
# 定义像素点周围的8邻域
# P9 P2 P3
# P8 P1 P4
# P7 P6 P5
def neighbours(x,y,image):
img = image
x_1, y_1, x1, y1 = x-1, y-1, x+1, y+1
return [ img[x_1][y],img[x_1][y1],img[x][y1],img[x1][y1], # P2,P3,P4,P5
img[x1][y], img[x1][y_1], img[x][y_1], img[x_1][y_1] ] # P6,P7,P8,P9
# 计算邻域像素从0变化到1的次数
def transitions(neighbours):
n = neighbours + neighbours[0:1] # P2,P3,...,P8,P9,P2
return sum( (n1, n2) == (0, 1) for n1, n2 in zip(n, n[1:]) ) # (P2,P3),(P3,P4),...,(P8,P9),(P9,P2)
# Zhang-Suen 细化算法
def zhangSuen(image):
Image_Thinned = image.copy() # Making copy to protect original image
changing1 = changing2 = 1
while changing1 or changing2: # Iterates until no further changes occur in the image
# Step 1
changing1 = []
rows, columns = Image_Thinned.shape
for x in range(1, rows - 1):
for y in range(1, columns - 1):
P2,P3,P4,P5,P6,P7,P8,P9 = n = neighbours(x, y, Image_Thinned)
if (Image_Thinned[x][y] == 1 and # Condition 0: Point P1 in the object regions
2 <= sum(n) <= 6 and # Condition 1: 2<= N(P1) <= 6
transitions(n) == 1 and # Condition 2: S(P1)=1
P2 * P4 * P6 == 0 and # Condition 3
P4 * P6 * P8 == 0): # Condition 4
changing1.append((x,y))
for x, y in changing1:
Image_Thinned[x][y] = 0
# Step 2
changing2 = []
for x in range(1, rows - 1):
for y in range(1, columns - 1):
P2,P3,P4,P5,P6,P7,P8,P9 = n = neighbours(x, y, Image_Thinned)
if (Image_Thinned[x][y] == 1 and # Condition 0
2 <= sum(n) <= 6 and # Condition 1
transitions(n) == 1 and # Condition 2
P2 * P4 * P8 == 0 and # Condition 3
P2 * P6 * P8 == 0): # Condition 4
changing2.append((x,y))
for x, y in changing2:
Image_Thinned[x][y] = 0
return Image_Thinned# 对染色体图像应用Zhang-Suen细化算法
BW_Skeleton = zhangSuen(BW_Original)
import numpy as np
BW_Skeleton = np.invert(BW_Skeleton)# 显示细化结果
fig, ax = plt.subplots(1, 2)
ax1, ax2 = ax.ravel()
ax1.imshow(img, cmap=plt.cm.gray)
ax1.set_title('Original binary image')
ax1.axis('off')
ax2.imshow(BW_Skeleton, cmap=plt.cm.gray)
ax2.set_title('Skeleton of the image')
ax2.axis('off')
plt.savefig('E://straight//3 thinned.png')
plt.show()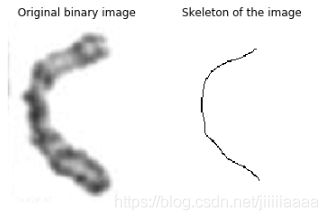
# 生成骨架图像并保存
Skeleton = np.ones((BW_Skeleton.shape[0],BW_Skeleton.shape[1]),np.uint8) *255 #生成一个空灰度图像
BW_Skeleton = BW_Skeleton + 0
for i in range(BW_Skeleton.shape[0]):
    for j in range(BW_Skeleton.shape[1]):
        if BW_Skeleton[i][j] == 0:
            Skeleton[i][j] = 0

plt.axis('off')
plt.imshow(Skeleton, cmap=plt.cm.gray)

import imageio
imageio.imwrite('E://straight//3 Skeleton.png', Skeleton)
# 利用opencv在染色体图像上画出中轴线
import numpy as np
import cv2 as cv

img = cv.imread('E://straight//3 Skeleton.png')
binaryImg = cv.Canny(img,100,200)
h = cv.findContours(binaryImg, cv.RETR_TREE, cv.CHAIN_APPROX_NONE)
contours = h[1]

Org_img =  cv.imread('E://straight//3.png')
cv.drawContours(Org_img, contours, -1,(0,0,255),3)

plt.axis('off')
plt.imshow(Org_img, cmap=plt.cm.gray)

cv.imwrite('E://straight//3 contours.png',Org_img)