mmdetection各模块拆解(一)数据读取与处理
mmdetection各模块拆解(一)数据读取与处理
文章目录
- mmdetection各模块拆解(一)数据读取与处理
-
- 动机
- mmdetection中的COCO数据集
- Pipelines
-
- 1.LoadImageFromFile
- 2.LoadAnnotations
- 3. Resize
- 4.DefaultFormatBundle
- 5. Collect
- Pipeline总结
- 自定义数据处理
-
- 随机保存待检测目标切片
动机
之前在一次比赛中使用了mmdetection作为开发工具,用起来确实很方便。但是由于mmdetection封装得太好了,想自己DIY模型就有些复杂。但是,考虑到始终有要开发自己的新模型的一天,我决定好好看一看mmdet的源码,争取能弄清楚在模型训练和测试的时候mmdet内部到底经历了什么。之后,根据学习的内容,自己尝试DIY数据处理的程序,不想看大段代码的朋友请直接看到自定义数据处理部分。
mmdetection中的COCO数据集
在检测中,我们最常使用的应该是COCO格式的数据,那就来看看CocoDataset的相关代码吧。使用过mmdetection的同学都知道,mmdet使用配置文件来调配数据的读取、增强、模型结构的选取、训练和测试等,因此我们来看一看Cocodetection的基本配置文件coco_detection.py
# dataset settings
dataset_type = 'CocoDataset'
data_root = 'data/coco/'
img_norm_cfg = dict(
    mean=[123.675, 116.28, 103.53], std=[58.395, 57.12, 57.375], to_rgb=True)
train_pipeline = [
    dict(type='LoadImageFromFile'),
    dict(type='LoadAnnotations', with_bbox=True),
    dict(type='Resize', img_scale=(1333, 800), keep_ratio=True),
    dict(type='RandomFlip', flip_ratio=0.5),
    dict(type='Normalize', **img_norm_cfg),
    dict(type='Pad', size_divisor=32),
    dict(type='DefaultFormatBundle'),
    dict(type='Collect', keys=['img', 'gt_bboxes', 'gt_labels']),
]
test_pipeline = [
    dict(type='LoadImageFromFile'),
    dict(
        type='MultiScaleFlipAug',
        img_scale=(1333, 800),
        flip=False,
        transforms=[
            dict(type='Resize', keep_ratio=True),
            dict(type='RandomFlip'),
            dict(type='Normalize', **img_norm_cfg),
            dict(type='Pad', size_divisor=32),
            dict(type='ImageToTensor', keys=['img']),
            dict(type='Collect', keys=['img']),
        ])
]
data = dict(
    samples_per_gpu=2,
    workers_per_gpu=2,
    train=dict(
        type=dataset_type,
        ann_file=data_root + 'annotations/instances_train2017.json',
        img_prefix=data_root + 'train2017/',
        pipeline=train_pipeline),
    val=dict(
        type=dataset_type,
        ann_file=data_root + 'annotations/instances_val2017.json',
        img_prefix=data_root + 'val2017/',
        pipeline=test_pipeline),
    test=dict(
        type=dataset_type,
        ann_file=data_root + 'annotations/instances_val2017.json',
        img_prefix=data_root + 'val2017/',
        pipeline=test_pipeline))
evaluation = dict(interval=1, metric='bbox')
上述配置文件中的train_pipeline和test_pipeline分别指定训练和测试的数据处理过程,字典data指定batch_size(samples_per_gpu)和训练、验证、测试使用的数据集、标注文件和数据源地址。可以看到所有的配置均以字典的形式出现。在这篇博客中,我们重点关注train_pipeline,也就是数据处理方法的代码。
Pipelines
我们首先看几个常用的pipeline的源码,然后尝试自己写一个pipeline并注册,算是DIY的第一步。与pipeline相关的代码库为mmdetection/mmdet/datasets/pipelines/
1.LoadImageFromFile
顾名思义,这个方法的作用就是从文件中读取图片,代码见pipelines/loading.py
@PIPELINES.register_module()
class LoadImageFromFile:
    """Load an image from file.
    Required keys are "img_prefix" and "img_info" (a dict that must contain the
    key "filename"). Added or updated keys are "filename", "img", "img_shape",
    "ori_shape" (same as `img_shape`), "pad_shape" (same as `img_shape`),
    "scale_factor" (1.0) and "img_norm_cfg" (means=0 and stds=1).
    Args:
        to_float32 (bool): Whether to convert the loaded image to a float32
            numpy array. If set to False, the loaded image is an uint8 array.
            Defaults to False.
        color_type (str): The flag argument for :func:`mmcv.imfrombytes`.
            Defaults to 'color'.
        file_client_args (dict): Arguments to instantiate a FileClient.
            See :class:`mmcv.fileio.FileClient` for details.
            Defaults to ``dict(backend='disk')``.
    """

    def __init__(self,
                 to_float32=False,
                 color_type='color',
                 file_client_args=dict(backend='disk')):
        self.to_float32 = to_float32
        self.color_type = color_type
        self.file_client_args = file_client_args.copy()
        self.file_client = None
看到@PIPELINES.register_module()的时候,有没有觉得很眼熟?是的,mmdetection和detectron2一样,都采用注册表来统一管理模块。这行代码以修饰器的方式来注册LoadImageFromFile类别到注册表PIPELINES中。 下面看一下它的调用函数:
 def __call__(self, results):
        """
        Args:
            results (dict): Result dict from :obj:`mmdet.CustomDataset`.
        Returns:
            dict: The dict contains loaded image and meta information.
        """

        if self.file_client is None:
            self.file_client = mmcv.FileClient(**self.file_client_args)
		# 当给定图片的前缀时,要将前缀加到文件位置前面
        if results['img_prefix'] is not None:
            filename = osp.join(results['img_prefix'],
                                results['img_info']['filename'])
        else:
            filename = results['img_info']['filename']
		# file_client的作用为按照给定的目标位置读取文件,返回二进制文件
        img_bytes = self.file_client.get(filename)
        # mmcv.imfrombytes,就是读取二进制的图片文件
        img = mmcv.imfrombytes(img_bytes, flag=self.color_type)
        # 读取的文件默认为uint8,可通过self.to_float32=True转化为float32
        if self.to_float32:
            img = img.astype(np.float32)
		# 根据读取的图片信息更新results中的信息并返回
        results['filename'] = filename
        results['ori_filename'] = results['img_info']['filename']
        # 将读取的图片加入到results字典中
        results['img'] = img
        results['img_shape'] = img.shape
        results['ori_shape'] = img.shape
        results['img_fields'] = ['img']
        return results
首先,这个调用函数接收的参数results是一个由mmdet.CustomDataset实例返回的字典对象。这里就告诉大家,results是一个包含了图片信息和标注信息的字典,具体包含哪些内容大家甘新渠可以自己查看源码~ 其他关键代码的注释已经写在上面了。
LoadImageFromFile 通常是图片处理的第一步,后面的一些处理都是基于图片读取的基础之上的。
2.LoadAnnotations
下面看一下pipeline中怎么读取数据集的标注文件。为避免在接下来看代码时的困惑,先给大家展示一下mmdetection中默认的标注文件格式:
        [
            {
                'filename': 'a.jpg',
                'width': 1280,
                'height': 720,
                'ann': {
                	# N个目标框位置,每个框以xmin,ymin,xmax,ymax顺序记录
                    'bboxes': <np.ndarray> (n, 4) in (x1, y1, x2, y2) order.
                    # 每个框的类别信息
                    'labels': <np.ndarray> (n, ),
                    'bboxes_ignore': <np.ndarray> (k, 4), (optional field)
                    'labels_ignore': <np.ndarray> (k, 4) (optional field)
                }
            },
            ...
        ]
可以看到,标注文件的格式为List[Dict],每一个字典标注了一张图片中的所有目标。 标注的关键词为"ann"。如果是分割任务,一般还会有‘seg’和‘mask’等关键字,因为笔者主要研究目标检测方向,这里就不多赘述。
言归正传,看LoadAnnotations的代码:
@PIPELINES.register_module()
class LoadAnnotations:
    def __init__(self,
                 with_bbox=True,
                 with_label=True,
                 with_mask=False,
                 with_seg=False,
                 poly2mask=True,
                 file_client_args=dict(backend='disk')):
        self.with_bbox = with_bbox
        self.with_label = with_label
        self.with_mask = with_mask
        self.with_seg = with_seg
        self.poly2mask = poly2mask
        self.file_client_args = file_client_args.copy()
        self.file_client = None
同样地,使用@PIPELINES.register_module()来注册这一pipeline。初始化函数中的with_bbox, with_label, with_seg等参数标志着需要读入哪些任务所需要的标注。下面看一下调用函数(只以检测任务为例)
    def __call__(self, results):
        """
        Args:
            results (dict): Result dict from :obj:`mmdet.CustomDataset`.
        Returns:
            dict: The dict contains loaded bounding box, label, mask and
                semantic segmentation annotations.
        """
        # 根据参数来返回需要的标注信息
        if self.with_bbox:
            results = self._load_bboxes(results)
            if results is None:
                return None
        if self.with_label:
            results = self._load_labels(results)
        if self.with_mask:
            results = self._load_masks(results)
        if self.with_seg:
            results = self._load_semantic_seg(results)
        # 将边框、类别等标注信息加入到results字典中并返回
        return results

	    def _load_labels(self, results):
	    # 将
        results['gt_labels'] = results['ann_info']['labels'].copy()
        return results

    def _load_bboxes(self, results):
        ann_info = results['ann_info']
        results['gt_bboxes'] = ann_info['bboxes'].copy()

        gt_bboxes_ignore = ann_info.get('bboxes_ignore', None)
        if gt_bboxes_ignore is not None:
            results['gt_bboxes_ignore'] = gt_bboxes_ignore.copy()
            results['bbox_fields'].append('gt_bboxes_ignore')
        results['bbox_fields'].append('gt_bboxes')
        return results
在经过LoadImageFromFile 和 LoadAnnotations的处理后,每个图片样本对应的results应该包含以下关键字(只以检测任务为例):
results : {'filename': filename of the image,
		'ori_filename' original filename:,
		'img': img,
		'img_shape':img.shape,
		'ori_shape':img.shape,
		'img_fields': ['img'],
		'gt_bboxes': bboxes(N,4),
		'gt_labels':labels(N,),
		'bbox_fields':['gt_bboxes']

		}
3. Resize
经过LoadImageFromFile 和 LoadAnnotations的处理后,我们已经从数据集中获取了已知的所有信息,我们可以对图片进行进一步的处理,比如数据增强。 Resize是检测中最常用的数据增强方法,作用是将输入的图片统一放缩成同样的大小:
#img_scale 指定放缩的最终图片尺寸
train_pipeline = [...,
				dict(type='Resize', img_scale=(1333, 800), keep_ratio=True),
				...]
有时,我们还会使用多尺度训练,即给定不同的图片尺度,用多个尺度同时进行训练:
train_pipeline = [...,
				dict(
        type='Resize',
        img_scale=[(1333, 640), (1333, 800)],
        multiscale_mode='value',
        keep_ratio=True),
				...]
@PIPELINES.register_module()
class Resize:
    """Resize images & bbox & mask.

    将输入的图片和边界框等标注同步放缩为合适的大小。

    `img_scale` can either be a tuple (single-scale) or a list of tuple
    (multi-scale). 共支持三种多尺度放缩类型,感兴趣的自己阅读~:

    - ``ratio_range is not None``: randomly sample a ratio from the ratio \
      range and multiply it with the image scale.
    - ``ratio_range is None`` and ``multiscale_mode == "range"``: randomly \
      sample a scale from the multiscale range.
    - ``ratio_range is None`` and ``multiscale_mode == "value"``: randomly \
      sample a scale from multiple scales.

    Args:
        img_scale (tuple or list[tuple]): 放缩尺度
        multiscale_mode (str): Either "range" or "value".
        keep_ratio (bool): 是否保持图片的原有比例
        backend (str): 'cv2' 或者 'pillow',指定图像处理的后端程序

    """

    def __init__(self,
                 img_scale=None,
                 multiscale_mode='range',
                 ratio_range=None,
                 keep_ratio=True,
                 bbox_clip_border=True,
                 backend='cv2',
                 override=False):
        if img_scale is None:
            self.img_scale = None
        else:
            if isinstance(img_scale, list):
                self.img_scale = img_scale
            else:
                self.img_scale = [img_scale]
            #最终self.img_scale应当为
            assert mmcv.is_list_of(self.img_scale, tuple)

        if ratio_range is not None:
            # mode 1: given a scale and a range of image ratio
            assert len(self.img_scale) == 1
        else:
            # mode 2: given multiple scales or a range of scales
            assert multiscale_mode in ['value', 'range']

        self.backend = backend
        self.multiscale_mode = multiscale_mode
        self.ratio_range = ratio_range
        self.keep_ratio = keep_ratio
        # TODO: refactor the override option in Resize
        self.override = override
        # 此参数指定是否要裁剪超出图片尺寸的边界框
        self.bbox_clip_border = bbox_clip_border
看一下resize的调用函数:
    def __call__(self, results):
        """
        Args:
            results (dict): 从loading过程中得到的result字典
        Returns:
            dict: Resized results, 'img_shape', 'pad_shape', 'scale_factor', \
                'keep_ratio' keys are added into result dict.
        """
		# 此处的程序为根据给定的参数选定放缩的scale并加入到results字典中,不细讲
        if 'scale' not in results:
            if 'scale_factor' in results:
                img_shape = results['img'].shape[:2]
                scale_factor = results['scale_factor']
                assert isinstance(scale_factor, float)
                results['scale'] = tuple(
                    [int(x * scale_factor) for x in img_shape][::-1])
            else:
                self._random_scale(results)
        else:
            if not self.override:
                assert 'scale_factor' not in results, (
                    'scale and scale_factor cannot be both set.')
            else:
                results.pop('scale')
                if 'scale_factor' in results:
                    results.pop('scale_factor')
                self._random_scale(results)
		#可以看到,图片、边界框、掩码和分割标注都会同步进行放缩
        self._resize_img(results)
        self._resize_bboxes(results)
        self._resize_masks(results)
        self._resize_seg(results)
        return results
笔者重点关注检测任务,因此主要看self._resize_img(results) 以及self._resize_bboxes(results) 两步具体做了哪些操作:
    def _resize_img(self, results):
        """Resize images with ``results['scale']``."""
        # 找img关键字,默认值为['img']
        for key in results.get('img_fields', ['img']):
            if self.keep_ratio:
            	# 这里的key一般是'img'  所以下方代码中的results[key]实际上就是results['imgs'],
            	# 也就是在LoadImageFromFile操作中得到的img
            	# 使用mmcv中的imrescale方法,backend指定后端使用的图像处理库(PIL or cv2)
                img, scale_factor = mmcv.imrescale(
                    results[key],
                    results['scale'],
                    return_scale=True,
                    backend=self.backend)
             	# 记录新边长/旧边长 的比值
                new_h, new_w = img.shape[:2]
                h, w = results[key].shape[:2]
                w_scale = new_w / w
                h_scale = new_h / h
            else:
                img, w_scale, h_scale = mmcv.imresize(
                    results[key],
                    results['scale'],
                    return_scale=True,
                    backend=self.backend)
            # 更新缩放后的图片
            results[key] = img

            scale_factor = np.array([w_scale, h_scale, w_scale, h_scale],
                                    dtype=np.float32)
            results['img_shape'] = img.shape
            # in case that there is no padding
            results['pad_shape'] = img.shape
            results['scale_factor'] = scale_factor
            results['keep_ratio'] = self.keep_ratio
            '''
            在完成放缩后,results 字典中加入了一下关键字:
            {'img_shape':放缩后的图片形状,
             'pad_shape': 填充尺寸,
             'scale_factor': 放缩前后的尺寸比值,一个长度为4的向量,
             'keep_ratio': 放缩过程中是否保持原有的长宽比}
            '''
可以看到,在self.keep_ratio==True 时,程序使用了mmcv.imrescale函数,而在不需要保持长宽比的时候则直接使用mmcv.imresize函数。
# mmcv
def imrescale(img,
              scale,
              return_scale=False,
              interpolation='bilinear',
              backend=None):
    """放缩图片,同时保留原有的长宽比

    Args:
        img (ndarray): The input image.
        scale (float | tuple[int]): The scaling factor or maximum size.
    Returns:
        ndarray: The rescaled image.
    """
    h, w = img.shape[:2]
   ''' 因为要保留长宽比,不能直接使用给定的scale进行放缩,而是要计算新的目标尺寸'''
    new_size, scale_factor = rescale_size((w, h), scale, return_scale=True)
    ''' 得到new_size后,仍使用imresize函数'''
    rescaled_img = imresize(
        img, new_size, interpolation=interpolation, backend=backend)
    if return_scale:
        return rescaled_img, scale_factor
    else:
        return rescaled_img

def imresize(img,
             size,
             return_scale=False,
             interpolation='bilinear',
             out=None,
             backend=None):
    """这个函数非常非常简单,就是根据backend的不同,选用不同的库来放缩图片并记录新图片和原图片的放缩比例

    Args:
        img (ndarray): The input image.
        size (tuple[int]): Target size (w, h).
        return_scale (bool): Whether to return `w_scale` and `h_scale`.
    Returns:
        tuple | ndarray: (`resized_img`, `w_scale`, `h_scale`) or
            `resized_img`.
    """
    h, w = img.shape[:2]
    if backend is None:
        backend = imread_backend
    if backend not in ['cv2', 'pillow']:
        raise ValueError(f'backend: {backend} is not supported for resize.'
                         f"Supported backends are 'cv2', 'pillow'")

	''' 按照使用的backend来进行放缩'''
    if backend == 'pillow':
        assert img.dtype == np.uint8, 'Pillow backend only support uint8 type'
        pil_image = Image.fromarray(img)
        pil_image = pil_image.resize(size, pillow_interp_codes[interpolation])
        resized_img = np.array(pil_image)
    else:
        resized_img = cv2.resize(
            img, size, dst=out, interpolation=cv2_interp_codes[interpolation])
    if not return_scale:
        return resized_img
    else:
    	''''返回新的尺寸与旧尺寸的比值 '''
        w_scale = size[0] / w
        h_scale = size[1] / h
        return resized_img, w_scale, h_scale
下面再看一下resize_bboxes:
    def _resize_bboxes(self, results):
        """Resize bounding boxes with ``results['scale_factor']``."""
        for key in results.get('bbox_fields', []):
        	'''这里的key即为'bboxes',这里执行的操作为:将边界框按照resize_img时得到的
        	scale_factor 进行放缩,并将超出图像边界的边框进行裁剪
        	'''
            bboxes = results[key] * results['scale_factor']
            if self.bbox_clip_border:
                img_shape = results['img_shape']
                bboxes[:, 0::2] = np.clip(bboxes[:, 0::2], 0, img_shape[1])
                bboxes[:, 1::2] = np.clip(bboxes[:, 1::2], 0, img_shape[0])
            results[key] = bboxes
之后的一些RandomFlip, Normalize, 以及Pad 这些基础的几何操作和Resize大同小异,就不多看了,感兴趣的同学自己翻翻源码。
4.DefaultFormatBundle
DefaultFormatBundle即是“默认格式包”,用于简化对于一些默认字段如‘img’,‘gt_bboxes’, 'gt_labels’等的处理。
@PIPELINES.register_module()
class DefaultFormatBundle:
    """Default formatting bundle.

    - img: (1)transpose, (2)to tensor, (3)to DataContainer (stack=True)
    - proposals: (1)to tensor, (2)to DataContainer
    - gt_bboxes: (1)to tensor, (2)to DataContainer
    - gt_bboxes_ignore: (1)to tensor, (2)to DataContainer
    - gt_labels: (1)to tensor, (2)to DataContainer
    - gt_masks: (1)to tensor, (2)to DataContainer (cpu_only=True)
    - gt_semantic_seg: (1)unsqueeze dim-0 (2)to tensor, \
                       (3)to DataContainer (stack=True)
    """
    '''
    下方代码使用的DC是mmcv自定义的数据容器(DataContainer,用于格式化储存张量等数据)
    '''

    def __call__(self, results):
        """Call function to transform and format common fields in results.
        """
        if 'img' in results:
            img = results['img']
            # add default meta keys
            results = self._add_default_meta_keys(results)
            '''将图片转置为C,H,W的格式并且加入到DataContainer(DC)中 '''
            if len(img.shape) < 3:
                img = np.expand_dims(img, -1)
            img = np.ascontiguousarray(img.transpose(2, 0, 1))
            results['img'] = DC(to_tensor(img), stack=True)
        for key in ['proposals', 'gt_bboxes', 'gt_bboxes_ignore', 'gt_labels']:
            if key not in results:
                continue
            '''将原有的数据替换为DC(torch.tensor)'''
            results[key] = DC(to_tensor(results[key]))
        if 'gt_masks' in results:
            results['gt_masks'] = DC(results['gt_masks'], cpu_only=True)
        if 'gt_semantic_seg' in results:
            results['gt_semantic_seg'] = DC(
                to_tensor(results['gt_semantic_seg'][None, ...]), stack=True)
        return results
5. Collect
Collect 处理一般是数据处理的最后一步,其作用为从给定的results中提取特定的任务需要的内容。
'''
就以本文开头的配置文件为例,可以看到,在训练的pipeline中,我们需要提取图片(img) 目标边界框(gt_bboxes)
和 目标类别(gt_labels) 等数据来进行训练;而在测试时仅仅需要输入图片即可。
'''
train_pipeline = [
    ...,
    dict(type='Collect', keys=['img', 'gt_bboxes', 'gt_labels']),
]
test_pipeline = [
    dict(type='LoadImageFromFile'),
    dict(
        type='MultiScaleFlipAug',
        img_scale=(1333, 800),
        flip=False,
        transforms=[
            ...,
            dict(type='Collect', keys=['img']),
        ])
]
看一下Collect的源码:
@PIPELINES.register_module()
class Collect:
    """Collect data from the loader relevant to the specific task.
    """
    def __init__(self,
                 keys,
                 meta_keys=('filename', 'ori_filename', 'ori_shape',
                            'img_shape', 'pad_shape', 'scale_factor', 'flip',
                            'flip_direction', 'img_norm_cfg')):
        self.keys = keys
        self.meta_keys = meta_keys

    def __call__(self, results):
        """Call function to collect keys in results.
        """
        """最终要返回的data字典"""
        data = {}
        img_meta = {}
        for key in self.meta_keys:
            img_meta[key] = results[key]
        """储存一些图片元信息('filename','img_shape','scale_factor'等)"""
        data['img_metas'] = DC(img_meta, cpu_only=True)
        """将需要的信息保存到data中并返回"""
        for key in self.keys:
            data[key] = results[key]
        return data

    def __repr__(self):
        return self.__class__.__name__ + \
            f'(keys={self.keys}, meta_keys={self.meta_keys})'
Pipeline总结
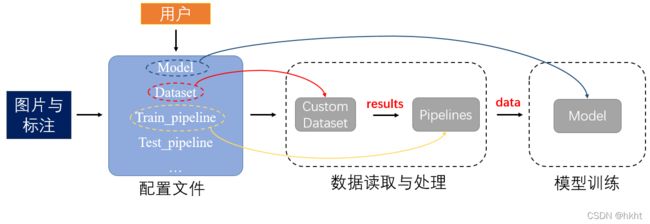
mmdetection中的常用的数据处理过程可用其文档中的一张图来展示:

贯穿整个处理过程的是字典results , 图中绿色的键值表示该处新增内容,黄色键值表示在该处更新的内容。
那么results从何处来,到何处去? 来看一下CustomDataset
@DATASETS.register_module()
class CustomDataset(Dataset):
    def __init__(self,
                 ann_file,
                 pipeline,
                 classes=None,
                 data_root=None,
                 img_prefix='',
                 seg_prefix=None,
                 proposal_file=None,
                 test_mode=False,
                 filter_empty_gt=True):
        self.ann_file = ann_file
        self.data_root = data_root
        self.img_prefix = img_prefix
        self.seg_prefix = seg_prefix
        self.proposal_file = proposal_file
        self.test_mode = test_mode
        self.filter_empty_gt = filter_empty_gt
        self.CLASSES = self.get_classes(classes)
		''' 中间省略一部分代码'''
        # processing pipeline
        '''这里的Compose可以类比于torchvision.transforms的Compose,就是将不同的pipeline组合到一起'''
        self.pipeline = Compose(pipeline)
  	  '''这里的getitem与torch中自定义Dataset的过程一致,仅对给定的idx进行数据读取和处理'''
      def __getitem__(self, idx):
        """Get training/test data after pipeline."""
        if self.test_mode:
            return self.prepare_test_img(idx)
        while True:
            data = self.prepare_train_img(idx)
            if data is None:
                idx = self._rand_another(idx)
                continue
            return data

       def prepare_train_img(self, idx):
        """Get training data and annotations after pipeline."""
		"""获取img_info(图片路径,处理后端程序),ann_info(标注文件路径等)等信息"""
        img_info = self.data_infos[idx]
        ann_info = self.get_ann_info(idx)
        """创建results并将信息加入到results中"""
        results = dict(img_info=img_info, ann_info=ann_info)
        if self.proposals is not None:
            results['proposals'] = self.proposals[idx]
        """用组合的pipelines对results进行处理,并返回最终的结果"""
        self.pre_pipeline(results)
        return self.pipeline(results)
在mmdetection的训练过程中,使用如下的代码构建数据集:
datasets = [build_dataset(cfg.data.train)]
"""
build_dataset为mmdet自带的数据集构建函数,传入的参数为cfg.data.train, 参考本文开篇给出的配置文件示例,train_pipeline字典已经包含在cfg.data.train中
"""
自定义数据处理
随机保存待检测目标切片
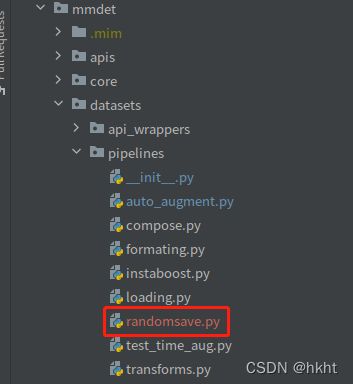
这个数据处理的目标为,依据一个给定的概率来将检测任务中的待检测目标切片输出保存到指定位置。首先,我们需要在mmdet/datasets/pipelines中添加一个新文件:

"""Randomsave.py """
""" 不要忘记使用修饰器进行注册"""
@PIPELINES.register_module()
class RandomSaveObject:
    """
    依据给定的概率保存目标切片
    """
    def __init__(self,
                 save_dir,
                 prob=0.3,
                 ):
	        """save_dir 指定保存的位置,prob指定保存目标的概率 """
	    self.save_dir = save_dir
	    self.prob = prob

	       	""" __call__ 为调用函数,接收的参数为从前面的pipeline中传入的results字典"""
	def __call__(self,results):
	    """ 读取results中的图片信息"""
	    img = results['img']
	    filename = results['filename'].split('/')[-1]
		"""读取目标边框信息"""
	    gt_bboxes = results['gt_bboxes']
	    obj_num = 0
	    for bbox in gt_bboxes:
			"""依据给定概率保存图片"""
	        if np.random.rand() < self.prob:
	            x1,y1,x2,y2 = bbox
	            print('save image to',os.path.join(self.save_dir,filename.split('.')[0])+f'_{obj_num}.png')
	            """输出图片到指定位置"""
	            cv2.imwrite(os.path.join(self.save_dir,filename.split('.')[0])+f'_{obj_num}.png',img[int(x1):int(x2),int(y1):int(y2),:])
	            obj_num += 1
			"""为保证与前后pipeline的连续性,这里必须返回results字典,否则训练会卡住,无法运行"""
	    return results

    def __repr__(self):
    	"""此方法用于返回RandomSave的属性"""
        repr_str = self.__class__.__name__
        repr_str += f'(save_dir={self.save_dir}, prob={self.prob})'
        return repr_str
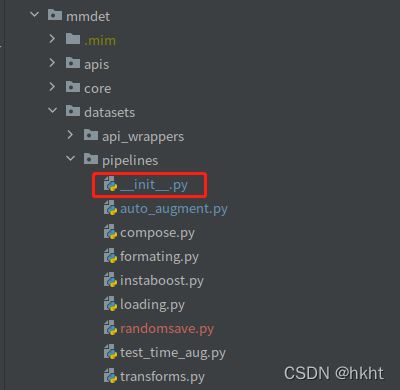
到这里,代码部分就完成了,但我们还需要将写好的RandomSaveObject类加入到原有的Pipelines中。先找到mmdet/datasets/pipelines/__ init __.py:


最后,只需要将RandomSaveObject直接加入到配置文件中即可使用:

在训练过程中,可以在save_dir中找到保存好的目标图片。
