C++知识点
目录
-
- 摘要:
- 知识点内容:
-
- C/C++在linux环境中的编译
- 类成员函数的重载、覆盖和隐藏
- 封装,继承,多态(重点是多态)
- 虚函数、虚函数表
- 内存管理
-
- 智能指针 shared_ptr/unique_ptr
- new/delete、malloc/free
- 指针、引用
- 函数指针和指针函数用法和区别
- static
- const
- this
- allocator类
- size_type、size_t
- map
-
- multimap和struct使用
- map默认构造
-
- find、=
- ostream
- 文本查询程序
- 线程
-
- 1.普通多线程
- 2.互斥量 \互斥锁
- 3.异步线程
- 遇到的问题记录:
-
- 搭建开发环境
- 一个类的对象不能访问该类的私有函数和成员
- 变量 "using" 不是类型名
- vscode中头文件的引用
- C++ 头文件理解
- 随机数生成
- 静态成员函数、成员初始化
- 变量、结构体等初始化问题
- linux中使用g++编译出现问题
-
- g++ xxx.h: 没有那个文件或目录
- "xxx"找不到标识符 (xxx为自定义的函数)
- 没有与参数列表匹配的构造函数
- conflicting declaration/redeclared as different kind of entity
- 42ERROR: AddressSanitizer: heap-buffer-overflow on address
- undefined reference to `vtable for xxx'
- 实例
-
- C++简易计算器
摘要:
该文章用于个人参考学习,记录琐碎零散知识点,因参考引用较多,有未标明引用之处,望指出。
知识点内容:
C/C++在linux环境中的编译
如何在Linux系统下进行编译运行C代码
类成员函数的重载、覆盖和隐藏
类成员函数的重载、覆盖和隐藏
封装,继承,多态(重点是多态)
封装、继承、多态是C++、python、java等面向对象的编程语言的面向对象的三个主要特征。
https://blog.csdn.net/weixin_44138807/article/details/108102074
多态:https://blog.csdn.net/qq_53558968/article/details/116886784
C++的多态必须满足两个条件:
1 必须通过基类的指针或者引用调用虚函数
2 被调用的函数是虚函数,且必须完成对基类虚函数的重写
简单例程:
//实现多态实现;
#include虚函数、虚函数表
https://blog.csdn.net/sinat_31275315/article/details/107963408
内存管理
https://www.cnblogs.com/mrlsx/p/5411874.html
智能指针 shared_ptr/unique_ptr
https://blog.csdn.net/shaosunrise/article/details/85228823
new/delete、malloc/free
https://blog.csdn.net/qq_41709234/article/details/123265795
智能指针的使用
指针、引用
https://blog.csdn.net/daaikuaichuan/article/details/89061269
函数指针和指针函数用法和区别
函数指针和指针函数用法和区别
static
https://blog.csdn.net/qq_42564908/article/details/106466409
const
C/C++中const关键字详解
this
- this 是 C++ 中的一个关键字,也是一个 const 指针,它指向当前对象(正在使用的对象),通过它可以访问当前对象的所有成员。
- this 只能用在类的内部,通过 this 可以访问类的所有成员,包括 private、protected、public 属性的。并使用 -> 来访问成员变量或成员函数。
只能在“成员函数”中使用
this指针类型: 类类型 *const (加const是为了保证,指针的指向不被更改)
this指针不存储在对象中,不影响对象大小,且始终指向当前对象
this指针是“成员函数”的第一个隐藏参数,由编译器自动给出
allocator类
为标准库类 ,定义在头文件memory中
作用:将内存分配和对象构造分离。
不使用alloctor构造:
	std::string str{ "s" };//先创建一个string类型对象str
	std::string* ps;//创建一个指向string类型的指针
	//*ps=str;//错误,使用了未初始化的内存ps
	//原因:还未构造对象的情况下就使用原始内存是错误的,即首先要对原始内存进行初始化,使其指向一个对象后才能使用赋值,而直接让未初始化的内存指向一个地址是可以的
	ps = &str;//将str的地址赋值给ps
	std::cout << *ps << '\n';//s
	*ps="w";//此时使用值赋值时可以的,因为ps的内存已经初始化过;
	auto pw = ps;//创建一个指向string类型的指针pw,并复制地址给pw
	std::cout << *ps << '\n';//w
	std::cout << *pw << '\n';//w
使用allocator:
	std::cout << sizeof(std::string) << '\n';//40;获取string类型所占字节数
	std::allocator<std::string> alloc;
	auto const p = alloc.allocate(5);//分配5个未初始化的string
	auto q = p;//q指向p最后构造的元素之后的位置;可理解为迭代器,q=alloc.end(),而alloc.end()是alloc最后一个元素的后一块内存,而这块内存是未定义的
	auto &q2 = p;//q2是p的引用,等价于p;
	std::cout << p << '\n';//x;x为此时的指针p的输出值
	std::cout << q << '\n';//x
	alloc.construct(q++);
	std::cout << p << '\n';//x
	std::cout << *p << '\n';//*x=
	std::cout << (q-1) << '\n';//x+40-40; 注:此40为十进制,二进制则为28;
	std::cout << *(q - 1) << '\n';//*(x+40-40)=
	std::cout << q << '\n';//(x+40)

	alloc.construct(q++,10,'c');
	std::cout << p << '\n';//x
	std::cout << *(p+1) << '\n';//*(x+40)=cccccccccc
	std::cout << (p + 1) << '\n';//(x+40)
	std::cout << (q - 1) << '\n';//(x+40+40-40)
	std::cout << *(q - 1) << '\n';//*(x+40+40-40)=cccccccccc
	std::cout << q << '\n';//(x+40+40)

	alloc.construct(q++,"hi");
	std::cout << p << '\n';//x
	std::cout << *(p+2) << '\n';//*(x+40+40)=hi
	std::cout << (p + 2) << '\n';//(x+40+40)
	std::cout << (q - 1) << '\n';//(x+40+40+40-40)
	std::cout << *(q - 1) << '\n';//*(x+40+40+40-40)
	std::cout << q << '\n';//(x+40+40+40)

	alloc.deallocate(p, 5);//释放内存
size_type、size_t
https://blog.csdn.net/u012246313/article/details/44537757
map
https://blog.csdn.net/sevenjoin/article/details/81943864
multimap和struct使用
直接使用,形式如下:
std::multimap<float, type_struct> fs;
#include
#include配合指针使用:
map默认构造
#includefind、=
	std::map<std::string, int> si;
	si["d"] = 41;
	si["a"] = 11;
	si["b"] = 21;
	si["c"] = 31;

	auto mem = si["c"];//mem为“c”对应的value,为int类型的31;
	auto &mem1 = si["c"];
	std::cout << mem << std::endl;
	std::cout << mem1 << std::endl;
	//std::map::iterator iter = si.find("c");
	auto iter = si.find("c");//iter为迭代器
	std::cout << iter->first << std::endl;
	//ps:这里迭代器不能用*iter,迭代器不是地址[1]
[1] 迭代器不是地址,它是对象的一个逻辑的位置信息
ostream
https://www.coder.work/article/577324
文本查询程序
C++ primer 例程实现:文本查询
#include
if (!lines) {//若此单词为第一次遇到,此指针为空,并分配一个新的set
lines.reset(new std::set<line_no>);//p.reset(q) //q为智能指针要指向的新对象
}
lines->insert(n);//将此行号插入到set中
/* std::cout << lines << std::endl;
std::cout << word << "," << n << std::endl;*/
}
}
};
QueryResult TextQuery::query(const std::string& sought) const {
static std::shared_ptr<std::set<line_no>> nodata(new std::set<line_no>);
auto loc = wm.find(sought);
if (loc == wm.end())
return QueryResult(sought, nodata, file);
else
return QueryResult(sought, loc->second, file);
}
int main() {
std::ifstream srcfile("text.txt");//同路径下的txt文件
TextQuery tq(srcfile);
QueryResult qr=tq.query("when");
print(std::cout, qr);
}
线程
参考:C++多线程详细讲解
引用: thread
#include1.普通多线程
使用
thread t1(fun1, a);// thread t1线程实例名称 fun1调用函数 a函数输入参数
t1.join(); // join对主线程进行阻塞;
join(), 当前线程暂停, 等待指定的线程执行结束后, 当前线程再继续。th1.join(),即该语句所在的线程(该语句写在main()函数里面,即主线程内部)暂停,等待指定线程(指定线程为th1)执行结束后,主线程再继续执行。
#include几次运行结果:
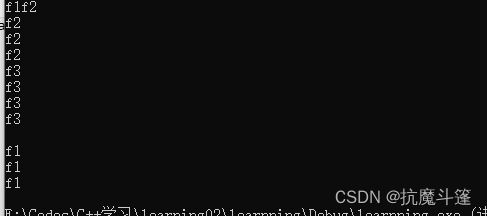
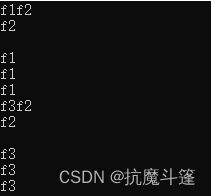
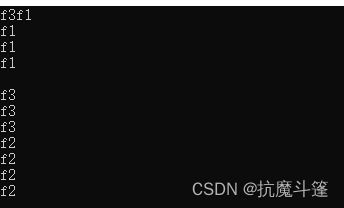
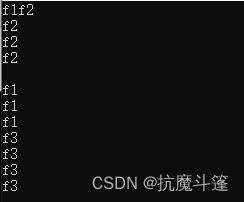
几个线程的顺序并不是调用顺序,并且没有上锁(lock),函数执行时也是互相抢占cpu执行权。
detach():
当使用detach()函数时,主调线程继续运行,被调线程驻留后台运行,主调线程无法再取得该被调线程的控制权。当主调线程结束时,由运行时库负责清理与被调线程相关的资源。
2.互斥量 \互斥锁
使用锁的原因,是一个进程内的多线程之间是数据共享的,各线程均可读写修改数据,可能导致出现错误。
如下为一个多线程的计数例程:
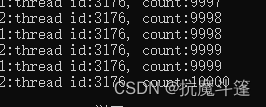
#include 但运行结果正常,多次运行也很少会出现线程间的数据干扰:
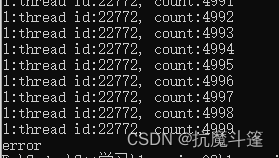
原因:现在的计算机计算速度太快了,线程之间的干扰不够严重。
需要加大线程之间的干扰力度,有一种比较重要且容易实现的手段:触发线程间切换 。
参考:Linux线程互斥与同步—互斥锁(mutex)的原理及其实现机制
知识科普
内核态:操作系统的模式,如果用户或某程序进入了内核态,那么它的权限就会不受约束,可以做任何事。操作系统向外提供系统调用接口方便进行用户态到内核态的转变。
用户态:一般用户的模式,用户或某程序在此状态下只能调用用户代码,权限受约束。当用户想调用系统接口,执行内核代码,就要从用户态变成内核态。触发线程间切换:在线程执行函数代码中多次进行系统调用,使其不断地从用户态到内核态。这样多个线程之间就会相互干扰。
一个简单的系统调用就是:printf
增加使用printf也就增加了 线程间切换,加大了线程干扰:
#include 因此要解决问题,归根结底就是要解决线程之间互相干扰的问题,从而保证临界资源的原子性。
使用互斥锁保证线程的数据安全。
2.1 lock() unlock()
需要引用并实例化
#includevoid fun1(int a)
{
m.lock(); //lock
cout << "fun1" << endl;
cout << "a" << a << endl;
cout << "a+1" << a + 1 << endl;
m.unlock();//unlock需与lock配对
}
使用 lock() unlock() 对计数例程进行修改:
#include 运行结果:
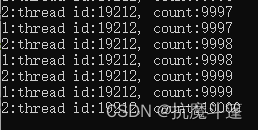
运行结果没有出现错误,两个线程在读取修改gCount变量时都保证了线程互斥。
2.2 lock_guard():
lock_guard()
lock_guard():
其原理是:声明一个局部的lock_guard对象,在其构造函数中进行加锁,在其析构函数中进行解锁。最终的结果就是:创建即加锁,作用域结束自动解锁。从而使用lock_guard()就可以替代lock()与unlock()。
void thread_count() {
    int i = 0;
    int tmp = 0;
    while (i < 5000)
    {
        lock_guard<mutex> g1(m);//用此语句替换了m.lock();lock_guard传入一个参数时,该参数为互斥量,此时调用了lock_guard的构造函数,申请锁定m
        tmp = gCount;

        i++;
        printf("1:thread id:%u, count:%d \n",std::this_thread::get_id(), gCount);
        gCount = tmp + 1;
        printf("2:thread id:%u, count:%d \n", std::this_thread::get_id(), gCount);

    }
    //printf("error");
}
2.3 unique_lock
unique_lock类似于lock_guard,只是unique_lock用法更加丰富,同时支持lock_guard()的原有功能。
使用lock_guard后不能手动lock()与手动unlock();使用unique_lock后可以手动lock()与手动unlock();
unique_lock的第二个参数,除了可以是adopt_lock,还可以是try_to_lock与defer_lock;
try_to_lock:尝试去锁定,得保证锁处于unlock的状态,然后尝试现在能不能获得锁;尝试用mutx的lock()去锁定这个mutex,但如果没有锁定成功,会立即返回,不会阻塞在那里。
defer_lock: 始化了一个没有加锁的mutex;
void thread_count() {
    int i = 0;
    int tmp = 0;
    while (i < 5000)
    {
        unique_lock<mutex> g1(m, defer_lock);//始化了一个没有加锁的mutex
        g1.lock();
        tmp = gCount;

        i++;
        printf("1:thread id:%u, count:%d \n",std::this_thread::get_id(), gCount);
        gCount = tmp + 1;
        printf("2:thread id:%u, count:%d \n", std::this_thread::get_id(), gCount);
        g1.unlock();
    }
    //printf("error");
}
3.异步线程
C++并发编程之线程异步 std::future知识点总结
包含头文件#include
async是一个函数模板,用来启动一个异步任务,它返回一个future类模板对象,future对象起到了占位的作用,刚实例化的future是没有储存值的,但在调用future对象的get()成员函数时,主线程会被阻塞直到异步线程执行结束,并把返回结果传递给future,即通过FutureObject.get()获取函数返回值。
#include 总体来说异步线程时比较灵活的,个人认为相较于同步多线程来说使用更加方便高效,在工程中可以较多使用。
遇到的问题:
在类中实现异步线程时:
error:invalid use of non-static member function
解决方法:invalid use of non-static member function
遇到的问题记录:
搭建开发环境
https://zhuanlan.zhihu.com/p/122956974
一个类的对象不能访问该类的私有函数和成员
使用类的代码不可以访问带有 private 标号的成员。private 封装了类型的实现细节。只能在内部使用,规则的设立是为了防止数据泄漏,你想象要是这样你能访问不就是说在外面就能引用乃至修改了,这是不允许的。private在定义类的时候,其类型只能由类的成员函数使用,这样如果类中没有相应的函数,在外面是获取不到该值的。
要想访问private成员,需要在类中定义public成员函数,在该函数里访问private成员。
(通过基类指针只能访问派生类的成员变量,但是不能访问派生类的成员函数)
例:
#include m_name、m_age、m_score都是pravite成员,定义一个public成员函数show()即可访问pravite成员。
变量 “using” 不是类型名
1.可能原因:
文件名后缀不正确,在test.c文件中使用using namespace std;即报错
将后缀改为.cpp文件错误消除
vscode中头文件的引用
在一个工程(或功能包)文件中,引用头文件需要配置c_cpp_properties.json文件(除非将cpp文件和h文件都放在一个src下)。
在"includePath":[]中加入:
"${workspaceFolder}/xxx/include/**"
{workspaceFolder}为工作空间索引,xxx为工程文件(功能包名称),include为头文件存放文件夹,**为包含所有。
C++ 头文件理解
个人简单理解其作用为
如:头文件 h1.h有声明函数fun1()。在src1.cpp中包含了头文件h1.h, 并且定义了两个函数fun1()、fun2(),那么src1.cpp中的fun1()就是对h1.h中的fun1()进行了定义。src2.cpp包含h1.h, 则其可直接使用fun1()函数,而函数fun2()对于src2.cpp而言是未定义的。
代码例程:
head01.h
#pragma once //保证头文件只被编译一次。
#includesrc01.cpp
#include "head01.h"
void PrintStudent(student s){
    s.ShowInfo();
}
void PrintHello() {
    printf("hello_world");
}
src02.cpp
#include"head01.h"
int main()
{
    student s1;
    s1.name = "xiaoming";
    PrintStudent(s1);
    s1.ShowInfo();
    PrintHello();
}
更多参考:https://zhuanlan.zhihu.com/p/387773355
随机数生成
#include 静态成员函数、成员初始化
#include
cout << "/";
cout << a.x; //正确
cout << "/";
}
A b;//b定义在函数体之外,内置类型或复合类型变量将被初始化0
int main(int argc, char const* argv[])
{
A a;//对于函数体内的内置类型的对象,若没有初始化,其值是未定义的,即a的成员未定义;
b.f(b);//正确
//a.f(a);//错误,a未初始化
a.f(A());//等价于 a.f(A::A()); 默认构造函数初始化
system("pause");
return 0;
}
参考:https://www.cnblogs.com/coding-wtf/p/5786854.html
变量、结构体等初始化问题
结构体:C++中,没有检测结构体中成员变量是否已经赋值的较好办法,所以如要保证安全性,可以在结构体加入默认构造函数避免结构体初始化但成员未赋值导致程序报错。或者将结构体在全局定义中初始化,结构体的成员自动初始化为0、空和false。
变量:对于变量,若定义为局部变量,初始化时未赋值,则其将保持未赋值状态,使用时需注意可能需要手动赋值;若定义为全局变量,全局变量会默认初始化为0 空 和 false。
容器:容器不管是全局变量还是局部变量都会自动初始化为0、空和false。
参考:https://www.cnblogs.com/ericling/p/11897771.html
linux中使用g++编译出现问题
g++ xxx.h: 没有那个文件或目录
一个可能出现的情况是,已经在vscode中的c_cpp_properties.json设置了包含头文件的路径,但这只是设置了vscode的自动补齐,也即在vscode中不会报告头文件错误,但使用g++编译头文件仍会报错,因为g++默认头文件的路径中不包含你的头文件,解决办法1是编译时设置头文件路径:
g++ code01.cpp -o code01 -I /home/xia/mydemo01_ws/src/cpp_learnning/include
其中/home/xia/mydemo01_ws/src/cpp_learnning/include为code01.cpp中包含的头文件的完整路径。
"xxx"找不到标识符 (xxx为自定义的函数)
这种情况可能的一种原因是函数定义顺序的问题,如:
需要自定义两个函数A和B,其中B使用了函数A,则需要先定义A,再定义B,否则会报错;
先定义B,而B使用了函数A,但是此时A未定义,则会报错“找不到表示符”。
没有与参数列表匹配的构造函数
1.可能的原因为 函数使用正确,如:
//调用 fun1 错误,报错:没有与参数列表匹配的构造函数
int  fun1(a);
//调用 fun1 正确
int fa = fun1(a);
conflicting declaration/redeclared as different kind of entity
redeclared as different kind of entity:
一般得原因是声明定义了两个同名得不同变量对象等;
如:
std::string a{"aaa"};
....
int a=1; //此处会报错 conflicting declaration/redeclared as different kind of entity
conflicting declaration:
可能是重复定义/调用构造函数不正确;
例:先定义一个类A
class A{
    private:
        std::string m_name;
    public:
        A(const std::string &name = "");
};

A::A(const std::string& name):m_name(name){
    std::cout << " m_name " << m_name << std::endl;
}
如果这样始化一个A对象a:
std::string a{"x"};
A a;//此处会报错 conflicting declaration
这样初始化:
std::string a{"x"};
A a();//此处会报错redeclared as different kind of entity
42ERROR: AddressSanitizer: heap-buffer-overflow on address
leetcode上的报错:堆缓冲区溢出
=================================================================
42ERROR: AddressSanitizer: heap-buffer-overflow on address 0x603000000028 at pc 0x00000034bdb5 bp 0x7fff269ac5d0 sp 0x7fff269ac5c8
READ of size 4 at 0x603000000028 thread T0
#2 0x7faca7d18082 (/lib/x86_64-linux-gnu/libc.so.6+0x24082)
0x603000000028 is located 0 bytes to the right of 24-byte region [0x603000000010,0x603000000028)
allocated by thread T0 here:
#7 0x7faca7d18082 (/lib/x86_64-linux-gnu/libc.so.6+0x24082)
Shadow bytes around the buggy address:
0x0c067fff7fb0: 00 00 00 00 00 00 00 00 00 00 00 00 00 00 00 00
0x0c067fff7fc0: 00 00 00 00 00 00 00 00 00 00 00 00 00 00 00 00
0x0c067fff7fd0: 00 00 00 00 00 00 00 00 00 00 00 00 00 00 00 00
0x0c067fff7fe0: 00 00 00 00 00 00 00 00 00 00 00 00 00 00 00 00
0x0c067fff7ff0: 00 00 00 00 00 00 00 00 00 00 00 00 00 00 00 00
=>0x0c067fff8000: fa fa 00 00 00[fa]fa fa fa fa fa fa fa fa fa fa
0x0c067fff8010: fa fa fa fa fa fa fa fa fa fa fa fa fa fa fa fa
0x0c067fff8020: fa fa fa fa fa fa fa fa fa fa fa fa fa fa fa fa
0x0c067fff8030: fa fa fa fa fa fa fa fa fa fa fa fa fa fa fa fa
0x0c067fff8040: fa fa fa fa fa fa fa fa fa fa fa fa fa fa fa fa
0x0c067fff8050: fa fa fa fa fa fa fa fa fa fa fa fa fa fa fa fa
Shadow byte legend (one shadow byte represents 8 application bytes):
Addressable: 00
Partially addressable: 01 02 03 04 05 06 07
Heap left redzone: fa
Freed heap region: fd
Stack left redzone: f1
Stack mid redzone: f2
Stack right redzone: f3
Stack after return: f5
Stack use after scope: f8
Global redzone: f9
Global init order: f6
Poisoned by user: f7
Container overflow: fc
Array cookie: ac
Intra object redzone: bb
ASan internal: fe
Left alloca redzone: ca
Right alloca redzone: cb
Shadow gap: cc
42ABORTING
可能的错误情况:
- 这是题 剑指 Offer 53 - I. 在排序数组中查找数字 I
class Solution {
public:
    int search(vector<int>& nums, int target) {
        int l =0;
        int r = nums.size();

        while(l<=r){
            int mid = int((l+r)/2);
            if(nums[mid]<target){
                l = mid+1;
            }
            else if(nums[mid]==target){
                if(nums[l]==target&&nums[r]==target){
                    return r-l+1;
                }
                if(nums[l]!=target){
                    l++;
                }
                if(nums[r]!=target){
                    r--;
                }
            }
            else if(nums[mid]>target){
                r = mid-1;
            }
        }
        return 0;
    }
};
上面提交就会报错,原因是定义了 int r = nums.size(); r 是 数组的左边界,但左边界的实际下标应该为int r = nums.size()-1;所以就会报错;
undefined reference to `vtable for xxx’
虚函数必须定义(纯虚函数除外)
实例
C++简易计算器
C++ 简易计算器 实现简易表达式计算


