AI学习(五):用tensorflow object detection 训练自己的数据集
0.前言
本章,我们来制作周杰伦的图片检测,先看一下效果


检测效果还是不错的,这里我使用了100张train图片和50张test图片进行标注(标注图片的时候尽量找清楚的,不要找一些犄角旮旯的,我吃过亏的,训练效果很不好),训练步数40000+,batch size=24。接下来我们开始吧。
1.labellmg的下载和使用
对下载好的jpg格式的图片进行标注,期间,需要下载labellmg。下载地址:https://github.com/tzutalin/labelImg/releases

下载下来后是一个压缩文件,这是一款绿色软件,解压缩后,打开就能用。根据视频做好标注。
我是在object_detection文件夹下建了一个叫images的文件夹,在文件夹里,我分别建了一个叫train和test的文件,把train和test的图片分别放在了里面。然后进行的标注。

电脑切换到英文输入法,按下“w”,就会出现十字框。然后对你想标注的对象进行标注。

这就是标注的结果。生成了XML文件。
2.生成CSV文件
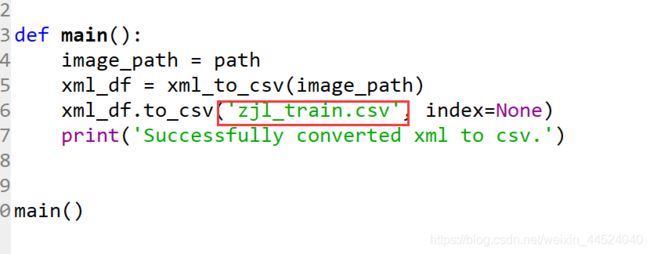
打开spyder,新建文件,将下面这段代码输入进去,重命名为xml_to_csv
# -*- coding: utf-8 -*-
"""
Created on Tue Jan 16 00:52:02 2018
@author: Xiang Guo
"""

import os
import glob
import pandas as pd
import xml.etree.ElementTree as ET

os.chdir('F:\\ML\\models-master\\research\\object_detection\\images\\train')
path = 'F:\\ML\\models-master\\research\\object_detection\\images\\train'

def xml_to_csv(path):
    xml_list = []
    for xml_file in glob.glob(path + '/*.xml'):
        tree = ET.parse(xml_file)
        root = tree.getroot()
        for member in root.findall('object'):
            value = (root.find('filename').text,
                     int(root.find('size')[0].text),
                     int(root.find('size')[1].text),
                     member[0].text,
                     int(member[4][0].text),
                     int(member[4][1].text),
                     int(member[4][2].text),
                     int(member[4][3].text)
                     )
            xml_list.append(value)
    column_name = ['filename', 'width', 'height', 'class', 'xmin', 'ymin', 'xmax', 'ymax']
    xml_df = pd.DataFrame(xml_list, columns=column_name)
    return xml_df


def main():
    image_path = path
    xml_df = xml_to_csv(image_path)
    xml_df.to_csv('zjl_train.csv', index=None)
    print('Successfully converted xml to csv.')


main()

绿色的路径是要对应到你的train文件和test文件的,生成train的csv时候是…\train,生成test的csv文件的时候是…\test.
这里选择你想生成的文件的名字。点击下图标红的按钮。

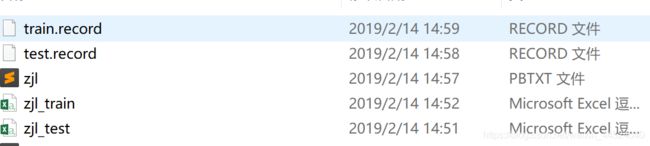
最终我在train文件夹中生成了 zjl_train.csv,在test文件夹中生成了zjl_test.csv。
3.生成record文件。
把刚刚生成的train.csv和test.csv文件复制到object_detection文件下的data文件中
打开spyder,复制下面代码,保存命名为generate_tfr.py。
# -*- coding: utf-8 -*-
"""
Created on Tue Jan 16 01:04:55 2018
@author: Xiang Guo
"""

"""
Usage:
  # From tensorflow/models/
  # Create train data:
  python generate_tfr.py --csv_input=data/zjl_train.csv  --output_path=data/train.record
  # Create test data:
  python generate_tfr.py --csv_input=data/zjl_test.csv  --output_path=data/test.record
"""


import os
import io
import pandas as pd
import tensorflow as tf

from PIL import Image
from object_detection.utils import dataset_util
from collections import namedtuple, OrderedDict

os.chdir('F:\\ML\\models-master\\research\\object_detection\\')

flags = tf.app.flags
flags.DEFINE_string('csv_input', '', 'Path to the CSV input')
flags.DEFINE_string('output_path', '', 'Path to output TFRecord')
FLAGS = flags.FLAGS


# TO-DO replace this with label map
def class_text_to_int(row_label):
    if row_label == 'zjl':
        return 1
    else:
        None


def split(df, group):
    data = namedtuple('data', ['filename', 'object'])
    gb = df.groupby(group)
    return [data(filename, gb.get_group(x)) for filename, x in zip(gb.groups.keys(), gb.groups)]


def create_tf_example(group, path):
    with tf.gfile.GFile(os.path.join(path, '{}'.format(group.filename)), 'rb') as fid:
        encoded_jpg = fid.read()
    encoded_jpg_io = io.BytesIO(encoded_jpg)
    image = Image.open(encoded_jpg_io)
    width, height = image.size

    filename = group.filename.encode('utf8')
    image_format = b'jpg'
    xmins = []
    xmaxs = []
    ymins = []
    ymaxs = []
    classes_text = []
    classes = []

    for index, row in group.object.iterrows():
        xmins.append(row['xmin'] / width)
        xmaxs.append(row['xmax'] / width)
        ymins.append(row['ymin'] / height)
        ymaxs.append(row['ymax'] / height)
        classes_text.append(row['class'].encode('utf8'))
        classes.append(class_text_to_int(row['class']))

    tf_example = tf.train.Example(features=tf.train.Features(feature={
        'image/height': dataset_util.int64_feature(height),
        'image/width': dataset_util.int64_feature(width),
        'image/filename': dataset_util.bytes_feature(filename),
        'image/source_id': dataset_util.bytes_feature(filename),
        'image/encoded': dataset_util.bytes_feature(encoded_jpg),
        'image/format': dataset_util.bytes_feature(image_format),
        'image/object/bbox/xmin': dataset_util.float_list_feature(xmins),
        'image/object/bbox/xmax': dataset_util.float_list_feature(xmaxs),
        'image/object/bbox/ymin': dataset_util.float_list_feature(ymins),
        'image/object/bbox/ymax': dataset_util.float_list_feature(ymaxs),
        'image/object/class/text': dataset_util.bytes_list_feature(classes_text),
        'image/object/class/label': dataset_util.int64_list_feature(classes),
    }))
    return tf_example


def main(_):
    writer = tf.python_io.TFRecordWriter(FLAGS.output_path)
    path = os.path.join(os.getcwd(), 'images/train')
    examples = pd.read_csv(FLAGS.csv_input)
    grouped = split(examples, 'filename')
    for group in grouped:
        tf_example = create_tf_example(group, path)
        writer.write(tf_example.SerializeToString())

    writer.close()
    output_path = os.path.join(os.getcwd(), FLAGS.output_path)
    print('Successfully created the TFRecords: {}'.format(output_path))


if __name__ == '__main__':
    tf.app.run()
注意第99行,这里时提取test和train的csv的路径,
1.生成test.Record,如图红框位置,你要改成’images/test’,保存,然后在anaconda prompt中在object_detection文件夹下运行 :
python generate_tfr.py --csv_input=images/train/chair_train.csv --output_path=data/train.record
这说明是从data文件下提取test.csv文件,同时在data文件下输出test.record
2.生成test.Record,如图红框位置,你要改成’images/train’,保存,然后在anaconda prompt中在object_detection文件夹下运行:
python generate_tfr.py --csv_input=images/test/chair_test.csv --output_path=data/test.record
这说明是从data文件下提取train.csv文件,同时在data文件下输出train.record

这时候你就看到了在data文件下分别生成了test.record和train.record。如下图所示。

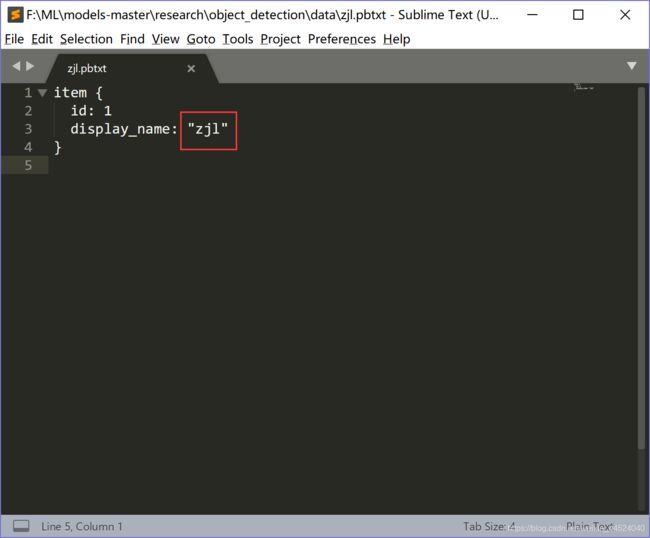
这里有好多label map,随便找一个在这个文件夹下复制粘贴,重命名为“zjl”,打开zjl,将下面的全部删除(你想想出现几个种类就留下几个item),更改红框位置的名称。
4.配置训练文件
我下载了一个app,sublime text,百度直接下载就行,就是一个记事本打开用的。下载完后打开,将下面的代码复制进去,重命名为ssd_mobilenet_v1_coco,在object_detection文件夹下新建一个文件夹,重命名为training,将ssd_mobilenet_v1_coco保存到training中。

修改你希望的种类数量,这里修改为1.
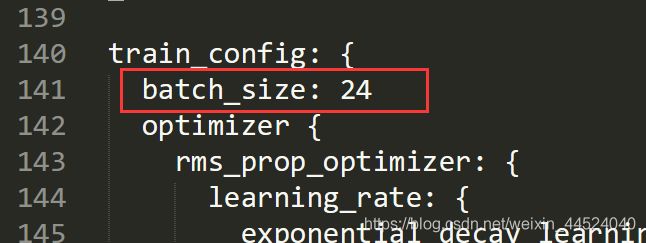
batch_size我是修改为24,数字越大越容易收敛,训练速度越慢。网上有说为了先尝试一下修改为1的,但是我就出问题了,所以我修改为24,问题解决。

注意修改上图中标注的位置的路径
# SSD with Mobilenet v1 configuration for MSCOCO Dataset.
# Users should configure the fine_tune_checkpoint field in the train config as
# well as the label_map_path and input_path fields in the train_input_reader and
# eval_input_reader. Search for "PATH_TO_BE_CONFIGURED" to find the fields that
# should be configured.

model {
  ssd {
    num_classes: 1
    box_coder {
      faster_rcnn_box_coder {
        y_scale: 10.0
        x_scale: 10.0
        height_scale: 5.0
        width_scale: 5.0
      }
    }
    matcher {
      argmax_matcher {
        matched_threshold: 0.5
        unmatched_threshold: 0.5
        ignore_thresholds: false
        negatives_lower_than_unmatched: true
        force_match_for_each_row: true
      }
    }
    similarity_calculator {
      iou_similarity {
      }
    }
    anchor_generator {
      ssd_anchor_generator {
        num_layers: 6
        min_scale: 0.2
        max_scale: 0.95
        aspect_ratios: 1.0
        aspect_ratios: 2.0
        aspect_ratios: 0.5
        aspect_ratios: 3.0
        aspect_ratios: 0.3333
      }
    }
    image_resizer {
      fixed_shape_resizer {
        height: 300
        width: 300
      }
    }
    box_predictor {
      convolutional_box_predictor {
        min_depth: 0
        max_depth: 0
        num_layers_before_predictor: 0
        use_dropout: false
        dropout_keep_probability: 0.8
        kernel_size: 1
        box_code_size: 4
        apply_sigmoid_to_scores: false
        conv_hyperparams {
          activation: RELU_6,
          regularizer {
            l2_regularizer {
              weight: 0.00004
            }
          }
          initializer {
            truncated_normal_initializer {
              stddev: 0.03
              mean: 0.0
            }
          }
          batch_norm {
            train: true,
            scale: true,
            center: true,
            decay: 0.9997,
            epsilon: 0.001,
          }
        }
      }
    }
    feature_extractor {
      type: 'ssd_mobilenet_v1'
      min_depth: 16
      depth_multiplier: 1.0
      conv_hyperparams {
        activation: RELU_6,
        regularizer {
          l2_regularizer {
            weight: 0.00004
          }
        }
        initializer {
          truncated_normal_initializer {
            stddev: 0.03
            mean: 0.0
          }
        }
        batch_norm {
          train: true,
          scale: true,
          center: true,
          decay: 0.9997,
          epsilon: 0.001,
        }
      }
    }
    loss {
      classification_loss {
        weighted_sigmoid {
        }
      }
      localization_loss {
        weighted_smooth_l1 {
        }
      }
      hard_example_miner {
        num_hard_examples: 3000
        iou_threshold: 0.99
        loss_type: CLASSIFICATION
        max_negatives_per_positive: 3
        min_negatives_per_image: 0
      }
      classification_weight: 1.0
      localization_weight: 1.0
    }
    normalize_loss_by_num_matches: true
    post_processing {
      batch_non_max_suppression {
        score_threshold: 1e-8
        iou_threshold: 0.6
        max_detections_per_class: 100
        max_total_detections: 100
      }
      score_converter: SIGMOID
    }
  }
}

train_config: {
  batch_size: 24
  optimizer {
    rms_prop_optimizer: {
      learning_rate: {
        exponential_decay_learning_rate {
          initial_learning_rate: 0.0004
          decay_steps: 800720
          decay_factor: 0.95
        }
      }
      momentum_optimizer_value: 0.9
      decay: 0.9
      epsilon: 1.0
    }
  }
  # Note: The below line limits the training process to 200K steps, which we
  # empirically found to be sufficient enough to train the pets dataset. This
  # effectively bypasses the learning rate schedule (the learning rate will
  # never decay). Remove the below line to train indefinitely.
  num_steps: 200000
  data_augmentation_options {
    random_horizontal_flip {
    }
  }
  data_augmentation_options {
    ssd_random_crop {
    }
  }
}

train_input_reader: {
  tf_record_input_reader {
    input_path: "data/train.record"
  }
  label_map_path: "data/zjl.pbtxt"
}

eval_config: {
  num_examples: 8000
  # Note: The below line limits the evaluation process to 10 evaluations.
  # Remove the below line to evaluate indefinitely.
  max_evals: 10
}

eval_input_reader: {
  tf_record_input_reader {
    input_path: "data/test.record"
  }
  label_map_path: "data/zjl.pbtxt"
  shuffle: false
  num_readers: 1
}
5.准备训练
然后在object_detection文件夹下运行:
python train.py --logtostderr --train_dir=training/ --pipeline_config_path=training/ssd_mobilenet_v1_coco.config
从现在开始,开始训练。
这里我使用了100+train和50+test张照片,训练步数40000+

再在object_detection打开,输入tensorboard --logdir=training

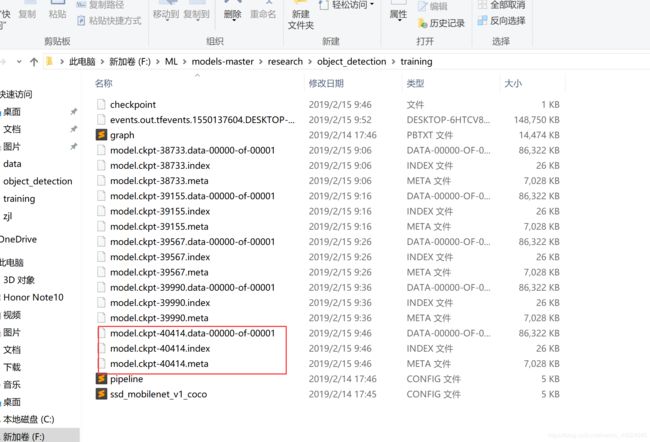
我是训练到40000步+然后就停止了,直接点击"×"号,就能停止训练。
6.测试结果

在object_detection中新建一个文件夹,将名字命名为“zjl_detection”
打开training文件夹,我们会看到有新生成的文件。Anaconda Prompt 定位到 models\research\object_detection 文件夹下,运行
python export_inference_graph.py \ --input_type image_tensor \ --pipeline_config_path training\ssd_mobilenet_v1_coco.config \ --trained_checkpoint_prefix training/model.ckpt-40414 \ --output_directory zjl_detection

40414这个数字要修改成training文件夹中对应的最大数字,zjl_detection要对应到刚刚新建好的文件夹的名称。
回车后,命令开始运行,运行结束后zjl_detection生成新的文件。

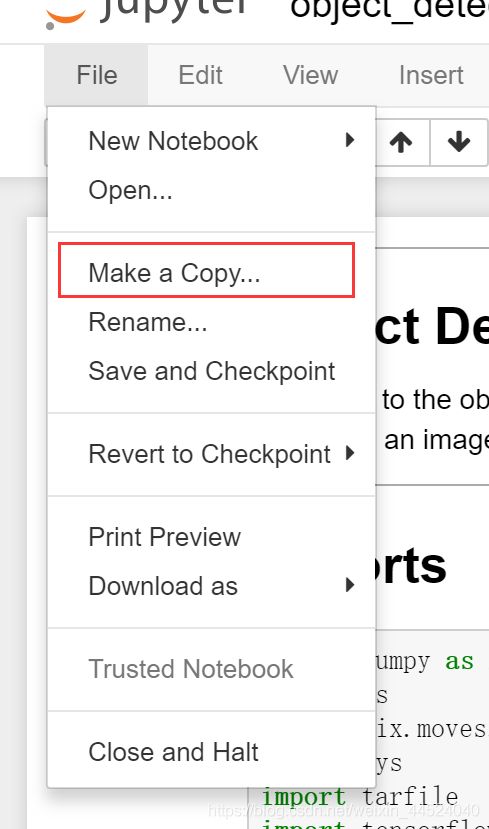
Anaconda Prompt 定位到 models\research\object_detection 文件夹下,运行jupyter notebook。打开自带的object_detection_tutorial.ipynb,打开后复制一下这个文件,重命名为zjl(最好不要出现中文哦)。
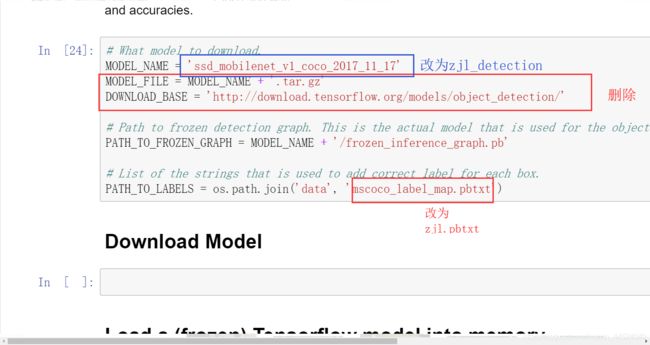
从网上下载几张周杰伦的图片,放入object_detection/test_images中,重命名为image1 ,image2。。。。。。


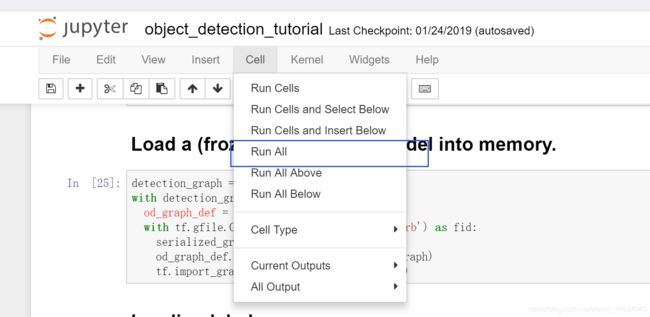
点击run all,开始运行。会等待一段时间。
运行结束。
补充
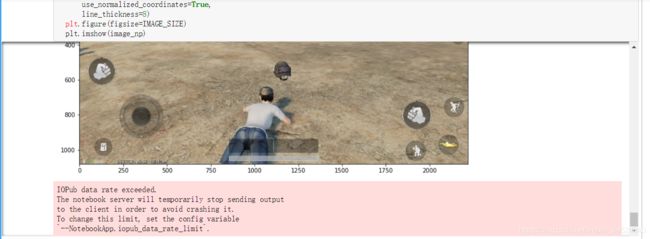
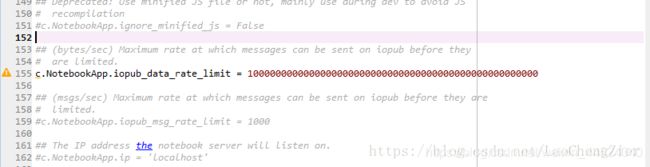
运行程序最后,可能会出现这种问题。在anaconda prompt中输入:jupyter notebook --generate-config,可以看到生成一个路径

找到对应路径下的文件,从中找到iopub_data_rate_limit,在去掉注释后多加好多0得意
重新启动jupyter notebook,即可看到原先报错的内容可以显示啦