yolo制作数据集 小记
b站:目标检测 YOLOv5 开源代码项目调试与讲解实战【土堆 x 布尔艺数】保姆式教学,对小白帮助颇多。
跟着视频最后用4张图训练识别汽车,因为数据太小,结果没有识别出来,主要是学习方法。
本小记 为自制数据集训练及github中Train Custom Data总结笔记


—————————————————————————————————————————————
小记总结
1.用labelimg打框,(注意 创建的class顺序),可以把生成的txt 与图片先放在一个文件夹里,全部打完后,剪切进labels/train
2.创建自己的 .yaml (mydata.yaml) 。将data下的coco128.yaml或者其他的 ,另存为mydata.yaml,再点进去 进行修改。
1)修改 图片路径
2)修改类 数
3)修改 类别

3.修改train.py
1)weight 的default=''
2)cfg的 选择合适的(5s/5m/5l/或这其他的)
3)data的 复制 第2步中创建的mydata.yaml的路径

4.运行
————————————————————————————————————————————
下面分步总结视频内容
1. Create dataset.yaml创建数据集(先跳过)
1)the dataset root directory path (指定数据集根目录)
and relative paths to train / val / test image directories (or *.txt files with image paths), 训练集/验证集/测试集文件的相对路径
2) the number of classes nc 有多少类
3) a list of class names:类分别是什么
.yaml如下:
path: ../datasets/coco128    # dataset root dir`(数据集根目录)
train: images/train2017  # train images (relative to 'path') 128 images`(路径)
val: images/train2017  # val images (relative to 'path') 128 images`(路径)
test:  # test images (optional)`(路径)
nc: 80  # number of classes(80个类)
names: [ 'person', 'bicycle', 'car', 'motorcycle', 'airplane', 'bus', 'train', 'truck', 'boat', 'traffic light',
         'fire hydrant', 'stop sign', 'parking meter', 'bench', 'bird', 'cat', 'dog', 'horse', 'sheep', 'cow',
         'elephant', 'bear', 'zebra', 'giraffe', 'backpack', 'umbrella', 'handbag', 'tie', 'suitcase', 'frisbee',
         'skis', 'snowboard', 'sports ball', 'kite', 'baseball bat', 'baseball glove', 'skateboard', 'surfboard',
         'tennis racket', 'bottle', 'wine glass', 'cup', 'fork', 'knife', 'spoon', 'bowl', 'banana', 'apple',
         'sandwich', 'orange', 'broccoli', 'carrot', 'hot dog', 'pizza', 'donut', 'cake', 'chair', 'couch',
         'potted plant', 'bed', 'dining table', 'toilet', 'tv', 'laptop', 'mouse', 'remote', 'keyboard', 'cell phone',
         'microwave', 'oven', 'toaster', 'sink', 'refrigerator', 'book', 'clock', 'vase', 'scissors', 'teddy bear',
         'hair drier', 'toothbrush' ]  # class names
2. Create Labels创建标签 得到txt(就是通过打框软件 打框后导出图片对应txt文件)
One row per object 每一行代表一个目标
Each row is class x_center y_center width height format.(x中心 y中心 宽度 高度)
Box coordinates must be in normalized xywh format (from 0 - 1). 每个标注要归一化到(0-1)之间
If your boxes are in pixels, divide x_center and width by image width, and y_center and height by image height.如果是像素,x的中心坐标除图片的宽度,y的中心坐标除图片的高度
Class numbers are zero-indexed (start from 0)

3. Organize Directories
创建一个images文件夹放图,一个labels文件夹放标注
../datasets/coco128/images/im0.jpg # 放image
../datasets/coco128/labels/im0.txt # 放label

回头写 第1节 .yaml

复制一个coco128.yaml 重命名为mydata.yaml
把mydata.yaml 中的下载部分删掉


修改训练数据集路径


val验证数据集暂时没有,先用 训练数据集代替

类别个数修改


打开train.py修改程序

训练结果在(runs/train)
——————————————————————————————————————————
测试一下训练的结果(数据太少并没成功,视频弹幕中有人识别出了一个)
复制best.pt的路径,打开detect.py,
1)修改weights权重
2)先用训练的图片测试


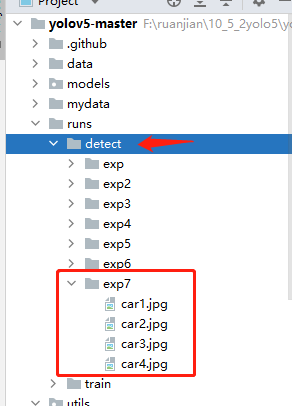
结果在(runs/detect)

还是建议用labelimg
补充:使用labelme打标得到的是json,(用labelimg 选好打框格式yolo出的是txt)
新建一个程序,将json导出为txt.之后还需要自己创建一个classes.txt。
import os
import json
import numpy as np

dir_json ='F:/ruanjian/10_5_2yolo5/yolov5-liu/yolov5-master/mydata/labels/train_json/'  # json存储的文件目录
dir_txt = 'F:/ruanjian/10_5_2yolo5/yolov5-liu/yolov5-master/mydata/labels/train_json/'  # txt存储目录
if not os.path.exists(dir_txt):
    os.makedirs(dir_txt)
list_json = os.listdir(dir_json)


def json2txt(path_json, path_txt):  # 可修改生成格式
    with open(path_json, 'r') as path_json:
        jsonx = json.load(path_json)
        with open(path_txt, 'w+') as ftxt:
            for shape in jsonx['shapes']:
                label = str(shape['label']) + ' '
                xy = np.array(shape['points'])
                strxy = ''
                for m, n in xy:
                    m = int(m)
                    n = int(n)
                    strxy += str(m) + ' ' + str(n) + ' '

                label += strxy
                ftxt.writelines(label + "\n")


for cnt, json_name in enumerate(list_json):
    print('cnt=%d,name=%s' % (cnt, json_name))
    path_json = dir_json + json_name
    path_txt = dir_txt + json_name.replace('.json', '.txt')
    json2txt(path_json, path_txt)
补充:
train.py
parser.add_argument('--weights', type=str, default='weights/yolov5s.pt', help='initial weights path')
parser.add_argument('--cfg', type=str, default='models/yolov5s_back.yaml', help='model.yaml path')
parser.add_argument('--data', type=str, default='data/back.yaml', help='data.yaml path')
parser.add_argument('--hyp', type=str, default='data/hyp.scratch.yaml', help='hyperparameters path')
parser.add_argument('--epochs', type=int, default=100)
parser.add_argument('--batch-size', type=int, default=8, help='total batch size for all GPUs')
parser.add_argument('--img-size', nargs='+', type=int, default=[640, 640], help='[train, test] image sizes')
自己做背部数据集
训练train.py:
–cfg 自己建 yolov5s_back.yaml
# parameters
nc: 1  # number of classes
depth_multiple: 0.33  # model depth multiple
width_multiple: 0.50  # layer channel multiple
–data自己建 back.yaml(图片路径再这修改)
train:F://ruanjian//10_5_2yolo5//yolov5-5.0//yolov5-5.0//mydata//images//train  # 16551 images
val: F://ruanjian//10_5_2yolo5//yolov5-5.0//yolov5-5.0//mydata//images//val  # 4952 images

# number of classes
nc: 1

# class names
names: [ 'back' ]
测试效果detect.py:
    parser.add_argument('--weights', nargs='+', type=str, default='C:\\Users\\LTX\\yolov5-5.0\\runs\\train\\exp4\\weights\\best.pt', help='model.pt path(s)')
    parser.add_argument('--source', type=str, default='VOCdevkit/images/val/35.JPG', help='source')  # file/folder, 0 for webcam
    parser.add_argument('--img-size', type=int, default=640, help='inference size (pixels)')
    parser.add_argument('--conf-thres', type=float, default=0.25, help='object confidence threshold')
    parser.add_argument('--iou-thres', type=float, default=0.45, help='IOU threshold for NMS')
    parser.add_argument('--device', default='', help='cuda device, i.e. 0 or 0,1,2,3 or cpu')

