使用pytorch构建基于VGG16的网络实现Cifar10分类
使用pytorch构建基于VGG16的网络实现Cifar10分类
pytorch是当前比较流行的框架,可以用来构建和训练网络模型。为了能够上手pytorch记录一下如何使用来搭建网络、训练以及预测。
VGG16是一个sequence结构的网络,搭建起来难度不高,很适合上手学习,本文着重如何搭建和训练,对于一些neural network的常用知识(前向、反向传播原理等)不再赘述。另结合图文来记录pytorch的学习。
对框架的介绍这篇文档不再记录。下载pytorch也只需要一行命令即可完成,建议去官网寻找下载方式。下面是下载方式:
//pytorch官网
https://pytorch.org/get-started/locally/

//cpu版本下载;工具conda
conda install pytorch torchvision torchaudio cpuonly -c pytorch

//gpu cuda11.6;工具conda
conda install pytorch torchvision torchaudio cudatoolkit=11.6 -c pytorch -c conda-forge
1 神经网络的训练过程
训练神经网络并用于预测的步骤大致分为以下几步:
1)首先定义神经网络。如网络都有哪些层,这些层之间的连接方式等。
2)迭代将数据分批次的输入。
3)有神经网络计算得到输出。
4)有输出和“真实值”计算损失。
5)反向传递梯度回到网络的参数。
6)根据反向传播的梯度来更新网络的权重参数。
2 定义VGG16网络结构
pytorch已经包含了诸多的网络结构,可以直接导入来使用。这里来使用torch手工搭建不使用内置模块。定义网络结构主要使用torch的nn,以及nn模块下的functional模块。
在搭建之前首先来看一下VGG16的网路结构图,可以看到网络主要包含卷积和全连接,卷积之后跟着池化,每个隐藏层的激活都是用relu,通道数不断增加直到512这样能提取到更多信息,而全连接的数量为经验值可以更改,由此看出VGG16是一种简单的sequence结构。
分析完VGG16的结构,下面使用pytorch来搭建网络。下面的代码就是完全按照上图的结构来搭建的,输入图像的尺寸大小为224*224(cifar10数据集的图像尺寸为 3×32×32,因此需要注意修改第一个fc层的参数)
class _VGG16_(nn.Module):

    def __init__(self):
        super(_VGG16_, self).__init__()
        self.conv1_1 = nn.Conv2d(3, 64, 3)
        self.conv1_2 = nn.Conv2d(64, 64, 3, stride=1, padding=1)            # 假设输入图像的尺寸为7*224*224
        self.max_pooling_1 = nn.MaxPool2d(2, stride=2, padding=1)           # 112 * 64 * 64

        self.conv2_1 = nn.Conv2d(64, 128, 3)
        self.conv2_2 = nn.Conv2d(128, 128, 3, stride=1, padding=1)
        self.max_pooling_2 = nn.MaxPool2d(2, stride=2, padding=1)           # 56 * 128 * 128

        self.conv3_1 = nn.Conv2d(128, 256, 3)
        self.conv3_2 = nn.Conv2d(256, 256, 3, stride=1, padding=1)
        self.conv3_3 = nn.Conv2d(256, 256, 3, stride=1, padding=1)
        self.max_pooling_3 = nn.MaxPool2d(2, stride=2, padding=1)           # 28 * 256 * 256

        self.conv4_1 = nn.Conv2d(256, 512, 3)
        self.conv4_2 = nn.Conv2d(512, 512, 3, stride=1, padding=1)
        self.conv4_3 = nn.Conv2d(512, 512, 3, stride=1, padding=1)
        self.max_pooling_4 = nn.MaxPool2d(2, stride=2, padding=1)           # 14 * 512 * 512

        self.conv5_1 = nn.Conv2d(512, 512, 3)
        self.conv5_2 = nn.Conv2d(512, 512, 3, stride=1, padding=1)
        self.conv5_3 = nn.Conv2d(512, 512, 3, stride=1, padding=1)
        self.max_pooling_5 = nn.MaxPool2d(2, stride=2, padding=1)           # 7 * 512 * 512

        self.fc1 = nn.Linear(7 * 7 * 512, 4096)
        self.fc2 = nn.Linear(4096, 4096)
        self.fc3 = nn.Linear(4096, 10)

    def forward(self, x):
        x = self.conv1_1(x)
        x = F.relu(x)
        x = self.conv1_2(x)
        x = F.relu(x)
        x = self.max_pooling_1(x)

        x = self.conv2_1(x)
        x = F.relu(x)
        x = self.conv2_2(x)
        x = F.relu(x)
        x = self.max_pooling_2(x)

        x = self.conv3_1(x)
        x = F.relu(x)
        x = self.conv3_2(x)
        x = F.relu(x)
        x = self.conv3_3(x)
        x = F.relu(x)
        x = self.max_pooling_3(x)

        x = self.conv4_1(x)
        x = F.relu(x)
        x = self.conv4_2(x)
        x = F.relu(x)
        x = self.conv4_3(x)
        x = F.relu(x)
        x = self.max_pooling_4(x)

        x = self.conv5_1(x)
        x = F.relu(x)
        x = self.conv5_2(x)
        x = F.relu(x)
        x = self.conv5_3(x)
        x = F.relu(x)
        x = self.max_pooling_5(x)

        x = x.view(-1, 7 * 7 * 512)
        x = self.fc1(x)
        x = F.relu(x)
        x = self.fc2(x)
        x = F.relu(x)
        x = self.fc3(x)

        x = F.softmax(x)

        return x
可以看到构建网络难度不高只要按照顺序写出每一层即可。
3 构建数据集
构建数据集主要使用torchvision和的它的transforms模块,它主要用于对输入图像进行随即处理操作并把图像数据转换为tensor(tensor是pytorch的基础数据结构)。下面的代码通过datasets来下载cifar10并把数据集分为训练和测试集。
# transform的创建(compose方法)
transform = transforms.Compose(
    [
        transforms.ToTensor(),  # 将数据转换为pytorch的tensor
        # transforms.Resize(size=([224, 224]), interpolation=transforms.InterpolationMode.BILINEAR),
        transforms.Normalize([0.5, 0.5, 0.5], [0.5, 0.5, 0.5]),  # 均值、方差
        transforms.RandomHorizontalFlip()  # 随机水平翻转
    ]
)

# 训练数据集
trainset = torchvision.datasets.CIFAR10(root='../data', train=True, download=False, transform=transform)
trainloader = torch.utils.data.DataLoader(trainset, batch_size=4, shuffle=True, num_workers=0)

# 测试数据集
testset = torchvision.datasets.CIFAR10(root='../data/', train=False, download=False, transform=transform)
testloader = torch.utils.data.DataLoader(testset, batch_size=4, shuffle=False, num_workers=0)
4 定义loss和optim开始训练
准备好数据之后,要定义好损失和优化,损失和优化器torch也已提供,这里就直接使用即可。选择何种损失和优化策略需要根据任务来制定,对于本文的分类任务loss选择交叉熵,optim选择SGD。这一步有很多对应的文献可以自行查找。
在训练过程中的反向传播torch已经集成好,反向传播是神经网络比较核心的一部分,由于计算过程复杂,了解原理后可以直接使用torch提供的方法来自动的完成这一步。
net = VGG16()
# net.to(device)

critertion = nn.CrossEntropyLoss()
optimizer = optim.SGD(net.parameters(), lr=0.001, momentum=0.9)

# data_all = trainloader.to(device)


def TrainNeuralNetwork(epoch_num):
    # 训练数据
    for epoch in range(epoch_num):
        for i, data in enumerate(trainloader):
            images, labels = data

            # 若使用gpu训练需要将tensor拷贝到gpu上
            # if device == 'cuda':
            images = images.to(device)
            labels = labels.to(device)

            # 前向传播
            outputs = net(images)

            # 计算损失
            loss = critertion(outputs, labels)

            optimizer.zero_grad()  # 梯度清零
            loss.backward()  # 反向传播
            optimizer.step()  # 更新参数

            if i % 1000 == 0:  # 每1000个batch打印loss等信息
                print("epoch: %d, step: %d, Loss: %.3f" % (epoch, i, loss.item()))

        # 保存模型
        torch.save(net.state_dict(), '../model/vgg16model.pt')
5 加载模型并预测
训练并保存好模型后,可以使用下面的方法来加载模型文件,并执行预测(执行一遍前向传播),这里构建测试集之后,得到的是所有图像score的平均值。
model = VGG16()

model.load_state_dict(torch.load('../model/vgg16model.pt'))

device = torch.device('cuda' if torch.cuda.is_available() else 'cpu')
model.to(device)

# transform的创建(compose方法)
transform = transforms.Compose(
    [
        transforms.ToTensor(),  # 将数据转换为pytorch的tensor
        # transforms.Resize(size=([224, 224]), interpolation=transforms.InterpolationMode.BILINEAR),
        transforms.Normalize([0.5, 0.5, 0.5], [0.5, 0.5, 0.5]),  # 均值、方差
        transforms.RandomHorizontalFlip()  # 随机水平翻转
    ]
)

# 测试数据集
testset = torchvision.datasets.CIFAR10(root='../data/', train=False, download=False, transform=transform)
testloader = torch.utils.data.DataLoader(testset, batch_size=4, shuffle=False, num_workers=0)

correct = 0.0
total = 0.0

with torch.no_grad():
    for data in testloader:
        images, labels = data
        images = images.to(device)
        labels = labels.to(device)

        outputs = model(images)

        _, predicted = torch.max(outputs.data, 1)

        correct += (predicted == labels).sum()
        total += labels.size(0)

print('score: ', float(correct) / total)
6 优化网络并使用GPU加速训练
通过上面的例子可以训练模型,但是loss很大,下降的速度也很慢,这里可以对数据进行各种操作来增强,或者给网络权重赋初始值,增加dropout,另外可以加入BN层加速模型收敛。另外就是代码冗余。
下面是优化后的网络结构代码,可以对比上面的定义网络结构的代码来看。
class VGG16(nn.Module):

    def __init__(self):
        super(VGG16, self).__init__()
        # 构建网络的卷积层和池化层,最终输出命名features,原因是通常认为经过这些操作的输出为包含图像空间信息的特征层
        self.features = self._make_layers(cfg['VGG16'])

        # 构建卷积层之后的全连接层以及分类器
        self.classifier = nn.Sequential(
            nn.Dropout(),
            nn.Linear(512, 512),  # fc1
            nn.ReLU(True),
            nn.Dropout(),
            nn.Linear(512, 512),  # fc2
            nn.ReLU(True),
            nn.Linear(512, 10),  # fc3,最终cifar10的输出是10类
        )
        # 初始化权重
        for m in self.modules():
            if isinstance(m, nn.Conv2d):
                n = m.kernel_size[0] * m.kernel_size[1] * m.out_channels
                m.weight.data.normal_(0, math.sqrt(2. / n))
                m.bias.data.zero_()

    def forward(self, x):
        x = self.features(x)  # 前向传播的时候先经过卷积层和池化层
        x = x.view(x.size(0), -1)
        x = self.classifier(x)  # 再将features(得到网络输出的特征层)的结果拼接到分类器上
        return x

    def _make_layers(self, cfg):
        layers = []
        in_channels = 3
        for v in cfg:
            if v == 'M':
                layers += [nn.MaxPool2d(kernel_size=2, stride=2)]
            else:
                # conv2d = nn.Conv2d(in_channels, v, kernel_size=3, padding=1)
                # layers += [conv2d, nn.ReLU(inplace=True)]
                layers += [nn.Conv2d(in_channels, v, kernel_size=3, padding=1),
                           nn.BatchNorm2d(v),
                           nn.ReLU(inplace=True)]
                in_channels = v
        return nn.Sequential(*layers)
优化完毕之后,在训练时只需要指定训练的GPU,以及把tensor送到GPU上即可使用GPU训练,这里是单机单卡训练的方式(多GPU的训练需要自行查资料)。另外使用GPU训练的代码在预测时也要在GPU上预测。主要添加下面的代码:
# 查找设备
device = torch.device('cuda' if torch.cuda.is_available() else 'cpu')

# 把模型数据转移到GPU显存
net.to(device)
images,labels = data[0].to(device), data[1].to(device)
7 查看每一层的shape
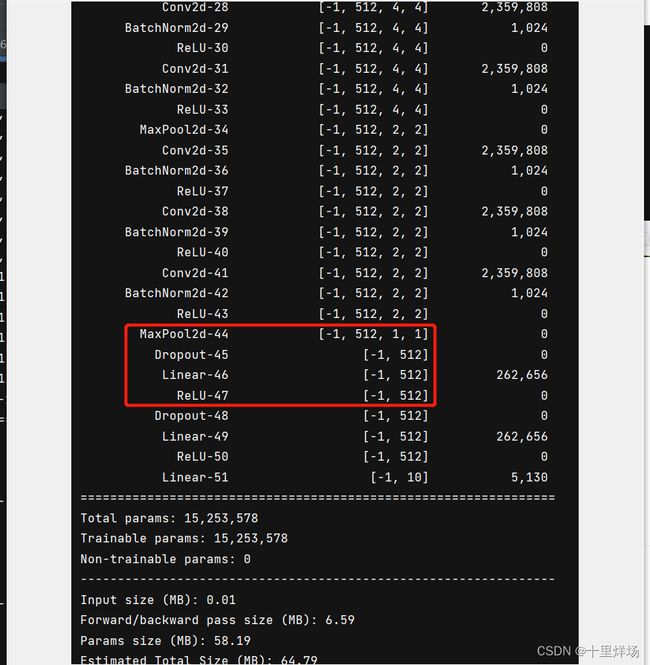
在构建网络时,需要设置第一个fc层的参数大小,如果不清楚可以通过下面的方法来查看每一层的shape大小。
import torch
from torchvision import models
from torchsummary import summary
from VGG16Net import VGG16

device = torch.device('cuda' if torch.cuda.is_available() else 'cpu')

vgg = models.vgg16().to(device)

model = VGG16().to(device)

summary(model, (3, 32, 32))
结果如下图:可以看到对于cifar10数据32*32大小的图像,不改变图像大小的情况下进入第一个fc层的输入参数为1×1×512。


