springsecurity结合jwt实现前后端分离开发
svbadmin学习日志
本学习日志是使用Springboot和Vue来搭建的后台管理系统:
演示地址:http://118.31.68.110:8081/index.html
账号:root
密码:123
所有代码可以在gitbub上找到,切换到相应分支即可。【代码传送门】
正篇
第一节 spring boot 模块化构建项目
第二节 整合mybatisplus完成用户增删改查
第三节 整合springsecurity实现基于RBAC的用户登录
第四节 springsecurity结合jwt实现前后端分离开发
第五节 使用ResponseBodyAdvice格式化接口输出
第六节 springboot结合redis实现缓存策略
第七节 springboot结合rabbitmq实现队列消息
第八节 springboot结合rabbitmq实现异步邮件发送
第九节 利用springboot的aop实现行为日志管理
第十节 利用Quartz实现数据库定时备份
第十一节 springboot配置log输出到本地文件
第十二节 使用flyway对数据库进行版本管理
第十三节 springboot配合VbenAdmin实现前端登录
第十四节 springboot配合VbenAdmin实现用户CURD
第十五节 基于RBAC的权限管理VbenAdmin前端实现
第十六节 springboot 打包vue代码实现前后端统一部署
番外
2.1 数据库设计原则
3.1 配置apifox自动获取登录的token
13.1 springboot 全局捕捉filter中的异常
14.1 springsecurity整合mybatisplus出现isEnable的问题和解决方案
前言
前后端分离现在是主流开发形式,jwt也是用的比较多一种令牌方式,接下来我们来整合下jwt。方便后续和vue进行前后端联动开发。
一、加入jwt依赖
<dependency>
    <groupId>io.jsonwebtoken</groupId>
    <artifactId>jjwt</artifactId>
    <version>0.9.1</version>
</dependency>
二、创建jwt处理类
1.处理登录的类 JwtLoginFilter
public class JwtLoginFilter extends AbstractAuthenticationProcessingFilter {
    protected JwtLoginFilter(String defaultFilterProcessesUrl, AuthenticationManager authenticationManager) {
        super(new AntPathRequestMatcher(defaultFilterProcessesUrl));
        setAuthenticationManager(authenticationManager);
    }
    @Override
    public Authentication attemptAuthentication(HttpServletRequest req, HttpServletResponse resp) throws AuthenticationException, IOException, ServletException, IOException {
        User user = new ObjectMapper().readValue(req.getInputStream(), User.class);
        return getAuthenticationManager().authenticate(new UsernamePasswordAuthenticationToken(user.getUsername(), user.getPassword()));
    }
    @Override
    protected void successfulAuthentication(HttpServletRequest req, HttpServletResponse resp, FilterChain chain, Authentication authResult) throws IOException, ServletException {
        Collection<? extends GrantedAuthority> authorities = authResult.getAuthorities();
        StringBuffer as = new StringBuffer();
        for (GrantedAuthority authority : authorities) {
            as.append(authority.getAuthority())
                    .append(",");
        }
        String jwt = Jwts.builder()
                .claim("authorities", as)//配置用户角色
                .setSubject(authResult.getName())
                .setExpiration(new Date(System.currentTimeMillis() + 10 * 60 * 1000))
                .signWith(SignatureAlgorithm.HS512,"sang@123")
                .compact();
        resp.setContentType("application/json;charset=utf-8");
        PrintWriter out = resp.getWriter();
        out.write(new ObjectMapper().writeValueAsString(jwt));
        out.flush();
        out.close();
    }
    protected void unsuccessfulAuthentication(HttpServletRequest req, HttpServletResponse resp, AuthenticationException failed) throws IOException, ServletException {
        resp.setContentType("application/json;charset=utf-8");
        PrintWriter out = resp.getWriter();
        out.write("登录失败!");
        out.flush();
        out.close();
    }
}
2.处理验证的类 JwtFilter
public class JwtFilter extends GenericFilterBean {
    @Override
    public void doFilter(ServletRequest servletRequest, ServletResponse servletResponse, FilterChain filterChain) throws IOException, ServletException {
        HttpServletRequest req = (HttpServletRequest) servletRequest;
        String jwtToken = req.getHeader("authorization");
        System.out.println(jwtToken);
        if (jwtToken != null){
            Claims claims = Jwts.parser().setSigningKey("sang@123").parseClaimsJws(jwtToken.replace("Bearer",""))
                    .getBody();
            String username = claims.getSubject();//获取当前登录用户名
            List<GrantedAuthority> authorities = AuthorityUtils.commaSeparatedStringToAuthorityList((String) claims.get("authorities"));
            UsernamePasswordAuthenticationToken token = new UsernamePasswordAuthenticationToken(username, null, authorities);
            SecurityContextHolder.getContext().setAuthentication(token);
        }else{
	            SecurityContextHolder.getContext().setAuthentication(null); // 如果没有token,则清空认证,否则会使用上一次缓存的token
        }
        filterChain.doFilter(req,servletResponse);
    }
}
3.修改SecurityConfiguration
...
.addFilterBefore(new JwtLoginFilter("/login",authenticationManager()), UsernamePasswordAuthenticationFilter.class)
.addFilterBefore(new JwtFilter(),UsernamePasswordAuthenticationFilter.class)
...
三、测试
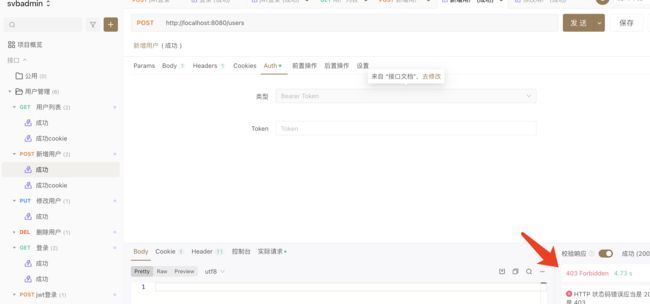
未登录的情况下,访问接口
这里显示的是403,当然可以自定义成401。具体可直接下载代码体验。

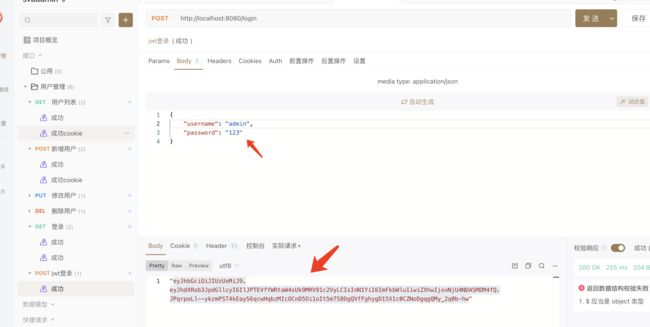
login 登录返回token
使用返回的token, 放入到auth中继续请求其他接口
总结
- Security 整合jwt 有很多种方法, 核心还是要理解filterChain
- 目前的返回格式比较不符规范,下一节把输出格式化下
问题
- 如果第一次带token访问,第二次删除token直接访问,竟然直接成功了。于是我加了行判断,把token置空。 就是以下这段代码:
SecurityContextHolder.getContext().setAuthentication(null); // 如果没有token,则清空认证,否则会使用上一次缓存的token
这不知道有没有更好的解决方法,大家可以留言探讨下。
代码地址
代码
参考文档:
干货|一个案例学会Spring Security 中使用 JWT
整合SpringSecurity和JWT实现登录认证和授权

