视觉检测模型对比RetinaNet-YOLO-CenterNet-FCOS-DCN-稀疏化剪枝-DIOU、CIOU、LOSS
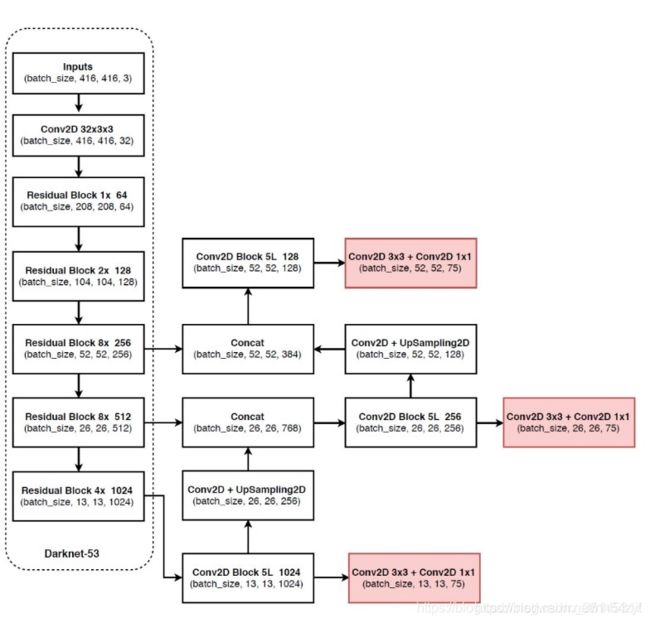
YOLOV3 YOLOV4 CenterNet
笔记本 thikpad 960max() X1 1650ti
台式机 1050ti
1:YOLOV3和YOLOV4对比:
onnx的输入size trt的输入size必须一样
thindpad GTX 940max
int8 yolov4 31ms yolov3 20msfp16 yolov4 52ms yolov3 47ms
fp32 yolov4 53ms yolov3 20ms
1650ti (fp32)
yolov3_416 infer 41ms
yolov3_608 infer 74ms

yolov4_416 infer 43ms
yolov4_608 infer 83ms
YOLO V4炼丹配方
这么一看,这炼丹配方多清晰呀,和YOLO V3对比,主要做了以下改变:
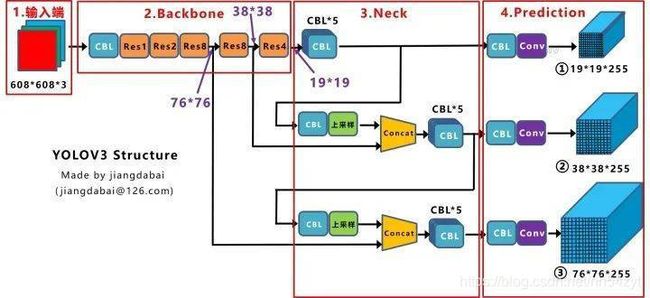
相较于YOLO V3的DarkNet53,YOLO V4用了CSPDarkNet53
相较于YOLO V3的FPN,YOLO V4用了SPP+PAN
CutMix数据增强和马赛克(Mosaic)数据增强
DropBlock正则化

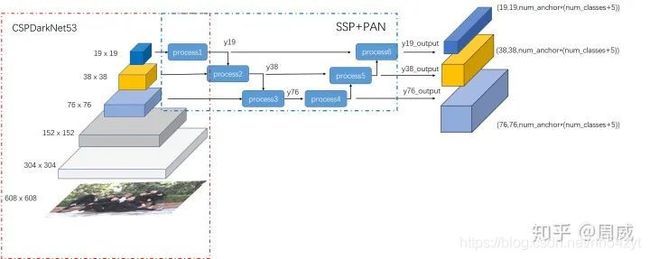
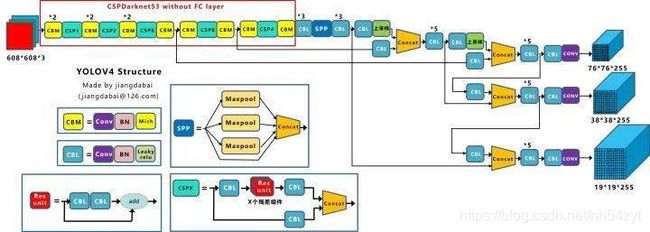

在SPP模块中,使用k={11,55,99,1313}的最大池化的方式,再将不同尺度的特征图进行Concat操作。

YOLOV4
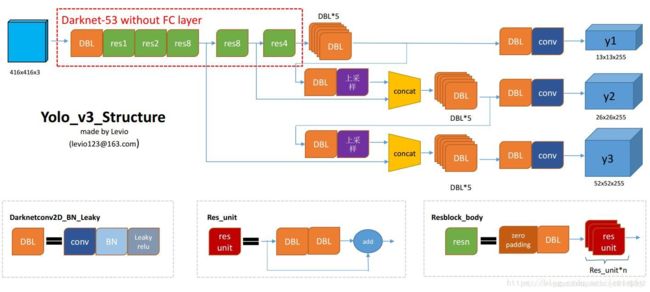
CBM:Yolov4网络结构中的最小组件,由Conv+Bn+Mish激活函数三者组成。
CBL:由Conv+Bn+Leaky_relu激活函数三者组成。
Res unit:借鉴Resnet网络中的残差结构,让网络可以构建的更深。
CSPX:借鉴CSPNet网络结构,由三个卷积层和X个Res unint模块Concate组成。
SPP:采用1×1,5×5,9×9,13×13的最大池化的方式,进行多尺度融合。
对比:
Yolov3的FPN层输出的三个大小不一的特征图①②③直接进行预测
但Yolov4的FPN层,只使用最后的一个7676特征图①,而经过两次PAN结构,输出预测的特征图②和③。
比如Yolov3.cfg最后的三个Yolo层,
第一个Yolo层是最小的特征图1919,mask=6,7,8,对应最大的anchor box。
第二个Yolo层是中等的特征图3838,mask=3,4,5,对应中等的anchor box。
第三个Yolo层是最大的特征图7676,mask=0,1,2,对应最小的anchor box。
而Yolov4.cfg则恰恰相反
第一个Yolo层是最大的特征图7676,mask=0,1,2,对应最小的anchor box。
第二个Yolo层是中等的特征图3838,mask=3,4,5,对应中等的anchor box。
第三个Yolo层是最小的特征图19*19,mask=6,7,8,对应最大的anchor box。
YOLOV3生态,稀疏化训练,剪枝和量化
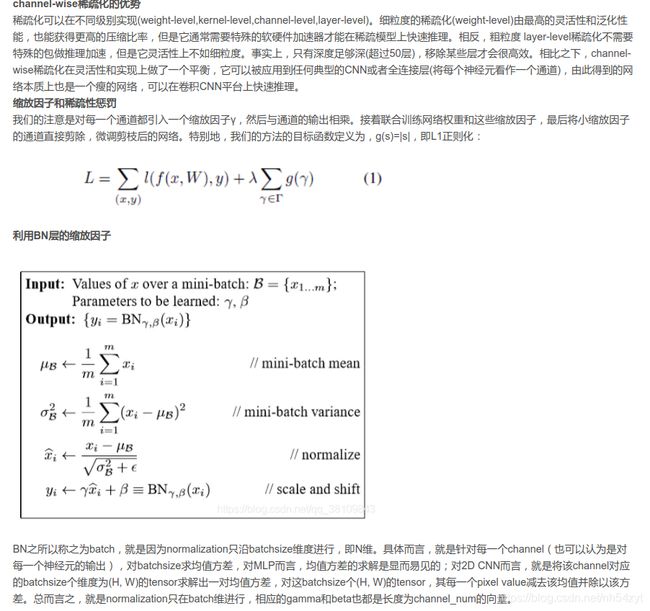
1、利用batch normalization中的缩放因子γ
作为重要性因子,即γ越小,所对应的channel不太重要,就可以裁剪(pruning)。2、约束γ的大小,在目标方程中增加一个关于γ的L1正则项,使其稀疏化,这样可以做到在训练中自动剪枝,这是以往模型压缩所不具备的。
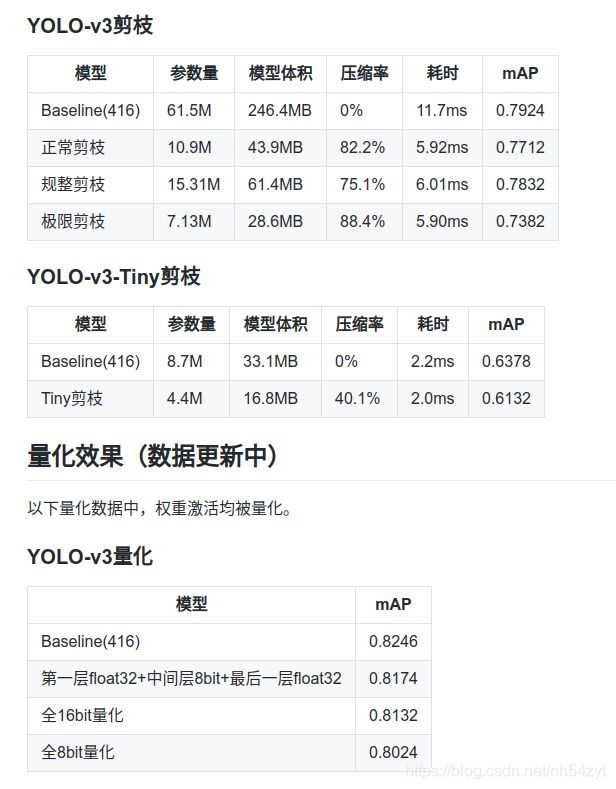

使用了正常剪枝模式,不对short cut层(需要考虑add操作的维度一致问题)及上采样层(无BN)进行裁剪。
1、找到需要裁剪的BN层的对应的索引。
2、每次反向传播前,将L1正则产生的梯度添加到BN层的梯度中。
3、设置裁剪率进行裁剪。
将需要裁剪的层的BN层的γ参数的绝对值提取到一个列表并从小到大进行排序,若裁剪率0.8,则列表中0.8分位数的值为裁剪阈值。
将小于裁剪阈值的通道的γ置为0,验证裁剪后的map(并没有将β置为0)。
4、创建新的模型结构,β合并到下一个卷积层中BN中的running_mean计算。
5、生成新的模型文件。
选择L1正则化
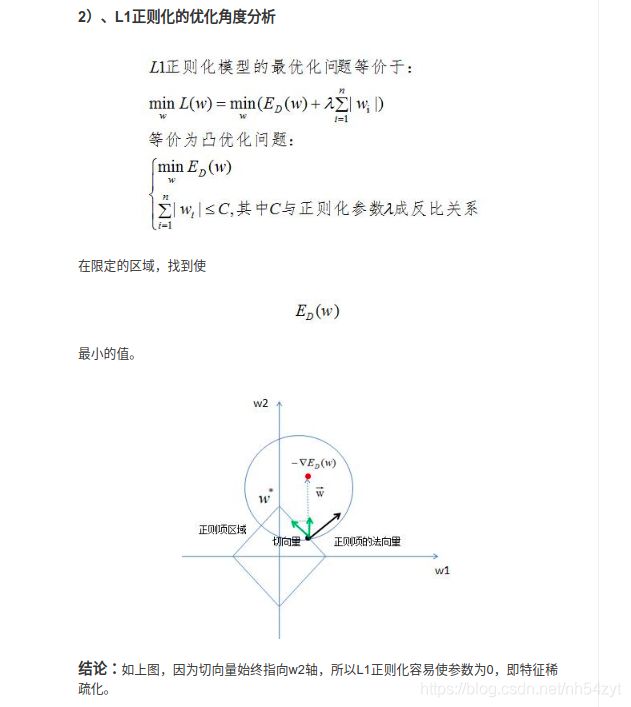
线性模型常用来处理回归和分类任务,为了防止模型处于过拟合状态,需要用L1正则化和L2正则化降低模型的复杂度,很多线性回归模型正则化的文章会提到L1是通过稀疏参数(减少参数的数量)来降低复杂度,L2是通过减小参数值的大小来降低复杂度。
https://baijiahao.baidu.com/s?id=1621054167310242353&wfr=spider&for=pc
层剪枝
和优化的正常剪枝类似。
这个策略是在之前的通道剪枝策略基础上衍生出来的,针对每一个shortcut层前一个CBL进行评价,对各层的Gmma均值进行排序,取最小的进行层剪枝。为保证yolov3结构完整,这里每剪一个shortcut结构,会同时剪掉一个shortcut层和它前面的两个卷积层。是的,这里只考虑剪主干中的shortcut模块。但是yolov3中有23处shortcut,剪掉8个shortcut就是剪掉了24个层,剪掉16个shortcut就是剪掉了48个层,总共有69个层的剪层空间;实验中对简单的数据集剪掉了较多shortcut而精度降低很少。
(py3torch) (base) zyt@l01010008:~/torch_tensorflow/$ python3 normal_prune.py
               Class    Images   Targets         P         R       mAP        F1: 100%|█| 52/52 [00:32<00:00,  1.
                 all       821  2.03e+03     0.118     0.934     0.807      0.21
Threshold should be less than 1.0452.
The corresponding prune ratio is 0.807.
Channels with Gamma value less than 0.9615 are pruned!
               Class    Images   Targets         P         R       mAP        F1: 100%|█| 52/52 [00:21<00:00,  2.
                 all       821  2.03e+03         0         0         0         0
Number of channels has been reduced from 13376 to 6688
Prune ratio: 0.500
mAP of the pruned model is 0.0000
layer index:   0 	 total channel:   32 	 remaining channel:   29
layer index:   2 	 total channel:   32 	 remaining channel:   18
layer index:   6 	 total channel:   64 	 remaining channel:    5
layer index:   9 	 total channel:   64 	 remaining channel:   47
layer index:  13 	 total channel:  128 	 remaining channel:   25
layer index:  16 	 total channel:  128 	 remaining channel:   48
layer index:  19 	 total channel:  128 	 remaining channel:   36
layer index:  22 	 total channel:  128 	 remaining channel:   39
layer index:  25 	 total channel:  128 	 remaining channel:   18
layer index:  28 	 total channel:  128 	 remaining channel:   19
layer index:  31 	 total channel:  128 	 remaining channel:   16
layer index:  34 	 total channel:  128 	 remaining channel:   24
layer index:  38 	 total channel:  256 	 remaining channel:  105
layer index:  41 	 total channel:  256 	 remaining channel:   61
layer index:  44 	 total channel:  256 	 remaining channel:   11
layer index:  47 	 total channel:  256 	 remaining channel:   15
layer index:  50 	 total channel:  256 	 remaining channel:    8
layer index:  53 	 total channel:  256 	 remaining channel:    2
layer index:  56 	 total channel:  256 	 remaining channel:   17
layer index:  59 	 total channel:  256 	 remaining channel:    3
layer index:  63 	 total channel:  512 	 remaining channel:  100
layer index:  66 	 total channel:  512 	 remaining channel:   43
layer index:  69 	 total channel:  512 	 remaining channel:   32
layer index:  72 	 total channel:  512 	 remaining channel:   90
layer index:  75 	 total channel:  512 	 remaining channel:  339
layer index:  76 	 total channel: 1024 	 remaining channel:  743
layer index:  77 	 total channel:  512 	 remaining channel:  344
layer index:  78 	 total channel: 1024 	 remaining channel:  779
layer index:  79 	 total channel:  512 	 remaining channel:  364
layer index:  80 	 total channel: 1024 	 remaining channel: 1001
layer index:  87 	 total channel:  256 	 remaining channel:  145
layer index:  88 	 total channel:  512 	 remaining channel:  299
layer index:  89 	 total channel:  256 	 remaining channel:  140
layer index:  90 	 total channel:  512 	 remaining channel:  337
layer index:  91 	 total channel:  256 	 remaining channel:  166
layer index:  92 	 total channel:  512 	 remaining channel:  474
layer index:  99 	 total channel:  128 	 remaining channel:   70
layer index: 100 	 total channel:  256 	 remaining channel:  140
layer index: 101 	 total channel:  128 	 remaining channel:   83
layer index: 102 	 total channel:  256 	 remaining channel:  173
layer index: 103 	 total channel:  128 	 remaining channel:   77
layer index: 104 	 total channel:  256 	 remaining channel:  203
Prune channels: 6688	Prune ratio: 0.254
               Class    Images   Targets         P         R       mAP        F1: 100%|█| 52/52 [00:21<00:00,  2.
                 all       821  2.03e+03         0         0         0         0
after prune_model_keep_size map is 0.0
^[
               Class    Images   Targets         P         R       mAP        F1:  83%|▊| 43/52 [00:12<00:02,  3.71it/s]^[
               Class    Images   Targets         P         R       mAP        F1: 100%|█| 52/52 [00:14<00:00,  3.65it/s]
                 all       821  2.03e+03         0         0         0         0
+------------+----------+----------+
| Metric     | Before   | After    |
+------------+----------+----------+
| mAP        | 0.807155 | 0.000000 |
| Parameters | 61523734 | 21958910 |
| Inference  | 0.5060   | 0.3207   |
+------------+----------+----------+
Config file has been saved: cfg/prune_0.5_yolov3-hand.cfg
Compact model has been saved: weights/yolov3_hand_normal_pruning_0.5percent.weights
YOLOV4和 CenterNet对比:
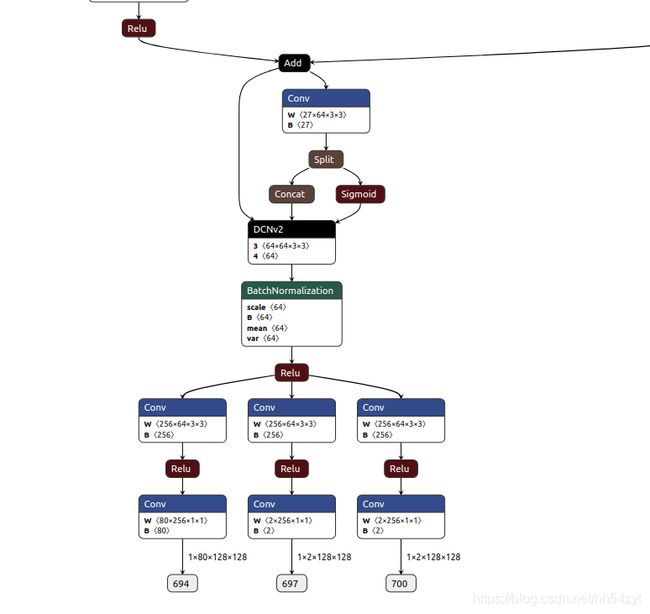
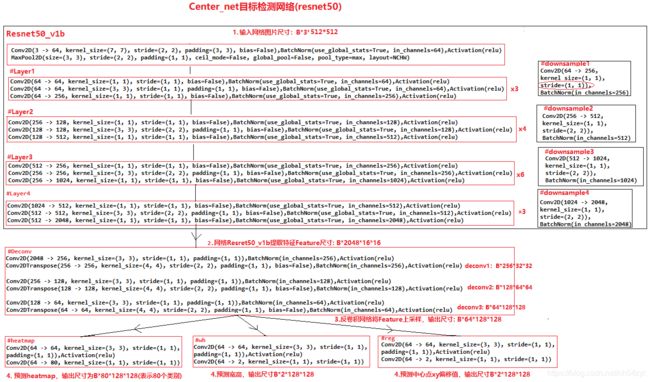
centerNet网络结构:
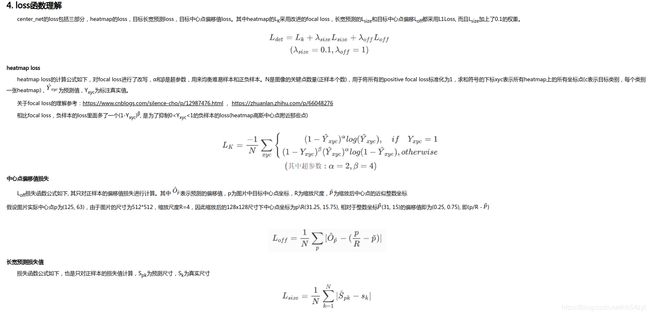
这三个网络中输出内容都是一样的,80个类别,2个预测中心对应的长和宽,2个中心点的偏差。
heatmap 输出的tensor的通道个数是80,每个通道代表对应类别的heatmap (hm): Sequential( (0): Conv2d(64, 64, kernel_size=(3, 3), stride=(1, 1), padding=(1, 1)) (1):
ReLU(inplace) (2): Conv2d(64, 80, kernel_size=(1, 1), stride=(1, 1)) )
wh 输出是中心对应的长和宽,通道数为2 (wh): Sequential( (0): Conv2d(64, 64, kernel_size=(3, 3), stride=(1, 1), padding=(1, 1)) (1): ReLU(inplace)
(2): Conv2d(64, 2, kernel_size=(1, 1), stride=(1, 1)) )
reg 输出的tensor通道个数为2,分别是w,h方向上的偏移量 (reg): Sequential( (0): Conv2d(64, 64, kernel_size=(3, 3), stride=(1, 1), padding=(1, 1)) (1):
ReLU(inplace) (2): Conv2d(64, 2, kernel_size=(1, 1), stride=(1, 1)) )
后处理区别:
CenterNet推理过程核心工作:
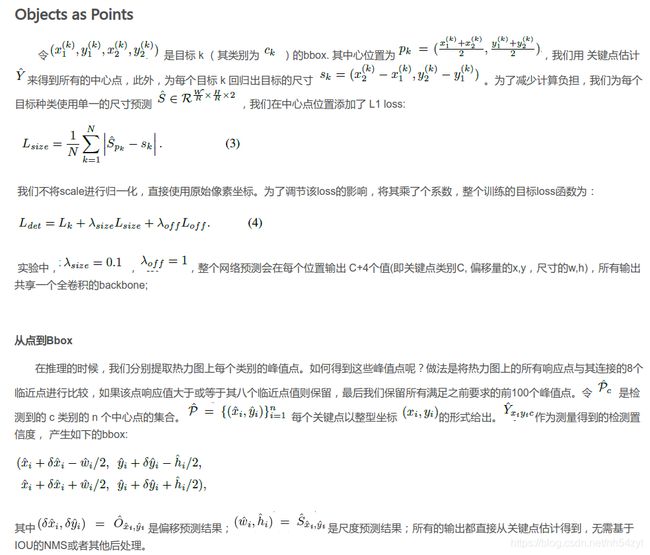
就是从heatmap提取得到需要的bounding box,具体的提取方法是使用了一个3x3的最大化池化,检查当前热点的值是否比周围8个临近点的值都大。然后取100个这样的点,再做筛选。
//这里的nms和带anchor的目标检测方法中的不一样,这里使用的是3x3的maxpool筛选
    hmap = _nms(hmap)  # perform nms on heatmaps
    # 找到前K个极大值点代表存在目标
    scores, inds, clses, ys, xs = _topk(hmap, K=K)
centerNet dla_2x :512*512
fp32 1050ti: 92ms
https://github.com/xingyizhou/CenterNet
我们的方法与基于锚点的one-stage方法相近。中心点可看成形状未知的锚点(见图3)。但存在几个重要差别(本文创新点):
第一,我们分配的锚点仅仅是放在位置上,没有尺寸框。没有手动设置的阈值做前后景分类。(像Faster RCNN会将与GT IOU 0.7的作为前景,<0.3的作为背景,其他不管);
第二,每个目标仅仅有一个正的锚点,因此不会用到NMS,我们提取关键点特征图上局部峰值点(local peaks);
第三,CenterNet 相比较传统目标检测而言(缩放16倍尺度),使用更大分辨率的输出特征图(缩放了4倍),因此无需用到多重特征图锚点;

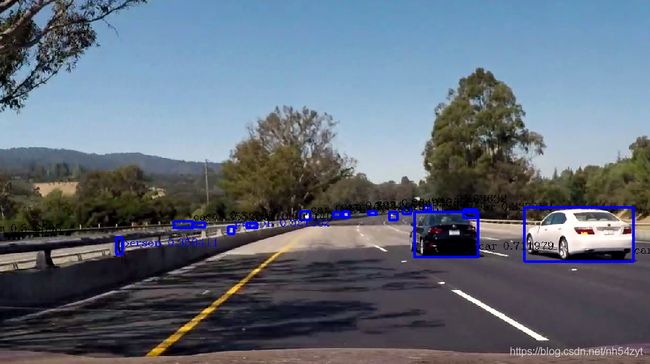
yoloV4 : 608*608
fp32 1050ti: 95ms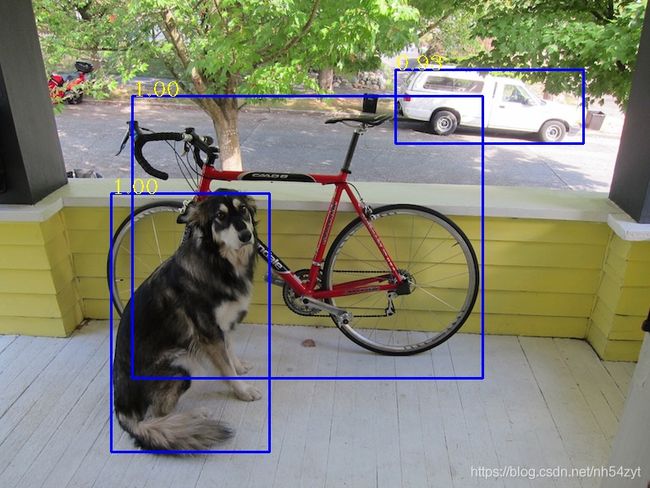


https://www.cnblogs.com/silence-cho/p/13955766.html
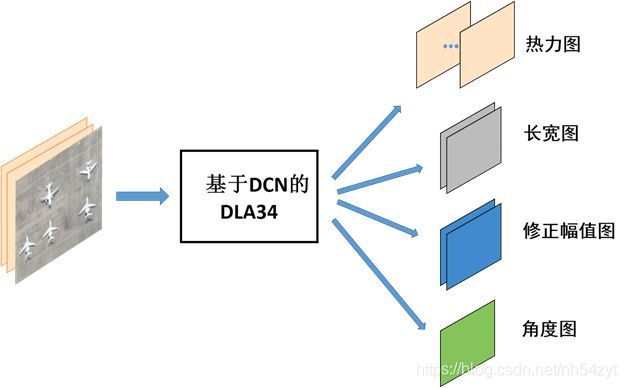
2:CenterNet旋转检测
通过anchor-free思路,很容易完成旋转目标检测
https://zhuanlan.zhihu.com/p/163696749
3:RetinaNet
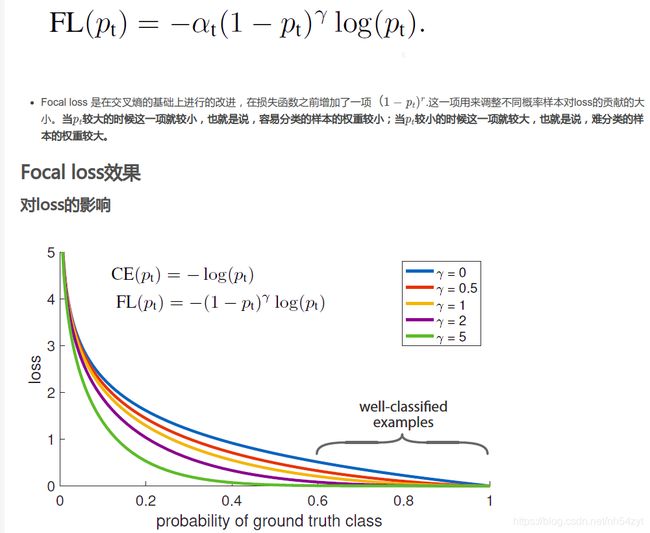
针对类别不均衡问题,作者提出一种新的损失函数:focal loss,这个损失函数是在标准交叉熵损失基础上修改得到的。这个函数可以通过减少易分类样本的权重,使得模型在训练时更专注于难分类的样本。为了证明focal loss的有效性,作者设计了一个dense detector:RetinaNet,并且在训练时采用focal loss训练。实验证明RetinaNet不仅可以达到one-stage detector的速度,也能有two-stage detector的准确率。
与Faster R-CNN一样,RetinaNet的box回归loss采用smooth L1,但是分类loss采用focal
loss,论文中最优参数。Focal loss 是在交叉熵的基础上进行的改进,在损失函数之前增加了一项( 1 − p t ) r (1-p_t)^r(1−p t) r
.这一项用来调整不同概率样本对loss的贡献的大小。当p t p_tp t
较大的时候这一项就较小,也就是说,容易分类的样本的权重较小;当p t p_tp t
较小的时候这一项就较大,也就是说,难分类的样本的权重较大。
4: Loss
https://blog.csdn.net/bu_fo/article/details/110428980
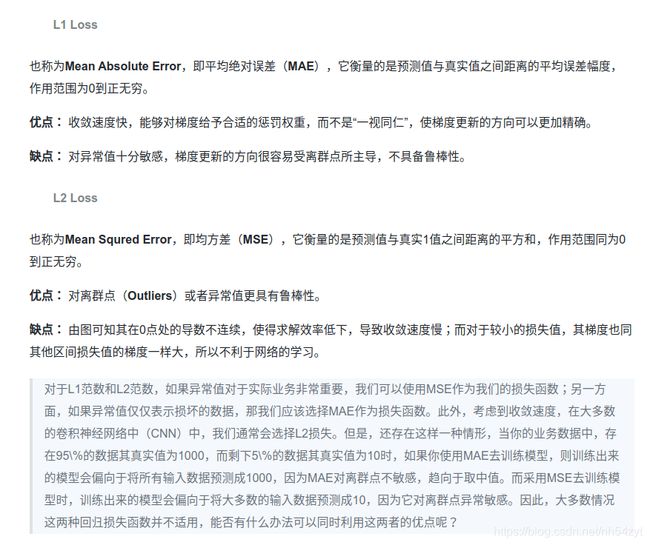
L1 L2
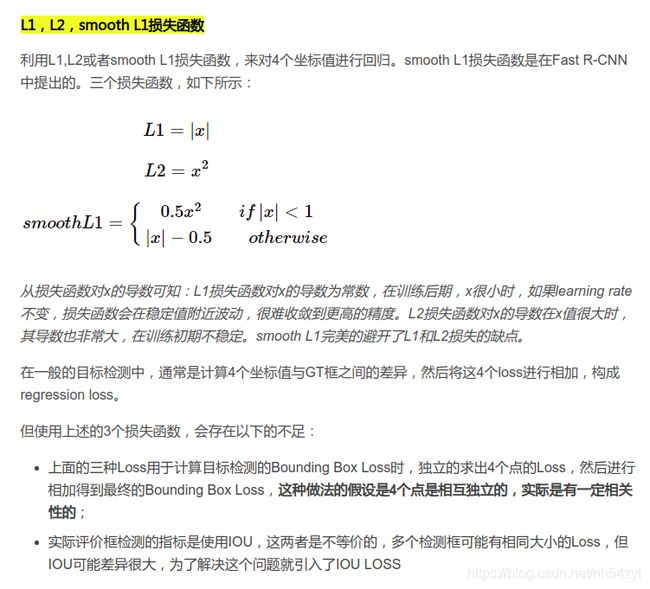
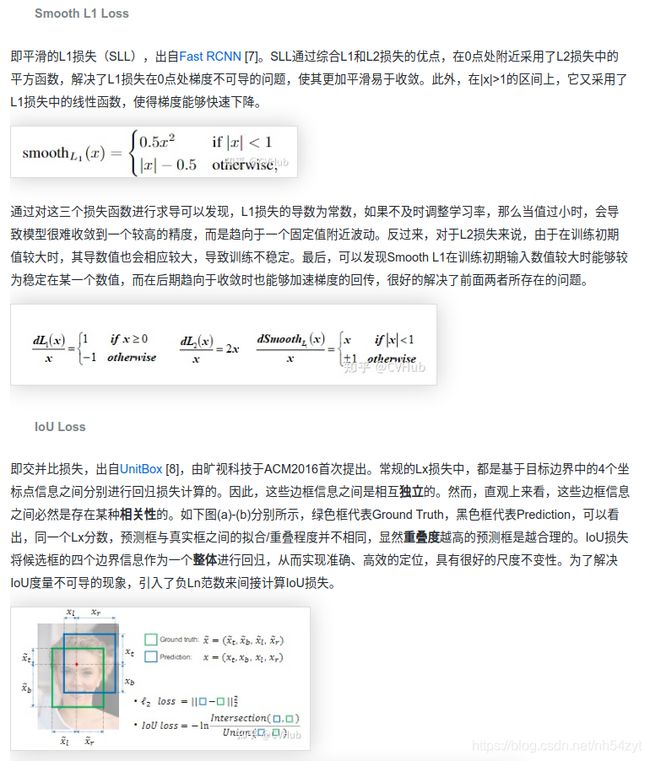
在YOLOv4中,选择CIoU作为损失函数,测试时使用DIoU进行NMS。
在IOU Loss基础上添加一个惩罚项以最小化预测框和真实框之间的标准化距离,从而加快收敛。
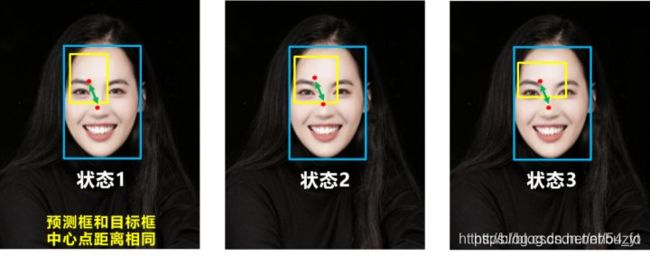
考虑3个度量:重叠面积、中心点距离和box的宽高比,提出了C-IOU Loss用于边界框损失以得到精确的回归。
D-IOU 应用于NMS具有更好的性能。
CIoU考虑形状了,宽高比。
GIOU Loss
Yolov5中采用其中的GIOU_Loss做Bounding box的损失函数
GIoU损失不仅关注重叠区域,还关注非重合区域,解决了无重叠框之间差距无法评估的问题。当预测框和目标框完全重叠:GIoU=IoU=1;当预测框和目标框无重叠,GIoU随着距离增大而减小,趋近于-1。

可能结论:
在精度不太高的模型(YOLOv3)上进行实验对比,DIoU loss和CIoU的效果都很显著,而使用DIoU-NMS则能进一步提升。
在精度较高的模型(SSD-FPN)上进行实验对比,DIoU loss和CIoU的提升就不大了,同样使用DIoU-NMS能进一步提升。
CIoU在小物体上的性能都有所下降,可能由于宽高比对小物体的检测贡献不大,因为此时中心点比宽高比更重要。
在中大型物体检测上,CIoU的结果比GIoU要准确。
DIoU-NMS能够更好地引导bbox的消除。
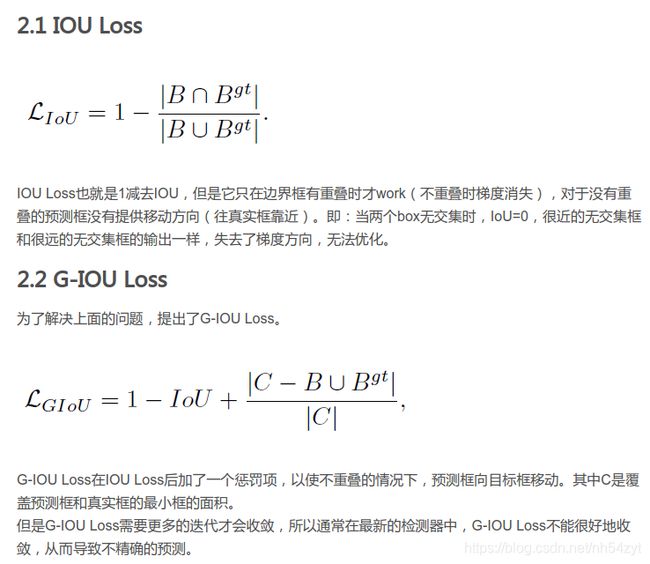
G-IOU可能存在难收敛的问题,

IOU缺点:
当两个box无交集时,IoU=0,很近的无交集框和很远的无交集框的输出一样,失去了梯度方向,无法优化。
GIOU缺点:
GIoU在回归的过程中,当IoU为0时,GIoU会先尽可能让anchor能够和目标框产生重叠,之后GIoU会渐渐退化成IoU回归策略,因此整个过程会非常缓慢而且存在发散的风险。而DIoU考虑到anchor和目标之间的中心点距离,可以更快更有效更稳定的进行回归。
DIOU缺点:
虽然DIOU能够直接最小化预测框和真实框的中心点距离加速收敛,但是Bounding box的回归还有一个重要的因素纵横比暂未考虑。
DIoU的优点如下:
1.与GIoU loss类似,DIoU loss在与目标框不重叠时,仍然可以为边界框提供移动方向。
2.DIoU loss可以直接最小化两个目标框的距离,而GIOU loss优化的是两个目标框之间的面积,因此比GIoU loss收敛快得多。
3.对于包含两个框在水平方向和垂直方向上这种情况,DIoU损失可以使回归非常快,而GIoU损失几乎退化为IoU损失
总体来说


在精度不太高的模型(YOLOv3)上进行实验对比,DIoU loss和CIoU的效果都很显著,而使用DIoU-NMS则能进一步提升。
在精度较高的模型(SSD-FPN)上进行实验对比,DIoU loss和CIoU的提升就不大了,同样使用DIoU-NMS能进一步提升。
CIoU在小物体上的性能都有所下降,可能由于宽高比对小物体的检测贡献不大,因为此时中心点比宽高比更重要。
在中大型物体检测上,CIoU的结果比GIoU要准确。
DIoU-NMS能够更好地引导bbox的消除。
损失函数:
损失函数是用于衡量模型所作出的预测离真实值(Ground Truth)之间的偏离程度。 通常,我们都会最小化目标函数,最常用的算法便是“梯度下降法”(Gradient Descent)。
俗话说,任何事情必然有它的两面性,因此,并没有一种万能的损失函数能够适用于所有的机器学习任务,所以在这里我们需要知道每一种损失函数的优点和局限性,才能更好的利用它们去解决实际的问题。
损失函数大致可分为两种:
回归损失(针对连续型变量)和分类损失(针对离散型变量)。
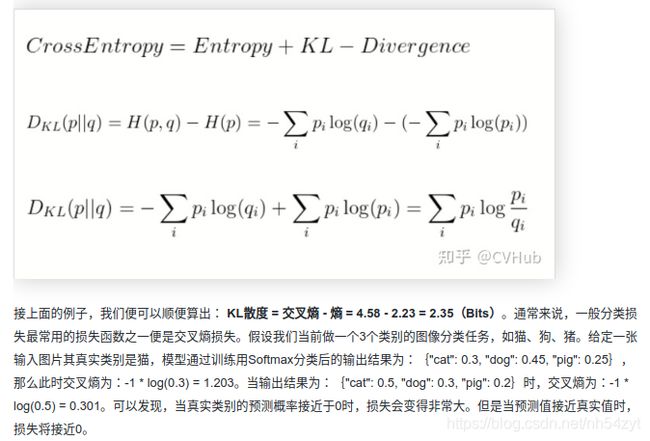
一般分类损失最常用的损失函数之一便是交叉熵损失。
假设我们当前做一个3个类别的图像分类任务,如猫、狗、猪。给定一张输入图片其真实类别是猫,模型通过训练用Softmax分类后的输出结果为:{“cat”: 0.3, “dog”: 0.45, “pig”: 0.25},
那么此时交叉熵为:-1 * log(0.3) = 1.203。当输出结果为:{“cat”: 0.5, “dog”: 0.3, “pig”: 0.2}时,交叉熵为:-1 * log(0.5) = 0.301。
可以发现,当真实类别的预测概率接近于0时,损失会变得非常大。但是当预测值接近真实值时,损失将接近0。
总结
总的来说,损失函数的形式千变万化,但追究溯源还是万变不离其宗。
其本质便是给出一个能较全面合理的描述两个特征或集合之间的相似性度量或距离度量,针对某些特定的情况,如类别不平衡等,给予适当的惩罚因子进行权重的加减。大多数的损失都是基于最原始的损失一步步改进的,或提出更一般的形式,或提出更加具体实例化的形式。
便于求导:
推导反向传播:
https://zhuanlan.zhihu.com/p/35709485
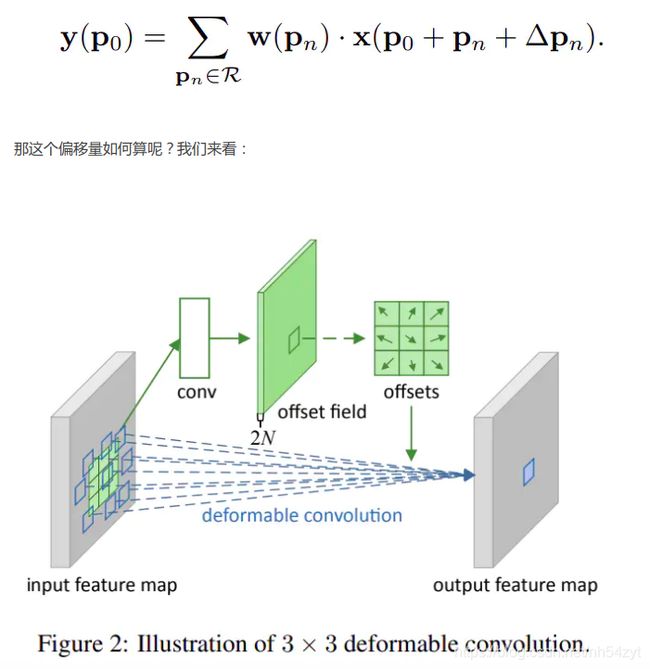
5:Deformable Convolutional Networks
https://www.jianshu.com/p/55ddeb498c65
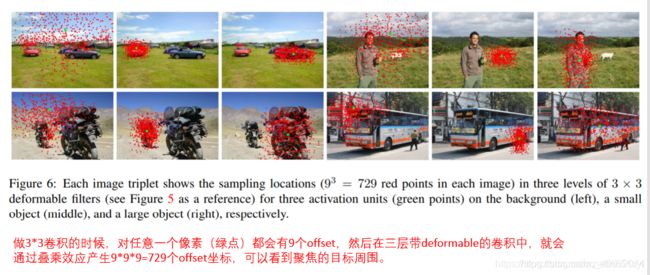
动机: 视觉识别中的一个关键挑战是如何在目标尺度,姿态,视点和部件变形中适应几何变化或建模几何变换。 现有方法:
1.增加现有的数据样本来实现,例如通过仿射变换。 缺点:以昂贵的训练和复杂的模型参数为代价;几何变换被假定是固定并且已知的,阻止了对具有未知几何变换的新任务的泛化能力。2.不变特征: SIFT(尺度不变特征变换)和基于滑动窗口的目标检测。 缺点:复杂的变换可能是困难的或不可行的。
3.卷积神经网络(CNNs):大量的数据增强,一些简单的手工设计模块(最大池化可以对小的平移有不变性) 缺点: CNN模块的固定几何结构,缺乏处理几何变换的内部机制。
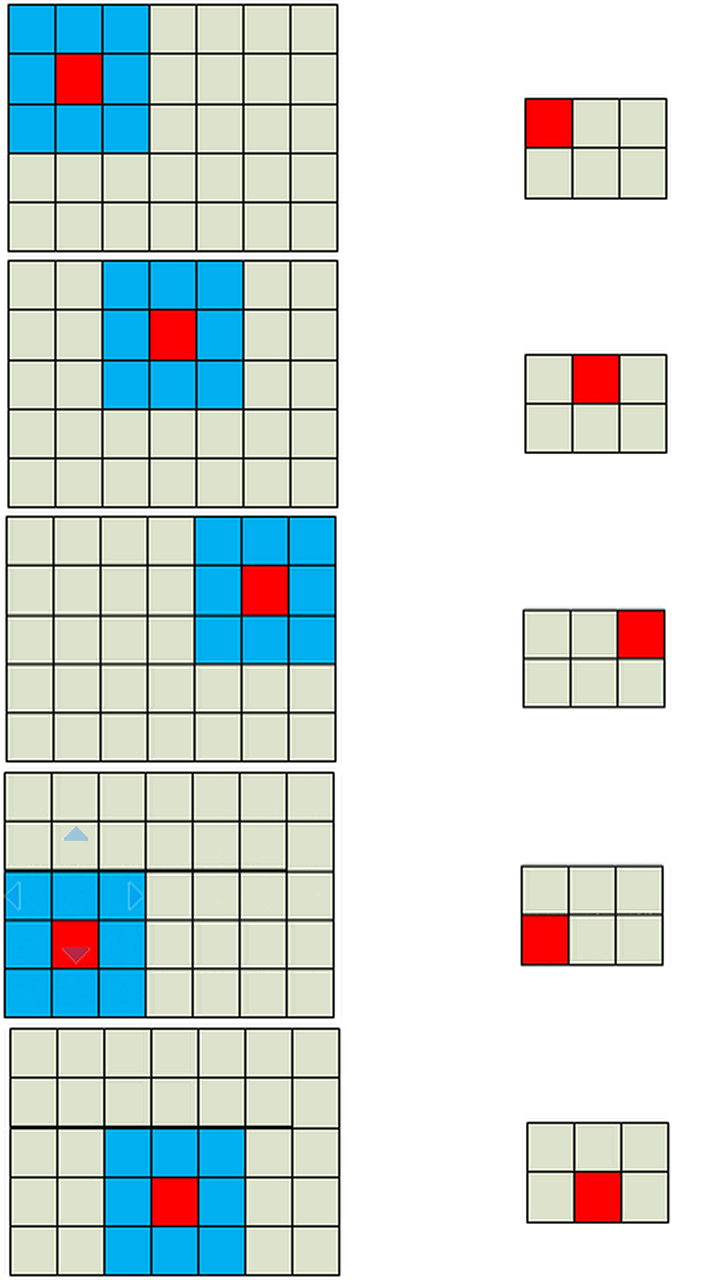
p_conv卷积过程(stride为2,kernel_size为3)
