9.初识Pytorch使用卷积层并对其进行可视化
- 首先,查看Pytorch官方文档
torch.nn.conv2d

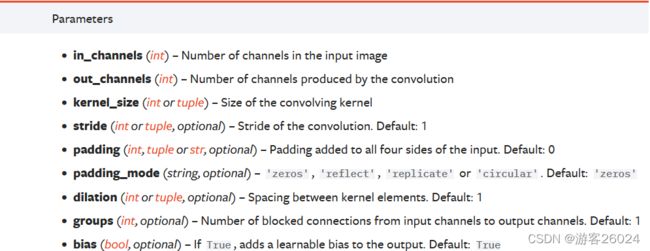
 其中常用的参数有:
in_channels为输入通道;
out_channels为输出通道;
kernel_size为使用卷积的大小;
stride为步长;
padding为填充的大小;
padding_mode为填充的模式;
dilation为空洞卷积;
为理解torch.nn.conv2d,上代码:
import torch
import torch.nn.functional as F

input = torch.tensor([[1, 2, 0, 3, 1],
                      [0, 1, 2, 3, 1],
                      [1, 2, 1, 0, 0],
                      [5, 2, 3, 1, 1],
                      [2, 1, 0, 1, 1]])

kernel = torch.tensor([[1, 2, 1],
                       [0, 1, 0],
                       [2, 1, 0]])

input = torch.reshape(input, (1, 1, 5, 5))
kernel = torch.reshape(kernel, (1, 1, 3, 3))

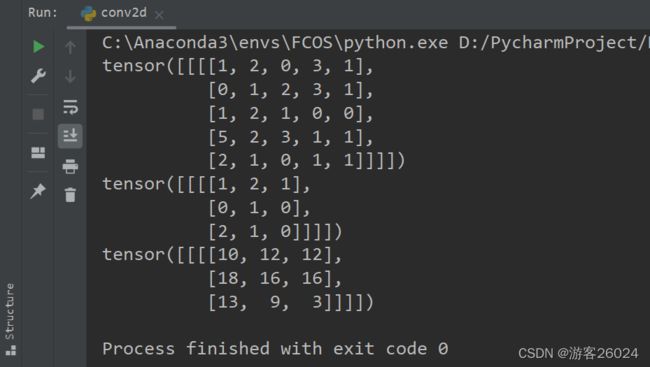
print(input)
print(kernel)
output = F.conv2d(input, kernel, stride=1)
print(output)
以图示意,input,kernel,output
演示一轮推理:
 因为这是一个具体讲如何编程的系列,假设看博客的人都已经具备有卷积神经网络的知识,所以不会具体补充卷积神经网络这些知识,而是直接去使用这些知识。
- 下面具体看一个如何使用卷积层的例子
简单粗暴上代码:
from torch.utils.tensorboard import SummaryWriter
import torch
from torch import nn
import torch.nn.functional as F
from torchvision import transforms
import torchvision
from torch.utils.data import DataLoader

# step 1. 这是创建的一个只含一层卷积的模型类
# 上一章讲过模型三要素 1.nn.Module
class MyModule(nn.Module):
		# 模型三要素 2.定义变量__init__()
    def __init__(self):
        super(MyModule, self).__init__()
        # 这是一个输入通道为3,输出通道为6,kernel_size卷积大小为3,padding为0
        self.conv1 = nn.Conv2d(in_channels=3, out_channels=6, kernel_size=3, stride=1, padding=0)
		# 模型三要素 3.forward()
    def forward(self, x):
        x = self.conv1(x)
        return x

# step 2. 导入或者处理数据
# transforms.ToTensor将img从PIL格式转化为Tensor格式
tran_tensor = transforms.ToTensor()

# 导入数据CIFAR10
# root为数据的位置,train是否是训练集False是测试集,True为训练集,transform为数据增强,download为是否下载该数据集
dataset = torchvision.datasets.CIFAR10(root="../dataset", train=False, transform=tran_tensor, download=True)
# 将数据可视化,使用Tensorboard.SummaryWriter()
writer = SummaryWriter("logs")

# 使用DataLoader处理数据
# dataset为导入数据的名字,batch_size一次性处理多少数据,shuffle是否打乱,True为打乱,False为不打乱,num_workers多不多线程,0为单线程,drop_last设不舍去最后的没有除尽batch_size的余数,False为不舍取
dataloader = DataLoader(dataset=dataset, batch_size=64, shuffle=True, num_workers=0, drop_last=False)

step = 0
for data in dataloader:
    imgs, targets = data
    # 创立单层卷积的模型
    module = MyModule()
    # 将图像喂给模型得到输出
    outputs = module(imgs)
    # 显示原始图像
    writer.add_images("original_imgs", imgs, step)

    # torch.Size([64, 3, 60, 60])
    print(imgs.shape)

    # torch.Size([64, 6, 30, 30]) 因为做了步长为1的卷积没有padding所以size变小了
    print(outputs.shape)

        # 因为outputs为6通道,但是我们Tensorboard显示3通道;所以显示6通道会报错,需要reshape,6通道改成3通道
    outputs = torch.reshape(outputs, (-1, 3, 60, 60))
    # torch.Size([-1,3,30,30]) 64*6*30*30 -> ?*3*30*30 -1=?
    print(outputs.shape)
    # 显示通过一层卷积之后的图像
    writer.add_images("outputs", outputs, step)
    step = step + 1

writer.close()
上一章 8.初识Pytorch之nn.Module神经网络基本架构的使用
下一章 10.初识Pytorch使用池化层并对其进行可视化


