pytorch学习笔记(一)——基本操作,自动求导机制
四:pytorch基本操作
1.检查pytorch是否安装成功
print(torch.__version__)
![]()
2.基本操作
# 基本使用方法
x = torch.empty(5, 3)  # 创建一个矩阵,很小的数,类似0
print(x)
# 使用pytorch框架,必须将所有数据类型都转化成tensor格式,它是最小的一个计算单元
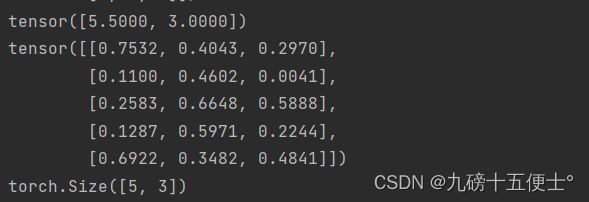
x = torch.rand(5, 3)  # 创建一个随机矩阵
print(x)
# 初始化一个全零矩阵
x = torch.zeros(5, 3, dtype=torch.long)
print(x)
# 直接传入数据
x = torch.tensor([5.5, 3])
print(x)
x = x.new_ones(5, 3, dtype=torch.double) # 根据现有的张量创建新张量
x = torch.rand_like(x, dtype=torch.float) # 覆盖dtype
print(x)
# 打印矩阵维度
print(x.size())3.基本计算方法及索引
# 基本计算方法
y = torch.rand(5, 3) # 加法
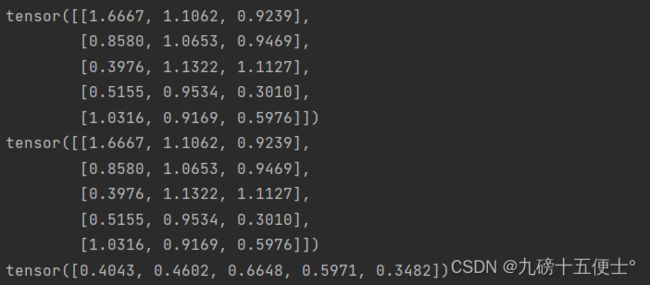
print(x + y)
print(torch.add(x, y)) # 加法的另一种方法
# 索引
print(x[:, 1])4.改变矩阵维度
# view操作可以改变矩阵的维度
x = torch.rand(4, 4)
y = x.view(16)
z = x.view(-1, 8)
print(x.size(), y.size(), z.size())![]()
5.与numpy协同操作
# 与numpy的协同操作
a = torch.ones(5) # 创建一个全为1的张量
b = a.numpy()
print(b)
# numpy 转tensor
a = np.ones(5)
b = torch.from_numpy(a)
print(b)五:自动求导机制
1.两种方法
# 自动求导机制
# 框架最厉害的一点就是帮助我们把反向传播都计算好了
# 方法1
x = torch.randn(3, 4, requires_grad=True)
print(x)
# 方法2
x = torch.randn(3, 4)
x.requires_grad = True
print(x)
b = torch.randn(3, 4, requires_grad=True)
t = x + b
y = t.sum()
print(y)
y.backward()
print(b.grad)
print(x.requires_grad, b.requires_grad, t.requires_grad)2.计算流程
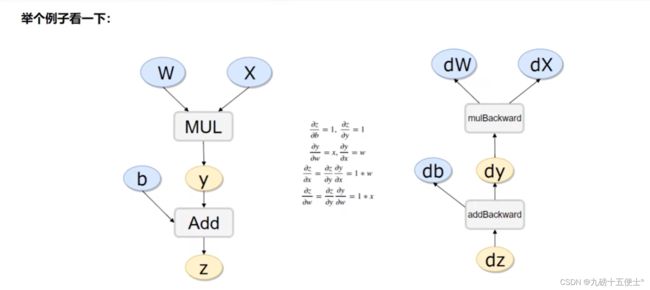
# 计算流程
x = torch.rand(1)
b = torch.rand(1, requires_grad=True)
w = torch.rand(1, requires_grad=True)
print(w)
y = w * x
z = y + b
print(x.requires_grad, w.requires_grad, b.requires_grad, y.requires_grad)
print(x.is_leaf, w.is_leaf, b.is_leaf, y.is_leaf, z.is_leaf)
# 反向传播计算
z.backward(retain_graph=True) # 如果不清零会累加起来
print(w.grad)
print(b.grad)六:线性回归Demo
1.数据与参数配置:
# 线性回归Demo
print("——————————————————————————以下是线性回归Demo————————————————————————")
x_values = [i for i in range(11)]
x_train = np.array(x_values, dtype=np.float32)
x_train = x_train.reshape(-1, 1)
print(x_train.shape)
y_values = [2 * i + 1 for i in x_values]
y_train = np.array(y_values, dtype=np.float32)
y_train = y_train.reshape(-1, 1)
print(y_train.shape)
class LinearRegressionModel(nn.Module):
def __init__(self, input_dim, output_dim):
super(LinearRegressionModel, self).__init__()
self.linear = nn.Linear(input_dim, output_dim) # 输入维度和输出维度
def forward(self, x): # 前向传播函数
out = self.linear(x)
return out
input_dim = 1
output_dim = 1
model = LinearRegressionModel(input_dim, output_dim)
print(model)
# 指定好参数和损失函数
epochs = 1000
learning_rate = 0.01
optimizer = torch.optim.SGD(model.parameters(), lr=learning_rate)
criterion = nn.MSELoss()2.训练回归模型
for epoch in range(epochs):
# 注意转换成tensor
inputs = torch.from_numpy(x_train)
labels = torch.from_numpy(y_train)
# print(inputs)
# 梯度要清零每一次迭代
optimizer.zero_grad()
# 前向传播
outputs = model(inputs)
# 计算损失
loss = criterion(outputs, labels)
# 反向传播
loss.backward()
# 更新权重参数
optimizer.step()
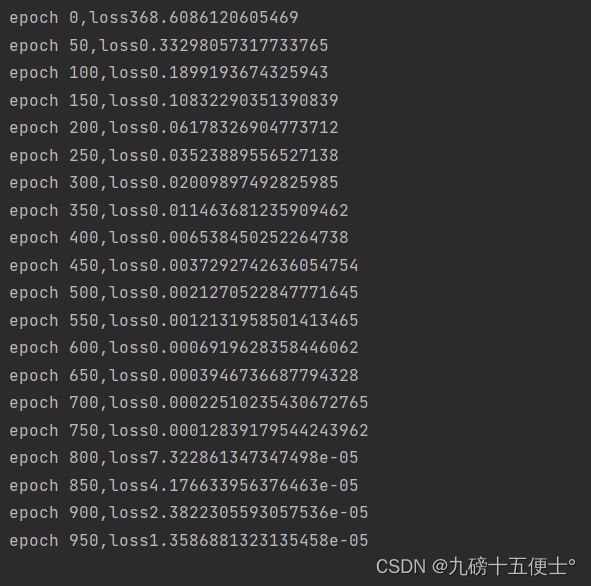
if epoch % 50 == 0:
print('epoch {},loss{}'.format(epoch, loss.item()))3.测试模型预测结果:
# 测试模型预测结果
predicted=model(torch.from_numpy(x_train).requires_grad_()).data.numpy()
print(predicted)4.模型的保存与读取:
# 模型的保存与读取
torch.save(model.state_dict(),'model.plk')
model.load_state_dict(torch.load('model.plk'))5.使用GPU进行训练
6.报错
1.错误:RuntimeError: Expected all tensors to be on the same device, but found at least two devices, cuda:0 and cpu!
原因:参与运算的两个或多个变量,有的在CPU上,有的在GPU上
放到GPU上
2.TypeError: can‘t convert cuda:0 device type tensor to numpy. Use Tensor.cpu()
需要先将 tensor 转换到 CPU ,因为 Numpy 是 CPU-only
7.完整代码
#!/usr/bin/env python3
# -*- coding: utf-8 -*-
_author_ = '张起凡'
import torch
import numpy as np
import torch.nn as nn
print(torch.__version__)
# 基本使用方法
x = torch.empty(5, 3) # 创建一个矩阵,很小的数,类似0
print(x)
# 使用pytorch框架,必须将所有数据类型都转化成tensor格式,它是最小的一个计算单元
x = torch.rand(5, 3) # 创建一个随机矩阵
print(x)
# 初始化一个全零矩阵
x = torch.zeros(5, 3, dtype=torch.long)
print(x)
# 直接传入数据
x = torch.tensor([5.5, 3])
print(x)

x = x.new_ones(5, 3, dtype=torch.double)  # 根据现有的张量创建新张量
x = torch.rand_like(x, dtype=torch.float)  # 覆盖dtype
print(x)

# 打印矩阵维度
print(x.size())
# 基本计算方法
y = torch.rand(5, 3)  # 加法
print(x + y)
print(torch.add(x, y))  # 加法的另一种方法

# 索引
print(x[:, 1])
# view操作可以改变矩阵的维度
x = torch.rand(4, 4)
y = x.view(16)
z = x.view(-1, 8)
print(x.size(), y.size(), z.size())
# 与numpy的协同操作
a = torch.ones(5) # 创建一个全为1的张量
b = a.numpy()
print(type(b))
# numpy 转tensor
a = np.ones(5)
b = torch.from_numpy(a)
print(b)
# 自动求导机制
# 框架最厉害的一点就是帮助我们把反向传播都计算好了
# 方法1
x = torch.randn(3, 4, requires_grad=True)
print(x)

# 方法2
x = torch.randn(3, 4)
x.requires_grad = True
print(x)

b = torch.randn(3, 4, requires_grad=True)
t = x + b
y = t.sum()
print(y)
y.backward()
print(b.grad)
print(x.requires_grad, b.requires_grad, t.requires_grad)
# 计算流程
x = torch.rand(1)
b = torch.rand(1, requires_grad=True)
w = torch.rand(1, requires_grad=True)
print(w)
y = w * x
z = y + b
print(x.requires_grad, w.requires_grad, b.requires_grad, y.requires_grad)
print(x.is_leaf, w.is_leaf, b.is_leaf, y.is_leaf, z.is_leaf)

# 反向传播计算
z.backward(retain_graph=True)  # 如果不清零会累加起来
print(w.grad)
print(b.grad)
# 线性回归Demo
print("——————————————————————————以下是线性回归Demo————————————————————————")
x_values = [i for i in range(11)]
x_train = np.array(x_values, dtype=np.float32)
x_train = x_train.reshape(-1, 1)
print(x_train.shape)
y_values = [2 * i + 1 for i in x_values]
y_train = np.array(y_values, dtype=np.float32)
y_train = y_train.reshape(-1, 1)
print(y_train.shape)
class LinearRegressionModel(nn.Module):
def __init__(self, input_dim, output_dim):
super(LinearRegressionModel, self).__init__()
self.linear = nn.Linear(input_dim, output_dim) # 输入维度和输出维度
def forward(self, x): # 前向传播函数
out = self.linear(x)
return out
input_dim = 1
output_dim = 1
model = LinearRegressionModel(input_dim, output_dim)
print(model)
device = torch.device("cuda:0" if torch.cuda.is_available() else "cpu")
model.to(device)
# 指定好参数和损失函数
epochs = 1000
learning_rate = 0.01
optimizer = torch.optim.SGD(model.parameters(), lr=learning_rate)
criterion = nn.MSELoss()
for epoch in range(epochs):
# 注意转换成tensor
inputs = torch.from_numpy(x_train).to(device)
labels = torch.from_numpy(y_train).to(device)
# print(inputs)
# 梯度要清零每一次迭代
optimizer.zero_grad()
# 前向传播
outputs = model(inputs)
# 计算损失
loss = criterion(outputs, labels)
# 反向传播
loss.backward()
# 更新权重参数
optimizer.step()
if epoch % 50 == 0:
print('epoch {},loss{}'.format(epoch, loss.item()))
# 测试模型预测结果
predicted = model(torch.from_numpy(x_train).to(device).requires_grad_()).data.cpu().numpy()
print(predicted)
# 模型的保存与读取
torch.save(model.state_dict(), 'model.plk')
model.load_state_dict(torch.load('model.plk'))


