双目相机的标定 python_教程丨INDEMIND双目惯性模组运行VINS-Fusion算法示例
本文涉及很多代码及文字,排版、文字错误请见谅。
本文包含约3200字,阅读时间预计12分钟
文章目录
一、SDK的安装
1. Ubuntu版本的安装过程
2. ROS Wrapper版本的安装
(1) `make ros`
(2) 开启权限后运行节点`roslaunch imsee_ros_wrapper start.launch`
(3) 另起终端查看ropic`rostopic list`
(4) 选择一个查看发送内容`rostopic hz /imsee/imu`
二、VINS的编译
1. 安装环境
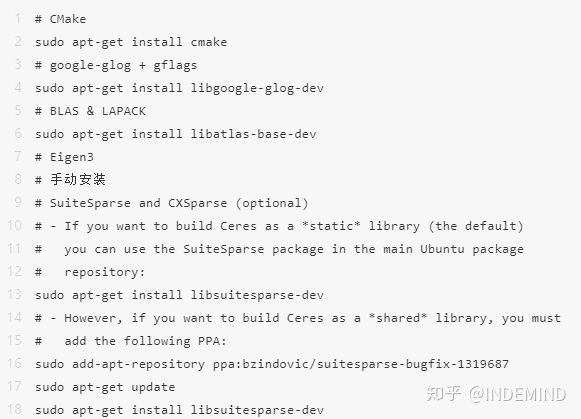
(1) 安装所需库、依赖等
(2) Eigen(手动安装)**
(3) 安装Ceres2. 编译VINS
三、INDEMIND双目惯性模组运行VINS-Fusion
1. 更改配置文件
(1) 获取标定文件
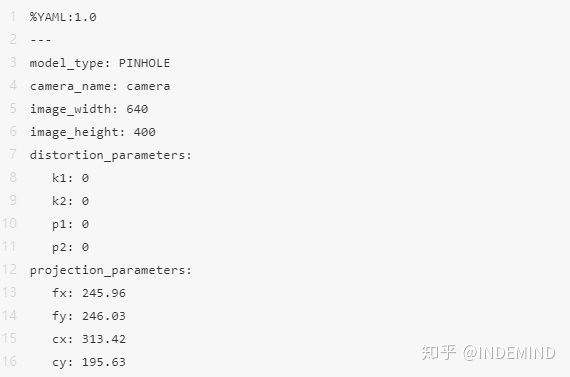
(2) 新建`cam0_pinhole.yaml`(左相机)
(3) 新建`cam1_pinhole.yaml`(右相机)
(4) 新建`Indemind_stereo_imu_config.yaml`
2. 使用INDEMIND双目惯性模组运行VINS-Fusion
(1) `运行Rviz`
(2) `运行VINS-Fusion`
(3) 启动INDEMIND双目惯性模组
环境搭建及调用
环境:Ubuntu16.04,ROS Kinetic
一、SDK的安装
具体安装过程->SDK的安装
地址:https://imsee-sdk-docs.readthedocs.io/zh/latest/src/sdk/install_ubuntu.html
1. 进行Ubuntu版本的安装
(1) make init
(2) make demo
(3) 测试sudo ./demo/output/bin/get_image
用户也可以运行其他样例查看效果,SDKUbuntu下安装完成。
2. 进行ROS Wrapper版本的安装
注意:boost版本,测试1.58与1.65是可以安装成功,1.68不可以。
(1) make ros
(2) 开启权限后运行节点roslaunch imsee_ros_wrapper start.launch
(3) 另起终端查看ropicrostopic list
(4) 选择一个查看发送内容rostopic hz /imsee/imu
用户也可以运行官方Rviz预览查看效果,ROS Wrapper下安装完成。
二、VINS的编译
1.安装环境
VINS-Fusion github地址:https://github.com/HKUST-Aerial-Robotics/VINS-Fusion
(1) 安装所需库、依赖等
(2) Eigen(手动安装)**
源码安装,建议安装3.2.2或者以上版本,本次教程安装的是3.3.1。
源码下载地址:http://eigen.tuxfamily.org/index.php?title=Main_Page
(3) 安装Ceres
官网安装方法及下载地址:http://ceres-solver.org/installation.html
本次安装版本1.14.0
github下载地址:https://github.com/ceres-solver/ceres-solver
解压后进入目录
2. 编译VINS
roslaunch vins vins_rviz.launch
rosrun vins vins_node ~/catkin_ws/src/VINS-Fusion/config/euroc/euroc_stereo_imu_config.yaml
(optional) rosrun loop_fusion loop_fusion_node ~/catkin_ws/src/VINS-Fusion/config/euroc/euroc_stereo_imu_config.yaml
rosbag play YOUR_DATASET_FOLDER/MH_01_easy.bag
三、INDEMIND双目惯性模组运行VINS-Fusion
1. 更改配置文件
根据INDEMIND标定文件,将Euroc数据集的配置文件改为INDEMIND双目惯性模组与IMU参数。
这里给出一份改好的文件,一共包括三个文件,新建一个文件夹,放入下面三个文件
用户只需将自己的标定文件内的参数填入这三个文件即可。
(1) 获取标定文件
运行Uuntu版本下的样例get_device_info将会打印模组的标定参数,具体运行方法见SDK安装中的运行样例,可以得到下图标定参数。
Module info:
id: 2018111100883b3d8bbwe
designer: INDEMINDwsSYSTEM32
fireware_version: 1.1.1-CNAVICAP32.
hardware_version: 1.1.1.�:�r�
lens: ICM20602�9�r�
imu: 120mm��P pP p
viewing_angle: 120��,75��r� p � p
_baseline: OV9281��Q��r�
Left param:
_width: 640, height: 400
_focal_length[0]: 245.96
_principal_point[0]: 318.423
_focal_length[1]: 245.793
_principal_point[1]: 195.635
_focal_length: { 245.96 245.793 }
_principal_point: { 318.423 195.635 }
_TSC: { -0.999977 -0.006624 -0.001162 0.0600095 0.006621 -0.999975 0.002465 2.61872e-05 -0.001178 0.002458 0.999996 -0.002 0 0 0 1 }
_R: { 0.999988 0.0036888 -0.00331281 -0.00368906 0.999993 -7.24943e-05 0.00331252 8.47145e-05 0.999995 }
_P: { 260.561 0 317.946 0 0 260.561 195.495 0 0 0 1 0 }
_K: { 245.96 0 318.423 0 245.793 195.635 0 0 1 }
_D: { 0.563794 0.220819 -0.618616 0.276757 }
Right param:
_width: 640, height: 400
_focal_length[0]: 245.861
_principal_point[0]: 312.777
_focal_length[1]: 246.03
_principal_point[1]: 195.784
_focal_length: { 245.861 246.03 }
_principal_point: { 312.777 195.784 }
_TSC: { -0.99997 0.00354651 0.00679795 -0.0599567 -0.00353089 -0.999991 0.00232702 2.52975e-05 0.00680645 0.0023037 0.999974 -0.002 0 0 0 1 }
_R: { 0.999915 -0.00648092 -0.011273 0.00648181 0.999979 4.20702e-05 0.0112724 -0.000115136 0.999936 }
_P: { 260.561 0 317.946 -31.161 0 260.561 195.495 0 0 0 1 0 }
_K: { 245.861 0 312.777 0 246.03 195.784 0 0 1 }
_D: { 0.575677 0.161192 -0.517131 0.222985 }
Imu param:
_a_max: 176
_g_max: 30
_sigma_g_c: 0.12
_sigma_a_c: 0.009
_sigma_bg: 0.1
_sigma_ba: 0.001
_sigma_gw_c: 4e-05
_sigma_aw_c: 4e-05
_tau: 3600
_g: 9.802
_a0: { 0 0 0 0 }
_T_BS: { 1 0 0 0 0 1 0 0 0 0 1 0 0 0 0 1 }
_Acc: { -0.008097 0.999308 0.001538 0.008065 -0.013054 -0.003092 0.998176 -0.001289 0.0019 -0.007423 0.001276 0.998734 }
_Gyr: { -0.124572 1.001 -0.000519 0.007419 0.492365 -0.001803 0.999118 -9.8e-05 0.143341 -0.006275 0.000768 1.0006 }
Driver Close
Driver unload
(2) 新建cam0_pinhole.yaml(左相机)
这个文件需要改动的部分是fx、fy、cx、cy,用户将获取的左相机内参K_K: { 245.96 0 318.423 0 245.793 195.635 0 0 1 }填入fx、fy、cx、cy即可。
(3)新建cam1_pinhole.yaml(右相机)
这个文件需要改动的部分是fx、fy、cx、cy,用户将获取的右相机内参K_K: { 245.861 0 312.777 0 246.03 195.784 0 0 1 }填入fx、fy、cx、cy即可。
(3)新建Indemind_stereo_imu_config.yaml
%YAML:1.0

#common parameters
#support: 1 imu 1 cam; 1 imu 2 cam: 2 cam;
imu: 1
num_of_cam: 2

imu_topic: "/imsee/imu"
image0_topic: "/imsee/image/left"
image1_topic: "/imsee/image/right"
output_path: "~/output/"

cam0_calib: "cam0_pinhole.yaml"
cam1_calib: "cam1_pinhole.yaml"
image_width: 640
image_height: 400


# Extrinsic parameter between IMU and Camera.
estimate_extrinsic: 0   # 0  Have an accurate extrinsic parameters. We will trust the following imu^R_cam, imu^T_cam, don't change it.
                        # 1  Have an initial guess about extrinsic parameters. We will optimize around your initial guess.

body_T_cam0: !!opencv-matrix
   rows: 4
   cols: 4
   dt: d
   data: [-9.9997700000000000e-01, -6.6239999999999997e-03,
       -1.1620000000000001e-03, 6.0009463039882860e-02,
       6.6210000000000001e-03, -9.9997499999999995e-01,
       2.4650000000000002e-03, 2.6187168570039717e-05,
       -1.1780000000000000e-03, 2.4580000000000001e-03,
       9.9999600000000000e-01, -2.0000000000000000e-03, 0., 0., 0., 1. ]

body_T_cam1: !!opencv-matrix
   rows: 4
   cols: 4
   dt: d
   data: [ -9.9997021870395630e-01, 3.5465086057243763e-03,
       6.7979504905114896e-03, -5.9956664597022216e-02,
       -3.5308852774539250e-03, -9.9999101611613739e-01,
       2.3270210942022453e-03, 2.5297544370180334e-05,
       6.8064500649322943e-03, 2.3036962017883643e-03,
       9.9997389700197870e-01, -2.0000000000000000e-03, 0., 0., 0., 1. ]

#Multiple thread support
multiple_thread: 1

#feature traker paprameters
max_cnt: 176            # max feature number in feature tracking
min_dist: 30            # min distance between two features
freq: 10                # frequence (Hz) of publish tracking result. At least 10Hz for good estimation. If set 0, the frequence will be same as raw image
F_threshold: 1.0        # ransac threshold (pixel)
show_track: 1           # publish tracking image as topic
flow_back: 1            # perform forward and backward optical flow to improve feature tracking accuracy

#optimization parameters
max_solver_time: 0.04  # max solver itration time (ms), to guarantee real time
max_num_iterations: 8   # max solver itrations, to guarantee real time
keyframe_parallax: 10.0 # keyframe selection threshold (pixel)

#imu parameters       The more accurate parameters you provide, the better performance
acc_n: 4.000000000000000e-1        # accelerometer measurement noise standard deviation.
gyr_n:  4.000000000000000e-2        # gyroscope measurement noise standard deviation.
acc_w: 1.0000000000000000e-03      # accelerometer bias random work noise standard deviation.
gyr_w: 1.0000000000000001e-4    # gyroscope bias random work noise standard deviation.
g_norm: 9.81007     # gravity magnitude

#unsynchronization parameters
estimate_td: 0                      # online estimate time offset between camera and imu
td: 0.02                             # initial value of time offset. unit: s. readed image clock + td = real image clock (IMU clock)

#loop closure parameters
load_previous_pose_graph: 0        # load and reuse previous pose graph; load from 'pose_graph_save_path'
pose_graph_save_path: "~/output/pose_graph/" # save and load path
save_image: 1                   # save image in pose graph for visualization prupose; you can close this function by setting 0
其中,topic、图片大小、IMU噪声均已调好。该文件需要更改的为body_T_cam0、body_T_cam1
将获取的左相机_TSC代替文中body_T_cam0,将获取的右相机_TSC代替文中body_T_cam1。
2.使用INDEMIND双目惯性模组运行VINS-Fusion
(1)运行Rviz
(2)运行VINS-Fusion
(3)启动INDEMIND双目惯性模组
至此,INDEMIND双目视觉惯性模组运行VINS-Fusion工程全部部署完毕
测试视频
知乎视频www.zhihu.com*注意
若在运行VINS过程中发现延迟,可重新插拔模组、在SDK配置文件中更改image与imu的频率或重启电脑。
1.SDK的配置文件在/IMSEE-SDK/ros/src/imsee_ros_wrapper/config
2.源码的位置在/IMSEE-SDK/ros/src/imsee_ros_wrapper/src/http://wrapper_nodelet.cc 中373行。
查看话题频率rostopic hz /imsee/imu
INDEMIND双目视觉惯性模组是专为计算机视觉技术研发应用而研发的双目惯性相机,模组采用“双目+IMU”多传感器融合架构,拥有微秒级时间同步机制,减少了传感器数据同步误差,可提供精准实时的1280×800@100FPS图像源与高频率IMU数据,为SLAM研发奠定了良好的前端数据基础。
在出厂时,INDEMIND还对双目视觉惯性模组进行了高精度的专业标定,减少了传感器装配误差,提升精度。并且,INDEMIND双目视觉惯性模组拥有完备的SDK开发工具及丰富的开发文档,无缝支持多种开源项目,节省开发者开发工作。
详细SDK信息,请参考:https://imsee-sdk-docs.readthedocs.io/zh/latest/index.html


