Efficientdet源码详解
1.参数配置
最重要的参数配置如下
-p:配置文件,需要在project文件夹下新建配置文件
 -c:efficientdet的版本,efficientdet B0-B7
 -n:windows为0,linix根据自己的需求修改
 --batch_size:batch大小
 '--data_path:数据集路径
 -p data --batch_size 16
其中,在运行时,需要在project文件夹下新建配置文件,并指定在-p下。其中,mean/std/anchors_scales/anchors_ratios一般不用修改。

2.dataloader数据读取
数据读取部分做得比较简单,没有使用过多的数据增强策略
数据读取部分如下:
-
从json中取出图片名称,并读取图片,并归一化至0-1之间
-
取出对应的标签,并将x,y,w,h转为x1,y1,x2,y2
-
数据增强,仅仅进行标准化、平移、翻转等操作,最后,将图像resize到指定大小
class CocoDataset(Dataset):
    def __init__(self, root_dir, set='train2017', transform=None):

        self.root_dir = root_dir
        self.set_name = set
        self.transform = transform
        # 若是自己创建的coco数据,可以在此指定名称
        self.coco = COCO(os.path.join(self.root_dir, 'annotations', 'instances_' + self.set_name + '.json'))
        self.image_ids = self.coco.getImgIds()

        self.load_classes()

    def load_classes(self):

        # load class names (name -> label)
        categories = self.coco.loadCats(self.coco.getCatIds())
        categories.sort(key=lambda x: x['id'])

        self.classes = {}
        for c in categories:
            self.classes[c['name']] = len(self.classes)

        # also load the reverse (label -> name)
        self.labels = {}
        for key, value in self.classes.items():
            self.labels[value] = key

    def __len__(self):
        return len(self.image_ids)

    def __getitem__(self, idx):
        # 从json中取出图片名称,并读取图片,并归一化至0-1之间
        img = self.load_image(idx)
        # 取出对应的标签,并将x,y,w,h转为x1,y1,x2,y2
        annot = self.load_annotations(idx)
        sample = {'img': img, 'annot': annot}
        if self.transform:
            # 数据增强,仅仅进行标准化、平移、翻转等操作,最后,将图像resize到指定大小
            sample = self.transform(sample)
        return sample

    def load_image(self, image_index):
        image_info = self.coco.loadImgs(self.image_ids[image_index])[0]
        path = os.path.join(self.root_dir, self.set_name, image_info['file_name'])
        img = cv2.imread(path)
        img = cv2.cvtColor(img, cv2.COLOR_BGR2RGB)

        return img.astype(np.float32) / 255.

    def load_annotations(self, image_index):
        # get ground truth annotations
        annotations_ids = self.coco.getAnnIds(imgIds=self.image_ids[image_index], iscrowd=False)
        annotations = np.zeros((0, 5))

        # some images appear to miss annotations
        if len(annotations_ids) == 0:
            return annotations

        # parse annotations
        coco_annotations = self.coco.loadAnns(annotations_ids)
        for idx, a in enumerate(coco_annotations):

            # some annotations have basically no width / height, skip them
            if a['bbox'][2] < 1 or a['bbox'][3] < 1:
                continue

            annotation = np.zeros((1, 5))
            annotation[0, :4] = a['bbox']
            annotation[0, 4] = a['category_id'] - 1
            annotations = np.append(annotations, annotation, axis=0)

        # transform from [x, y, w, h] to [x1, y1, x2, y2]
        annotations[:, 2] = annotations[:, 0] + annotations[:, 2]
        annotations[:, 3] = annotations[:, 1] + annotations[:, 3]

        return annotations
3.backbone
backbone采用efficientnet,详见博客:Efficientnet网络详解及构建_樱花的浪漫的博客-CSDN博客_efficientnet网络 \
需要注意的是,深度可分离卷积在pytorch的实现上,通过指定groups参数实现。

4.BiFPN
首先,FPN实现了高维特征和低维特征的融合,PANet通过自上而下和自上而下的路径实现了更高程度的特征融合。但是,BiFPN做了两个方面的改进:(1)PANet进行特征融合时,是通过Concat的,一般高层和低层的特征贡献程度相同,BiFPN在特征融合时,通过一组可学习的归一化权重参数调整各层贡献程度。(2)BiFPN堆叠多层实现更高维度的特征融合。

在源码的实现上,单个BiFPN有两个核心,
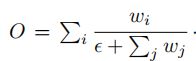
- 第一个是可学习参数的设定。首先,为各层生成一组可学习的权重参数,经过relu激活函数保证权重参数为正。对于权重参数的归一化,论文作者认为softmax归一化太慢,因此采用最简单的归一化:
- 第二个是特征融合,对于特征融合,由于训练了一组权重参数,因此采用add比concat更适宜。在从上到下的路径时,特征融合由三部分组成,如上图(d)所示
最后,对提取的特征分别做分类和回归。