- python + selenium通过滑块验证
weixin_51144854
pythonselenium爬虫opencv
1、介绍使用python进行自动化操作或者爬虫过程中,可能会遇到需要进行验证的情况。本文介绍了两种通过滑块验证的方法:轮廓检测通过OpenCV进行轮廓检测,找到滑块背景中缺口的位置,计算缺口到滑块的距离。模板匹配通过OpenCV分析滑块背景图与滑块的相似度,找到滑块背景图中与滑块最相似的区域就是缺口的位置,然后计算缺口到滑块的距离。2、轮廓检测测试地址:https://accounts.douba
- Python爬虫实战:研究MarkupSafe库相关技术
ylfhpy
爬虫项目实战python爬虫开发语言MarkupSafe
1.引言1.1研究背景与意义随着互联网数据量的爆炸式增长,网页内容自动提取与分析技术在信息检索、舆情监控、数据挖掘等领域的需求日益凸显。网络爬虫作为获取网页内容的核心工具,能够自动化采集互联网信息。然而,直接渲染爬取的网页内容存在安全隐患,特别是跨站脚本攻击(XSS)风险。攻击者可能通过注入恶意脚本窃取用户信息或破坏网站功能。MarkupSafe作为Python的安全字符串处理库,能够有效处理不可
- Python爬虫实战:研究sanitize库相关技术
ylfhpy
爬虫项目实战python爬虫网络开发语言安全sanitize
1.引言1.1研究背景与意义在当今数字化时代,互联网已成为人们获取信息、交流互动的重要平台。随着Web2.0技术的发展,用户生成内容(UGC)、社交媒体嵌入、第三方插件等功能极大丰富了网页的内容和交互性,但也带来了严峻的安全挑战。根据Web应用安全联盟(WAS)的统计数据,2025年全球范围内因网页安全漏洞导致的数据泄露事件超过15万起,造成的经济损失高达250亿美元。其中,跨站脚本攻击(XSS)
- Python爬虫实战:研究xmltodict库相关技术
ylfhpy
爬虫项目实战python爬虫开发语言xmltodict
1.引言1.1研究背景与意义气象数据在农业生产、交通规划、灾害预警等多个领域具有重要应用价值。传统的气象数据获取方式主要依赖于气象部门发布的统计信息,存在更新不及时、数据维度有限等问题。随着互联网技术的发展,气象网站提供了丰富的实时气象数据,但这些数据通常以HTML、XML等非结构化或半结构化形式存在,难以直接利用。因此,开发高效的数据采集与解析系统具有重要的现实意义。1.2国内外研究现状网络爬虫
- 【TVM 教程】PAPI 入门
ApacheTVM是一个深度的深度学习编译框架,适用于CPU、GPU和各种机器学习加速芯片。更多TVM中文文档可访问→https://tvm.hyper.ai/性能应用程序编程接口(PerformanceApplicationProgrammingInterface,简称PAPI)是一个可在各种平台上提供性能计数器的库。在指定的运行期间,性能计数器提供处理器行为的准确底层信息,包含简单的指标,如总
- Pthon httpx 使用代理下载文件(qbit)
前言技术栈Python3.11.8httpx0.28.1示例代码#encoding:utf-8#author:qbit#date:2025-06-30#summary:httpx使用代理下载文件importhttpxproxy='http://127.0.0.1:8081'defDownFile(url,file):withopen(file,'wb')asf:withhttpx.stream('
- python网络安全实战_基于Python网络爬虫实战
weixin_39907850
python网络安全实战
文件的操作:一般都要使用os模块和os.path模块importos.pathos.path.exists('D:\\Python\\1.txt')#判断文件是否存在abspath(path)#返回path所在的绝对路径dirname(p)#返回目录的路径exists(path)#判断文件是否存在getatime(filename)#返回文件的最后访问时间getctime(filename)#返回
- Java流式处理
太阳伞下的阿呆
java生成器迭代器stream流式处理
在Java中,没有直接类似Python生成器的语法,但可以通过迭代器(Iterator)和流式处理(如使用Spliterator或ReactiveStreams)来实现类似生成器的功能。此外,也可以通过BlockingQueue和线程的组合实现异步文件解压流。以下是几种实现方式:**方法1:使用****Iterator**实现一个Iterator,在每次调用next()时返回解压完成的下一个文件名
- 【Python系列PyCharm控制台pip install报错】如何解决pip安装报错ModuleNotFoundError: No module named ‘numpy’问题
【Python系列PyCharm控制台pipinstall报错】如何解决pip安装报错ModuleNotFoundError:Nomodulenamed‘numpy’问题摘要在日常Python开发过程中,pipinstall相关的问题频繁困扰着新手和老手。尤其是在PyCharm控制台下执行pipinstallnumpy后,仍然报ModuleNotFoundError:Nomodulenamed'n
- 【Python系列PyCharm控制台pip install报错】如何解决pip安装报错ModuleNotFoundError: No module named ‘flask’问题
lyzybbs
全栈Bug解决方案专栏pythonpycharmpipsklearn开发语言flaskpandas
【Python系列PyCharm控制台pipinstall报错】如何解决pip安装报错ModuleNotFoundError:Nomodulenamed‘flask’问题摘要在进行Python开发时,我们常常会遇到通过pipinstall安装依赖包时出现的各种问题。其中最常见的报错之一是ModuleNotFoundError:Nomodulenamed‘flask’。这个错误通常发生在安装Flas
- MCP+A2A:从实验室到生产环境的落地之旅
CarlowZJ
AI应用落地+MCP+A2A数据库MCP+A2A
目录摘要一、引言二、MCP与A2A概念讲解(一)MCP(ModelContextProtocol)(二)A2A(Application-to-Application)(三)MCP与A2A的融合三、MCP+A2A技术架构图与工作流程图(一)整体架构图(二)工作流程图四、MCP+A2A代码示例(一)基于Python的MCP+A2A通信示例(二)基于Java的MCP+A2A应用集成示例五、MCP+A2A
- Python爬虫实战:研究difflib库相关技术
ylfhpy
爬虫项目实战python爬虫easyui开发语言前端difflib
1.引言1.1研究背景与意义在信息爆炸的数字时代,互联网每天产生海量文本内容。据统计,全球新闻网站日均发布文章超过300万篇,社交媒体平台产生的文本信息量更以亿级单位增长。这种信息过载带来了内容同质化、抄袭剽窃等问题,给新闻媒体行业、学术研究领域和搜索引擎优化等带来了挑战。文本相似度分析作为自然语言处理的重要分支,能够有效识别内容间的相似程度,具有重要的应用价值:新闻媒体行业:通过检测新闻抄袭和重
- 机器学习在智能供应链中的应用:需求预测与库存优化
Blossom.118
机器学习与人工智能机器学习人工智能机器人深度学习python神经网络sklearn
在当今全球化的商业环境中,供应链管理的效率和灵活性对于企业的竞争力至关重要。智能供应链通过整合先进的信息技术,如物联网(IoT)、大数据和机器学习,能够实现从原材料采购到产品交付的全流程优化。机器学习技术在智能供应链中的应用尤为突出,尤其是在需求预测和库存优化方面。本文将探讨机器学习在智能供应链中的应用,并分析其带来的机遇和挑战。一、智能供应链中的需求预测准确的需求预测是供应链管理的核心。需求预测
- 面向隐私保护的机器学习:联邦学习技术解析与应用
Blossom.118
机器学习与人工智能机器学习人工智能深度学习tensorflowpython神经网络cnn
在当今数字化时代,数据隐私和安全问题日益受到关注。随着《数据安全法》《个人信息保护法》等法律法规的实施,企业和机构在数据处理和分析过程中面临着越来越严格的合规要求。然而,机器学习模型的训练和优化往往需要大量的数据支持,这就产生了一个矛盾:如何在保护数据隐私的前提下,充分利用数据的价值进行机器学习模型的训练和优化?联邦学习(FederatedLearning)作为一种新兴的隐私保护技术,为解决这一问
- 人工智能-基础篇-10-什么是卷积神经网络CNN(网格状数据处理:输入层,卷积层,激活函数,池化层,全连接层,输出层等)
weisian151
人工智能人工智能cnn神经网络
卷积神经网络(ConvolutionalNeuralNetwork,CNN)是一种专为处理网格状数据(如图像、视频、音频)设计的深度学习模型。它通过模拟生物视觉机制,从原始数据中自动提取多层次的特征,最终实现高效的分类、检测或生成任务。1、核心概念与原理1、生物视觉启发局部感受野:模仿人类视觉皮层神经元仅响应局部区域刺激的特性,每个神经元关注输入数据的局部区域(如图像的一小块区域)。权值共享:同一
- 3 大语言模型预训练数据-3.2 数据处理-3.2.2 冗余去除——2.SimHash算法文本去重实战案例:新闻文章去重场景
SimHash算法文本去重实战案例:新闻文章去重场景一、案例背景与目标二、具体实现步骤与示例1.**待去重文本示例**2.**步骤1:文本预处理与特征提取**3.**步骤2:特征向量化与哈希映射**4.**步骤3:特征向量聚合**5.**步骤4:降维生成SimHash值**6.**步骤5:计算汉明距离与去重判断**三、工程化实现代码(Python简化示例)四、案例总结与优化点一、案例背景与目标假设
- python系列教程246——多态
人工智能AI技术
python系列教程python开发语言
朋友们,如需转载请标明出处:https://blog.csdn.net/jiangjunshow声明:在人工智能技术教学期间,不少学生向我提一些python相关的问题,所以为了让同学们掌握更多扩展知识更好地理解AI技术,我让助理负责分享这套python系列教程,希望能帮到大家!由于这套python教程不是由我所写(有时候有空也会参与编写),所以不如我的人工智能教程风趣幽默,学起来比较枯燥;但它的知
- Python 解析 AI 在能源管理与智能电网中的应用
头发在线失联
python人工智能开发语言
```htmlPython解析AI在能源管理与智能电网中的应用Python解析AI在能源管理与智能电网中的应用随着全球对可持续发展的重视和能源需求的不断增长,能源管理与智能电网技术正在成为研究和实践的重要领域。在这个背景下,人工智能(AI)作为一项前沿技术,正被广泛应用于能源管理与智能电网中,以提高效率、优化资源分配并减少环境影响。本文将探讨Python如何在这一领域中发挥作用,并解析其具体应用场
- 如何实现聊天模型响应流式处理
yunwu12777
langchain
在现代人工智能应用中,流式处理聊天模型的响应成为一种常见需求,特别是在需要实时输出或大规模处理时。本文将详细介绍如何在Python中实现聊天模型的同步和异步流式处理,使用langchain库中提供的ChatAnthropic模型作为示例。技术背景介绍流式处理是指从模型逐步获取输出,而不是等待整个输出完成。这对于处理长文本生成或需要动态响应的应用场景特别有用。langchain库中的聊天模型实现了R
- 解锁UV工具新玩法:让Python脚本运行更高效的实用技巧
marao
pythonuv深度学习开发语言人工智能
作为Python开发者,你是否经常被依赖安装的漫长等待、虚拟环境的繁琐管理,或是脚本分享时“环境不一致”的问题困扰?近年来,一款名为UV的工具悄然兴起,它不仅以极速安装依赖著称,更通过一系列创新设计重构了Python脚本的运行逻辑。本文主要介绍UV的三大实用技巧,从“依赖即代码”到“动态环境隔离”,体验真正“即写即跑”的高效开发模式。1.极速启动:1秒搞定依赖安装,告别虚拟环境烦恼传统Python
- Centos7.9 使用宝塔部署Python3.12 .0
cceyatao
python宝塔python3.12python项目管理器
使用宝塔安装Python3.12运行之后提示ImportError:Nomodulenamed_ssl,因为服务器有python2.7的项目正在运行,所以需要新建python3.12.0因为CentOS7默认的OpenSSL1.0.x较旧,不满足Python3.12的要求(需要1.1.1或更高)1、安装OpenSSL:CentOS7默认OpenSSL可能较旧(1.0.x)。安装OpenSSL1.1
- python中解决Chrome中文字体显示为方框的问题
张苹果博客
pythonchrome开发语言
当您在CentOS或RHEL系统上处理中文内容时,可能会遇到字体显示为方框或乱码的情况。这是因为系统默认没有安装中文字体包。本指南将详细介绍如何正确安装和配置中文字体。原文地址:python中解决Chrome中文字体显示为方框的问题-张苹果博客字体显示问题示例如下:在CentOS/RHEL上安装中文字体的正确方法1.使用yum安装中文字体#安装文泉驿中文字体sudoyuminstall-ywqy-
- CPO-CNN-GRU-Attention、CNN-GRU-Attention、CPO-CNN-GRU、CNN-GRU四模型多变量时序预测对比
Matlab科研辅导帮
cnngru人工智能
✅作者简介:热爱科研的Matlab仿真开发者,擅长数据处理、建模仿真、程序设计、完整代码获取、论文复现及科研仿真。个人主页:Matlab科研工作室个人信条:格物致知,求助可私信。内容介绍多变量时序预测在诸多领域扮演着至关重要的角色,例如金融、气象和工业控制等。近年来,深度学习方法在时序预测任务中取得了显著的进展。本文旨在系统地比较四种基于卷积神经网络(CNN)和循环神经网络(GRU)的不同架构,包
- Python包管理新纪元:极速工具 uv 完全指南(2025最新版)
coder_风逝
Python数据挖掘分析pythonuv开发语言
作为Python开发者,你是否还在忍受pip缓慢的依赖解析速度?是否厌倦了在virtualenv、pip-tools和poetry之间来回切换?今天我要向大家介绍一款革命性的工具—uv,它将彻底改变你的Python开发体验!一、uv是什么?uv是由打造了Ruff(Python超速Linter)的Astral团队开发的全新Python包管理工具,基于Rust编写,旨在成为"Python界的Cargo
- Python 包管理新选择:全面了解 uv(附 Conda 对比)
茫茫人海一粒沙
pythonuvconda
在Python的世界里,我们常用pip安装依赖,用venv创建虚拟环境,还可能用pip-tools来生成锁文件。这些工具虽然灵活,但组合使用时也容易让人混乱。最近,一个名叫uv的新工具火了起来,目标是统一和简化整个Python包管理流程。uv是什么?uv是由Astral开发的一个超快的Python包管理器,用Rust编写。它旨在作为pip、pip-tools、virtualenv和python-b
- DeepSeek:AI驱动的效率革命与实战案例解
weixin_45788582
人工智能aiDeepSeek
在人工智能技术的浪潮中,DeepSeek作为一款专注实现AGI(通用人工智能)的先锋工具,正通过其强大的自然语言处理(NLP)与分布式计算能力,重新定义高效办公的边界。以下通过技术解析与实战案例,展现DeepSeek如何赋能个人与企业,开启职场效率革命。一、技术革新:DeepSeek的核心竞争力深度学习赋能DeepSeek的技术架构基于BERT、Transformer等先进深度学习模型,通过构建复
- AI驱动的智能电网:平衡供需提高效率
AI智能应用
AI大模型应用入门实战与进阶javapythonjavascriptkotlingolang架构人工智能
智能电网,AI,机器学习,预测模型,优化算法,供需平衡,能源效率1.背景介绍随着全球能源需求的不断增长和可再生能源的快速发展,传统电网面临着越来越多的挑战。传统的电网结构是集中式供电,难以适应分布式能源的接入和负荷需求的波动性。智能电网应运而生,它利用先进的通信技术、传感器网络和数据分析技术,实现电网的自动化、智能化和可视化,从而提高电网的可靠性、效率和安全性。人工智能(AI)作为一种新兴技术,在
- 同花顺python_【本地直连】同花顺 Python量化交易接口上线
weixin_39938724
同花顺python
来源:雪球App,作者:私募之家THS,(https://xueqiu.com/5808549553/129022113)导读:同花顺智能交易终端MindGo版已上线2年多,凭借着同花顺深厚的技术底蕴,不断地对终端进行优化。至今,已服务近1000位个人客户,超过200家私募机构,市场份额不断扩大。目前终端已实现:支持股票、指数、基金、期货、外汇、黄金T+D等6个品种日/分钟级策略回测投研策略无缝对
- 基于SpringBoot律师事务所案件管理系统的设计与实现
一点教程
Java项目springboot后端javaspring律师事务所案件管理系统
博主主页:一点教程博主简介:专注Java技术领域和毕业设计项目实战、Java微信小程序、安卓等技术开发,远程调试部署、代码讲解、文档指导、ppt制作等技术指导。主要内容:毕业设计,SpringBoot、Vue、SSM、HLMT、Jsp、PHP、Python、Nodejs、小程序、安卓app、大数据等设计与开发感兴趣的可以先收藏起来,还有大家在毕设选题,项目以及论文编写等相关问题都可以和博主沟通,希
- Python爬虫实战:使用Scrapy+Selenium+Playwright高效爬取Stack Overflow问答数据
Python爬虫项目
2025年爬虫实战项目python爬虫scrapy微信开发语言科技selenium
摘要本文将详细介绍如何使用Python生态中最先进的爬虫技术组合(Scrapy+Selenium+Playwright)来爬取StackOverflow的问答数据。我们将从基础爬虫原理讲起,逐步深入到分布式爬虫、反反爬策略、数据存储等高级话题,并提供完整的可运行代码示例。本文适合有一定Python基础,想要掌握专业级网络爬虫技术的开发者阅读。1.爬虫技术概述1.1为什么选择StackOverflo
- html页面js获取参数值
0624chenhong
html
1.js获取参数值js
function GetQueryString(name)
{
var reg = new RegExp("(^|&)"+ name +"=([^&]*)(&|$)");
var r = windo
- MongoDB 在多线程高并发下的问题
BigCat2013
mongodbDB高并发重复数据
最近项目用到 MongoDB , 主要是一些读取数据及改状态位的操作. 因为是结合了最近流行的 Storm进行大数据的分析处理,并将分析结果插入Vertica数据库,所以在多线程高并发的情境下, 会发现 Vertica 数据库中有部分重复的数据. 这到底是什么原因导致的呢?笔者开始也是一筹莫 展,重复去看 MongoDB 的 API , 终于有了新发现 :
com.mongodb.DB 这个类有
- c++ 用类模版实现链表(c++语言程序设计第四版示例代码)
CrazyMizzz
数据结构C++
#include<iostream>
#include<cassert>
using namespace std;
template<class T>
class Node
{
private:
Node<T> * next;
public:
T data;
- 最近情况
麦田的设计者
感慨考试生活
在五月黄梅天的岁月里,一年两次的软考又要开始了。到目前为止,我已经考了多达三次的软考,最后的结果就是通过了初级考试(程序员)。人啊,就是不满足,考了初级就希望考中级,于是,这学期我就报考了中级,明天就要考试。感觉机会不大,期待奇迹发生吧。这个学期忙于练车,写项目,反正最后是一团糟。后天还要考试科目二。这个星期真的是很艰难的一周,希望能快点度过。
- linux系统中用pkill踢出在线登录用户
被触发
linux
由于linux服务器允许多用户登录,公司很多人知道密码,工作造成一定的障碍所以需要有时踢出指定的用户
1/#who 查出当前有那些终端登录(用 w 命令更详细)
# who
root pts/0 2010-10-28 09:36 (192
- 仿QQ聊天第二版
肆无忌惮_
qq
在第一版之上的改进内容:
第一版链接:
http://479001499.iteye.com/admin/blogs/2100893
用map存起来号码对应的聊天窗口对象,解决私聊的时候所有消息发到一个窗口的问题.
增加ViewInfo类,这个是信息预览的窗口,如果是自己的信息,则可以进行编辑.
信息修改后上传至服务器再告诉所有用户,自己的窗口
- java读取配置文件
知了ing
1,java读取.properties配置文件
InputStream in;
try {
in = test.class.getClassLoader().getResourceAsStream("config/ipnetOracle.properties");//配置文件的路径
Properties p = new Properties()
- __attribute__ 你知多少?
矮蛋蛋
C++gcc
原文地址:
http://www.cnblogs.com/astwish/p/3460618.html
GNU C 的一大特色就是__attribute__ 机制。__attribute__ 可以设置函数属性(Function Attribute )、变量属性(Variable Attribute )和类型属性(Type Attribute )。
__attribute__ 书写特征是:
- jsoup使用笔记
alleni123
java爬虫JSoup
<dependency>
<groupId>org.jsoup</groupId>
<artifactId>jsoup</artifactId>
<version>1.7.3</version>
</dependency>
2014/08/28
今天遇到这种形式,
- JAVA中的集合 Collectio 和Map的简单使用及方法
百合不是茶
listmapset
List ,set ,map的使用方法和区别
java容器类类库的用途是保存对象,并将其分为两个概念:
Collection集合:一个独立的序列,这些序列都服从一条或多条规则;List必须按顺序保存元素 ,set不能重复元素;Queue按照排队规则来确定对象产生的顺序(通常与他们被插入的
- 杀LINUX的JOB进程
bijian1013
linuxunix
今天发现数据库一个JOB一直在执行,都执行了好几个小时还在执行,所以想办法给删除掉
系统环境:
ORACLE 10G
Linux操作系统
操作步骤如下:
第一步.查询出来那个job在运行,找个对应的SID字段
select * from dba_jobs_running--找到job对应的sid
&n
- Spring AOP详解
bijian1013
javaspringAOP
最近项目中遇到了以下几点需求,仔细思考之后,觉得采用AOP来解决。一方面是为了以更加灵活的方式来解决问题,另一方面是借此机会深入学习Spring AOP相关的内容。例如,以下需求不用AOP肯定也能解决,至于是否牵强附会,仁者见仁智者见智。
1.对部分函数的调用进行日志记录,用于观察特定问题在运行过程中的函数调用
- [Gson六]Gson类型适配器(TypeAdapter)
bit1129
Adapter
TypeAdapter的使用动机
Gson在序列化和反序列化时,默认情况下,是按照POJO类的字段属性名和JSON串键进行一一映射匹配,然后把JSON串的键对应的值转换成POJO相同字段对应的值,反之亦然,在这个过程中有一个JSON串Key对应的Value和对象之间如何转换(序列化/反序列化)的问题。
以Date为例,在序列化和反序列化时,Gson默认使用java.
- 【spark八十七】给定Driver Program, 如何判断哪些代码在Driver运行,哪些代码在Worker上执行
bit1129
driver
Driver Program是用户编写的提交给Spark集群执行的application,它包含两部分
作为驱动: Driver与Master、Worker协作完成application进程的启动、DAG划分、计算任务封装、计算任务分发到各个计算节点(Worker)、计算资源的分配等。
计算逻辑本身,当计算任务在Worker执行时,执行计算逻辑完成application的计算任务
- nginx 经验总结
ronin47
nginx 总结
深感nginx的强大,只学了皮毛,把学下的记录。
获取Header 信息,一般是以$http_XX(XX是小写)
获取body,通过接口,再展开,根据K取V
获取uri,以$arg_XX
&n
- 轩辕互动-1.求三个整数中第二大的数2.整型数组的平衡点
bylijinnan
数组
import java.util.ArrayList;
import java.util.Arrays;
import java.util.List;
public class ExoWeb {
public static void main(String[] args) {
ExoWeb ew=new ExoWeb();
System.out.pri
- Netty源码学习-Java-NIO-Reactor
bylijinnan
java多线程netty
Netty里面采用了NIO-based Reactor Pattern
了解这个模式对学习Netty非常有帮助
参考以下两篇文章:
http://jeewanthad.blogspot.com/2013/02/reactor-pattern-explained-part-1.html
http://gee.cs.oswego.edu/dl/cpjslides/nio.pdf
- AOP通俗理解
cngolon
springAOP
1.我所知道的aop 初看aop,上来就是一大堆术语,而且还有个拉风的名字,面向切面编程,都说是OOP的一种有益补充等等。一下子让你不知所措,心想着:怪不得很多人都和 我说aop多难多难。当我看进去以后,我才发现:它就是一些java基础上的朴实无华的应用,包括ioc,包括许许多多这样的名词,都是万变不离其宗而 已。 2.为什么用aop&nb
- cursor variable 实例
ctrain
variable
create or replace procedure proc_test01
as
type emp_row is record(
empno emp.empno%type,
ename emp.ename%type,
job emp.job%type,
mgr emp.mgr%type,
hiberdate emp.hiredate%type,
sal emp.sal%t
- shell报bash: service: command not found解决方法
daizj
linuxshellservicejps
今天在执行一个脚本时,本来是想在脚本中启动hdfs和hive等程序,可以在执行到service hive-server start等启动服务的命令时会报错,最终解决方法记录一下:
脚本报错如下:
./olap_quick_intall.sh: line 57: service: command not found
./olap_quick_intall.sh: line 59
- 40个迹象表明你还是PHP菜鸟
dcj3sjt126com
设计模式PHP正则表达式oop
你是PHP菜鸟,如果你:1. 不会利用如phpDoc 这样的工具来恰当地注释你的代码2. 对优秀的集成开发环境如Zend Studio 或Eclipse PDT 视而不见3. 从未用过任何形式的版本控制系统,如Subclipse4. 不采用某种编码与命名标准 ,以及通用约定,不能在项目开发周期里贯彻落实5. 不使用统一开发方式6. 不转换(或)也不验证某些输入或SQL查询串(译注:参考PHP相关函
- Android逐帧动画的实现
dcj3sjt126com
android
一、代码实现:
private ImageView iv;
private AnimationDrawable ad;
@Override
protected void onCreate(Bundle savedInstanceState)
{
super.onCreate(savedInstanceState);
setContentView(R.layout
- java远程调用linux的命令或者脚本
eksliang
linuxganymed-ssh2
转载请出自出处:
http://eksliang.iteye.com/blog/2105862
Java通过SSH2协议执行远程Shell脚本(ganymed-ssh2-build210.jar)
使用步骤如下:
1.导包
官网下载:
http://www.ganymed.ethz.ch/ssh2/
ma
- adb端口被占用问题
gqdy365
adb
最近重新安装的电脑,配置了新环境,老是出现:
adb server is out of date. killing...
ADB server didn't ACK
* failed to start daemon *
百度了一下,说是端口被占用,我开个eclipse,然后打开cmd,就提示这个,很烦人。
一个比较彻底的解决办法就是修改
- ASP.NET使用FileUpload上传文件
hvt
.netC#hovertreeasp.netwebform
前台代码:
<asp:FileUpload ID="fuKeleyi" runat="server" />
<asp:Button ID="BtnUp" runat="server" onclick="BtnUp_Click" Text="上 传" />
- 代码之谜(四)- 浮点数(从惊讶到思考)
justjavac
浮点数精度代码之谜IEEE
在『代码之谜』系列的前几篇文章中,很多次出现了浮点数。 浮点数在很多编程语言中被称为简单数据类型,其实,浮点数比起那些复杂数据类型(比如字符串)来说, 一点都不简单。
单单是说明 IEEE浮点数 就可以写一本书了,我将用几篇博文来简单的说说我所理解的浮点数,算是抛砖引玉吧。 一次面试
记得多年前我招聘 Java 程序员时的一次关于浮点数、二分法、编码的面试, 多年以后,他已经称为了一名很出色的
- 数据结构随记_1
lx.asymmetric
数据结构笔记
第一章
1.数据结构包括数据的
逻辑结构、数据的物理/存储结构和数据的逻辑关系这三个方面的内容。 2.数据的存储结构可用四种基本的存储方法表示,它们分别是
顺序存储、链式存储 、索引存储 和 散列存储。 3.数据运算最常用的有五种,分别是
查找/检索、排序、插入、删除、修改。 4.算法主要有以下五个特性:
输入、输出、可行性、确定性和有穷性。 5.算法分析的
- linux的会话和进程组
网络接口
linux
会话: 一个或多个进程组。起于用户登录,终止于用户退出。此期间所有进程都属于这个会话期。会话首进程:调用setsid创建会话的进程1.规定组长进程不能调用setsid,因为调用setsid后,调用进程会成为新的进程组的组长进程.如何保证? 先调用fork,然后终止父进程,此时由于子进程的进程组ID为父进程的进程组ID,而子进程的ID是重新分配的,所以保证子进程不会是进程组长,从而子进程可以调用se
- 二维数组 元素的连续求解
1140566087
二维数组ACM
import java.util.HashMap;
public class Title {
public static void main(String[] args){
f();
}
// 二位数组的应用
//12、二维数组中,哪一行或哪一列的连续存放的0的个数最多,是几个0。注意,是“连续”。
public static void f(){
- 也谈什么时候Java比C++快
windshome
javaC++
刚打开iteye就看到这个标题“Java什么时候比C++快”,觉得很好笑。
你要比,就比同等水平的基础上的相比,笨蛋写得C代码和C++代码,去和高手写的Java代码比效率,有什么意义呢?
我是写密码算法的,深刻知道算法C和C++实现和Java实现之间的效率差,甚至也比对过C代码和汇编代码的效率差,计算机是个死的东西,再怎么优化,Java也就是和C
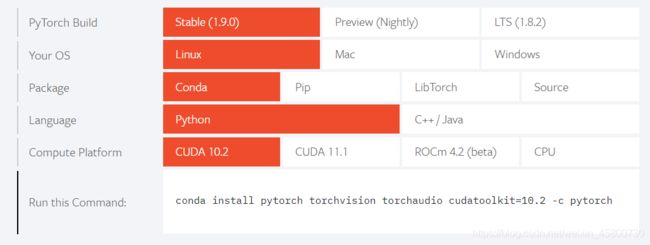 复制命令
复制命令 整个安装过程一个bug接着一个,从头进行了3次,终于成功了,希望自己之后的学习过程就算不是一帆风顺,也能化险为夷,绝处逢生!