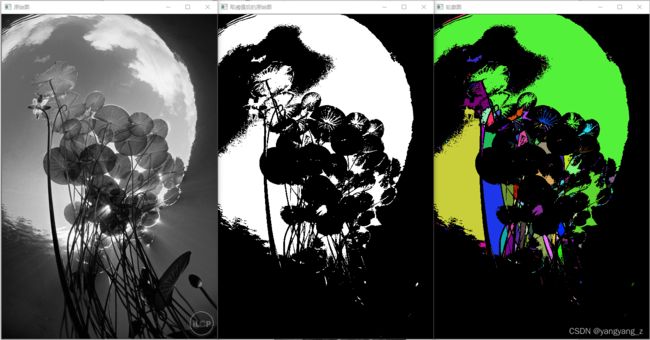
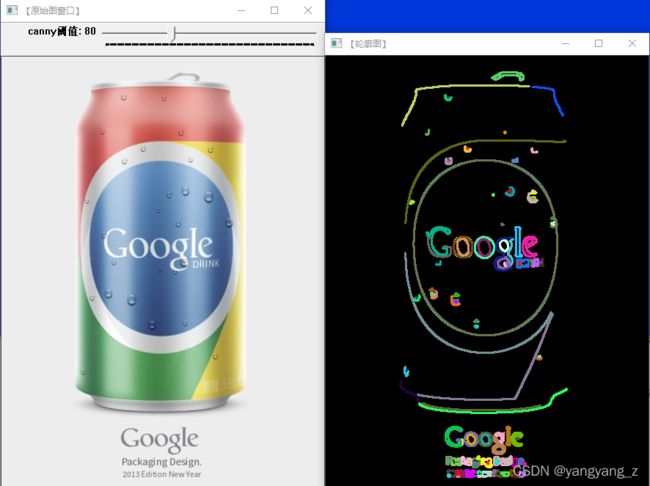
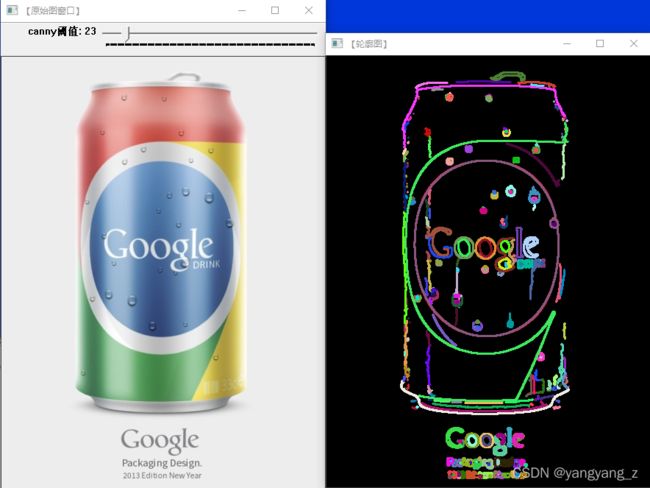
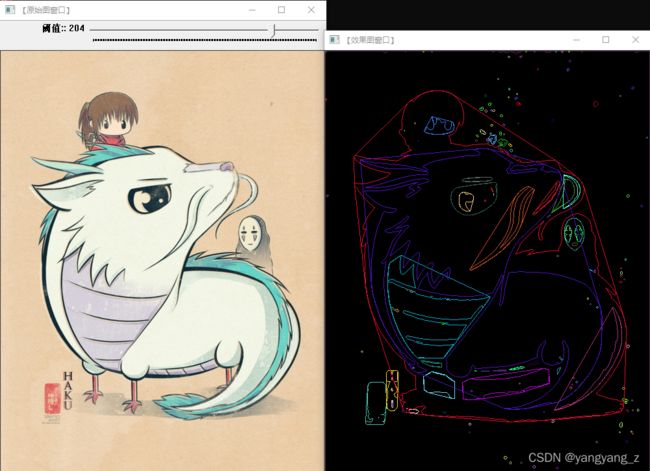
虽然Canny之类的边缘检测算法可以根据像素之间的差异,检测出轮廓边界的像素,但是它并没有将轮廓作为一个整体。
一个轮廓一般对应一系列的点,也就是图像中的一条曲线,其表示方法可能根据不同的情况而有所不同。在OpenCV中可以用findContours()函数从二值图像中查找轮廓。
#include
#include
using namespace cv;
static void test()
{
//1、载入原始图,且必须以二值图模式载入
Mat srcImage = imread("69_1.jpg", 0);
imshow("原始图", srcImage);
//2、初始化结果图
Mat dstImage = Mat::zeros(srcImage.rows, srcImage.cols, CV_8UC3);
//3、srcImage取大于阈值119的那部分
srcImage = srcImage > 119;
imshow("取阈值后的原始图", srcImage);
//4、定义轮廓和层次结构
std::vector<std::vector<Point>> contours;
std::vector<Vec4i> hierarchy;
//5、查找轮廓
findContours(srcImage, contours, hierarchy, RETR_CCOMP, CHAIN_APPROX_SIMPLE);
//6、遍历所有顶层的轮廓,以随机颜色绘制出每个连接组件颜色
int index = 0;
for (; index >= 0; index = hierarchy[index][0])
{
Scalar color(rand() & 255, rand() & 255, rand() & 255);
drawContours(dstImage, contours, index, color, FILLED, 8, hierarchy);
}
//7、显示最后的轮廓图
imshow("轮廓图", dstImage);
waitKey(0);
}
int main()
{
test();
system("pause");
return 0;
}
#include
#include
#include
using namespace cv;
static std::string windows_name1 = "【原始图窗口】";
static std::string windows_name2 = "【轮廓图】";
static Mat g_srcImage, g_grayImage, g_cannyMat_output;
static int g_nThresh = 80, g_nThresh_max = 255;
static RNG g_rng(12345);
std::vector<std::vector<Point>> g_vContours;
std::vector<Vec4i> g_vHierarchy;
static void on_ThreshChange(int, void*);
static void test()
{
//1、改变console字体颜色
system("color 1F");
//2、加载源图像
g_srcImage = imread("70_1.jpg", 1);
if (!g_srcImage.data) {
std::cout << "image not load" << std::endl;
return;
}
//3、转成灰度并模糊化降噪
cvtColor(g_srcImage, g_grayImage, COLOR_BGR2GRAY);
blur(g_grayImage, g_grayImage, Size(3, 3));
//4、创建窗口
namedWindow(windows_name1, WINDOW_AUTOSIZE);
imshow(windows_name1, g_srcImage);
//5、创建滚动条并初始化
createTrackbar("canny阈值", windows_name1, &g_nThresh, g_nThresh_max, on_ThreshChange);
on_ThreshChange(0, 0);
waitKey(0);
}
int main()
{
test();
system("pause");
return 0;
}
void on_ThreshChange(int, void *)
{
//1、用于Canny算子检测边缘
Canny(g_grayImage, g_cannyMat_output, g_nThresh, g_nThresh * 2, 3);
//2、寻找轮廓
findContours(g_cannyMat_output, g_vContours, g_vHierarchy, RETR_TREE, CHAIN_APPROX_SIMPLE, Point(0, 0));
//3、绘出轮廓
Mat drawing = Mat::zeros(g_cannyMat_output.size(), CV_8UC3);
for (int i = 0; i < g_vContours.size(); i++)
{
Scalar color = Scalar(g_rng.uniform(0, 255), g_rng.uniform(0, 255), g_rng.uniform(0, 255));
drawContours(drawing, g_vContours, i, color, 2, 8, g_vHierarchy, 0, Point());
}
//显示效果图
imshow(windows_name2, drawing);
}
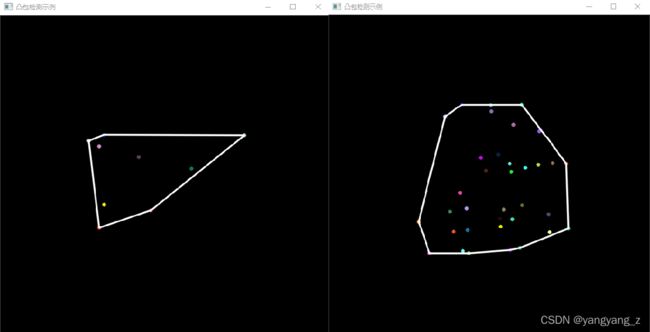
凸包(Convex Hull)是一个计算机中常见的概念。简单来说,给定二维平面上的点集,凸包就是将最外层的点连接起来构造成的凸多边形,它是能包含点集中所有点的。
#include
#include
#include
using namespace cv;
static void test()
{
//初始化变量和随机值
Mat image(600, 600, CV_8UC3);
RNG& rng = theRNG();
//循环,按下ESC,Q,q键程序退出,否则有键按下便一直更新
while (1) {
//参数初始化
char key; //键值
int count = (unsigned)rng % 100 + 3; //随机生成点的数量
std::vector<Point>points; //点值
//随机生成点坐标
for (int i = 0; i < count; i++) {
Point point;
point.x = rng.uniform(image.cols / 4, image.cols * 3 / 4);
point.y = rng.uniform(image.rows / 4, image.rows * 3 / 4);
points.push_back(point);
}
//检测凸包
std::vector<int> hull;
convexHull(Mat(points), hull, true);
//绘制出随机颜色的点
image = Scalar::all(0);
for (int i = 0; i < count; i++)
circle(image, points[i], 3, Scalar(rng.uniform(0, 255),
rng.uniform(0, 255), rng.uniform(0, 255)), FILLED, LINE_AA);
//准备参数
int hullcount = (int)hull.size(); //凸包的边数
Point point0 = points[hull[hullcount - 1]]; //连接凸包边的坐标点
//绘制凸包的边
for (int i = 0; i < hullcount; i++)
{
Point point = points[hull[i]];
line(image, point0, point, Scalar(255, 255, 255), 2, LINE_AA);
point0 = point;
}
//显示效果图
imshow("凸包检测示例", image);
//按下ESC,Q,q,程序退出
key = (char)waitKey();
if (key == 27 || key == 'q' || key == 'Q')
break;
}
}
int main()
{
test();
system("pause");
return 0;
}
#include
#include
#include
using namespace cv;
static std::string window_name1 = "【原始图窗口】";
static std::string window_name2 = "【效果图窗口】";
static Mat g_srcImage, g_grayImage, g_thresholdImage_output;
static int g_nThresh = 50, g_maxThresh = 255;
static RNG g_rng(12345);
static Mat srcImage_copy = g_srcImage.clone();
static std::vector<std::vector<Point>> g_vContours;
static std::vector<Vec4i> g_vHierarchy;
static void on_ThreshChange1(int, void*);
static void test()
{
//1、加载源图像
g_srcImage = imread("72_1.jpg", 1);
//2、将原图转换成灰度图并进行模糊降噪
cvtColor(g_srcImage, g_grayImage, COLOR_BGR2GRAY);
blur(g_grayImage, g_grayImage, Size(3, 3));
//3、创建原图窗口并显示
namedWindow(window_name1, WINDOW_AUTOSIZE);
imshow(window_name1, g_srcImage);
//4、创建滚动条
createTrackbar("阈值:", window_name1, &g_nThresh, g_maxThresh, on_ThreshChange1);
on_ThreshChange1(0, 0);
waitKey(0);
}
int main()
{
test();
system("pause");
return 0;
}
void on_ThreshChange1(int, void *)
{
//对图像进行二值化控制阈值
threshold(g_grayImage, g_thresholdImage_output, g_nThresh, 255, THRESH_BINARY);
//寻找轮廓
findContours(g_thresholdImage_output, g_vContours, g_vHierarchy, RETR_TREE, CHAIN_APPROX_SIMPLE, Point(0, 0));
//遍历每个轮廓,寻找其凸包
std::vector<std::vector<Point>> hull(g_vContours.size());
for (unsigned int i = 0; i < g_vContours.size(); i++)
convexHull(Mat(g_vContours[i]), hull[i], false);
//绘出轮廓及其凸包
Mat drawing = Mat::zeros(g_thresholdImage_output.size(), CV_8UC3);
for (unsigned int i = 0; i < g_vContours.size(); i++) {
Scalar color = Scalar(g_rng.uniform(0, 255), g_rng.uniform(0, 255), g_rng.uniform(0, 255));
drawContours(drawing, g_vContours, i, color, 1, 8, std::vector<Vec4i>(), 0, Point());
drawContours(drawing, hull, i, color, 1, 8, std::vector<Vec4i>(), 0, Point());
}
//显示效果图
imshow(window_name2, drawing);
}
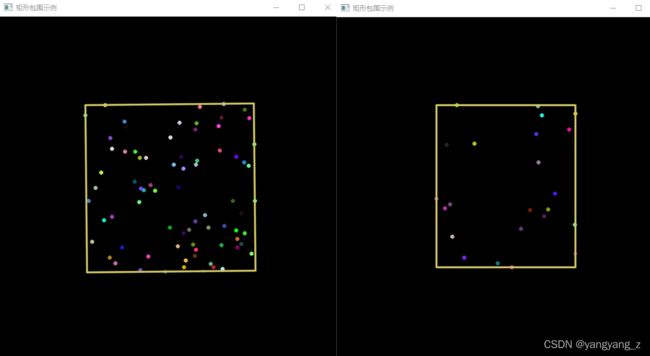
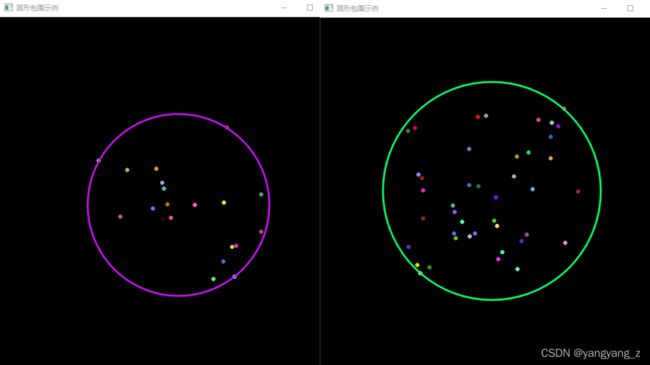
在实际应用中,常常会有将检测到的轮廓用多边形表示出来的需求。
#include
#include
#include
using namespace cv;
static void test()
{
//1、改变console字体颜色
system("color 1F");
//2、初始化变量和随机值
Mat image(600, 600, CV_8UC3);
RNG& rng = theRNG();
//3、循环,按下ESC,Q,q键程序退出,否则有键按下便一直更新
while (1)
{
//参数初始化
int count = rng.uniform(3, 103);//随机生成点的数量
std::vector<Point> points;//点值
//随机生成点坐标
for (int i = 0; i < count; i++)
{
Point point;
point.x = rng.uniform(image.cols / 4, image.cols * 3 / 4);
point.y = rng.uniform(image.rows / 4, image.rows * 3 / 4);
points.push_back(point);
}
//对给定的 2D 点集,寻找最小面积的包围矩形
RotatedRect box = minAreaRect(Mat(points));
Point2f vertex[4];
box.points(vertex);
//绘制出随机颜色的点
image = Scalar::all(0);
for (int i = 0; i < count; i++)
circle(image, points[i], 3, Scalar(rng.uniform(0, 255), rng.uniform(0, 255), rng.uniform(0, 255)), FILLED, LINE_AA);
//绘制出最小面积的包围矩形
for (int i = 0; i < 4; i++)
line(image, vertex[i], vertex[(i + 1) % 4], Scalar(100, 200, 211), 2, LINE_AA);
//显示窗口
imshow("矩形包围示例", image);
//按下ESC,Q,或者q,程序退出
char key = (char)waitKey();
if (key == 27 || key == 'q' || key == 'Q') // 'ESC'
break;
}
}
int main()
{
test();
system("pause");
return 0;
}
#include
#include
#include
using namespace cv;
static void test()
{
//改变console字体颜色
system("color 1F");
//初始化变量和随机值
Mat image(600, 600, CV_8UC3);
RNG& rng = theRNG();
//循环,按下ESC,Q,q键程序退出,否则有键按下便一直更新
while (1)
{
//参数初始化
int count = rng.uniform(3, 103);//随机生成点的数量
std::vector<Point> points;//点值
//随机生成点坐标
for (int i = 0; i < count; i++)
{
Point point;
point.x = rng.uniform(image.cols / 4, image.cols * 3 / 4);
point.y = rng.uniform(image.rows / 4, image.rows * 3 / 4);
points.push_back(point);
}
//对给定的 2D 点集,寻找最小面积的包围圆
Point2f center;
float radius = 0;
minEnclosingCircle(Mat(points), center, radius);
//绘制出随机颜色的点
image = Scalar::all(0);
for (int i = 0; i < count; i++)
circle(image, points[i], 3, Scalar(rng.uniform(0, 255), rng.uniform(0, 255), rng.uniform(0, 255)), FILLED, LINE_AA);
//绘制出最小面积的包围圆
circle(image, center, cvRound(radius), Scalar(rng.uniform(0, 255), rng.uniform(0, 255), rng.uniform(0, 255)), 2, LINE_AA);
//显示窗口
imshow("圆形包围示例", image);
//按下ESC,Q,或者q,程序退出
char key = (char)waitKey();
if (key == 27 || key == 'q' || key == 'Q') // 'ESC'
break;
}
}
int main()
{
test();
system("pause");
return 0;
}