python-flask+opencv -摔倒监测-计算机视觉
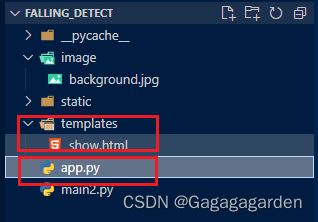
首先,先理清楚文件的结构,flask的静态渲染文件template,以及运行的app.py的位置一定要位于文件的根目录上
先来看一下效果
app.py文件如下
from importlib import import_module
import os
from flask import Flask, render_template, Response, request, redirect, url_for
import cv2
import numpy as np
import time
from PIL import Image, ImageDraw, ImageFont
# import main2
if os.environ.get('CAMERA'):
    Camera = import_module('camera_' + os.environ['CAMERA']).Camera
else:
    from camera import Camera

import main2
app = Flask(__name__)

NAME = ""
FILE_FLAG = False
# CAMERA_FLAG=False

@app.route('/')
def index():
    """Video streaming home page."""
    return render_template('show.html')
def cv2ImgAddText(img, text, left, top, textColor=(0, 255, 0), textSize=20):
        if (isinstance(img, np.ndarray)):  # 判断是否OpenCV图片类型
            img = Image.fromarray(cv2.cvtColor(img, cv2.COLOR_BGR2RGB))
        # 创建一个可以在给定图像上绘图的对象
        draw = ImageDraw.Draw(img)
        # 字体的格式
        fontStyle = ImageFont.truetype(
            "font/simsun.ttc", textSize, encoding="utf-8")
        # 绘制文本
        draw.text((left, top), text, textColor, font=fontStyle)
        # 转换回OpenCV格式
        return cv2.cvtColor(np.asarray(img), cv2.COLOR_RGB2BGR)


def video_gen(name):
    """Video streaming generator function."""
    cam = cv2.VideoCapture(NAME) #读取文件路径
    cam.set(3, 640) # set video widht
    cam.set(4, 480) # set video height
    scale=0

    fg = cv2.createBackgroundSubtractorMOG2()

    while True:
        time.sleep(0.02)
        ret,img = cam.read()
        if not ret:break

        #canny 边缘检测
        image= img.copy()
        blurred = cv2.GaussianBlur(image, (3, 3), 0)
        gray = cv2.cvtColor(blurred, cv2.COLOR_RGB2GRAY)
        xgrad = cv2.Sobel(gray, cv2.CV_16SC1, 1, 0) #x方向梯度
        ygrad = cv2.Sobel(gray, cv2.CV_16SC1, 0, 1) #y方向梯度
        edge_output = cv2.Canny(xgrad, ygrad, 50, 150)

        #背景减除
        fgmask = fg.apply(edge_output)
        # cv2.imshow("fgmask", fgmask)

        #闭运算
        hline = cv2.getStructuringElement(cv2.MORPH_RECT, (1, 4), (-1, -1)) #定义结构元素,卷积核
        vline = cv2.getStructuringElement(cv2.MORPH_RECT, (4, 1), (-1, -1))
        result = cv2.morphologyEx(fgmask,cv2.MORPH_CLOSE,hline)#水平方向
        result = cv2.morphologyEx(result,cv2.MORPH_CLOSE,vline)#垂直方向
        # cv2.imshow("result", result)
        # erodeim = cv2.erode(th,cv2.getStructuringElement(cv2.MORPH_ELLIPSE, (3,3)),iterations=1)  # 腐蚀
        dilateim = cv2.dilate(result,cv2.getStructuringElement(cv2.MORPH_ELLIPSE, (4,4)),iterations=1) #膨胀
        #查找轮廓
        contours, hier = cv2.findContours(dilateim, cv2.RETR_EXTERNAL, cv2.CHAIN_APPROX_NONE)
        for c in contours:
            if cv2.contourArea(c) > 1200:
                (x,y,w,h) = cv2.boundingRect(c)
                if scale==0:scale=-1;break
                scale = w/h
                cv2.putText(image, "scale:{:.3f}".format(scale), (10, 30),cv2.FONT_HERSHEY_SIMPLEX, 0.7, (0, 0, 255), 2)
                cv2.drawContours(image, [c], -1, (255, 0, 0), 1)
                cv2.rectangle(image,(x,y),(x+w,y+h),(0,255,0),1)
                image = cv2.fillPoly(image, [c], (255, 255, 255)) #填充

        #根据人体比例判断
        if scale >0 and scale <0.8:
            img = cv2ImgAddText(img, "Walking 行走中", 10, 20, (255, 0 , 0), 30)#行走中
            # cv2.putText(img, "Walking 行走中", (10, 30),cv2.FONT_HERSHEY_SIMPLEX, 0.7, (0, 0, 255), 2)#行走中
        if scale >0.8 and scale <1.2:
            img = cv2ImgAddText(img, "Falling 中间过程", 10, 20, (255, 0 , 0), 30)#跌倒中
            # cv2.putText(img, "Falling 跌倒中", (10, 30),cv2.FONT_HERSHEY_SIMPLEX, 0.7, (0, 0, 255), 2)#跌倒中
        if scale >1.2:
            img = cv2ImgAddText(img, "Falled 跌倒了", 10, 20, (255, 0 , 0), 30)#跌倒了

        jpeg = cv2.imencode('.jpg', img)[1].tobytes()
        yield (b'--frame\r\n'
               b'Content-Type: image/jpeg\r\n\r\n' + jpeg + b'\r\n')

@app.route('/video', methods=['POST','GET'])
def upload():
    f = request.files['file']
    basepath = os.path.dirname(__file__)  # 当前文件所在路径
    upload_path = './static/uploads'
    if not os.path.exists(upload_path):
        os.mkdir(upload_path)
    upload_file_path = os.path.join(basepath, upload_path, (f.filename))  # 注意:没有的文件夹一定要先创建,不然会提示没有该路径
    upload_file_path=upload_file_path.replace('\\','/')
    upload_file_path=upload_file_path.replace('./','')
    f.save(upload_file_path)
    global NAME, FILE_FLAG
    # NAME记录了选择文件的路径
    NAME = upload_file_path
    FILE_FLAG = True
    # CAMERA_FLAG = False
    print(NAME)
    # return render_template('show.html')
    next_url = request.values.get('next', url_for('video_feed'))
    return redirect(next_url)
    # return redirect(url_for("show"))

@app.route('/video_start', methods=['POST','GET'])
def video_feed():
    """Video streaming route. Put this in the src attribute of an img tag."""
    if FILE_FLAG:
        return Response(video_gen(NAME),mimetype='multipart/x-mixed-replace; boundary=frame')


if __name__ == '__main__':
    app.run(host='127.0.0.1', threaded=True, port=5001,debug=True)
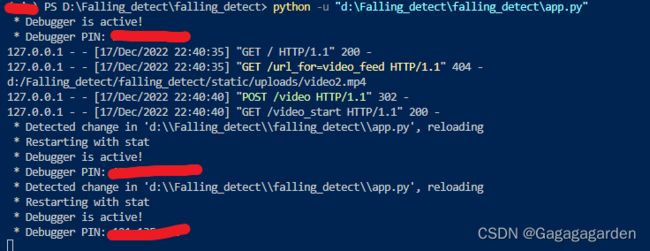
运行成功的终端界面如下
show.html界面如下,使用了在线bootstrap,调用了在线样式
摔倒监测
摔倒监测
检测文件上传
 }})
本来想用pyqt完成界面的展示,后来觉得以后可能用flask搭建网页框架比较多,所以选择了使用flask,就当是入门的练手吧。最后因为调试跳转路由出现了bug,加上身体不舒服而错过了上午的答辩,感觉还是很可惜,毕竟是自己一点一点查资料挤出来的 ,不过最终还是赶在今天完成了,希望能给你一点启发,如果觉得还可以就点个赞吧^o^


