Flink内核源码(一)任务提交流程
最近在学习了尚硅谷的Flink内核源码解析,内容很多,因此想要整理学习一下。Flink的版本是1.12.0。
第一章就来从源码层面学习一下Flink的任务提交流程。想要了解一个框架,需要了解它是怎么提交任务的。源码的解析跳转过程比较多,因此,只需要知道是怎么跳转运行的即可。
问题整理:
1. Flink任务是如何提交的?
2. 任务提交过程都需要哪些步骤?
以Yarn-per-job模式提交流程为例,(生产环境和官方建议都是使用Yarn-per-job)
首先回顾一下Yarn-per-job模式,它的特点是
- 一个Job一个集群,事先不需要启动集群,只有任务提交的时候,Yarn启动集群。
- 主要进程:JobManager、TaskManager还有一个Client
然后看一下Yarn-per-job模式提交流程图:
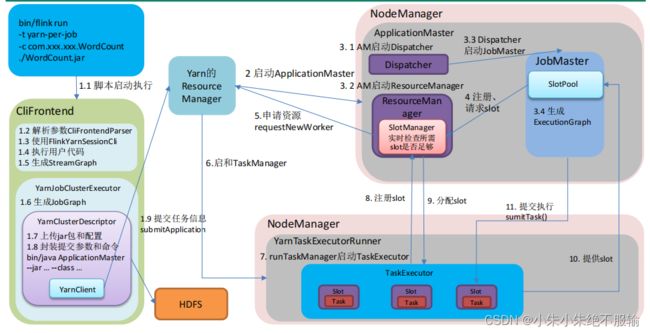
这里先整体描述一下Yarn-per-job模式提交流程(根据上面的流程图走一遍):
-
提交命令
1.1 执行脚本,flink run,进入到客户端入口类
CliFrontend。
在CliFrontend做了以下四件事:
1.2 解析参数CliFrontedParser:(-t,-c 还有run),解析完之后对这些命令行提供了一个接口。封装CommandLine,依次添加了 Generic、Yarn 和 Default 三种命令行客户端,挨个遍历挨个判断,优先判断Generic,就是指定的-t,yarn有没有指定appID等。
1.3 使用FlinkYarnSessionCli:,这里举例用的是YarnSessionCli,上面对应的是-m,选择了这种接口之后,封装配置,调用最后的invoke用户的代码。
1.4 执行用户代码:执行了最后一行的execute方法。
1.5 生成StreamGraph:根据代码生成逻辑流图。
接下来per-job模式要启动集群,会启动一个集群执行器:YarnJobClusterExecutor,它调用的execute方法,在这个执行器里面做了以下几件事:
1.6 生成JobGraph:生成了作业图。
然后到集群启动,会有一个集群的描述器:YarnClusterDescriptor,在描述器里做了如下的事情:
1.7 上传jar包和配置:还有作业图也上传上去,都上传到HDFS
1.8 封装提交参数和命令: bin/java ApplicationMaster --jar … --class …,封装AM各种环境信息和配置
这些做完会有一个YarnClient,YarnClient执行提交
1.9 提交任务信息执行:submitApplication给Yarn的ResourceManager -
RM启动容器AM
-
AM通过一个集群入口类YarnJobClusterEntrypoint开始执行,会启动三个组件:
3.1 AM启动Dispatcher:先创建启动了一个转发器Dispatcher
3.2 AM启动ResourceManager:启动一个YarnResourceManager,里面有一个SlotManager(真正管理资源的,向Yarn申请资源)
3.3 Dispatcher启动JobMaster:这里面有一个SlotPool,真正去发送请求的
3.4 生成ExecutionGraph:在JobMaster启动过程中还把作业图转换为执行图 -
注册、请求slot:接下来JobMaster中的槽值向ResourceManager的
SlotManager注册、请求slot -
申请资源requestNewWorker:SlotManager向Yarn的ResourceManager申请新的worker
-
启动TaskManager:选择某些节点启动容器,启动完容器后执行一个入口类
YarnTaskExecutorRunner -
runTaskManager启动TaskExecutor:之后在入口类里面通过生成调用启动了一个
TaskExecutor(真正底层的一个名字),这个里面有一些槽slot -
注册slot:启动完之后TaskExecutor会向YarnResourceManager中的槽管理器SlotManager注册slot
-
分配slot:槽管理器向TaskExecutor分配slot,根据请求的slot的数量和注册的slot数量做一个分配,告诉每一个节点
-
提供slot:TaskExecutor知道分配的slot后,会给JobMaster里面的SlotPool提供slot,提供offset给JobMaster
-
提交执行sumitTask():SlotPool会将任务task执行提交给slot执行(在流式的模式下所有的Task一次发送)
下面是具体的源码分析,比较繁琐,所以先把上面的图搞懂就可以了。做到能画能讲。
1. 环境准备及提交流程
任务提交:
bin/flink run -t yarn-per-job ……/SocketWindowwordCount.jar --port 9999
提交后会启动对应的进程,看一下启动的进程的名字(不同的提交模式下进程的名字不同)
CliFrontend
YarnJobClusterEntrypoint
TaskExecutorRunner  =>  TaskManagerRunner(Standalone)
1.1 程序起点
可以看到启动是flink脚本进行启动,因此我们需要先来看一下bin目录下的flink脚本
核心执行的语句:
=> exec $JAVA_RUN $JVM_ARGS "${log_setting[@]}" -classpath "`manglePathList
"$CC_CLASSPATH:$INTERNAL_HADOOP_CLASSPATHS"`"org.apache.flink.client.cli.CliFrontend "$@"
程序入口在:org.apache.flink.client.cli.CliFrontend
环境信息在:config.sh脚本
=> JAVA_RUN=java
=> JVM_ARGS="" => # Use conf/flink-conf.yaml
=>INTERNAL_HADOOP_CLASSPATHS="${HADOOP_CLASSPATH}:${HADOOP_CONF_DIR}:${YARN_CONF_DIR}"
所以Flink 提交任务的入口类为 CliFrontend,我们看一下这个类的main方法:(之后的源码都是递进式学习)
查找org.apache.flink.client.cli.CliFrontend,找到 CliFrontend类,并找到 main 方法
/**
* Submits the job based on the arguments.(根据参数提交作业)
*/
public static void main(final String[] args) {
	... ...
	final CliFrontend cli = new CliFrontend(
					configuration,
					customCommandLines);
	... ...
}
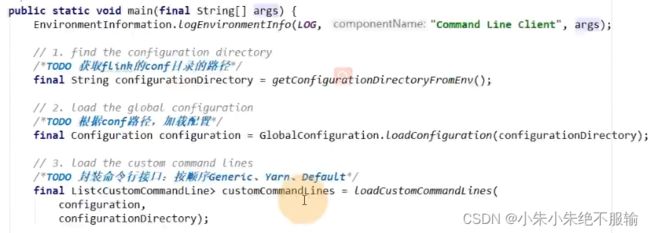
主函数中的执行步骤:
- 获取flink的conf目录的路径
- 根据conf路径,加载配置
- 封装命令行接口:
按顺序Generic、Yarn、Default
1.2 创建 Yarn 客户端应用程序
1.2.1 程序入口
CliFrontend.java
public static void main(final String[] args) {
	... ...
	final CliFrontend cli = new CliFrontend(
					configuration,
					customCommandLines);
	... ...
	int retCode = SecurityUtils.getInstalledContext()
							.runSecured(() -> cli.parseParameters(args));
	... ...
}
然后进入到解释且执行的方法parseParameters(args)
public int parseParameters(String[] args) {
... ...
	// get action
	String action = args[0];  // 提交的命令,解析输入参数,第一个是run
	// remove action from parameters
	final String[] params = Arrays.copyOfRange(args, 1, args.length);
	// do action
	switch (action) {
	case ACTION_RUN:
		run(params);  // 因此先执行run函数
		return 0;
	case ACTION_LIST:
		list(params);
		return 0;
	case ACTION_INFO:
		info(params);
		return 0;
	case ACTION_CANCEL:
		cancel(params);
		return 0;
	case ACTION_STOP:
		stop(params);
		return 0;
	case ACTION_SAVEPOINT:
		savepoint(params);
		return 0;
	case "-h":
	case "--help":
		CliFrontendParser.printHelp(customCommandLines);
		return 0;
	case "-v":
	case "--version":
		String version = EnvironmentInformation.getVersion();
		String commitID = EnvironmentInformation.getRevisionInformation().commitId;
		System.out.print("Version: " + version);
		System.out.println(commitID.equals(EnvironmentInformation.UNKNOWN) ? "" : ",
		Commit ID: " + commitID);
		return 0;
	default:
		System.out.printf("\"%s\" is not a valid action.\n", action);
		System.out.println();
		System.out.println("Valid actions are \"run\", \"list\", \"info\", \"savepoint\", \"stop\",
		or \"cancel\".");
		System.out.println();
		System.out.println("Specify the version option (-v or --version) to print Flink version.");
		System.out.println();
		System.out.println("Specify the help option (-h or --help) to get help on the
		command.");
		return 1;
	}
	... ...
}
1.2.2 解析输入参数
CliFrontend.java
解析提交的命令参数,首先执行run函数:
protected void run(String[] args) throws Exception {
	... ...
	// 获取默认的运行参数
	final Options commandOptions = CliFrontendParser.getRunCommandOptions();
	// 解析参数,返回 commandLine
	final CommandLine commandLine = getCommandLine(commandOptions, args, true);
	... ...
}
将默认的配置项传入函数getCommandLine:
public CommandLine getCommandLine(final Options commandOptions, final String[] args, final boolean
stopAtNonOptions) throws CliArgsException {
	final Options commandLineOptions = CliFrontendParser.mergeOptions(commandOptions,
	customCommandLineOptions);
	return CliFrontendParser.parse(commandLineOptions, args, stopAtNonOptions);
}
然后进入到解析函数parse,首先跳转到类CliFrontendParser,再跳转到DefaultParser.java:
(有时候一个小逻辑要跳好几个类)
DefaultParser.java中的parse函数,第一个参数是添加的自带默认配置项,第二个参数是我们传入的参数
public CommandLine parse(Options options, String[] arguments, Properties properties, boolean
stopAtNonOption)
 throws ParseException
{
	 ... ...
	 if (arguments != null)  // 如果参数不为空,-p -c都是空格隔开的
	 {
		 for (String argument : arguments)  // 遍历解析
		 {
			 handleToken(argument);  // 对每一项调用handleToken函数
		 }
	 }
	... ...
}
进入handleToken函数,主要是解析是--开头还是-开头的命令,以及其它开头形式的解析,看到这一步就差不多了解了,后面就不再继续解析了。
private void handleToken(String token) throws ParseException
{
	currentToken = token;
	if (skipParsing)
	{
		cmd.addArg(token);
	}
	else if ("--".equals(token))
	{
		skipParsing = true;
	}
	else if (currentOption != null && currentOption.acceptsArg() && isArgument(token))
	{
		// 添加参数值
		currentOption.addValueForProcessing(Util.stripLeadingAndTrailingQuotes(token));
	}
	else if (token.startsWith("--"))
	{
		// 解析 --形式的参数名,比如--class
		handleLongOption(token);
	}
	else if (token.startsWith("-") && !"-".equals(token)) {
		// 解析 -形式的参数名,比如-c
		handleShortAndLongOption(token);
	}
	else
	{
		handleUnknownToken(token);
	}
	if (currentOption != null && !currentOption.acceptsArg())
	{
		currentOption = null;
	}
}
1.2.3 选择创建哪种类型的客户端
然后再返回到CliFrontend.java的run函数里面,解析完参数后,就是验证活跃的命令行,进行客户端的选择,在上面提到了总共有三种命令行,依次添加了 Generic、Yarn 和 Default 三种命令行客户端(后面根据 isActive()按顺序选择)
在 run()里面,进行客户端的选择:
protected void run(String[] args) throws Exception {
	... ...
	final CustomCommandLine activeCommandLine =
				validateAndGetActiveCommandLine(checkNotNull(commandLine));
	... ...
}
isActive 方法选择客户端:
public CustomCommandLine validateAndGetActiveCommandLine(CommandLine commandLine) {
	... ...
	for (CustomCommandLine cli : customCommandLines) {
		... ...
		//在 FlinkYarnSessionCli 为 active 时优先返回 FlinkYarnSessionCli。
		//对于 DefaultCli,它的 isActive 方法总是返回 true。
		if (cli.isActive(commandLine)) {
			return cli;
		}
	}
	... ...
}
FlinkYarnSessionCli.java => Yarn 客户端 isActive 的判断逻辑:
-t 是1.11版本才有的,以前是 -m
-t 对应是 Generic
-m 对应是 yarn-cluster
这里提一下 yarn-per-job 新老版本写法:
- 老版本(<= 1.10):flink run -m yarn-cluster -c xxxx xxx.jar
- 新版本(>= 1.11):flink run -t yarn-per-job -c xxxx xxx.jar
public boolean isActive(CommandLine commandLine) {
	final String jobManagerOption = commandLine.getOptionValue(addressOption.getOpt(), null);
	// 是否指定为 per-job 模式,即指定”-m yarn-cluster”; ID = "yarn-cluster"
	final boolean yarnJobManager = ID.equals(jobManagerOption);
	// 是否存在 flink 在 yarn 的 appID,即 yarn-session 模式是否启动
	final boolean hasYarnAppId = commandLine.hasOption(applicationId.getOpt())
	|| configuration.getOptional(YarnConfigOptions.APPLICATION_ID).isPresent();
	// executor 的名字为 "yarn-session" 或 "yarn-per-job"
	final boolean hasYarnExecutor =
	YarnSessionClusterExecutor.NAME.equals(configuration.get(DeploymentOptions.TARGET))
	|| YarnJobClusterExecutor.NAME.equals(configuration.get(DeploymentOptions.TARGET));
	// -m yarn-cluster  || yarn有appID,或者命令行指定了 || 执行器是yarn的
	return hasYarnExecutor || yarnJobManager || hasYarnAppId || (isYarnPropertiesFileMode(commandLine)
&& yarnApplicationIdFromYarnProperties != null);
}
- -m yarn-cluster
- yarn有appID,或者命令行指定了
- 执行器是yarn的
这三个条件满足一个都是启动yarn。
1.2.4 获取有效配置
继续跟着run方法往下,获取有效配置:HA的id、Target(Session、per-job、JobManager内存、TaskManager内存、每个TM的slot数……)
protected void run(String[] args) throws Exception {
	... ...
	final Configuration effectiveConfiguration = getEffectiveConfiguration(
				activeCommandLine, commandLine, programOptions, jobJars);
	... ...
}
private <T> Configuration getEffectiveConfiguration(
		final CustomCommandLine activeCustomCommandLine,
		final CommandLine commandLine) throws FlinkException {

	final Configuration effectiveConfiguration = new Configuration(configuration);
	final Configuration commandLineConfiguration =
			checkNotNull(activeCustomCommandLine).toConfiguration(commandLine);

	effectiveConfiguration.addAll(commandLineConfiguration);
	return effectiveConfiguration;
}
再进入到FlinkYarnSessionCli.java的toConfiguration方法获取有效配置,这里就不再看了。
1.2.5 调用用户代码的 main 方法
继续run方法到执行程序:
protected void run(String[] args) throws Exception {
	... ...
	executeProgram(effectiveConfiguration, program);
	... ...
}
进入到ClientUtils.java:
public static void executeProgram(
		PipelineExecutorServiceLoader executorServiceLoader,
		Configuration configuration,
		PackagedProgram program,
		boolean enforceSingleJobExecution,
		boolean suppressSysout) throws ProgramInvocationException {

	checkNotNull(executorServiceLoader);
	final ClassLoader userCodeClassLoader = program.getUserCodeClassLoader();
	final ClassLoader contextClassLoader = Thread.currentThread().getContextClassLoader();
	try {

		//设置当前的 classloader 为用户代码的 classloader
		Thread.currentThread().setContextClassLoader(userCodeClassLoader);
		LOG.info("Starting program (detached:
		{})", !configuration.getBoolean(DeploymentOptions.ATTACHED));
		//用户代码中的 getExecutionEnvironment 会返回该 Environment
		//配置环境上下文,用户代码的 getExecutionEnvironment 就会拿到这些环境信息
		ContextEnvironment.setAsContext(
			executorServiceLoader,
			configuration,
			userCodeClassLoader,
			enforceSingleJobExecution,
			suppressSysout);
		StreamContextEnvironment.setAsContext(
			executorServiceLoader,
			configuration,
			userCodeClassLoader,
			enforceSingleJobExecution,
			suppressSysout);
		try {
			//调用用户代码的 main 方法
			program.invokeInteractiveModeForExecution();
		} finally {
			ContextEnvironment.unsetAsContext();
			StreamContextEnvironment.unsetAsContext();
		}
	} finally {
		Thread.currentThread().setContextClassLoader(contextClassLoader);
	}
}
1.2.6 调用执行环境的 execute 方法
StreamExecutionEnvironment.java
public JobExecutionResult execute() throws Exception {
	return execute(DEFAULT_JOB_NAME);
}
public JobExecutionResult execute(String jobName) throws Exception {
	... ...
	return execute(getStreamGraph(jobName));
}

public JobExecutionResult execute(StreamGraph streamGraph) throws Exception {
	final JobClient jobClient = executeAsync(streamGraph);
	... ...
}
public JobClient executeAsync(StreamGraph streamGraph) throws Exception {
	... ...
	//根据提交模式选择匹配的 factory
	final PipelineExecutorFactory executorFactory =
		executorServiceLoader.getExecutorFactory(configuration);
	... ...
	//选择合适的 executor 提交任务
	CompletableFuture<JobClient> jobClientFuture = executorFactory
		.getExecutor(configuration)
		.execute(streamGraph, configuration);
	... ...
}
1.3 yarn-per-job 提交流程
AbstractJobClusterExecutor.java
public CompletableFuture<JobClient> execute(@Nonnull final Pipeline pipeline, @Nonnull final
Configuration configuration) throws Exception {
	final JobGraph jobGraph = ExecutorUtils.getJobGraph(pipeline, configuration);
	// 创建并启动 yarn 客户端
	try (final ClusterDescriptor<ClusterID> clusterDescriptor =
clusterClientFactory.createClusterDescriptor(configuration)) {
		final ExecutionConfigAccessor configAccessor =
ExecutionConfigAccessor.fromConfiguration(configuration);
		// 获取集群配置参数
		final ClusterSpecification clusterSpecification =
clusterClientFactory.getClusterSpecification(configuration);
		// 部署集群
		final ClusterClientProvider<ClusterID> clusterClientProvider = clusterDescriptor
					.deployJobCluster(clusterSpecification, jobGraph,
		configAccessor.getDetachedMode());
			LOG.info("Job has been submitted with JobID " + jobGraph.getJobID());
			return CompletableFuture.completedFuture(
					new ClusterClientJobClientAdapter<>(clusterClientProvider, jobGraph.getJobID()));
	}
}
- 根据用户代码 ,调用的算子,生成streamgraph图
- streamgraph 转化 jobgraph
- yarnjobClusterExcutor 创建启动 yarnclient 包含了一些yarn flink的配置和环境信息,并构造了一个yarnClusterDescriptor
- yarnClusterDescriptor 获取集群特有配置 : jobmanager 内存 每个taskmanager 内存 每个 slot槽数
- 部署前检查: jar包路径conf路径 yarn最大核数 检查置顶的yarn队列是否存在, 检查yarn有足够的资源
- yarn启动appmaster AM 通过startAppMaster
……
搞不动了,不写了
……
具体细节参考:尚硅谷Flink内核源码解析课程