OkHttp源码分析之基本框架2
接上篇。
(主要从网络拉取响应分析)从sendRequest方法中可以看到
httpStream = connect();
httpStream.setHttpEngine(this);
接下来,我们就看看connect()方法:
HttpEngine#connect
  private HttpStream connect() throws RouteException, RequestException, IOException {
    boolean doExtensiveHealthChecks = !networkRequest.method().equals("GET");
    return streamAllocation.newStream(client.connectTimeoutMillis(),
        client.readTimeoutMillis(), client.writeTimeoutMillis(),
        client.retryOnConnectionFailure(), doExtensiveHealthChecks);
  }
继续跟踪
StreamAllocation#newStream
public HttpStream newStream(int connectTimeout, int readTimeout, int writeTimeout,
      boolean connectionRetryEnabled, boolean doExtensiveHealthChecks)
      throws RouteException, IOException {
    try {
      RealConnection resultConnection = findHealthyConnection(connectTimeout, readTimeout,
          writeTimeout, connectionRetryEnabled, doExtensiveHealthChecks);

      HttpStream resultStream;
      if (resultConnection.framedConnection != null) {
        resultStream = new Http2xStream(this, resultConnection.framedConnection);
      } else {
        resultConnection.socket().setSoTimeout(readTimeout);
        resultConnection.source.timeout().timeout(readTimeout, MILLISECONDS);
        resultConnection.sink.timeout().timeout(writeTimeout, MILLISECONDS);
        resultStream = new Http1xStream(this, resultConnection.source, resultConnection.sink);
      }

      synchronized (connectionPool) {
        stream = resultStream;
        return resultStream;
      }
    } catch (IOException e) {
      throw new RouteException(e);
    }
  }
可以看到这里创建了RealConnection resultConnection 对象。
具体创建的代码
StreamAllocation#findHealthyConnection
/**
   * Finds a connection and returns it if it is healthy. If it is unhealthy the process is repeated
   * until a healthy connection is found.
   */
  private RealConnection findHealthyConnection(int connectTimeout, int readTimeout,
      int writeTimeout, boolean connectionRetryEnabled, boolean doExtensiveHealthChecks)
      throws IOException, RouteException {
    while (true) {
      RealConnection candidate = findConnection(connectTimeout, readTimeout, writeTimeout,
          connectionRetryEnabled);

      // If this is a brand new connection, we can skip the extensive health checks.
      synchronized (connectionPool) {
        if (candidate.successCount == 0) {
          return candidate;
        }
      }

      // Otherwise do a potentially-slow check to confirm that the pooled connection is still good.
      if (candidate.isHealthy(doExtensiveHealthChecks)) {
        return candidate;
      }

      connectionFailed(new IOException());
    }
  }
继续跟踪
StreamAllocation#findConnection
/**
   * Returns a connection to host a new stream. This prefers the existing connection if it exists,
   * then the pool, finally building a new connection.
   */
  private RealConnection findConnection(int connectTimeout, int readTimeout, int writeTimeout,
      boolean connectionRetryEnabled) throws IOException, RouteException {
    Route selectedRoute;
    synchronized (connectionPool) {
      if (released) throw new IllegalStateException("released");
      if (stream != null) throw new IllegalStateException("stream != null");
      if (canceled) throw new IOException("Canceled");

      RealConnection allocatedConnection = this.connection;
      if (allocatedConnection != null && !allocatedConnection.noNewStreams) {
        return allocatedConnection;
      }

      // Attempt to get a connection from the pool.
      //如果连接池中已经存在连接,就从中取出(get)RealConnection
      RealConnection pooledConnection = Internal.instance.get(connectionPool, address, this);
      if (pooledConnection != null) {
        this.connection = pooledConnection;
        return pooledConnection;
      }

      selectedRoute = route;
    }

    if (selectedRoute == null) {
      selectedRoute = routeSelector.next();
      synchronized (connectionPool) {
        route = selectedRoute;
      }
    }
    RealConnection newConnection = new RealConnection(selectedRoute);
    acquire(newConnection);
//将建立成功的RealConnection放入(put)连接池缓存
    synchronized (connectionPool) {
      Internal.instance.put(connectionPool, newConnection);
      this.connection = newConnection;
      if (canceled) throw new IOException("Canceled");
    }
//根据选择的路线(Route),调用Platform.get().connectSocket选择当前平台Runtime下最好的socket库进行握手
    newConnection.connect(connectTimeout, readTimeout, writeTimeout, address.connectionSpecs(),
        connectionRetryEnabled);
    routeDatabase().connected(newConnection.route());

    return newConnection;
  }
到这里我们先介绍Socket管理(StreamAllocation)。
StreamAllocation
进行HTTP连接需要进行Socket握手,Socket握手的前提是根据域名或代理确定Socket的ip与端口。这个环节主要讲了http的握手过程与连接池的管理,分析的对象主要是StreamAllocation
选择路线与自动重连(RouteSelector)
此步骤用于获取socket的ip与端口,各位请欣赏源码中next()的迷之缩进与递归,代码进行了如下事情:
如果Proxy为null:
- 在构造函数中设置代理为Proxy.NO_PROXY
- 如果缓存中的lastInetSocketAddress为空,就通过DNS(默认是Dns.SYSTEM,包装了jdk自带的lookup函数)查询,并保存结果,注意结果是数组,即一个域名有多个IP,这就是自动重连的来源
- 如果还没有查询到就递归调用next查询,直到查到为止
- 一切next都没有枚举到,抛出NoSuchElementException,退出(这个几乎见不到)
如果Proxy为HTTP:
- 设置socket的ip为代理地址的ip
- 设置socket的端口为代理地址的端口
- 一切next都没有枚举到,抛出NoSuchElementException,退出
连接socket链路(RealConnection)
当地址,端口准备好了,就可以进行TCP连接了(也就是我们常说的TCP三次握手),步骤如下:
- 如果连接池中已经存在连接,就从中取出(get)RealConnection,如果没有命中就进入下一步
- 根据选择的路线(Route),调用Platform.get().connectSocket选择当前平台Runtime下最好的socket库进行握手
- 将建立成功的RealConnection放入(put)连接池缓存
- 如果存在TLS,就根据SSL版本与证书进行安全握手
- 构造HttpStream并维护刚刚的socket连接,管道建立完成
释放socket链路(release)
如果不再需要(比如通信完成,连接失败等)此链路后,释放连接(也就是TCP断开的握手)
- 尝试从缓存的连接池中删除(remove)
- 如果没有命中缓存,就直接调用jdk的socket关闭
经过上述分析,相信大家都有了一定的概念,对上面的那段源码也就看的很自然。如果连接池中已经存在连接,就从中取出(get)RealConnection,如果没有命就根据选择的路线(Route),调用Platform.get().connectSocket选择当前平台Runtime下最好的socket库进行握手。
RealConnection#connect
  public void connect(int connectTimeout, int readTimeout, int writeTimeout,
      List connectionSpecs, boolean connectionRetryEnabled) throws RouteException {
    if (protocol != null) throw new IllegalStateException("already connected");

    RouteException routeException = null;
    ConnectionSpecSelector connectionSpecSelector = new ConnectionSpecSelector(connectionSpecs);
    Proxy proxy = route.proxy();
    Address address = route.address();

    if (route.address().sslSocketFactory() == null
        && !connectionSpecs.contains(ConnectionSpec.CLEARTEXT)) {
      throw new RouteException(new UnknownServiceException(
          "CLEARTEXT communication not supported: " + connectionSpecs));
    }

    while (protocol == null) {
      try {
        rawSocket = proxy.type() == Proxy.Type.DIRECT || proxy.type() == Proxy.Type.HTTP
            ? address.socketFactory().createSocket()
            : new Socket(proxy);
        connectSocket(connectTimeout, readTimeout, writeTimeout, connectionSpecSelector);
      } catch (IOException e) {
        closeQuietly(socket);
        closeQuietly(rawSocket);
        socket = null;
        rawSocket = null;
        source = null;
        sink = null;
        handshake = null;
        protocol = null;

        if (routeException == null) {
          routeException = new RouteException(e);
        } else {
          routeException.addConnectException(e);
        }

        if (!connectionRetryEnabled || !connectionSpecSelector.connectionFailed(e)) {
          throw routeException;
        }
      }
    }
  }
如果存在TLS,就根据SSL版本与证书进行安全握手
RealConnection#connectSocket
  /** Does all the work necessary to build a full HTTP or HTTPS connection on a raw socket. */
  private void connectSocket(int connectTimeout, int readTimeout, int writeTimeout,
      ConnectionSpecSelector connectionSpecSelector) throws IOException {
    rawSocket.setSoTimeout(readTimeout);
    try {
      Platform.get().connectSocket(rawSocket, route.socketAddress(), connectTimeout);
    } catch (ConnectException e) {
      throw new ConnectException("Failed to connect to " + route.socketAddress());
    }
    source = Okio.buffer(Okio.source(rawSocket));
    sink = Okio.buffer(Okio.sink(rawSocket));

    if (route.address().sslSocketFactory() != null) {
      connectTls(readTimeout, writeTimeout, connectionSpecSelector);
    } else {
      protocol = Protocol.HTTP_1_1;
      socket = rawSocket;
    }

    if (protocol == Protocol.SPDY_3 || protocol == Protocol.HTTP_2) {
      socket.setSoTimeout(0); // Framed connection timeouts are set per-stream.

      FramedConnection framedConnection = new FramedConnection.Builder(true)
          .socket(socket, route.address().url().host(), source, sink)
          .protocol(protocol)
          .listener(this)
          .build();
      framedConnection.sendConnectionPreface();

      // Only assign the framed connection once the preface has been sent successfully.
      this.allocationLimit = framedConnection.maxConcurrentStreams();
      this.framedConnection = framedConnection;
    } else {
      this.allocationLimit = 1;
    }
  }
上面这段代码写的就是根据选择的路线(Route),调用Platform.get().connectSocket选择当前平台Runtime下最好的socket库进行握手。
这里又引入了一概念。HTTP请求序列化/反序列化
下面我们就来分析分析。
HTTP请求序列化/反序列化
分析的对象是HttpStream接口,在HTTP/1.1下是Http1xStream实现的。
获得HTTP流(httpStream)
以下为无缓存,无多次302跳转,网络良好,HTTP/1.1下的GET访问实例分析。
我们已经在上文的RealConnection通过connectSocket()构造HttpStream对象并建立套接字连接(完成三次握手)
在connect()有非常重要的一步,它通过okio库与远程socket建立了I/O连接,为了更好的理解,我们可以把它看成管道
//source 用于获取response
source = Okio.buffer(Okio.source(rawSocket));
//sink 用于write buffer 到server
sink = Okio.buffer(Okio.sink(rawSocket));
拼装Raw请求与Headers(writeRequestHeaders)
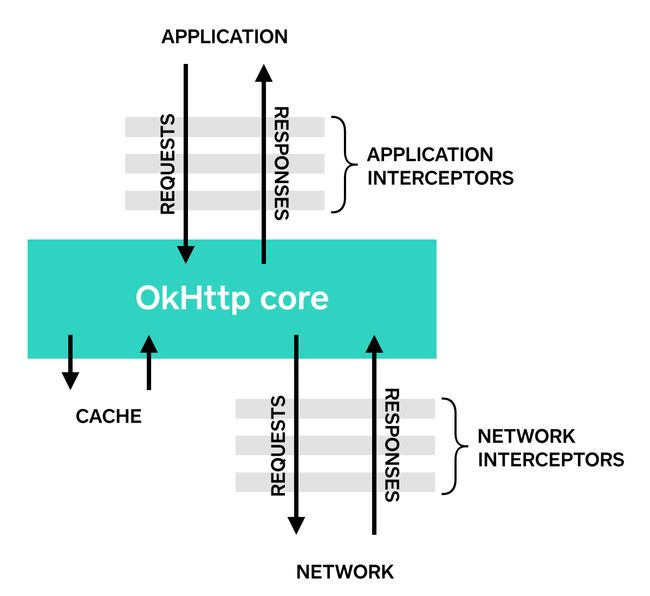
我们通过Request.Builder构建了简陋的请求后,可能需要进行一些修饰,这时需要使用Interceptors对Request进行进一步的拼装了。
拦截器是okhttp中强大的流程装置,它可以用来监控log,修改请求,修改结果,甚至是对用户透明的GZIP压缩。类似于函数式编程中的flatmap操作。在okhttp中,内部维护了一个Interceptors的List,通过InterceptorChain进行多次拦截修改操作。

源代码中是自增递归(recursive)调用Chain.process(),直到interceptors().size()中的拦截器全部调用完。主要做了两件事:
- 递归调用Interceptors,依次入栈对response进行处理
- 当全部递归出栈完成后,移交给网络模块(getResponse)
 if (index < client.interceptors().size()) {

    Interceptor.Chain chain = new ApplicationInterceptorChain(index + 1, request, forWebSocket);
    Interceptor interceptor = client.interceptors().get(index);
    //递归调用Chain.process()
    Response interceptedResponse = interceptor.intercept(chain);
    if (interceptedResponse == null) {
      throw new NullPointerException("application interceptor " + interceptor
          + " returned null");
    }
    return interceptedResponse;
  }
  // No more interceptors. Do HTTP.
  return getResponse(request, forWebSocket);
}
接下来是正式的网络请求getResponse(),此步骤通过http协议规范将对象中的数据信息序列化为Raw文本:
- 在okhttp中,通过RequestLine,Requst,HttpEngine,Header等参数进行序列化操作,也就是拼装参数为socketRaw数据。拼装方法也比较暴力,直接按照RFC协议要求的格式进行concat输出就实现了
- 通过sink写入write到socket连接。
获得响应(readResponseHeaders/Body)
此步骤根据获取到的Socket纯文本,解析为Response对象,我们可以看成是一个反序列化(通过http协议将Raw文本转成对象)的过程:
拦截器的设计:
- 自定义网络拦截器请求进行递归入栈
- 在自定义网络拦截器的intercept中,调用NetworkInterceptorChain的proceed(request),进行真正的网络请求(readNetworkResponse)
- 接自定义请求递归出栈
网络读取(readNetworkResponse)分析:
- 读取Raw的第一行,并反序列化为StatusLine对象
- 以Transfer-Encoding: chunked的模式传输并组装Body
接下来进行释放socket连接,上文已经介绍过了。现在我们就获得到response对象,可以进行进一步的Gson等操作了。
到目前,基本框架也算是介绍完了。还是那句话,共同学习与进步。