mmdetection使用教程及报错
目录
- 安装
- 验证
- 图片保存
- 数据标注
- 数据转化
-
- 转化成VOC
- 转化为coco数据集
- voc数据集进行训练
-
- mmdet/datasets/voc.py
- mmdet/core/evaluation/class_names.py
- configs/_ base_/datasetsvoc0712.py
- coco数据集进行训练
-
- _base_/datasets/coco_detection.py
- mmdet/datasets/coco.py
- mmdet/core/evalution/class_names.py
- fastrcnn训练
-
- coco类型数据集
-
- _ base_/models/faster_rcnn_r50_fpn.py
- VOC类型数据集
-
- faster_rcnn_r50_fpn_1x_voc0712.py
- faster_rcnn_r50_fpn.py
- VOC运行
- FCOS训练
- 模型调用
- 视频验证
- 批量测试
- mAP测试
- 单通道图片
- lr解读
- 训练过程可视化
- 使用余弦退火
- 多GPU训练
- 关闭SSH后继续执行
- 模型复杂度
- pytorch转ONNX
- 准备publish的模型
- 报错
-
- 报错1:
- 报错2:
- 报错3:
- 报错4
- 报错5
- 报错6
- 报错7
- 报错8
- 报错9
安装
安装过程按照官网步骤即可,注意版本对用即可,不再赘述。
或者按照:mmdetection安装博客
验证
在安装之后,首先要进行验证是否安装成功,在mmdetection的文件夹下有一demo目录,其中有一张图片,首先新建checkpoints文件夹,下载 https://download.openmmlab.com/mmdetection/v2.0/faster_rcnn/faster_rcnn_r50_fpn_1x_coco/faster_rcnn_r50_fpn_1x_coco_20200130-047c8118.pth 训练好的rcnn模型,放入checkpoints文件夹中,可以执行以下代码进行测试:
from mmdet.apis import init_detector, inference_detector, show_result_pyplot
import mmcv
config_file = '../configs/faster_rcnn/faster_rcnn_r50_fpn_1x_coco.py'
# download the checkpoint from model zoo and put it in `checkpoints/`
# url: https://download.openmmlab.com/mmdetection/v2.0/faster_rcnn/faster_rcnn_r50_fpn_1x_coco/faster_rcnn_r50_fpn_1x_coco_20200130-047c8118.pth
checkpoint_file = '../checkpoints/faster_rcnn_r50_fpn_1x_coco_20200130-047c8118.pth'

# build the model from a config file and a checkpoint file
model = init_detector(config_file, checkpoint_file, device='cuda:0')

# test a single image
img = 'demo.jpg'
result = inference_detector(model, img)
# show the results
show_result_pyplot(model, img, result)
得到相应的图片后代表安装成功。
图片保存
result = inference_detector(model, img)
model.show_result(img, result, out_file='result.jpg')
将结果图片保存到out_file中。
数据标注
数据标注采用labelimg软件,相关的使用方法可以进行百度,得到xml的标注文件。
数据转化
经过我自己的使用,我个人推荐转化成coco数据集,更加方便。
转化成VOC
相关的文件结构如图所示:
./data
└── VOCdevkit
    └── VOC2007
        ├── Annotations  # 标注的VOC格式的xml标签文件
        ├── JPEGImages   # 数据集图片
        ├── ImageSet
        │     └── Main
		│ 	     ├── test.txt   # 划分的测试集
		│ 	     ├── train.txt   # 划分的训练集
		│        ├── trainval.txt
		│        └── val.txt   # 划分的验证集
转换代码如下:
将xml文件放在Annotations,将图片都放在JPEGImages。
import os
import random

trainval_percent = 0.8
train_percent = 0.75
xmlfilepath = 'Annotations'
txtsavepath = 'Main'
total_xml = os.listdir(xmlfilepath)

num=len(total_xml)
list=range(num)
tv=int(num*trainval_percent)
tr=int(tv*train_percent)
trainval= random.sample(list,tv)
train=random.sample(trainval,tr)

ftrainval = open(r'./Main/trainval.txt', 'w')
ftest = open(r'Main/test.txt', 'w')
ftrain = open(r'Main/train.txt', 'w')
fval = open(r'Main/val.txt', 'w')

for i  in list:
    name=total_xml[i][:-4]+'\n'
    if i in trainval:
        ftrainval.write(name)
        if i in train:
            ftrain.write(name)
        else:
            fval.write(name)
    else:
        ftest.write(name)

ftrainval.close()
ftrain.close()
fval.close()
ftest .close()
转化为coco数据集
参考:把voc格式的标注文件.xml转为coco格式的.json文件,在此基础上进行修改,使满足格式要求。
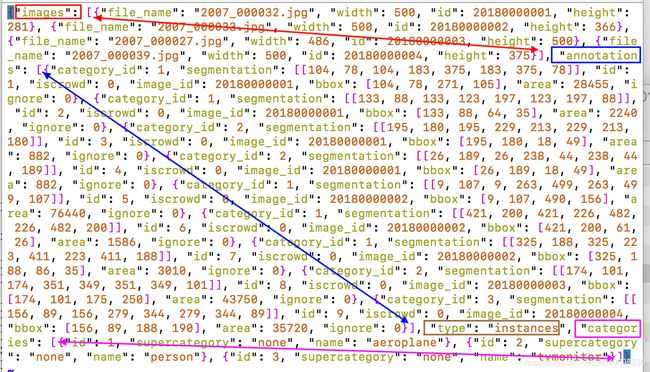
如下图所示为instances.json文件内容。从下图可以看到,coco的json标注格式实际上是一个大字典{},里面包括了“images”,“annotations”,“type”,"categories"等信息(为了便于观察,图中画出的双箭头表示该属性从开始到结束的范围)。"images"存放每个图像的名字宽高及图像id,"annotations"存放对应相同图像id的图像box的四个坐标位置及该框的类别id,"categories"则表示每个类别id到该类真实名字的对应关系。

一般只需要更改CLASSES和xml_dir即可。
#coding:utf-8

# pip install lxml

import os
import glob
import json
import shutil
import numpy as np
import xml.etree.ElementTree as ET


path2 = "./coco/"


START_BOUNDING_BOX_ID = 1


def get(root, name):
    return root.findall(name)


def get_and_check(root, name, length):
    vars = root.findall(name)
    if len(vars) == 0:
        raise NotImplementedError('Can not find %s in %s.'%(name, root.tag))
    if length > 0 and len(vars) != length:
        raise NotImplementedError('The size of %s is supposed to be %d, but is %d.'%(name, length, len(vars)))
    if length == 1:
        vars = vars[0]
    return vars


def convert(xml_list, json_file):
    json_dict = {"images": [], "type": "instances", "annotations": [], "categories": []}
    categories = pre_define_categories.copy()
    bnd_id = START_BOUNDING_BOX_ID
    all_categories = {}
    for index, line in enumerate(xml_list):
        # print("Processing %s"%(line))
        xml_f = line
        tree = ET.parse(xml_f)
        root = tree.getroot()

        filename = os.path.basename(xml_f)[:-4] + ".jpg"
        image_id = 20190000001 + index
        size = get_and_check(root, 'size', 1)
        width = int(get_and_check(size, 'width', 1).text)
        height = int(get_and_check(size, 'height', 1).text)
        image = {'file_name': filename, 'height': height, 'width': width, 'id':image_id}
        json_dict['images'].append(image)
        ## Cruuently we do not support segmentation
        #  segmented = get_and_check(root, 'segmented', 1).text
        #  assert segmented == '0'
        for obj in get(root, 'object'):
            category = get_and_check(obj, 'name', 1).text
            if category in all_categories:
                all_categories[category] += 1
            else:
                all_categories[category] = 1
            if category not in categories:
                if only_care_pre_define_categories:
                    continue
                new_id = len(categories) + 1
                print("[warning] category '{}' not in 'pre_define_categories'({}), create new id: {} automatically".format(category, pre_define_categories, new_id))
                categories[category] = new_id
            category_id = categories[category]
            bndbox = get_and_check(obj, 'bndbox', 1)
            xmin = int(float(get_and_check(bndbox, 'xmin', 1).text))
            ymin = int(float(get_and_check(bndbox, 'ymin', 1).text))
            xmax = int(float(get_and_check(bndbox, 'xmax', 1).text))
            ymax = int(float(get_and_check(bndbox, 'ymax', 1).text))
            assert(xmax > xmin), "xmax <= xmin, {}".format(line)
            assert(ymax > ymin), "ymax <= ymin, {}".format(line)
            o_width = abs(xmax - xmin)
            o_height = abs(ymax - ymin)
            ann = {'area': o_width*o_height, 'iscrowd': 0, 'image_id':
                   image_id, 'bbox':[xmin, ymin, o_width, o_height],
                   'category_id': category_id, 'id': bnd_id, 'ignore': 0,
                   'segmentation': []}
            json_dict['annotations'].append(ann)
            bnd_id = bnd_id + 1

    for cate, cid in categories.items():
        cat = {'supercategory': 'none', 'id': cid, 'name': cate}
        json_dict['categories'].append(cat)
    json_fp = open(json_file, 'w')
    json_str = json.dumps(json_dict)
    json_fp.write(json_str)
    json_fp.close()
    print("------------create {} done--------------".format(json_file))
    print("find {} categories: {} -->>> your pre_define_categories {}: {}".format(len(all_categories), all_categories.keys(), len(pre_define_categories), pre_define_categories.keys()))
    print("category: id --> {}".format(categories))
    print(categories.keys())
    print(categories.values())


if __name__ == '__main__':
    classes = ['yg',]
    pre_define_categories = {}
    for i, cls in enumerate(classes):
        pre_define_categories[cls] = i + 1
    # pre_define_categories = {'a1': 1, 'a3': 2, 'a6': 3, 'a9': 4, "a10": 5}
    only_care_pre_define_categories = True
    # only_care_pre_define_categories = False

    if os.path.exists(path2 + "/annotations"):
        shutil.rmtree(path2 + "/annotations")
    os.makedirs(path2 + "/annotations")
    if os.path.exists(path2 + "/train2017"):
        shutil.rmtree(path2 + "/train2017")
    os.makedirs(path2 + "/train2017")
    if os.path.exists(path2 + "/val2017"):
        shutil.rmtree(path2 +"/val2017")
    os.makedirs(path2 + "/val2017")

    train_ratio = 0.9
    save_json_train = path2 + 'annotations/instances_train2017.json'
    save_json_val = path2 + 'annotations/instances_val2017.json'
    xml_dir = "./oral"

    xml_list = glob.glob(xml_dir + "/*.xml")
    xml_list = np.sort(xml_list)
    np.random.seed(100)
    np.random.shuffle(xml_list)

    train_num = int(len(xml_list)*train_ratio)
    xml_list_train = xml_list[:train_num]
    xml_list_val = xml_list[train_num:]

    convert(xml_list_train, save_json_train)
    convert(xml_list_val, save_json_val)


    f1 = open(path2 + "train.txt", "w")
    for xml in xml_list_train:
        img = xml[:-4] + ".jpg"
        f1.write(os.path.basename(xml)[:-4] + "\n")
        shutil.copyfile(img, path2 + "/train2017/" + os.path.basename(img))

    f2 = open(path2 + "test.txt", "w")
    for xml in xml_list_val:
        img = xml[:-4] + ".jpg"
        f2.write(os.path.basename(xml)[:-4] + "\n")
        shutil.copyfile(img, path2 + "/val2017/" + os.path.basename(img))
    f1.close()
    f2.close()
    print("-------------------------------")
    print("train number:", len(xml_list_train))
    print("val number:", len(xml_list_val))
voc数据集进行训练
mmdet/datasets/voc.py
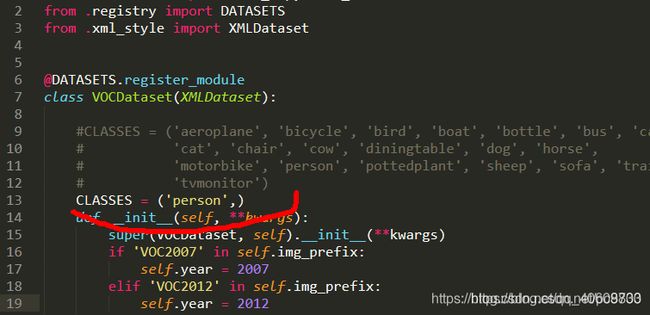
其中的CLASSES,修改为自己的类别,一定要加逗号。
from mmdet.core import eval_map, eval_recalls
from .builder import DATASETS
from .xml_style import XMLDataset


@DATASETS.register_module()
class VOCDataset(XMLDataset):

    CLASSES = ('yg', )
mmdet/core/evaluation/class_names.py
把voc_classes里的内容修改为和CLASSES一样的类别。
def voc_classes():
    return [
        'yg',
    ]
configs/_ base_/datasetsvoc0712.py
修改数据集地址
   type=dataset_type,
            ann_file=[
                data_root + 'VOC2007/ImageSets/Main/train.txt',
                # data_root + 'VOC2012/ImageSets/Main/trainval.txt'
            ],
            img_prefix=[data_root + 'VOC2007/', data_root + 'VOC2012/'],
            pipeline=train_pipeline)),
    val=dict(
        type=dataset_type,
        ann_file=data_root + 'VOC2007/ImageSets/Main/test.txt',
        img_prefix=data_root + 'VOC2007/',
        pipeline=test_pipeline),
    test=dict(
        type=dataset_type,
        ann_file=data_root + 'VOC2007/ImageSets/Main/test.txt',
        img_prefix=data_root + 'VOC2007/',
coco数据集进行训练
base/datasets/coco_detection.py
数据集的地址和格式只要正确就行,可以使用本博客以上的代码进行生成即可。
mmdet/datasets/coco.py
修改种类为自己的数据集
@DATASETS.register_module()
class CocoDataset(CustomDataset):

    CLASSES = ('yg', )

    def load_annotations(self, ann_file):
        """Load annotation
mmdet/core/evalution/class_names.py
修改验证名称
def coco_classes():
    return [
        'yg',
    ]
fastrcnn训练
以fastrcnn为例介绍两种数据集的运行,后面的检测网络都以coco数据集为例进行展示。
coco类型数据集
_ base_/models/faster_rcnn_r50_fpn.py
修改其中的num_classes
			in_channels=256,
            fc_out_channels=1024,
            roi_feat_size=7,
            num_classes=1,
运行以下代码即可,需要注意gpus不能为0
python tools/train.py configs/faster_rcnn/faster_rcnn_r50_fpn_1x_coco.py --gpus 1 --work-dir WORK_DIR
VOC类型数据集
faster_rcnn_r50_fpn_1x_voc0712.py
修改类别种类个数
model = dict(roi_head=dict(bbox_head=dict(num_classes=1)))
faster_rcnn_r50_fpn.py
修改num_classes种类个数
 in_channels=256,
            fc_out_channels=1024,
            roi_feat_size=7,
            num_classes=1,
            bbox_coder=dict(
VOC运行
python tools/train.py configs/pascal_voc/faster_rcnn_r50_fpn_1x_voc0712.py --work-dir WORK_DIR
得到如下训练输出即为成功:
2021-06-23 12:05:32,019 - mmdet - INFO - workflow: [('train', 1)], max: 4 epochs
2021-06-23 12:05:44,319 - mmdet - INFO - Saving checkpoint at 1 epochs
[>>>>>>>>>>>>>>>>>>>>>>>>>>>>>>>>>>>] 3/3, 2.3 task/s, elapsed: 1s, ETA:     0s2021-06-23 12:05:46,898 - mmdet - INFO -
+-------+-----+------+--------+-------+
| class | gts | dets | recall | ap    |
+-------+-----+------+--------+-------+
| yg    | 5   | 3    | 0.000  | 0.000 |
+-------+-----+------+--------+-------+
| mAP   |     |      |        | 0.000 |
+-------+-----+------+--------+-------+
2021-06-23 12:05:46,960 - mmdet - INFO - Exp name: faster_rcnn_r50_fpn_1x_voc0712.py
2021-06-23 12:05:46,960 - mmdet - INFO - Epoch(val) [1][14]	mAP: 0.0000
2021-06-23 12:05:59,536 - mmdet - INFO - Saving checkpoint at 2 epochs
FCOS训练
使用coco数据集进行fcos模型的训练,数据修改与上面类似,不再赘述。
需要修改的文件还有 configs/fcos/fcos_r50_caffe_fpn_gn-head_1x_coco.py 大致可以参考:mmdetection-fcos
修改其中的类别,lr等。
使用以下代码运行:
!python tools/train.py configs/fcos/fcos_r50_caffe_fpn_gn-head_1x_coco.py
模型调用
就像前面的模型测试一样,只需要加载模型结构和参数文件,就可以实现训练好的模型的调用。
from mmdet.apis import init_detector, inference_detector
import mmcv

# Specify the path to model config and checkpoint file
config_file = 'configs/faster_rcnn/faster_rcnn_r50_fpn_1x_coco.py'
checkpoint_file = 'WORK_DIR/epoch_12.pth'

# build the model from a config file and a checkpoint file
model = init_detector(config_file, checkpoint_file, device='cuda:0')

# test a single image and show the results
img = 'demo/2274.jpg'  # or img = mmcv.imread(img), which will only load it once
result = inference_detector(model, img)
# or save the visualization results to image files
model.show_result(img, result, out_file='result.jpg')
视频验证
以demo为例:
!python demo/video_demo.py demo/demo.mp4 configs/faster_rcnn/faster_rcnn_r50_fpn_1x_coco.py checkpoints/faster_rcnn_r50_fpn_1x_coco_20200130-047c8118.pth --out demo/1.mp4
得到:
视频
批量测试
python tools/test.py model_train/yolof/yolof_r50_c5_8x8_1x_coco.py model_train/yolof/latest.pth
--show-dir img_test_out/yolof
需要指定config文件、模型文件、图片保存文件夹。
其中config文件中有数据集信息。
mAP测试
可以批量测试模型在测试集数据,使用以下命令:
 python tools/test.py model_train/yolof/yolof_r50_c5_8x8_1x_coco.py model_train/yolof/epoch_70.pth --show
--eval bbox
其中的eval可选参数如下:
‘evaluation metrics, which depends on the dataset, e.g., “bbox”,’
’ “segm”, “proposal” for COCO, and “mAP”, “recall” for PASCAL VOC’
同时也可以通过以下命令:
--out=eval/result2.pkl
将测试结果保存成pkl文件。
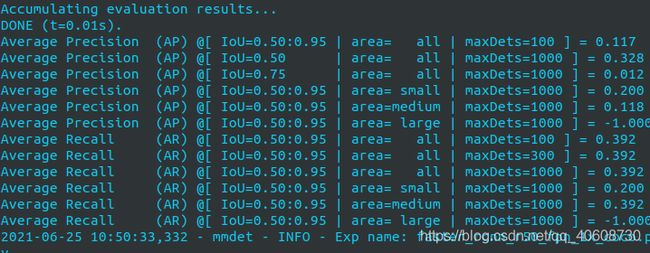
最终得到包含mAP0.5,mAP0.5:0.95等参数:
 Average Precision  (AP) @[ IoU=0.50:0.95 | area=   all | maxDets=100 ] = 0.504
 Average Precision  (AP) @[ IoU=0.50      | area=   all | maxDets=1000 ] = 0.860
 Average Precision  (AP) @[ IoU=0.75      | area=   all | maxDets=1000 ] = 0.538
 Average Precision  (AP) @[ IoU=0.50:0.95 | area= small | maxDets=1000 ] = 0.109
 Average Precision  (AP) @[ IoU=0.50:0.95 | area=medium | maxDets=1000 ] = 0.507
 Average Precision  (AP) @[ IoU=0.50:0.95 | area= large | maxDets=1000 ] = 0.653
 Average Recall     (AR) @[ IoU=0.50:0.95 | area=   all | maxDets=100 ] = 0.578
 Average Recall     (AR) @[ IoU=0.50:0.95 | area=   all | maxDets=300 ] = 0.578
 Average Recall     (AR) @[ IoU=0.50:0.95 | area=   all | maxDets=1000 ] = 0.578
 Average Recall     (AR) @[ IoU=0.50:0.95 | area= small | maxDets=1000 ] = 0.187
 Average Recall     (AR) @[ IoU=0.50:0.95 | area=medium | maxDets=1000 ] = 0.582
 Average Recall     (AR) @[ IoU=0.50:0.95 | area= large | maxDets=1000 ] = 0.662
OrderedDict([('bbox_mAP', 0.504), ('bbox_mAP_50', 0.86), ('bbox_mAP_75', 0.538), ('bbox_mAP_s', 0.109), ('bbox_mAP_m', 0.507), ('bbox_mAP_l', 0.653),
('bbox_mAP_copypaste', '0.504 0.860 0.538 0.109 0.507 0.653')])
最终得到的各个模型的测试结果如下:
| model | mAP0.5 | mAP0.5:0.95 |
|---|---|---|
| yolof | 0.860 | 0.504 |
| yolov3 | 0.913 | 0.564 |
| atss | 0.856 | 0.511 |
| reppoints | 0.878 | 0.503 |
| fastrcnn | 0.866 | 0.522 |
| fcos | 0.867 | 0.515 |
单通道图片
经过实际的测试和使用,mmdetection使用opencv进行读取,可以兼容单通道图片,和rgb图片一样使用即可。
lr解读
lr的设置与gpu个数成正比,以及batch size相关。
以以下代码为例:
# optimizer
optimizer = dict(type='SGD', lr=0.002, momentum=0.9, weight_decay=0.0001)
optimizer_config = dict(grad_clip=None)
# learning policy
lr_config = dict(
    policy='step',
    warmup='linear',
    warmup_iters=500,
    warmup_ratio=1.0/3,
    step=[8, 11])
runner = dict(type='EpochBasedRunner', max_epochs=12)
训练过程可视化
通过:
python tools/analysis_tools//analyze_logs.py plot_curve model_train/lr_test/20210705_095332.log.json --ke
ys lr --out lr.jpg --legend lr
我感觉官方给定的这个测试文件是有错误的,经常得不到正常的绘图。究其原因就是默认训练一次,测试一次,但是在绘图的时候,默认第一次没有训练。
修改建议:
将anglyze_logs.py的第68行附近的num_iters_per_epoch的初始化赋值修改为:
                if log_dict[epochs[0]]['mode'][-1]=='val':
                    num_iters_per_epoch = log_dict[epochs[0]]['iter'][-2]
                else:
                    num_iters_per_epoch = log_dict[epochs[0]]['iter'][-1]
使用余弦退火
居然改名字了,之前是CosineAnealing,现在是CosineAnnealing。
参考:https://github.com/search?q=org%3Aopen-mmlab+CosineAnealing&type=code
lr_config = dict(
    policy='CosineAnnealing',
    warmup='linear',
    warmup_iters=2000,
    warmup_ratio=1.0/30,
    min_lr = 0.0005,
    )
多GPU训练
格式为:
bash tools/dist_train.sh {config} {gpu_number}
比如:
bash tools/dist_train.sh configs/atss/atss...py 4 --work-dir train/
关闭SSH后继续执行
使用nohup, 参考:https://www.runoob.com/linux/linux-comm-nohup.html
nohup 命令 &
模型复杂度
通过以下代码进行计算:
python tools/analysis_tools/get_flops.py ${CONFIG_FILE} [--shape ${INPUT_SHAPE}]
以yolof模型为例:
python tools/analysis_tools/get_flops.py model_train/yolof/yolof_r50_c5_8x8_1x_coco.py
输入图片大小均为1280x800x3,得到:
==============================
Input shape: (3, 1280, 800)
Flops: 98.16 GFLOPs
Params: 42.06 M
==============================
yolo v3的网络输入大小为608x608,即:
python tools/analysis_tools/get_flops.py model_train/yolo/yolov3_d53_mstrain-608_273e_coco.py --shape 608
得到:
==============================
Input shape: (3, 608, 608)
Flops: 69.98 GFLOPs
Params: 61.52 M
==============================
| model | Flops | Params |
|---|---|---|
| yolof | 98.16G | 42.06M |
| atss | 201.41G | 31.89M |
| reppoints | 189.77G | 36.6M |
| fcos | 196.66G | 31.84M |
| fastrcnn | 206.66G | 41.12M |
| yolo v3(608*608) | 69.98G | 61.52M |
| yolo v3(1280*800) | 193.85G | 61.52M |
python tools/analysis_tools/get_flops.py model_train/yolo/yolov3_d53_mstrain-608_273e_coco.py --shape 1333 800
pytorch转ONNX
官方给定的命令是:
python tools/deployment/pytorch2onnx.py ${CONFIG_FILE} ${CHECKPOINT_FILE} --output_file ${ONNX_FILE} [--shape ${INPUT_SHAPE} --verify]
首先需要安装相关的noox转化库:
pip install onnx-simplifier
pip install onnxruntime
以yolo v3为例:
python tools/deployment/pytorch2onnx.py model_train/yolo/yolov3_d53_mstrain-608_273e_coco.py model_train/yolo/latest.pth --output-file torch2on
nx/yolo.onnx --show --verify  --shape 608
得到的部分输出为:
2021-07-07 19:22:41.919516843 [W:onnxruntime:, graph.cc:1074 Graph] Initializer 1860 appears in graph inputs and will not be treated as constant value/weight. This may prevent some of the
graph optimizations, like const folding. Move it out of graph inputs if there is no need to override it, by either re-generating the model with latest exporter/converter or with the tool o
nnxruntime/tools/python/remove_initializer_from_input.py.
准备publish的模型
-
将模型权重转换为CPU Tensors
-
删除优化器状态
-
计算检查点文件的哈希值并将哈希ID附加到文件名
使用以下指令:
python tools/model_converters/publish_model.py model_train/fastrcnn/latest.pth torch2onnx/fastrcnn_publish.pth
报错
报错1:
报错:
undefined symbol: _ZN6caffe28TypeMeta21_typeMetaDataInstanceISt7complexIdEEEPKNS_6detail12TypeMetaDataEv
ImportError: /home/liuyuan/.local/lib/python3.8/site-packages/mmcv/_ext.cpython-38-x86_64-linux-gnu.so: undefined symbol: _ZN6caffe28TypeMeta21_typeMetaDataInstanceISt7complexIdEEEPKNS_6detail12TypeMetaDataEv
原因:pytorch之前更新了
解决:重装mmcv-full和mmedit
版本要求 https://mmdetection.readthedocs.io/en/latest/get_started.html#
报错2:
OSError: checkpoints/faster_rcnn_r50_fpn_1x_coco_20200130-047c8118.pth is not a checkpoint file
#download the checkpoint from model zoo and put it in checkpoints/
#url: https://download.openmmlab.com/mmdetection/v2.0/faster_rcnn/faster_rcnn_r50_fpn_1x_coco/faster_rcnn_r50_fpn_1x_coco_20200130-047c8118.pth
checkpoint_file = ‘checkpoints/faster_rcnn_r50_fpn_1x_coco_20200130-047c8118.pth’
报错3:
报错
label = self.cat2label[name]
KeyError: ‘yg’
解决 加 ‘,’ https://blog.csdn.net/pc9803/article/details/104948411
只有一类的话,也要加逗号的

报错4
The model and loaded state dict do not match exactly
size mismatch for roi_head.bbox_head.fc_cls.weight: copying a param with shape torch.Size([81, 1024]) from checkpoint, the shape in current model is torch.Size([2, 1024]).
size mismatch for roi_head.bbox_head.fc_cls.bias: copying a param with shape torch.Size([81]) from checkpoint, the shape in current model is torch.Size([2]).
size mismatch for roi_head.bbox_head.fc_reg.weight: copying a param with shape torch.Size([320, 1024]) from checkpoint, the shape in current model is torch.Size([4, 1024]).
size mismatch for roi_head.bbox_head.fc_reg.bias: copying a param with shape torch.Size([320]) from checkpoint, the shape in current model is torch.Size([4]).
可能是因为 faster_rcnn_r50_fpn.py文件中的类别数不对应。
			in_channels=256,
            fc_out_channels=1024,
            roi_feat_size=7,
            num_classes=1,
            # num_classes=80,
            bbox_coder=dict(
报错5
Traceback (most recent call last):
  File "tools/train.py", line 178, in <module>
    main()
  File "tools/train.py", line 167, in main
    train_detector(
  File "/home/liuyuan/mmdetection/mmdet/apis/train.py", line 60, in train_detector
    data_loaders = [
  File "/home/liuyuan/mmdetection/mmdet/apis/train.py", line 61, in <listcomp>
    build_dataloader(
  File "/home/liuyuan/mmdetection/mmdet/datasets/builder.py", line 125, in build_dataloader
    data_loader = DataLoader(
  File "/home/liuyuan/miniconda3/lib/python3.8/site-packages/torch/utils/data/dataloader.py", line 272, in __init__
    batch_sampler = BatchSampler(sampler, batch_size, drop_last)
  File "/home/liuyuan/miniconda3/lib/python3.8/site-packages/torch/utils/data/sampler.py", line 216, in __init__
    raise ValueError("batch_size should be a positive integer value, "
ValueError: batch_size should be a positive integer value, but got batch_size=0
修改运行命令行的gpus为1:
python tools/train.py configs/faster_rcnn/faster_rcnn_r50_fpn_1x_coco.py --gpus 1 --work-dir WORK_DIR
报错6
"loss_rpn_cls": NaN, "loss_rpn_bbox": NaN, "loss_cls": NaN, "acc": 48.23145, "loss_bbox": NaN, "loss": NaN
lr太大了 降低lr即可。
报错7
训练过程中出现:
ERROR - The testing results of the whole dataset is empty.
估计是lr的问题。参考:解决思路
但是有时候重新运行又正常了
报错8
TypeError: 'NoneType' object is not iterable
Exception ignored in: <function _TemporaryFileCloser.__del__ at 0x7fa5d4ad8dd0>
Traceback (most recent call last):
  File "/home/liuyuan/anaconda3/envs/open-mmlab/lib/python3.7/tempfile.py", line 448, in __del__
    self.close()
  File "/home/liuyuan/anaconda3/envs/open-mmlab/lib/python3.7/tempfile.py", line 444, in close
    unlink(self.name)
FileNotFoundError: [Errno 2] No such file or directory: '/tmp/tmpohmfzvqk/tmp2rsbbsc1.py'
config文件有误
报错9
RuntimeError: Address already in use
netstat -nltp
kill -9 47177
欢迎各位在评论区进行交流和指正
另:
前几天yolox横空出世,超越一切YOLO!
大家也可以关注一下:YOLOX安装部署使用训练教程


