【从kitti开始自动驾驶】--3.1 机器人模型,相机视野可视化(RVIZ)
“愿世界和平无战争”
- 1. 本节内容
- 2. 加入相机视野
-
- 2.1 python文件新增代码
- 2.2 执行,查看视野效果
- 3. 加入机器人模型
-
- 3.1 下载3D模型
- 3.2为python增添代码
-
- 3.2.1 设置数据头信息
- 3.2.2 设置数据参数
- 3.2.3 模型初始平移量设定
- 3.2.4 模型初始旋转量设定
- 3.2.5 模型颜色设定
- 3.2.6 模型体积设定
- 3.2.7 最后的话
- 4. 执行,查看总效果
- 5. 源码
-
- --- publish_utils.py
- ---kitti_all.py
本节将在 2.2节的基础上,进行功能的添加,其他内容不变
工作空间是test3_autodrive_ws
python代码存在test3_autodrive_ws/src/demo1_kitti_pub_photo/scripts/kitti_all.py和publish_utils.py和data_utils.py中
下载的车模型文件解压在test3_autodrive_ws/src/demo1_kitti_pub_photo/mesh/car_model下
1. 本节内容
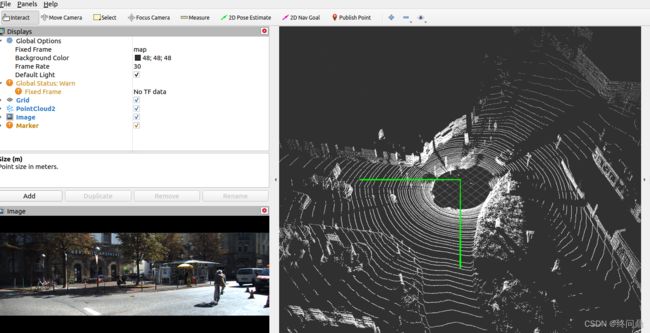
通过mark的line_strip为我们的摄像头添加视野(用绿色线标出)
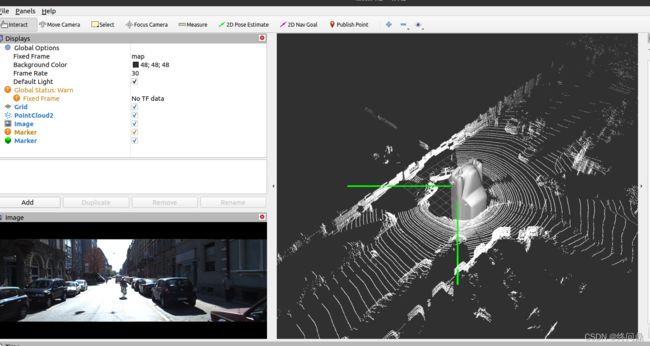
通过mark的mesh引入dae文件作为我们车的model发布
2. 加入相机视野
2.1 python文件新增代码
发布diplaytype的一种来代表相机视野
publish_utils中:
from visualization_msgs.msg import Marker
from geometry_msgs.msg import Point
- 导入发布相关消息的头文件,marker(是displaytype的一种),详见官方文档
- 点作为一种数据类型,需要导入相关头文件
    def publish_ego_car(ego_car_pub):
    'publish left and right 45 degree FOV and ego car model mesh'
    #header部分
    marker = Marker()
    marker.header.frame_id = FRAME_ID
    marker.header.stamp = rospy.Time.now()
    # marker的id
    marker.id = 0
    marker.action = Marker.ADD      # 加入一个marker
    marker.lifetime = rospy.Duration()  # 生存时间,()中无参数永远出现
    marker.type = Marker.LINE_STRIP     #marker 的type,有很多种,这里选择线条

    marker.color.r = 0.0
    marker.color.g = 1.0
    marker.color.b = 0.0            #这条线的颜色
    marker.color.a = 1.0            #透明度 1不透明
    marker.scale.x = 0.2            #大小,粗细

    #设定marker中的资料
    marker.points = []
    # 两条线,三个点即可
    #原点是0,0,0, 看左上角和右上角的数据要看kitti的设定,看坐标
    marker.points.append(Point(10, -10, 0))
    marker.points.append(Point(0, 0, 0))
    marker.points.append(Point(10, 10, 0))
	ego_car_pub.publish(marker)	#设置完毕,发布
- 首先填充marker的header
- 其次设置mark的相关参数,比如生存周期,和type等
- 然后设置选定type的详细参数 color和scale和alpha等
- 最后根据kitti的车的情况(x坐标在前方,以velodyne为0,0,0),两条线,三个点即可确定line_strip的具体位置坐标
kitti_all.py中:
发布一个publisher的三个步骤:
1. 建立publisher
ego_pub = rospy.Publisher('kitti_ego_car', Marker, queue_size=10)
- ego是自己/自我的意思
2. 读取资料
- 因为publish的是marker中的line_strip,只是线条,因此这一步忽略
3. 发布publisher
publish_ego_car(ego_pub)
2.2 执行,查看视野效果
- 首先启动roscore ;
- 然后运行:
rosrun demo1_kitti_pub_photo kitti_all.py
- 打开rviz,add by topic,看到kitti_cam下的image和point_cloud,mark勾选,可以看到如下效果(视频形式):
3. 加入机器人模型
3.1 下载3D模型
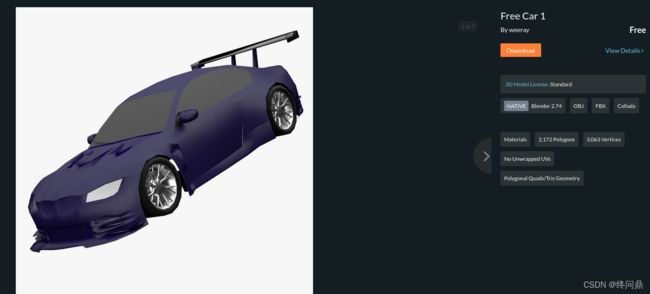
free 3d model ,在浏览器输入car dae即可
我的下载链接在这free car models
点击车辆detials,然后download即可
 下载完毕,和scripts同级目录下解压即可(文件后缀为.dae的即可)
3.2为python增添代码
发布汽车的model也需要使用我们的marker,区别的是我们使用mesh,主要是发布后缀为.DAE的model
publish_utils中:
3.2.1 设置数据头信息
#header部分
    mesh_marker = Marker()
    mesh_marker.header.frame_id = FRAME_ID
    mesh_marker.header.stamp = rospy.Time.now()
3.2.2 设置数据参数
mesh_marker.id = -1
mesh_marker.lifetime = rospy.Duration()  # 生存时间,()中无参数永远出现
mesh_marker.type = Marker.MESH_RESOURCE     #marker 的type,有很多种,这里选择mesh
mesh_marker.mesh_resource = "package://demo1_kitti_pub_photo/mesh/car_model/car.DAE"
- 这里注意mesh的导入路径写法
"package://包名//略去很多中间路径//模型.dae",当然很多时候也会是大写的DAE
3.2.3 模型初始平移量设定
mesh_marker.pose.position.x = 0.0
mesh_marker.pose.position.y = 0.0
#以为0,0,0 是velodyne的坐标(车顶),这里坐标是车底,所以是负数
mesh_marker.pose.position.z = -1.73
- 汽车模型初始平移量的设定
- 负数因为激光雷达在车顶,作为原点,所以车的中心z坐标为负数,可以和实际效果进行调节
3.2.4 模型初始旋转量设定
q = tf.transformations.quaternion_from_euler(0, 0, 0)
# 这里的参数和下载模型的预设角度有关,旋转关系,根据显示效果而调整,转成四元数q
#x轴旋转
mesh_marker.pose.orientation.x = q[0]
mesh_marker.pose.orientation.y = q[1]
mesh_marker.pose.orientation.z = q[2]
mesh_marker.pose.orientation.w = q[3]
- 汽车模型初始旋转角度的设定
- 根据实际效果调节,用到了q四元数,因此要在程序开始
import tf
3.2.5 模型颜色设定
mesh_marker.color.r = 1.0
mesh_marker.color.g = 1.0
mesh_marker.color.b = 1.0
mesh_marker.color.a = 1.0
- 为了不和其他颜色干扰冲突,影响视觉效果,个人选择白色
3.2.6 模型体积设定
mesh_marker.scale.x = 0.9
mesh_marker.scale.y = 0.9
mesh_marker.scale.z = 0.9

model.publish(mesh_marker) #设定完毕,发布
- 不按照1:1导入,而是在三个维度进行了拉伸或者压缩
- 最后发布
3.2.7 最后的话
创建publisher和发布,这里略,和相机视野写法类似,
如果发现效果不理想,需要逐个对,平移,旋转,体积等量进行调节
调节之后的代码放在最后5源码里
4. 执行,查看总效果
未调节参数时的离谱模型:
5. 源码
共三个文件,不过读取的都是我么提前设定的数据,因此data_utils.py文件源码和第二节:代码改进一样
— publish_utils.py
#!/usr/bin/env python3
#coding:utf-8

import rospy
from std_msgs.msg import Header
from sensor_msgs.msg import Image, PointCloud2
from visualization_msgs.msg import Marker
import sensor_msgs.point_cloud2 as pcl2
from geometry_msgs.msg import Point
from cv_bridge import CvBridge
import numpy as np
import tf

FRAME_ID = "map"

def publish_camera(cam_pub, bridge, image):
    cam_pub.publish(bridge.cv2_to_imgmsg(image, 'bgr8'))

def publish_point_cloud(pcl_pub, point_cloud):
    header = Header()
    header.frame_id = FRAME_ID
    header.stamp = rospy.Time.now()
    pcl_pub.publish(pcl2.create_cloud_xyz32(header, point_cloud[:, :3]))


def publish_ego_car(ego_car_pub):
    'publish left and right 45 degree FOV and ego car model mesh'
    #header部分
    marker = Marker()
    marker.header.frame_id = FRAME_ID
    marker.header.stamp = rospy.Time.now()
    # marker的id
    marker.id = 0
    marker.action = Marker.ADD      # 加入一个marker
    marker.lifetime = rospy.Duration()  # 生存时间,()中无参数永远出现
    marker.type = Marker.LINE_STRIP     #marker 的type,有很多种,这里选择线条

    marker.color.r = 0.0
    marker.color.g = 1.0
    marker.color.b = 0.0            #这条线的颜色
    marker.color.a = 1.0            #透明度 1不透明
    marker.scale.x = 0.2            #大小,粗细

    #设定marker中的资料
    marker.points = []
    # 两条线,三个点即可
    #原点是0,0,0, 看左上角和右上角的数据要看kitti的设定,看坐标
    marker.points.append(Point(10, -10, 0))
    marker.points.append(Point(0, 0, 0))
    marker.points.append(Point(10, 10, 0))

    ego_car_pub.publish(marker) #设定完毕,发布

def publish_car_model(model):
    #header部分
    mesh_marker = Marker()
    mesh_marker.header.frame_id = FRAME_ID
    mesh_marker.header.stamp = rospy.Time.now()
    # marker的id
    mesh_marker.id = -1
    mesh_marker.lifetime = rospy.Duration()  # 生存时间,()中无参数永远出现
    mesh_marker.type = Marker.MESH_RESOURCE     #marker 的type,有很多种,这里选择mesh
    mesh_marker.mesh_resource = "package://demo1_kitti_pub_photo/mesh/car_model/car.DAE"

    #平移量设置
    mesh_marker.pose.position.x = 0.0
    mesh_marker.pose.position.y = 0.0
    #以为0,0,0 是velodyne的坐标(车顶),这里坐标是车底,所以是负数
    mesh_marker.pose.position.z = -1.73

    #旋转量设定
    q = tf.transformations.quaternion_from_euler(np.pi/2, 0, np.pi/2)
    # 这里的参数和下载模型的预设角度有关,旋转关系,根据显示效果而调整,转成四元数q
    #x轴旋转
    mesh_marker.pose.orientation.x = q[0]
    mesh_marker.pose.orientation.y = q[1]
    mesh_marker.pose.orientation.z = q[2]
    mesh_marker.pose.orientation.w = q[3]

    #颜色设定(白色)
    mesh_marker.color.r = 1.0
    mesh_marker.color.g = 1.0
    mesh_marker.color.b = 1.0
    mesh_marker.color.a = 1.0

    #设置体积:  x,y,z方向的膨胀程度
    mesh_marker.scale.x = 0.4
    mesh_marker.scale.y = 0.4
    mesh_marker.scale.z = 0.4

    model.publish(mesh_marker) #设定完毕,发布
—kitti_all.py
#!/usr/bin/env python3
#coding:utf-8
from data_utils import *
from publish_utils import *


DATA_PATH = '/home/qinsir/kitti_folder/2011_09_26/2011_09_26_drive_0005_sync/'

if __name__ == '__main__':
    frame = 0
    rospy.init_node('kitti_node', anonymous=True)   #默认节点可以重名
    cam_pub = rospy.Publisher('kitti_cam', Image, queue_size=10)
    pcl_pub = rospy.Publisher("kitti_point_cloud", PointCloud2, queue_size=10)
    ego_pub = rospy.Publisher('kitti_ego_car', Marker, queue_size=10)
    model_pub = rospy.Publisher("kitti_car_model", Marker, queue_size=10)

    bridge = CvBridge()      #opencv支持的图片和ROS可以读取的图片之间转换的桥梁

    rate = rospy.Rate(10)

    while not rospy.is_shutdown():
        #使用OS,路径串接,%010d,这个字串有10个数字(比如0000000001).png
        img = read_camera(os.path.join(DATA_PATH, 'image_02/data/%010d.png'%frame))
        point_cloud = read_point_cloud(os.path.join(DATA_PATH, "velodyne_points/data/%010d.bin"%frame))

        publish_camera(cam_pub, bridge, img)
        publish_point_cloud(pcl_pub, point_cloud)
        publish_ego_car(ego_pub)
        publish_car_model(model_pub)

        rospy.loginfo('new file publish')
        rate.sleep()
        frame += 1
        frame %= 154
``


