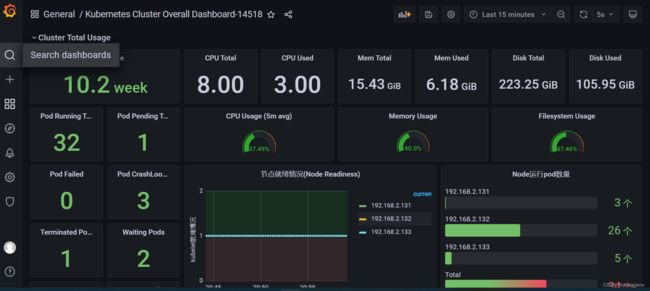
企业级prometheus+alertmanager+grafana+ victoriametrics高可用架构,实现基于钉钉、邮件的告警通知
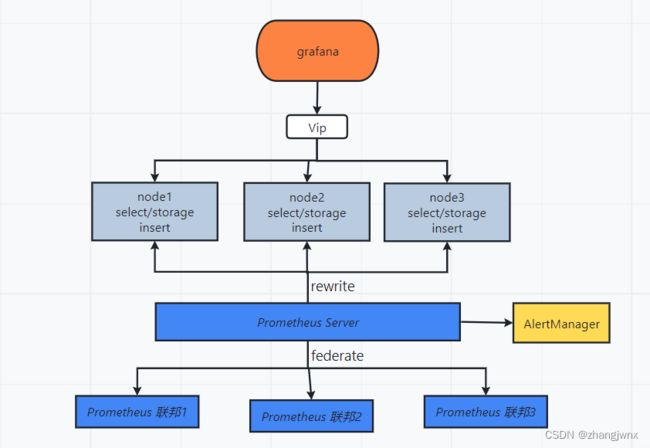
整体架构图
prometheus
简介:
官方地址:https://prometheus.io/
Prometheus是基于go语⾔开发的⼀套开源的监控、报警和时间序列数据库的组合,是由SoundCloud公司开发的开源监控系统,Prometheus于2016年加⼊CNCF(Cloud Native Computing Foundation,云原⽣计算基⾦会),2018年8⽉9⽇prometheus成为CNCF继kubernetes 之后毕业的第⼆个项⽬,prometheus在容器和微服务领域中得到了⼴泛的应⽤,其特点主要如下:
- 使⽤key-value的多维度(多个⻆度,多个层⾯,多个⽅⾯)格式保存数据
- 数据不使⽤MySQL这样的传统数据库,⽽是使⽤时序数据库,⽬前是使⽤的TSDB
- ⽀持第三⽅dashboard实现更绚丽的图形界⾯,如grafana(Grafana 2.5.0版本及以上)
- 组件模块化
- 不需要依赖存储,数据可以本地保存也可以远程保存
- 平均每个采样点仅占3.5 bytes,且⼀个Prometheus server可以处理数百万级别的的metrics指标数据。
- ⽀持服务⾃动化发现(基于consul等⽅式动态发现被监控的⽬标服务)
- 强⼤的数据查询语句功(PromQL,Prometheus Query Language)
- 数据可以直接进⾏算术运算
- 易于横向伸缩
- 众多官⽅和第三⽅的exporter(“数据”导出器)实现不同的指标数据收集
为什么使用prometheus?
容器监控的实现⽅对⽐虚拟机或者物理机来说⽐⼤的区别,⽐如容器在k8s环境中可以任意横向扩容与缩容,那么就需要监控服务能够⾃动对新创建的容器进⾏监控,当容器删除后⼜能够及时的从监控服务中删除,⽽传统的zabbix的监控⽅式需要在每⼀个容器中安装启动agent,并且在容器⾃动发现注册及模板关联⽅⾯并没有⽐较好的实现⽅式。
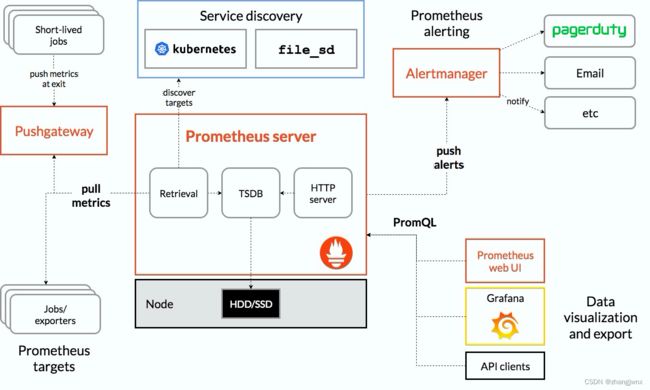
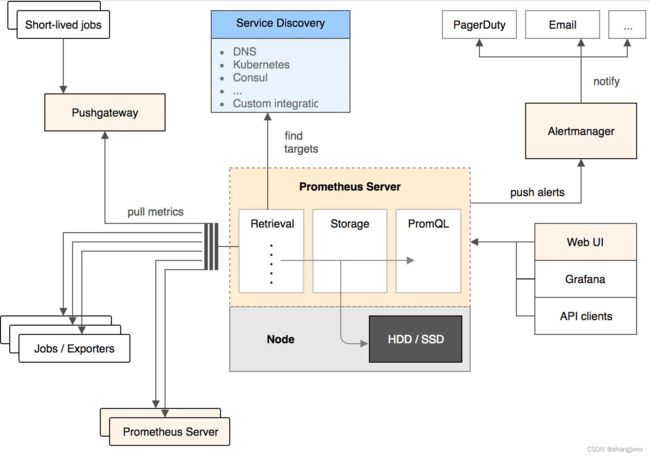
prometheus架构图
部署prometheus监控系统
二进制方式部署Prometheus Server
mkdir /apps
wget https://github.com/prometheus/prometheus/releases/download/v2.38.0/prometheus-2.38.0.linux-amd64.tar.gz
tar -xvf prometheus-2.38.0.linux-amd64.tar.gz
ln -sv prometheus-2.38.0.linux-amd64 prometheus
创建prometheus service 启动脚本
vim /etc/systemd/system/prometheus.service

[Unit]
Description=Prometheus Server
Documentation=https://prometheus.io/docs/introduction/overview/
After=network.target

[Service]
Restart=on-failure
WorkingDirectory=/apps/prometheus/
ExecStart=/apps/prometheus/prometheus --config.file=/apps/prometheus/prometheus.yml --web.enable-lifecycle

[Install]
WantedBy=multi-user.target
动态(热)加载配置:
# vim /etc/systemd/system/prometheus.service
--web.enable-lifecycle
curl -X POST http://192.168.2.132:9090/-/reload
启动prometheus服务
systemctl daemon-reload && systemctl restart prometheus && systemctl enable
prometheus
验证prometheus web界⾯:
prometheus存储系统
Prometheus 有着非常高效的时间序列数据存储方法,每个采样数据仅仅占用3.5byte 左右空间,上百万条时间序列,30 秒间隔,保留 60 天,大概 200 多 G空间。
prometheus 本地存储简介:
默认情况下,prometheus将采集到的数据存储在本地的 TSDB数据库中,路径默认为prometheus安装目录的 data目录,数据写入过程为先把数据写入 wal日志并放在内存,然后 2小时后将内存数据保存至一个新的 block块,同时再把新采集的数据写入内存并在 2小时后再保存至一个新的 block块,以此类推。
本地配置参数
--config.file="prometheus.yml" #指定配置文件
--web.listen-address="0.0.0.0:9090" #指定监听地址
--storage.tsdb.path="data/" #指定数存储目录
--storage.tsdb.retention.size=B, KB, MB, GB, TB, PB, EB #指定 chunk大小,默认 512MB
--storage.tsdb.retention.time= #数据保存时长,默认 15天
--query.timeout=2m #最大查询超时时间
-query.max-concurrency=20 #最大查询并发数
--web.read-timeout=5m #最大空闲超时时间
--web.max-connections=512 #最大并发连接数
--web.enable-lifecycle #启用 API动态加载配置功能
prometheus 联邦
- job_name: 'prometheus-federate-2.102'
  scrape_interval: 10s
  honor_labels: true
  metrics_path: '/federate'
  params:
    'match[]':
     - '{job="prometheus"}'
     - '{__name__=~"job:.*"}'
     - '{__name__=~"node.*"}'
  static_configs:
  - targets:
    - '172.31.2.102:9090'

## 注意对于k8s内部的prometheus节点数据的收集,要写容器中对应的job信息,不然prometheus service节点根据匹配条件,无法匹配到
'match[]':
     - '{job="kubernetes-service-endpoints"}'
二进制安装node-exporter
k8s各node节点使⽤⼆进制或者daemonset⽅式安装node_exporter,⽤于收集各k8s node节点宿主机的监控指标数据,默认监听端⼝为9100。
解压二进制程序
cd /apps
wget https://github.com/prometheus/node_exporter/releases/download/v1.3.1/node_exporter-1.3.1.linux-amd64.tar.gz
tar -xvf node_exporter-1.3.1.linux-amd64.tar.gz
ln -sv node_exporter-1.3.1.linux-amd64 node_exporter
创建node_exporter service 启动文件
vim /etc/systemd/system/node-exporter.service
[Unit]
Description=Prometheus Node Exporter
After=network.target

[Service]
ExecStart=/apps/node_exporter/node_exporter

[Install]
WantedBy=multi-user.target
启动node_exporter服务
systemctl daemon-reload && systemctl start node_exporter && systemctl enable node_exporter
添加node节点数据收集
vim /apps/prometheus/prometheus.yml
- job_name: 'promethues-node'
  static_configs:
    - targets: ['192.168.2.131:9100','192.168.2.132:9100']
grafana
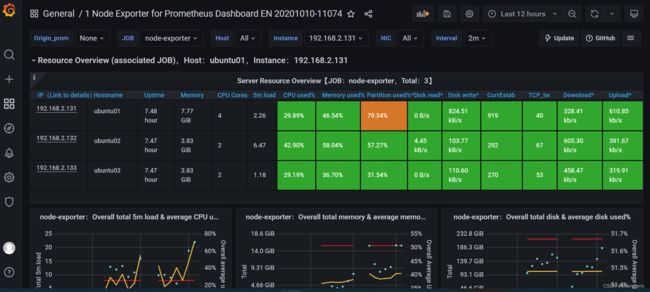
grafana是⼀个可视化组件,⽤于接收客户端浏览器的请求并连接到prometheus查询数据,最后经过渲染并在浏览器进⾏体系化显示,需要注意的是,grafana查询数据类似于zabbix⼀样需要⾃定义模板,模板可以⼿动制作也可以导⼊已有模板。
官网:https://grafana.com/
模板下载:https://grafana.com/grafana/dashboards/
安装Grafana Server
https://grafana.com/grafana/download #下载地址
https://grafana.com/docs/grafana/latest/installation/requirements/ #安装⽂档
cd /apps
wget https://dl.grafana.com/enterprise/release/grafana-enterprise-9.1.6-1.x86_64.rpm
或sudo yum install grafana-enterprise-9.1.6-1.x86_64.rpm
grafana server配置⽂件:
vim /etc/grafana/grafana.ini
[server]
# Protocol (http, https, socket)
protocol = http

# The ip address to bind to, empty will bind to all interfaces
http_addr = 0.0.0.0

# The http port to use
http_port = 3000
启动grafana服务
systemctl daemon-reload && systemctl restart grafana-server && systemctl enable grafana-server
插件管理
饼图插件未安装,需要提前安装
https://grafana.com/grafana/plugins/grafana-piechart-panel/
在线安装:
# grafana-cli plugins install grafana-piechart-panel

离线安装:
# pwd
/var/lib/grafana/plugins
wget https://grafana.com/api/plugins/grafana-piechart-panel/versions/1.6.2/download
unzip grafana-piechart-panel-1.6.2.zip
mv grafana-piechart-panel-1.6.2 grafana-piechart-panel
systemctl restart grafana-server
alertmanager
prometheus触发一条告警的过程
prometheus—>触发阈值—>超出持续时间—>alertmanager—>分组|抑制|静默—>媒体类型—>邮件|钉钉|企业微信|飞书等。

安装 alertmanager:
cd /apps
wget https://github.com/prometheus/alertmanager/releases/download/v0.24.0/alertmanager-0.24.0.linux-amd64.tar.gz
tar -xvf alertmanager-0.24.0.linux-amd64.tar.gz
ln -sv alertmanager-0.24.0.linux-amd64  alertmanager
创建alertmanager service启动文件
vim /etc/systemd/system/alertmanager.service
[Unit]
Description=Prometheus alertmanager
After=network.target

[Service]
ExecStart=/apps/alertmanager/alertmanager --config.file="/apps/alertmanager/alertmanager.yml"

[Install]
WantedBy=multi-user.target
启动alertmanager服务
systemctl daemon-reload && systemctl restart alertmanager && systemctl enablealertmanager
告警通知
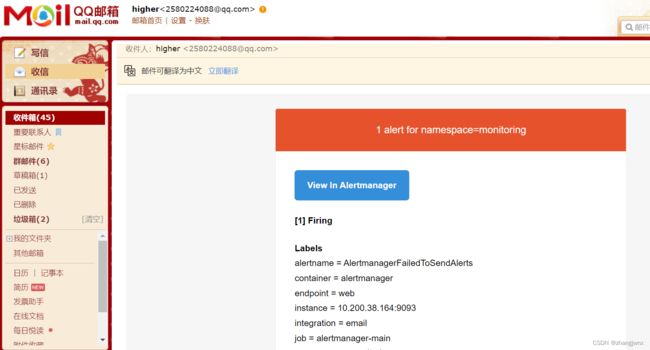
邮件告警通知
官方配置文档:https://prometheus.io/docs/alerting/configuration/
alertmanager配置文件说明:
vim /apps/alertmanager/alertmanager.yml
global:
  resolve_timeout: 1m #单次探测超时时间
  smtp_from: #发件人邮箱地址
  smtp_smarthost: #邮箱 smtp地址。
  smtp_auth_username: #发件人的登陆用户名,默认和发件人地址一致。
  smtp_auth_password: #发件人的登陆密码,有时候是授权码。
  smtp_require_tls: #是否需要 tls协议。默认是 true。

  wechart_api_url: #企业微信 API地址。
  wechart_api_secret: #企业微信 API secret。
  wechart_api_corp_id: #企业微信 corp id信息。

  resolve_timeout: 60s #当一个告警在 Alertmanager持续多长时间未接收到新告警后就标记告警状态为resolved(已解决/已恢复)。
配置详解:
global:
    resolve_timeout: 1m
    smtp_smarthost: 'smtp.qq.com:465'
    smtp_from: '[email protected]'
    smtp_auth_username: '[email protected]'
    smtp_auth_password: '********' #一般为开启pop3/smtp服务的授权码
    smtp_hello: '@qq.com'
    smtp_require_tls: false
route:
    group_by: [alertname] #通过 alertname的值对告警进行分类,- alert:物理节点 cpu使用率
    group_wait: 10s #一组告警第一次发送之前等待的延迟时间,即产生告警后延迟 10秒钟将组内新产生的消息一起合并发送(一般设置为 0秒 ~几分钟)。
    group_interval: 2m #一组已发送过初始通知的告警接收到新告警后,下次发送通知前等待的延迟时间(一般设置为 5分钟或更多)。
    repeat_interval: 5m #一条成功发送的告警,在最终发送通知之前等待的时间(通常设置为 3小时或更长时间)。
    receiver: default-receiver #其它的告警发送给 default-receiver
    routes: #将 critical的报警发送给 myalertname
    - receiver: myalertname
    group_wait: 10s
    match_re:
       severity: critical
receivers: #定义多接收者
- name: 'default-receiver'
    email_configs:
    - to: '[email protected]'
      send_resolved: true #通知已经恢复的告警
- name: myalertname
    webhook_configs:
    - url: 'http://172.30.7.101:8060/dingtalk/alertname/send'
      send_resolved: true #通知已经恢复的告警
配置并启动alertmanager
global:
    resolve_timeout: 1m
    smtp_smarthost: 'smtp.qq.com:465'
    smtp_from: '[email protected]'
    smtp_auth_username: '[email protected]'
    smtp_auth_password: '********' #一般为开启pop3/smtp服务的授权码
    smtp_hello: '@qq.com'
    smtp_require_tls: false
route:
    group_by: [alertname] #采用哪个标签来作为分组依据
    group_wait: 10s 。
    group_interval: 10s
    repeat_interval: 2m
    receiver: web.hook.qq #设置接收人
receivers: #定义多接收者
- name: 'web.hook.qq'
    email_configs:
    - to: '[email protected]'
      send_resolved: true #通知已经恢复的告警
inhibit_rules: #抑制的规则
  - source_match: #源匹配级别,当匹配成功发出通知,但是其它'alertname', 'dev', 'instance'产生的warning级别的告警通知将被抑制
      severity: 'critical' #报警的事件级别
      target_match:
        severity: 'warning' #调用 source_match的 severity即如果已经有'critical'级别的报警,那么将匹配目标为新产生的告警级别为'warning'的将被抑制
      equal: ['alertname', 'dev', 'instance'] #匹配那些对象的告警
钉钉告警通知
告警流程
prometheus—>alertmanager—>dingtalk—>dingdingServer
cd /apps
wget https://github.com/timonwong/prometheus-webhook-dingtalk/releases/download/v2.1.0/prometheus-webhook-dingtalk-2.1.0.linux-amd64.tar.gz
ln -sv prometheus-webhook-dingtalk-2.1.0.linux-amd64 prometheus-webhook-dingtalk
源端存储之victoriametrics
官方地址:
https://github.com/VictoriaMetrics/VictoriaMetrics
https://docs.victoriametrics.com/Single-server-VictoriaMetrics.html
单机版部署
cd /app
wget https://github.com/VictoriaMetrics/VictoriaMetrics/releases/download/v1.81.2/victoria-metrics-linux-amd64-v1.81.2.tar.gz
tar -xvf victoria-metrics-linux-amd64-v1.81.2.tar.gz
参数:
-httpListenAddr=0.0.0.0:8428 #监听地址及端口
-storageDataPath #VictoriaMetrics将所有数据存储在此目录中,默认为执行启动 victoria的当前目录下的 victoria-metrics-data目录中。
-retentionPeriod #存储数据的保留,较旧的数据会自动删除,默认保留期为 1个月,默认单位为 m(月),支持的单位有 h (hour), d (day), w (week), y (year)。

mv victoria-metrics-prod /usr/local/bin/
cp victoria-metrics-prod /usr/local/bin/
启动service文件
vim /etc/systemd/system/victoria-metrics-prod.service
[Unit]
Description=For Victoria-metrics-prod Service
After=network.target

[Service]
ExecStart=/usr/local/bin/victoria-metrics-prod -httpListenAddr=0.0.0.0:8428 -storageDataPath=/data/victoria -retentionPeriod=3

[Install]
WantedBy=multi-user.target
启动服务
systemctl daemon-reload && systemctl restart victoria-metrics-prod.service
systemctl enable victoria-metrics-prod.service
prometheus配置文件
global:
   scrape_interval: 15s # Set the scrape interval to every 15 seconds. Default is every 1 minute.
   evaluation_interval: 15s # Evaluate rules every 15 seconds. The default is every 1 minute.
   # scrape_timeout is set to the global default (10s).
remote_write:
  - url: http://192.168.2.131:8428/api/v1/write
grafana配置
添加数据源,类型为 prometheus,地址及端口为 VictoriaMetrics:
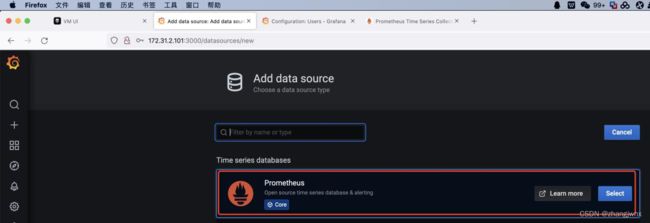 victoriametrics-data-source #数据源名称
http://192.168.2.131:8428 #victoriametrics server地址
集群版部署
组件介绍:
vminsert :
写入组件(写),vminsert负责接收数据写入并根据对度量名称及其所有标签的一致 hash结果将数据分散写入不同的后端 vmstorage节点之间 vmstorage,vminsert默认端口 8480
vmstorage :
存储原始数据并返回给定时间范围内给定标签过滤器的查询数据,默认端口 8482
vmselect:
查询组件(读),连接 vmstorage,默认端口 8481
部署集群
分别在各个VictoriaMetrics服务器进行安装配置:
cd /app
wget https://github.com/VictoriaMetrics/VictoriaMetrics/releases/download/v1.81.2/victoria-metrics-linux-amd64-v1.81.2-cluster.tar.gz
tar xvf victoria-metrics-linux-amd64-v1.81.2-cluster.tar.gz
vminsert-prod
vmselect-prod
vmstorage-prod
mv vminsert-prod vmselect-prod vmstorage-prod /usr/local/bin/
部署vmstorage-prod组件
负责数据持久化,监听端口为8482,数据写入端口为8400,数据读取端口为8401
启动service文件
vim /etc/systemd/system/vmstorage.service
[Unit]
Description=Vmstorage Server
After=network.target

[Service]
Restart=on-failure
WorkingDirectory=/tmp
ExecStart=/usr/local/bin/vmstorage-prod -loggerTimezone Asia/Shanghai -storageDataPath/data/vmstorage-data -httpListenAddr :8482 -vminsertAddr :8400 -vmselectAddr :8401

[Install]
WantedBy=multi-user.target
服务启动
systemctl daemon-reload && systemctl restart vmstorage.service && systemctl enable vmstorage.service
其他两个节点执行同样的操作
部署 vminsert-prod组件
接收外部的写请求,默认端口 8480
vim /etc/systemd/system/vminsert.service
[Unit]
Description=Vminsert Server
After=network.target

[Service]
Restart=on-failure
WorkingDirectory=/tmp
ExecStart=/usr/local/bin/vminsert-prod -httpListenAddr :8480-storageNode=192.168.2.131:8400,192.168.2.132:8400,192.168.2.133:8400

[Install]
WantedBy=multi-user.target
启动服务
systemctl daemon-reload && systemctl restart vminsert && systemctl enable vminsert
其他两个节点执行相同的操作
部署 vmselect-prod组件
负责接收外部的读请求,默认端口 8481
vim /etc/systemd/system/vmselect.service
[Unit]
Description=Vminsert Server
After=network.target

[Service]
Restart=on-failure
WorkingDirectory=/tmpExecStart=/usr/local/bin/vmselect-prod -httpListenAddr :8481 -storageNode=192.168.2.131:8401,192.168.2.132:8401,192.168.2.133:8401

[Install]
WantedBy=multi-user.target
启动服务
systemctl daemon-reload && systemctl restart vmselect && systemctl enable vmselect
其他两个节点执行相同的操作
验证服务端口
192.168.2.131:
# curl http://192.168.2.131:8480/metrics
# curl http://192.168.2.131:8481/metrics
# curl http://192.168.2.131:8482/metrics

192.168.2.132:
# curl http://192.168.2.132:8480/metrics
# curl http://192.168.2.132:8481/metrics
# curl http://192.168.2.132:8482/metrics

192.168.2.133:
# curl http://192.168.2.133:8480/metrics
# curl http://192.168.2.133:8481/metrics
# curl http://192.168.2.133:8482/metrics
prometheus配置远程写入
#集群写入
remote_write:
  - url: http://192.168.2.131:8480/insert/0/prometheus
  - url: http://192.168.2.132:8480/insert/0/prometheus
  - url: http://192.168.2.133:8480/insert/0/prometheus
grafana数据源配置
victoriametrics-clusterdata-source #数据源名称
http://192.168.2.131:8481/select/0/prometheus #集群数据源地址,可以写成vip实现高可用
开启数据复制
https://docs.victoriametrics.com/Cluster-VictoriaMetrics.html#replication-and-data-safety
默认情况下,数据被 vminsert的组件基于 hash算法分别将数据持久化到不同的vmstorage节点,可以启用 vminsert组件支持的-replicationFactor=N复制功能,将数据分别在各节点保存一份完整的副本以实现数据的高可用。
prometheus-operator
官方地址:https://github.com/prometheus-operator/prometheus-operator
Operator部署器基于已经编写好的yaml文件,可以将prometheus server、alertmanager、grafana、node-exporter等组件一键批量部署。
下载地址:
验证pod状态
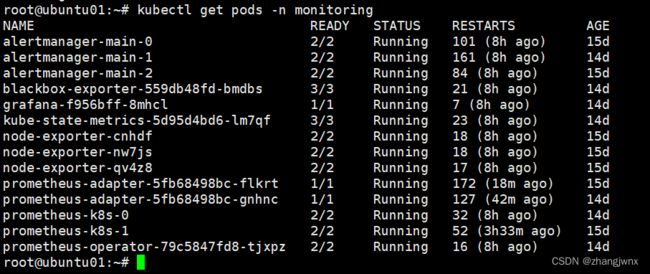
验证prometheus web界面:

验证grafana web界面
alertmanager
k8s组件监控
cadvisor监控pod的资源利用率

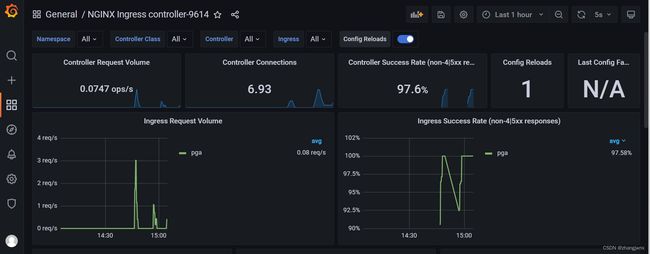
ingress-nginx监控
