Faceswap文档之---使用手册
前言
本篇博客,记录了使用github上的明星项目faceswap的过程,和一些踩坑记录。这个项目可以很好的实现视频换脸,感兴趣同学可以试一下。
说明:本篇文章我将项目部署在linux操作系统进行使用的,因为我们公司服务器性能更好一点。
当前时间版本:2022年3月
 https://github.com/deepfakes/faceswap
![]() https://github.com/deepfakes/faceswap
https://github.com/deepfakes/faceswap
关于视频换脸的大概原理,如果你感兴趣也想要知道的话,可以通过这个几分钟的视频大概了解。
AI 换脸的原理 - 知乎知乎,中文互联网高质量的问答社区和创作者聚集的原创内容平台,于 2011 年 1 月正式上线,以「让人们更好的分享知识、经验和见解,找到自己的解答」为品牌使命。知乎凭借认真、专业、友善的社区氛围、独特的产品机制以及结构化和易获得的优质内容,聚集了中文互联网科技、商业、影视、时尚、文化等领域最具创造力的人群,已成为综合性、全品类、在诸多领域具有关键影响力的知识分享社区和创作者聚集的原创内容平台,建立起了以社区驱动的内容变现商业模式。![]() https://www.zhihu.com/zvideo/1417898689550053376
https://www.zhihu.com/zvideo/1417898689550053376
效果展示
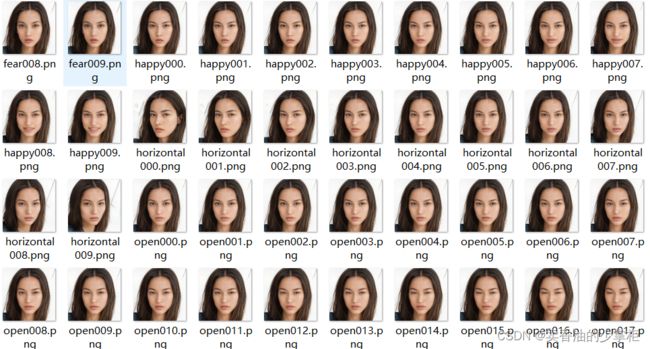
我使用stylegan2生成了一个世界上不存在的人,各种方位角度的人脸图片160多张
对对抗神经网络生成图片感兴趣,可以参考以下链接,关于stylegan2的项目:
G-Lab人脸生成实验![]() http://www.seeprettyface.com/index.html将一个美女视频的脸换成了这个生成不存在的人脸,效果在下边:
http://www.seeprettyface.com/index.html将一个美女视频的脸换成了这个生成不存在的人脸,效果在下边:
原视频:
林允唯美写真_哔哩哔哩_bilibili林允唯美写真视频片段![]() https://www.bilibili.com/video/BV1ZZ4y1n7gU换脸片段视频:
https://www.bilibili.com/video/BV1ZZ4y1n7gU换脸片段视频:
out2_哔哩哔哩_bilibiliout2![]() https://www.bilibili.com/video/BV1PZ4y167pR感觉很有趣是不是,那就来实操试一试吧。
https://www.bilibili.com/video/BV1PZ4y167pR感觉很有趣是不是,那就来实操试一试吧。
本片博客默认你已经部署安装好了faceswap在你的设备上,如果你还没有安装部署,请参照我上一篇博客《Faceswap文档之---部署安装》进行安装部署工作。
Faceswap文档之---部署安装_卖香油的少掌柜的博客-CSDN博客本篇博客,记录了部署github上的明星项目faceswap的过程,和一些踩坑记录。这个项目可以很好的实现视频换脸,感兴趣同学可以试一下。说明:本篇文章我将项目部署在linux操作系统进行使用的,因为我们公司服务器性能更好一点。当前时间版本:2022年3月https://blog.csdn.net/qq_58832911/article/details/123550556
使用手册
git上的项目提供了 Usage.md 使用说明文档,详细讲解了项目使用过程,各种插件的使用,但是全英文就让人看的很头疼,所以我翻译了一下,我认为全篇读一下,有助于你更加深入了解各个插件的作用和更加灵活的将插件配合使用。
引用块为译文:个人英语水平有限,大家最好对照原文灵活理解。
Introduction 综述
Disclaimer 声明
This guide provides a high level overview of the faceswapping process. It does not aim to go into every available option, but will provide a useful entry point to using the software. There are many more options available that are not covered by this guide. These can be found, and explained, by passing the -h flag to the command line (eg: python faceswap.py extract -h) or by hovering over the options within the GUI.
本指南提供了换脸过程中各个插件大体功能的介绍。它的目的不是探究插件所有可用的功能选项,而是为使用该软件提供一个流程化的指导。本指南没有涵盖完全所有可用的选项。可以通过将-h标志传递到命令行(例如:python faceswap.py extract -h)或将鼠标悬停在GUI中的选项上找到并解释插件中左右功能参数的含义。
Getting Started 让我们开始
So, you want to swap faces in pictures and videos? Well hold up, because first you gotta understand what this application will do, how it does it and what it can't currently do.
The basic operation of this script is simple. It trains a machine learning model to recognize and transform two faces based on pictures. The machine learning model is our little "bot" that we're teaching to do the actual swapping and the pictures are the "training data" that we use to train it.Note that the bot is primarily processing faces. Other objects might not work.
So here's our plan. We want to create a reality where Donald Trump lost the presidency to Nic Cage; we have his inauguration video; let's replace Trump with Cage.
那么,你想在照片和视频中交换面孔吗? 在此之前请稍等,我们想让您先了解这个应用程序可以做什么,它如何做,以及它目前不能做什么。
这个程序的基本操作很简单。它训练一个机器学习模型来识别和转换基于图片的两个人脸。我们训练机器学习模型教它做实际的人脸交换,所以我们需要大量人脸图片做我们用来训练它的“训练数据”。注意,机器人主要处理人脸。其他对象可能无法很好工作。
这是我们的例子。下面讲到的命令样例都是基于例子中的需求。我们希望创造这样一个需求:唐纳德·特朗普败给了尼古拉斯·凯奇,假设现在我们有唐纳德·特朗普的就职视频;让我们用尼克凯奇的脸代替视频中特朗普的脸。
Extract 图片中人脸的提取
In order to accomplish this, the bot needs to learn to recognize both face A (Trump) and face B (Nic Cage). By default, the bot doesn't know what a Trump or a Nic Cage looks like. So we need to show it lots of pictures and let it guess which is which. So we need pictures of both of these faces first.
A possible source is Google, DuckDuckGo or Bing image search. There are scripts to download large amounts of images. A better source of images are videos (from interviews, public speeches, or movies) as these will capture many more natural poses and expressions. Fortunately FaceSwap has you covered and can extract faces from both still images and video files. See Extracting video frames for more information.
So now we have a folder full of pictures/videos of Trump and a separate folder of Nic Cage. Let's save them in our directory where we put the FaceSwap project.
Example: ~/faceswap/src/trump and ~/faceswap/src/cage
为了做到需求,机器人需要学会识别人脸A(特朗普)和人脸B(尼克凯奇)。默认情况下,这个机器人不知道特朗普或尼克凯奇长什么样。所以我们需要给它看很多图片,让辨识出哪个是哪个。所以我们需要这两张脸的照片数据集。
一个可能的数据集来源是谷歌,DuckDuckGo或必应图像搜索。有一些脚本可以下载大量的图像。一个更好的图片来源是视频(采访、公开演讲或电影),因为这些可以捕捉更多自然的姿势和表情。也正是因为视频中获取图片更方便,FaceSwap的提取功能的插件,它即可以从静态图像集合问价夹中提取人脸也可以从视频文件中提取人脸。有关视频分帧成图片的更多信息,请参见Extracting video frames。
假设现在现在我们有了一个文件夹,里面都是特朗普的照片和视频,还有一个单独的文件夹是尼克凯奇的。让我们将它们保存到放置FaceSwap项目的目录中。例如我们存放的问价夹目录在这里:~/faceswap/src/trump(特朗普的目录) ~/faceswap/src/cage(尼克凯奇的目录)
Extracting Faces 开始提取人脸
So here's a problem. We have a ton of pictures and videos of both our subjects, but these are just of them doing stuff or in an environment with other people. Their bodies are on there, they're on there with other people... It's a mess. We can only train our bot if the data we have is consistent and focuses on the subject we want to swap. This is where FaceSwap first comes in.
在这之前有一个问题需要注意,我们的数据集中有大量的照片和视频,但是你收集的图片和视频中的画面里可能还存在其他于换脸对象不相干的其他人的人脸,如果一个画面的图片里混入了其他人的脸……会使训练模型变得很糟糕。只有当我们拥有的图像数据是同一个人一致人脸数据,我们的训练网络才能关注于我们想要交换的主题,我们才能更好训练换脸模型。这就是faceeswap功能设计的初衷。
Command Line: 提取图片或者视频中人脸的命令如下
# To extract trump from photos in a folder:要从特朗普图片文件夹中的照片中提取特朗普的脸
python faceswap.py extract -i ~/faceswap/src/trump -o ~/faceswap/faces/trump# To extract trump from a video file:从视频文件中提取特朗普的脸
python faceswap.py extract -i ~/faceswap/src/trump.mp4 -o ~/faceswap/faces/trump# To extract cage from photos in a folder:从文件夹中的照片中提取凯奇的脸
python faceswap.py extract -i ~/faceswap/src/cage -o ~/faceswap/faces/cage# To extract cage from a video file:从视频文件中提取凯奇的脸
python faceswap.py extract -i ~/faceswap/src/cage.mp4 -o ~/faceswap/faces/cageGUI: 可视化界面的操作方法
To extract trump from photos in a folder (Right hand folder icon):从一个文件夹的照片中提取特朗普的脸(右手边的文件夹图标):
To extract cage from a video file (Left hand folder icon):从视频文件中提取凯奇的脸(左侧文件夹图标):
For input we either specify our photo directory or video file and for output we specify the folder where our extracted faces will be saved. The script will then try its best to recognize face landmarks, crop the images to a consistent size, and save the faces to the output folder. An alignments.json file will also be created and saved into your input folder. This file contains information about each of the faces that will be used by FaceSwap.
Note: this script will make grabbing test data much easier, but it is not perfect. It will (incorrectly) detect multiple faces in some photos and does not recognize if the face is the person whom we want to swap. Therefore: Always check your training data before you start training. The training data will influence how good your model will be at swapping.
对于命令行中输入的参数,我们可以指定为我们的照片目录或视频文件,对于输出参数,我们可以指定保存我们提取的人脸图片的文件夹。需要您了解的是,脚本将尽力识别人脸在原数据图片中的像素坐标,并将脸部图片将图像裁剪成一致的大小,并将这些裁剪下来的人脸图片保存到输出文件夹中。同时一个alignments.json(和后缀名为FSA的)文件也将被创建并保存到您的数据集输入文件夹。这个文件包含FaceSwap将要使用的每个人脸和原图对应的像素坐标的信息。
注意:这个脚本将使提取人脸数据更加容易,但它并不是完美的。有时候它会(不正确地)在一些照片中检测到多个人脸,并且不能识别出这张脸是否是我们想要交换的人,于是都收集在输出文件夹中。因此:在开始训练之前一定要检查你的输出文件夹中的人脸训练数据。提前将不合格的人脸图片删去,训练数据的质量将影响您的模型训练结果的好坏。
General Tips 提取环节的一些知识点
When extracting faces for training, you are looking to gather around 500 to 5000 faces for each subject you wish to train. These should be of a high quality and contain a wide variety of angles, expressions and lighting conditions.
You do not want to extract every single frame from a video for training as from frame to frame the faces will be very similar.
You can see the full list of arguments for extracting by hovering over the options in the GUI or passing the help flag. i.e: python faceswap.py extract -h
在提取人脸进行训练时,比较好的数据收集量是每个角色的人脸图片收集大约500到5000张。这些应该是高质量的,并包含各种角度,表达和照明条件。
从视频中提取时不要把每一帧图片都用于训练,因为每一帧的人脸都非常相似。需要在精简一下,在多增加一些多样性。
通过将鼠标悬停在GUI中的选项上或帮助标志,您可以看到用于提取功能的完整参数列表。即和: python faceswap.py extract -h 命令同理
Some of the plugins have configurable options. You can find the config options in:
一些插件有可配置的选项。你可以在:
\config\extract.ini中找到配置选项。至少需要运行Extract或GUI一次,才能生成此文件。
Training a model训练模型
Ok, now you have a folder full of Trump faces and a folder full of Cage faces. What now? It's time to train our bot! This creates a 'model' that contains information about what a Cage is and what a Trump is and how to swap between the two.
The training process will take the longest, how long depends on many factors; the model used, the number of images, your GPU etc. However, a ballpark figure is 12-48 hours on GPU and weeks if training on CPU.
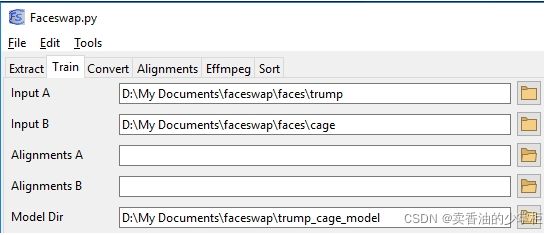
We specify the folders where the two faces are, and where we will save our training model.
ok,现在你有一堆特朗普的脸还有一堆凯奇的脸。是时候训练我们的机器学习模型了,接下来就是使用训练模型模块插件训练模型了,训练好的模型文件参数中将包含了什么是凯奇,什么是特朗普,以及如何在两者之间进行交换的信息。
训练过程将花费很长的时间,具体多长取决于许多因素:使用的模型,图像的数量,你的GPU性能等。然而,一个大概的数字是12-48小时使用GPU训练,如果使用CPU训练要一周或者更长时间。
使用训练模块插件,参数中需要我们指定两种脸所在的文件夹,以及我们将保存训练模型的文件夹。
Command Line: 命令如下
python faceswap.py train -A ~/faceswap/faces/trump -B ~/faceswap/faces/cage -m ~/faceswap/trump_cage_model/

# or -p to show a preview (加-p参数可以将训练参数图形可视化)
# 如果你的服务器不支持可视化可以不加

python faceswap.py train -A ~/faceswap/faces/trump -B ~/faceswap/faces/cage -m ~/faceswap/trump_cage_model/ -p
GUI: 可视化界面操作如下
Once you run the command, it will start hammering the training data. If you have a preview up, then you will see a load of blotches appear. These are the faces it is learning. They don't look like much, but then your model hasn't learned anything yet. Over time these will more and more start to resemble trump and cage.
一旦您运行该命令,它将开始敲使用数据训练模型。如果你打开了训练过程的可视化预览,那么你会看到大量的像素斑点出现。这些是它正在学习的面孔。刚开始它们看起来不太像人脸,但你的模型还没有学到任何东西。随着时间的推移,它们将越来越像川普和凯奇。
You want to leave your model learning until you are happy with the images in the preview. To stop training you can:
Command Line: press "Enter" in the preview window or in the console
GUI: Press the Terminate button
When stopping training, the model will save and the process will exit. This can take a little while, so be patient. The model will also save every 100 iterations or so.
You can stop and resume training at any time. Just point FaceSwap at the same folders and carry on.
当你在可视化预览界面看到比较满意的脸,或者训练过程输出的观测参数足够时。你就可以停止训练了,你可以通过以下方法停止训练:
命令行:在预览窗口或控制台中按“Enter”
GUI可视化界面:按Terminate按钮。
当停止训练时,模型将保存,过程将退出。这可能需要一段时间,所以耐心等待一下。另外模型还将每100次迭代保存一次。
您可以随时停止和恢复培训。只需将FaceSwap指向相同的文件夹,然后继续操作,就可以在上一次停止的地方继续训练。
General Tips 训练模型阶段的一些知识点
If you are training with a mask or using Warp to Landmarks, you will need to pass in an alignments.json file for each of the face sets. See Extract - General Tips for more information.
The model is automatically backed up at every save iteration where the overall loss has dropped (i.e. the model has improved). If your model corrupts for some reason, you can go into the model folder and remove the .bk extension from the backups to restore the model from backup.
You can see the full list of arguments for training by hovering over the options in the GUI or passing the help flag. i.e: python faceswap.py train -h
当你开始训练的时候,训练过程种,程序需要一个通alignments.json的文件为,这个文件记录了所有提取的脸和原图片之间的相关联系信息。有关更多信息,请参阅人脸提取时的说明。
训练过程的每次保存迭代中,当整体损失下降时(即模型得到了改进),模型会被自动备份。如果您的模型由于某种原因损坏了,您可以进入模型文件夹并从备份中删除.bk扩展名,从而从备份中恢复模型。
您可以通过将鼠标悬停在GUI可视化界面中的选项上或在命令行中 -h 来查看培训参数的说明。即: python faceswap.py train -h
Some of the plugins have configurable options. You can find the config options in:
一些插件有可配置的选项。你可以在:
\config\train.ini中找到配置选项。要生成此文件,您至少需要运行一次Train或GUI。
Converting a video 通过模型将视频中的脸进行转换
Now that we're happy with our trained model, we can convert our video. How does it work?
Well firstly we need to generate an alignments.json file for our swap. To do this, follow the steps in Extracting Faces, only this time you want to run extract for every face in your source video. This file tells the convert process where the face is on the source frame.
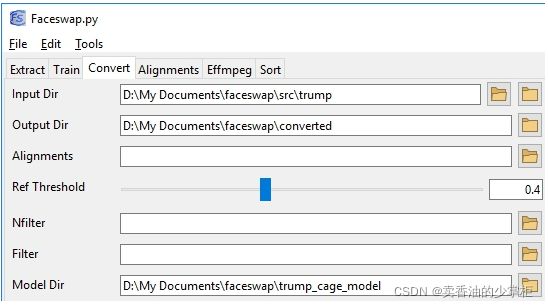
Remember those initial pictures we had of Trump? Let's try swapping a face there. We will use that directory as our input directory, create a new folder where the output will be saved, and tell them which model to use.
当我们对训练好的模型很满意时,我们可以转换视频。它是如何工作的?请参考以下说明。
首先,我们需要生成的alignments.json文件为我们交换逐帧中的图片人脸。在这个阶段要做到换脸,还需要将你想要换脸的那条视频,在进行一次提取脸的步骤,在这次运行提取你的源视频中的每个脸。生成的.json文件可以告诉你转换过程该面在源图像中的坐标位置。
完成上一步,我们就可以开始进行换脸的操作。
还记得我们最初看到的特朗普的照片吗?让我们试着换一张脸。我们将使用该目录作为输入目录,创建一个将保存输出的新文件夹,并告诉程序使用哪个模型。
Command Line: 命令行
(如果输入参数是一系列图像的文件夹,则输入的参数为文件夹目录地址)
python faceswap.py convert -i ~/faceswap/src/trump/ -o ~/faceswap/converted/ -m ~/faceswap/trump_cage_model/(如果输入参数是一段MP4视频,则输入的参数为具体到文件地址)
python faceswap.py convert -i ~/faceswap/src/trump/trump1.mp4 -o ~/faceswap/converted/ -m ~/faceswap/trump_cage_model/GUI: 可视化界面 操作示例
General Tips 换脸阶段的知识点
You can see the full list of arguments for Converting by hovering over the options in the GUI or passing the help flag. i.e:python faceswap.py convert -h
您可以通过将鼠标悬停在GUI中的选项上或命令行 -h 标志来查看conversion的完整参数说明。即:python faceswap.py convert -h
Some of the plugins have configurable options. You can find the config options in:
一些插件有可配置的选项。你可以在:
\config\convert.ini中找到配置选项。要生成此文件,您至少需要运行Convert或GUI一次。
GUI 关于可视化界面的说明
All of the above commands and options can be run from the GUI. This is launched with:
上述所有命令和选项都可以从GUI运行。这是启动命令:
python faceswap.py guiThe GUI allows a more user friendly interface into the scripts and also has some extended functionality. Hovering over options in the GUI will tell you more about what the option does.
GUI允许在脚本中提供更友好的用户界面,并具有一些扩展功能。将鼠标悬停在GUI中的选项上,将告诉您更多关于该选项的功能介绍。
Video's 关于视频的说明
A video is just a series of pictures in the form of frames. Therefore you can gather the raw images from them for your dataset or combine your results into a video.
视频就是一系列以时序形式呈现的图片集合。因此,您可以从视频中收集原始图像作为您的数据集,或将您的结果的图像集合合并成一个视频。
EFFMPEG 视频处理工具包的说明
You can perform various video processes with the built-in effmpeg tool. You can see the full list of arguments available by running:
你可以通过运行以下命令查看参数的完整参数说明列表:
python tools.py effmpeg -hExtracting video frames with FFMPEG Alternatively, you can split a video into separate frames using ffmpeg for instance. Below is an example command to process a video to separate frames.
从视频中逐帧提取图片:下面是一个处理视频以分离成帧的图片的示例命令。
ffmpeg -i /path/to/my/video.mp4 /path/to/output/video-frame-%d.pngGenerating a video If you split a video, using ffmpeg for example, and used them as a target for swapping faces onto you can combine these frames again. The command below stitches the png frames back into a single video again.
将图片集合合成为视频:下面的命令将png帧图片重新拼接成一个单独的视频。
ffmpeg -i video-frame-%0d.png -c:v libx264 -vf "fps=25,format=yuv420p" out.mp4更多的ffmpeg工具包的使用说明可以参考:
ffmpeg 编译 使用 问题集_poject的博客-CSDN博客1 ffmpeg 库多个版本 libavformat.so.57 libavformat.so.2 等编译的时候可以通过 软连接指定自己想要的名字创建软连接:ln -s libavformat.so.57 libavformat.so指定库的寻找路径:-rpath=$(SDK)/lib -lavformat...https://blog.csdn.net/poject/article/details/102964960
FFmpeg 将多幅jpg/png图片转为mp4/avi/yuv视频序列的方法_Z的三次方的博客-CSDN博客_ffmpeg png转mp4在视频编码应用中经常需要将多张png/jpg图片转为一个mp4/avi/yuv视频序列利用强大的视频编辑工具FFMPEG便可以轻松实现此过程。window下ffmpeg的安装及配置见博客ffmpeg安装及配置教程.ffmpeg下利用命令行将多张jpg/png图片转为一个yuv420视频序列的命令行方法如下:ffmpeg -i xx%4dxx.png -r 30 -pix_fmt -s WxH yuv420p out.yuv-i 表示输入图片路径,命名需是连续数字,如%4d表示图片命名中以000https://blog.csdn.net/zzz_zzz12138/article/details/106303451
使用过程中我踩到的坑
提取数据集图像脸的问题:
在提取数据集图像脸的过程中遇到报错:
是因为提取数据集图像时,需要加载截取头像的模型,加载地址在外网,所以可能会因为网络问题儿加载失败。
解决办法是,多尝试,有的时候可以连接上外网就可以加载上模型。如果实在加载不上,去访问这个链接加载压缩文件。
https://github.com/deepfakes-models/faceswap-models/releases/download/v1.13.2/face-alignment-network_2d4_keras_v2.zip![]() https://github.com/deepfakes-models/faceswap-models/releases/download/v1.13.2/face-alignment-network_2d4_keras_v2.zip
https://github.com/deepfakes-models/faceswap-models/releases/download/v1.13.2/face-alignment-network_2d4_keras_v2.zip
下载好后放入/home/nomal_zhang/faceswap/plugins/extract/align/.cache解压可以解决。
提取阶段遇到tensorflow报的一个错误:
tensorflow无法启用的问题:解决办法如下
命令行:进入‘faceswap/config/extract.ini’,将‘allow_growth’选项改为‘True’。
如果在wendow系统:GUI:转到设置>提取插件比;全局并启用' allow_growth '选项
遇到使用普通用户账户,在linux系统中文件操作权限不够的问题:
解决办法:最好将你的用户的权限设成有管理员权限
'''在root用户的root权限下改写sudolor文件,命令行如下。'''

$ chmod -v u+w /etc/sudoers   (增加 sudoers 文件的写的权限,默认为只读)
$ vi /etc/sudoers (修改 sudoers)
-------------------------------------------------------
## Allow root to run any commands anywhere
root ALL=(ALL) ALL
yourname ALL=(ALL) ALL (添加这一行)
-------------------------------------------------------$ chmod -v u-w /etc/sudoers (删除 sudoers 的写的权限)遇到文件夹中权限不够的问题
解决办法:(把文件夹中的文件都设置为可读可写可执行)
'''命令:'''
Sudo chmod -R 777 文件夹/
一些关于软件缺点的心得
有两个值得改善的地方:一是学习依赖于大量且完善的样本(这带来一个弊端是,当训练集中没有侧脸照片时,合成视频中的侧脸部分就会异常模糊)
二是内容受限于视频本身。因此,如果我们希望能够基于少样本合成人物的清晰视频,并且还要求人物的动作可以自行设定


