Vue-router
简介
是一个vue官方出品的 管理组件切换 的 插件
- 路由,用来找路。管理路径之间的切换,不同url对应不同的组件
- 核心思想:在同一个页面根据url进行组件切换,类似动态组件, 最终在 router-view 处出口
- 路由一般最多3级
- 版本对应: vue2 对应 v3.x | vue3 对应 v4.x
区分路由
前端路由 (hash路由)
在同一个html页面, 显示不同的内容(组件). 进而建立了URL和组件之间的对应关系
在同一个页面, 借助锚链接实现同一页面的不同部分的跳转
第一章: http://localhost:5500/index.html#chap1
第二章: http://localhost:5500/index.html#chap2
像#chap1, #chap2...这样的锚链接, 也叫做hash路由 也称为前端路由
后端路由
提供接口(数据)服务, 将不同请求方式+url, 映射到处理函数. 建立了URL和处理函数之间的对应关系
入门案例
Vue三步
- 引入vue.js
- 创建页面容器
- 实例vue实例
VueRouter
- 引入vue-router.js
- 定义组件对象
- 定义路由规则routes
-
- route: 路由规则, URL和组件的对应关系
- routes: 由路由规则组成的数组
- 定义创建路由对象router
-
- 用于管理路由规则
- 挂载router到根实例
改造html
- 编写路由链接 router-link
- 编写路由出口 router-view
Document
首页
相关
集成到项目中
安装
npm i vue-router@3
vue2 安装 vue-router3.x
vue3 安装 vue-router4.x
手动集成
- 安装
- 创建路由文件 src/router/index.js
- 在main.js中导入路由对象
- 创建页面级路由文件
- 编写路由规则
- 在app.vue中配置路由出口
VueRouter
- 引入
- 定义组件对象
- 定义路由规则routes
- 定义创建路由对象router
- 挂载router到根实例
//最核心的内容,导出VueRouter对象
import Vue from 'vue'
//1. 导入VueRouter
import VueRouter from 'vue-router'

import Home from '../views/Home'
import About from '../views/About'

// debugger //在代码中打断点
//安装插件(注册router-view,router-link组件,在 Vue上挂载 $router, $route)
Vue.use(VueRouter)
//2. 创建路由规则
// 页面级组件(大)放到views,公共组件、小组件放到components
const routes = [
  { path: '/home', component: Home },
  { path: '/about', component: About },
]

//3. 创建VueRouter的实例
const router = new VueRouter({
  routes,
})

//4. 导出router实例
export default router
Vue.use(VueRouter)安装插件,在vue-router的install方法中进行:
在Vue上注册router-view、router-link组件
在Vue原型对象上挂载了$router $route
在代码中打断点:debugger
// 导入路由对象
import router from './router'

new Vue({
  // 挂载
  router,
  render: (h) => h(App),
}).$mount('#app')
自动集成
使用@Vue/cli工具创建项目时, 构建项目时直接选择router
#/abouthash模式/abouthistory模式(需要?支持)
const routes = [
  //设置一级路由
  //login-登录页
  { path: '/login', component: () => import('@/views/Login') },
  //home-后台首页
  {
    path: '/home',
    component: () => import('@/views/Home'),
    //优化三、设置默认重定向
    redirect: '/home/article',
    children: [
      // 不写/,会跟base路由拼接,最终效果/home/article
      { path: 'about', component: () => import('@/views/About') },
      { path: 'user', component: () => import('@/views/User') },
      // webpack分包机制/ 路由懒加载,常用,异步路由加载
      { path: 'Article', component: () => import('@/views/Article') },
      // 优化一: 提供空的子路由,覆盖路由不匹配的情况
      { path: '', component: () => import('@/views/Article') },
    ],
  },
  // 优化二: 默认路由,*要写在最下面
  { path: '*', component: () => import('@/views/NotFound') },
]
案例
$router路由规则与$route路由对象
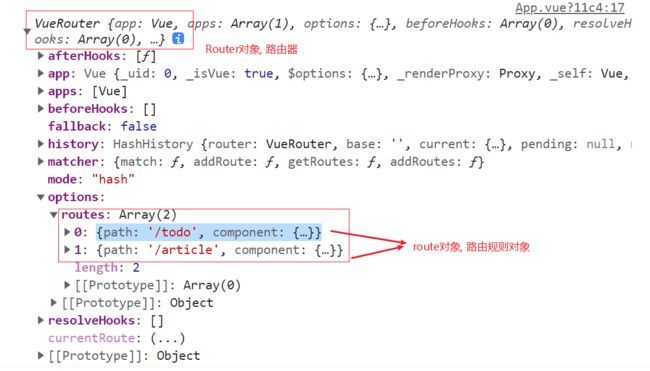
路由对象
$router表示路由对象
- 包含
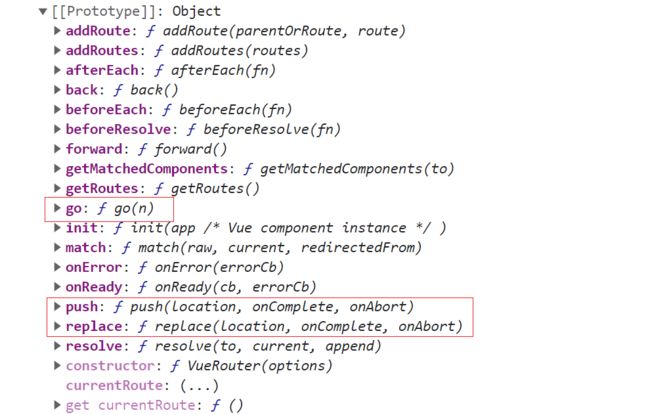
路由规则对象 - 操作
路由规则对象(push, replace, go)
路由规则
路由对象上的routes数组, 构成了路由规则$route
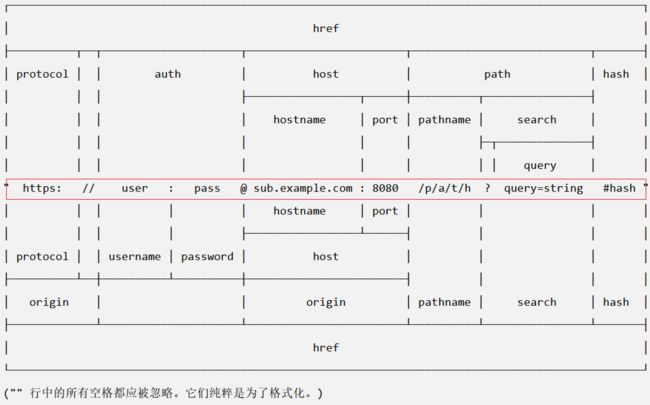
- 解析URL
参数
query
- 使用其属性
$route.path 对应 router/index.js中定义的路由规则
动态路由参数
获取到user的id //localhost:8080/user?id=3 3
{{ $route.params.id }}
methods: {
  handleClick() {
      this.$router.params.id
  },
},
路由出口 router-link 与 router-view
- 编写路由链接 router-link
-
- 实现组件之间的切换
- 默认情况, 被渲染为
a元素 - 可通过指定
tag属性, 渲染为任意元素
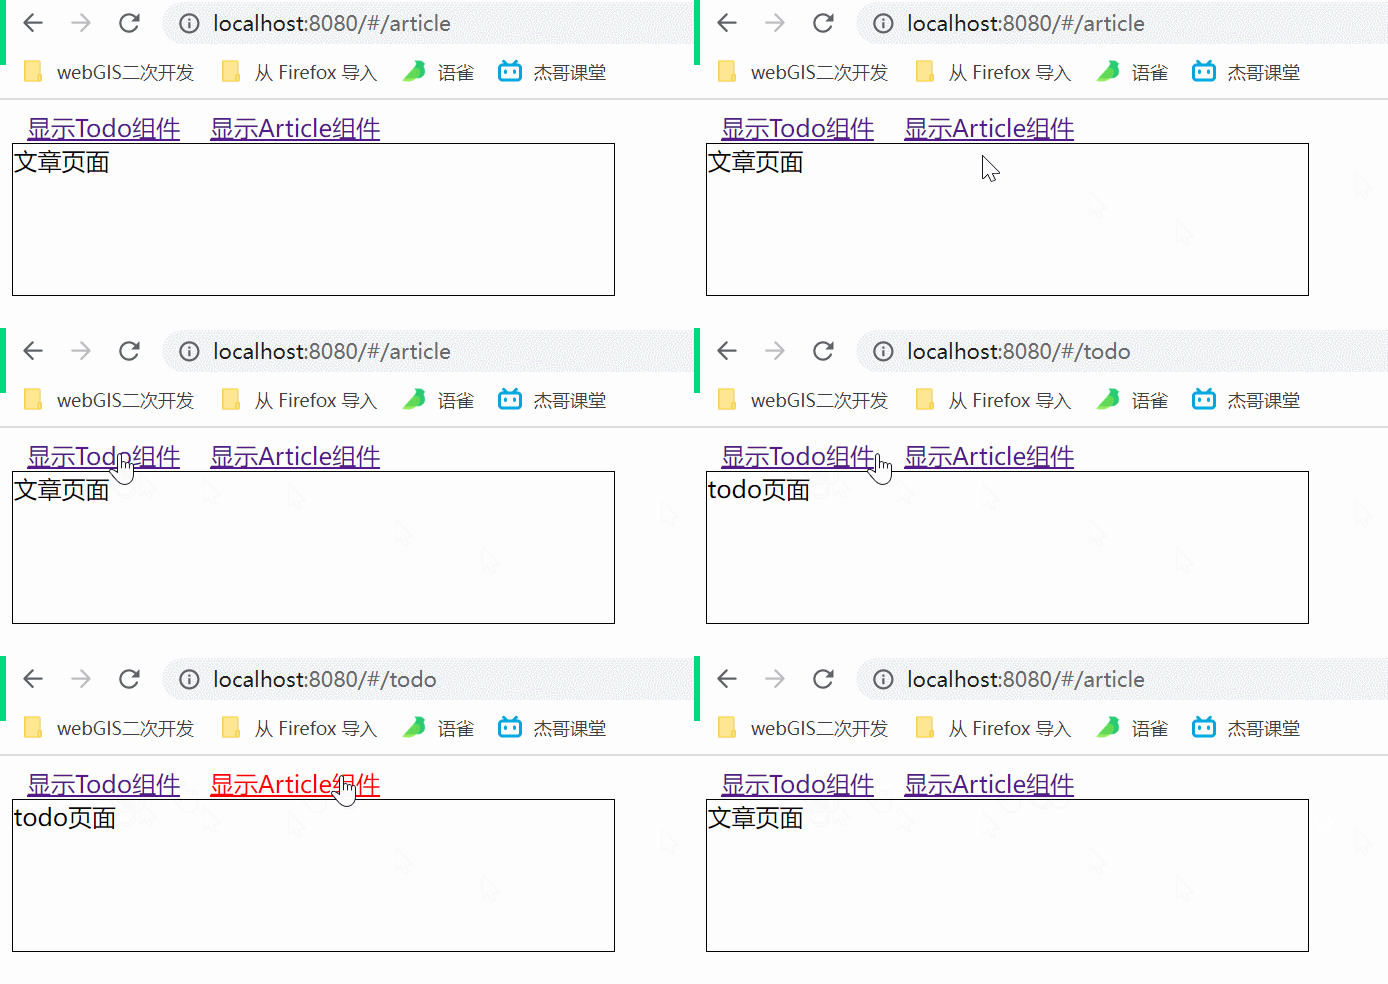
  显示Todo组件

  显示Article组件

显示Todo组件
显示Article组件- 编写路由出口 router-view
一级路由出口
二级路由出口
编程式导航
导航
router----编程式导航
vue-router两种方法
- 使用
router-link实现导航 - 调用
$router路由器的方法, 以js代码的方式进行导航
- push: 会将URL压入到History记录栈中, 可以通过浏览器
前进后退按钮进行操作 - replace: 不会将URL压入到History记录栈中
- go(n): -1 退回?
methods: {
  handleClick() {
    // 导航到/todo组件
    console.log(this.$route) // 保存当前的URL
    if (this.$route.path != '/todo') {
      this.$router.push('/todo')
    }
  },
},
应用- 搭建项目框架
0 需求分析
/login
/article
/user
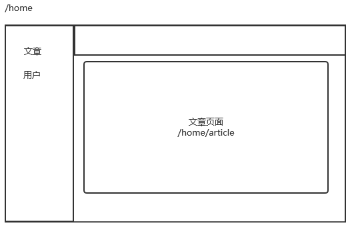
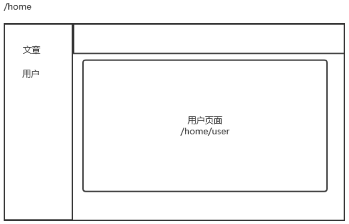
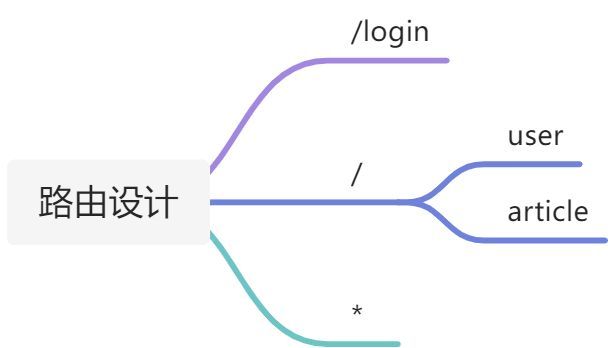
分析:
- /login 登录页面
- / 后台的首页
-
- /user 显示用户管理的页面
- /article 显示文章管理的页面
- * 404
1 搭建环境
1.1 创建工程
vue create admin-demo
选择 Babel 与Router
1.2 清理文件
- app.vue
- src/views
- src/components
- src/router/index.js
2 规划路由
2.1 编写路由规则, 多级路由
- 设置一级路由.
- 配置home对应路由, 设置二级路由
const routes = [
  //设置一级路由
  //login-登录页
  { path: '/login', component: () => import('@/views/Login') },
  //home-后台首页
  {
    path: '/home',
    component: () => import('@/views/Home'),
    //优化三、设置默认重定向
    redirect: '/home/article',
    children: [
      // 嵌套路由不要写 /,否则会匹配到根路由base路由,写/是 /about, 不写是 /home/about
      { path: 'about', component: () => import('@/views/About') },
      { path: 'user', component: () => import('@/views/User') },
      // webpack分包机制/ 路由懒加载,常用,异步路由加载
      { path: 'Article', component: () => import('@/views/Article') },
      // 优化一: 提供空的子路由,覆盖路由不匹配的情况
      { path: '', component: () => import('@/views/Article') },
    ],
  },
  // 优化二: 默认路由,*要写在最下面
  { path: '*', component: () => import('@/views/NotFound') },
]
2.2 创建对应的组件文件
2.3 改造html (设置路由出口)
- 编写路由链接 router-link
- 编写路由出口 router-view
一级路由出口
二级路由出口
3 优化
1:默认路由,* 要写在最下面
2:默认重定向
当访问后台首页时, 默认显示某一种信息(通常, 指定一个二级路由)
3:webpack分包机制/ 路由懒加载,常用,异步路由加载
4 实现界面
- 实现 login 界面
- 实现 404 界面
- 实现 home 界面
- 通过
编程式的导航进行页面跳转(组件的切换) - 通过
动态路由参数(或localStorage) 进行兄弟组件间的带参跳转
- 实现 article 与 user 界面
5 实现菜单点击切换功能
使用router-link渲染li元素, 使其具体点击切换功能
6 导航守卫
作用:
校验权限
守护组件
扩展:
jwt,用token来解析身份信息,控制登录
//设置全局前置导航守卫(url切换时执行)
router.beforeEach((to, from, next) => {
  // to:到哪个个path去, from: 从哪个path来
  let isLogin = localStorage.getItem('isLogin')

  // 只要用户处于登录状态,直接进入到home首页
  // 如果访问的是'/login',直接进入/home页
  // 如果访问的不是'/login',直接调用next() 放行
  if (isLogin) {
    if (to.path == '/login') {
      next('/home')
    } else {
      next()
    }
  } else {
    if (to.path == '/login') {
      next()
    } else {
      // elementUI提供消息提示框
      // $message挂在Vue的原型对象上。Vue的实例可以直接访问,但Vue需要通过prototype访问
      // Message.error('请先登录')
      Vue.prototype.$message({
        message: '请先登录',
        type: 'warning',
        showClose: true,
        duration: 1000,
      })
      // alert('请先登录')
      next('/login')
    }
  }
})
export default router