基于stm32f407的MNIST数字识别
基于stm32f407的MNIST数字识别
本文是将数字识别模型应用到stm32的实例,利用X-CUBE-AI将模型导入单片机进行调试
开发环境
操作系统:Windows
模型训练:tensorflow2.1 cpu版
模型嵌入:STM32CubeMX
硬件平台
STM32F407ZGT6开发板
ov2640摄像头模块
具体资料可以在这里下载 link.
软件平台
采用Keil5环境进行单片机的编程调试
采用PyCharm环境进行模型编写
1、安装虚拟环境
打开anaconda,使用conda create命令新建一个名为tensorflow2.1的虚拟环境
激活虚拟环境
conda create -n tf2.1 python=3.7
conda activate tensorflow2.1

下载安装tensorflow(注:可能需要)
安装完成,将pycham的解释器设置为新建虚拟环境的路径

测试版本号
import tensorflow as tf
print(tf.__version__)
如果可以正确显示版本号环境安装没问题。
2、模型训练
这里参考了mgcsky98博主的资料link.
我们同样采用MNIST数据集进行训练
具体代码如下:
import tensorflow as tf
import matplotlib.pyplot as plt
import numpy as np
import datetime
import pandas as pd
print(tf.__version__)

mnist = tf.keras.datasets.mnist
(x_train,y_train),(x_test,y_test) = mnist.load_data()
print(x_train.shape, y_train.shape)
print(x_test.shape, y_test.shape)

image_index = 5665

print(y_train[image_index])
plt.imshow(x_train[image_index])
plt.show()

x_train = np.pad(x_train,((0,0),(2,2),(2,2)),'constant',constant_values=0)
x_test = np.pad(x_test,((0,0),(2,2),(2,2)),'constant',constant_values=0)
print(x_train.shape)
print(x_test.shape)

x_train = x_train.astype('float32')
x_test = x_test.astype('float32')
x_train = x_train/255
x_test = x_test/255

x_train = x_train.reshape(x_train.shape[0],32,32,1)
x_test = x_test.reshape(x_test.shape[0],32,32,1)

plt.imshow(tf.squeeze(x_train[image_index]))
plt.show()

test = x_train[image_index]
test = test.reshape(32,32)
data = test
data_df = pd.DataFrame(data)
# create and writer pd.DataFrame to excel
writer = pd.ExcelWriter('gc1.xlsx')
data_df.to_excel(writer,'page_1',float_format='%.5f') # float_format 控制精度
writer.save()

print(x_train.shape)
print(x_test.shape)

model =  tf.keras.models.Sequential([
    tf.keras.layers.Conv2D(filters = 6, kernel_size = (5,5), padding = 'valid', activation = tf.nn.relu, input_shape = (32,32,1)),
    tf.keras.layers.AveragePooling2D(pool_size = (2,2), strides = (2,2), padding = 'same'),
    tf.keras.layers.Conv2D(filters = 16, kernel_size = (5,5), padding = 'valid', activation = tf.nn.relu),
    tf.keras.layers.AveragePooling2D(pool_size = (2,2), strides = (2,2), padding = 'same'),
    tf.keras.layers.Flatten(),
    tf.keras.layers.Dense(units = 120, activation = tf.nn.relu),
    tf.keras.layers.Dense(units = 84, activation = tf.nn.relu),
    tf.keras.layers.Dense(units = 10, activation = tf.nn.softmax)
])
model.summary()
#超参数设置
num_epochs = 5#这里规定训练的次数 请自行更改,为了演示设为很小5
batch_size = 32
learning_rate = 0.001

#优化器
adam_optimizer = tf.keras.optimizers.Adam(learning_rate)

model.compile(optimizer = adam_optimizer,
              loss = tf.keras.losses.sparse_categorical_crossentropy,
              metrics = ['accuracy'])

start_time = datetime.datetime.now()

model.fit(x = x_train,
          y = y_train,
          batch_size = batch_size,
          epochs = num_epochs)

end_time = datetime.datetime.now()
time_cost = end_time - start_time
print("time cost = ",time_cost)
#保存模型
model.save('mnist_lenet_model.h5')


#评估指标
print(model.evaluate(x_test,y_test))

#预测
image_index = 6666
print(x_test[image_index].shape)

plt.imshow(x_test[image_index].reshape(32,32))
plt.show()
pred = model.predict(x_test[image_index].reshape(1,32,32,1))


print(pred)
print(pred.argmax())
代码中的num_epochs用来控制训练次数
如果训练成功,会保存h5的模型文件
3、模型导入
3.1 搭配硬件环境
打开STM32CubeMX,选择相对应的芯片


按照开发板进行配置
3.2 安装CUBE-AI
打开菜单栏中的 Help,选择Software Embedded Packages Manager,然后在 STMicroelectronics 一栏中选择 X-CUBE-AI 插件的最新版本
之后会发现多了一个Additional Software选项,在工程中导入X-CUBE-AI插件,配置如下图所示:

3.3 导入AI模型
添加一个新的network,将存好的h5模型路径添加到这里

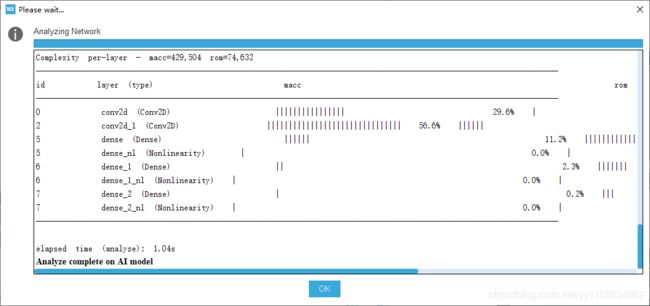
需要分析一下模型,检测是否可以被转换为嵌入式工程,验证成功界面如下图所示:
2.3 生成项目工程
接下来我们生成项目工程的源代码,Toolchain / IDE选择MDK-ARM V5.27的版本

这里注意我们将.c文件和.h文件分开,方便查找

4. 调试运行
这里提供一些关键步骤的代码
摄像头采集
void takepicture_fillarray()
{
		HAL_GPIO_WritePin(DCMI_CH1_GPIO_Port, DCMI_CH1_Pin, GPIO_PIN_RESET);
		if(HAL_DCMI_Start_DMA(&hdcmi, DCMI_MODE_SNAPSHOT,(uint32_t)dmabutter, 128*128*2)==HAL_OK)
		{
			printf("1\n");
		}
}

void  HAL_DCMI_VsyncEventCallback(DCMI_HandleTypeDef *hdcmi)
{
  /* Prevent unused argument(s) compilation warning */
  HAL_DCMI_Stop(hdcmi);
	j = 0;
	pretreatment();
	if(shut==1)
	{
		gray();
		show();
		LCD_ShowPicture(0,160,128,128,(uint8_t *)dmabutter1);
		pic128to32();
		show32();
		LCD_ShowPicture(140,160,32,32,(uint8_t *)show1);
		MX_X_CUBE_AI_Process();
		POINT_COLOR = RED;
		BACK_COLOR = GREEN;
		LCD_Fill(140,0,240,60,GREEN);
		LCD_ShowNum(140,0,max,1,16);
		char s1[10];
		sprintf(s1,"acc:%.3f",output[9]);
		LCD_ShowString(140,20,200,20,16,s1);
		t1=HAL_GetTick();
		LCD_ShowNum(140,40,t1-t0,3,16);
		printf("%d\n",t1-t0);
		shut=0;
	}
	if(shut==0)
	{
		LCD_ShowPicture(0,0,128,128,(uint8_t *)dmabutter);
		HAL_DCMI_Start_DMA(hdcmi, DCMI_MODE_SNAPSHOT,(uint32_t)dmabutter, 128*128*2);
	}

  /* NOTE : This function Should not be modified, when the callback is needed,
            the HAL_DCMI_FrameEventCallback could be implemented in the user file
   */
}
void HAL_DCMI_LineEventCallback(DCMI_HandleTypeDef *hdcmi)
{
  /* Prevent unused argument(s) compilation warning */
  j++;
  /* NOTE : This function Should not be modified, when the callback is needed,
            the HAL_DCMI_LineEventCallback could be implemented in the user file
   */
}
将摄像头采集的一帧图片进行灰度处理
void gray()
{
	uint8_t Red=0;
	uint8_t Green=0;
	uint8_t Blue=0;
	uint8_t Gray=0;
	uint16_t k=0;
	for(uint8_t i=0;i<128;i++)
	{
		for(uint16_t j=0;j<128*2;j+=2)
		{
			uint16_t RGB565=0;
			RGB565=(uint16_t)((dmabutter[i*128*2+j+1]<<8)|dmabutter[i*128*2+j]);
			Red   = (RGB565 & 0xf800) >> 8;
			Green = (RGB565 & 0x07e0) >> 3;
			Blue  = (RGB565 & 0x001f) << 3;
			Gray = (Red*38 + Green*75 + Blue*15) >> 7;
			gray128[i][k]=Gray;
			k++;
		}
		k=0;
	}
}
降低分辨率
void pic128to32()
{ uint8_t x=0,y=0;
	uint16_t z=0;
	for(i=0;i<128;i+=4)
	{
		for(j=0;j<128;j+=4)
		{
			gray32[x][y]=(gray128[i][j]+gray128[i][j+1]+gray128[i][j+2]+gray128[i][j+3]+gray128[i+1][j]+gray128[i+1][j+1]+gray128[i+1][j+2]+gray128[i+1][j+3]+gray128[i+2][j]+gray128[i+2][j+1]+gray128[i+2][j+2]+gray128[i+2][j+3]+gray128[i+3][j]+gray128[i+3][j+1]+gray128[i+3][j+2]+gray128[i+3][j+3])/16;
			preinput[z]=gray32[x][y];
			y++;
			z++;
		}
		y=0;
		x++;
	}
}
模型输入和输出的预处理
int acquire_and_process_data(void * data)
{
	uint8_t *p;
	p=(uint8_t *)data;
	for(x=0;x<1024;x++)
	{
		input[x]=(ai_float)(*p)/255.0f;
		p++;
	}
  return 0;
}

int post_process(void * data)
{	uint8_t i=0,j=0;
	ai_float out[10];
	for(i=0;i<10;i++)
	{
		out[i]=output[i];
	}
	for(i=0; i<9; i++)
  {
      for(j=0; j<9-i; j++)
      {
          if(output[j] > output[j+1])
          {
              ai_float temp = output[j];
              output[j] = output[j+1];
              output[j+1]=temp;
					}
			}
	}
	for(max=0;max<10;max++)
	{
		if(out[max]==output[9])
		{
			printf("%d\n",max);
			break;
		}
	}
	output[9]=output[9]*100;
	printf("%.2f\n",output[9]);
  return 0;
}
5. 测试结果


