springboot整合RabbitMQ
目录
-
-
- springboot整合RabbitMQ的依赖和yml:
- 死信队列TTL(存活时间):
- 延迟队列的优化:(设置灵活的到期时间)
- RabbitMQ延迟插件实现延迟队列:
- 发布确认高级:
-
- 发布确认的springboot版本:
- 交换机回调接口:
- 回退消息接口:
- 备份交换机:
- 其他知识:
-
springboot整合RabbitMQ的依赖和yml:
依赖:
            org.springframework.boot
            spring-boot-starter


            org.springframework.boot
            spring-boot-starter-amqp
            2.2.2.RELEASE


            org.springframework.amqp
            spring-rabbit-test
            2.3.9
            test


            org.springframework.boot
            spring-boot-starter-web
            2.5.0


            org.springframework.boot
            spring-boot-devtools
            runtime
            true


            com.alibaba
            fastjson
            1.2.73


            org.projectlombok
            lombok
            true


            org.springframework.boot
            spring-boot-starter-test
            test
yml配置:

application.yml:
server:
  port: 8080

spring:
  #rabbitmq的配置
  rabbitmq:
    host: 192.168.211.200
    port: 5672
    username: admin
    password: 123
死信队列TTL(存活时间):

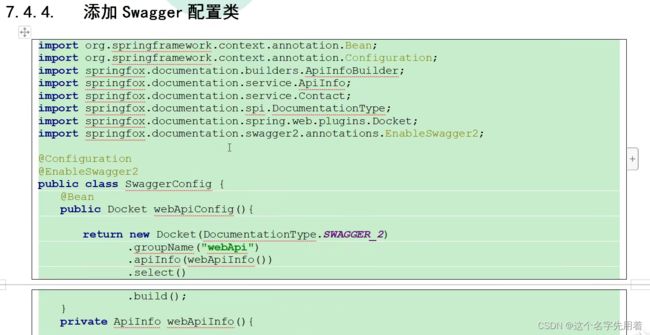
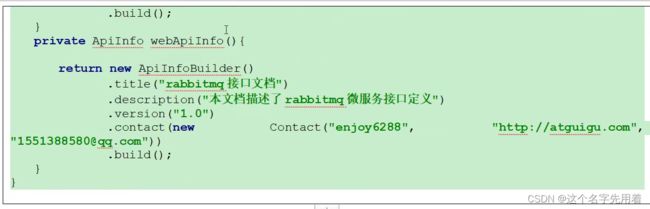
配置类:config.TtlQueueConfig:
package com.example.springbootrabbitmq.config;
import org.springframework.context.annotation.Configuration;
import org.springframework.amqp.core.*;
import org.springframework.beans.factory.annotation.Qualifier;
import org.springframework.context.annotation.Bean;
import java.util.HashMap;
@Configuration
public class TtlQueueConfig {
    //普通交换机的名称
    public static final String X_EXCHANGE = "X";
    //死信交换机的名字
    public static final String Y_DEAD_LETTER_EXCHANGE = "Y";
    //普通队列的名称
    public static final String QUEUE_A = "QA";
    public static final String QUEUE_B = "QB";
    //死信队列的名称
    public static final String DEAD_LETTER_QUEUE = "QD";
    //mq组件的声明
    //声明xEchange 别名
    @Bean("xExchange")
    public DirectExchange xExchange(){
        return new DirectExchange(X_EXCHANGE);//创建一个直接类型的交换机,名字为X
    }
    @Bean("yExchange")//声明yExchange别名
    public DirectExchange yExchange(){
        //创建一个直接类型的死信交换机,名字为Y
        return new DirectExchange(Y_DEAD_LETTER_EXCHANGE);
    }
    //声明三个队列,两个普通,一个死信
    //声明普通队列QA的TTL为10s,设置QA队列
    @Bean("queueA")
    public Queue queueA(){
        HashMap arguments = new HashMap<>(3);
        //设置死信交换机,即队列QA需要连接到死信交换机Y,
        arguments.put("x-dead-letter-exchange",Y_DEAD_LETTER_EXCHANGE);
        //设置死信交换机的漏由key,即队列QA需要连接到死信交换机Y的口令
        arguments.put("x-dead-letter-routing-key","YD");
        //设置TTL过期时间 ,单位是ms,即在队列 QA中存活多久后进入死信交换机
        arguments.put("x-message-ttl",10000);
        //队列的构建者实例化durable一个名字是QA的队列
        return QueueBuilder.durable(QUEUE_A).withArguments(arguments).build();
    }

    //声明普通队列QB的TTL为40s,设置QB队列
    @Bean("queueB")
    public Queue queueB(){
        HashMap arguments = new HashMap<>(3);
        //设置死信交换机,即队列QB需要连接到死信交换机Y,
        arguments.put("x-dead-letter-exchange",Y_DEAD_LETTER_EXCHANGE);
        //设置死信交换机的漏由key,即队列QB需要连接到死信交换机Y的口令
        arguments.put("x-dead-letter-routing-key","YD");
        //设置TTL过期时间 ,单位是ms,即在队列 QB中存活多久后进入死信交换机
        arguments.put("x-message-ttl",40000);
        //队列的构建者实例化durable一个名字是QB的队列
        return QueueBuilder.durable(QUEUE_B).withArguments(arguments).build();
    }
    //死信队列

    @Bean()
    public Queue queueD(){
        //注意:我们的漏由和队列都关心自己本身和下游连接,这里队列QD下游没有参数,只是简单的消费者
        return QueueBuilder.durable(DEAD_LETTER_QUEUE).build();
    }
    //绑定工作,即队列绑定到上游的漏由器。看图我们看到三个绑定
    @Bean
    public Binding queueABindingX(@Qualifier("queueA")Queue queueA,
                                  @Qualifier("xExchange") DirectExchange xExchange){
        //绑定器建造者绑定队列到交换机,用漏由key:XA
        return BindingBuilder.bind(queueA).to(xExchange).with("XA");
    }
    @Bean
    public Binding queueBBindingX(@Qualifier("queueB")Queue queueB,
                                  @Qualifier("xExchange")DirectExchange xExchange){
        return BindingBuilder.bind(queueB).to(xExchange).with("XB");
    }
    @Bean
    public Binding queueDBindingY(@Qualifier("queueD")Queue queueD,
                                  @Qualifier("yExchange")DirectExchange yExchange){
        return BindingBuilder.bind(queueD).to(yExchange).with("YD");
    }

}
消息生产者:
controller.SendMsgController:
package com.example.springbootrabbitmq.controller;

import lombok.extern.slf4j.Slf4j;
import org.springframework.amqp.rabbit.core.RabbitTemplate;
import org.springframework.beans.factory.annotation.Autowired;
import org.springframework.web.bind.annotation.GetMapping;
import org.springframework.web.bind.annotation.PathVariable;
import org.springframework.web.bind.annotation.RequestMapping;
import org.springframework.web.bind.annotation.RestController;

import java.util.Date;

@RestController
@Slf4j
@RequestMapping(value = "/ttl")
public class SendMsgController {
    @Autowired
    private RabbitTemplate rabbitTemplate;
    @GetMapping("/sendMsg/{message}")
    public void sendMsg(@PathVariable("message")String message){
        log.info("当前时间:{},发送一条信息给两个ttl队列:{}",new Date().toString(),message);
        //转变和发送  消息
        rabbitTemplate.convertAndSend("X","XA","消息来自ttl为10s的队列:"+message);
        rabbitTemplate.convertAndSend("X","XB","消息来自ttl为40s的队列:"+message);
    }
}
消息消费者:
consumer.DeadLetterQueueConsumer:
package com.example.springbootrabbitmq.consumer;
import com.rabbitmq.client.Channel;
import lombok.extern.slf4j.Slf4j;
import org.springframework.amqp.core.Message;
import org.springframework.amqp.rabbit.annotation.RabbitListener;
import org.springframework.stereotype.Component;
import java.util.Date;

@Component
@Slf4j
public class DeadLetterQueueConsumer {
    //接收消息
    @RabbitListener(queues = "QD")
    public void receiveD(Message message, Channel channel)throws Exception{
        String msg = new String(message.getBody());
        log.info("当前时间:{},收到死信队列的消息:{}",new Date().toString(),msg);
    }
}
网页测试:http://localhost:8080/ttl/sendMsg/呵呵


延迟队列的优化:(设置灵活的到期时间)
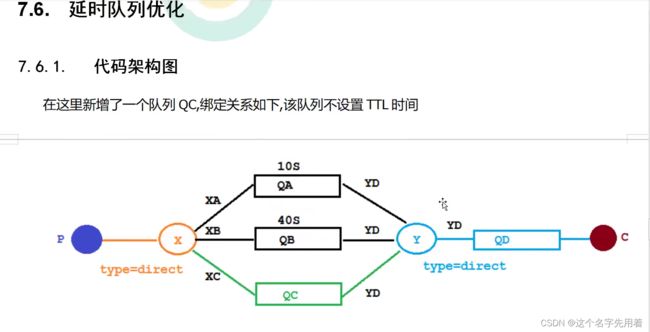
配置类增加代码:
 //增加一个队列QC,ttl时间是灵活的
    @Bean("queueC")
    public Queue queueC(){
        HashMap arguments = new HashMap<>();
        //设置死信交换机
        arguments.put("x-dead-letter-exchange",Y_DEAD_LETTER_EXCHANGE);
        //设置通往死信交换机的漏由key
        arguments.put("x-dead-letter-routing-key","YD");
        return QueueBuilder.durable(QUEUE_C).withArguments(arguments).build();
    }
    //绑定QC队列到x交换机,绑定需要参数
    @Bean
    public Binding queueCBindingX(@Qualifier("queueC")Queue queueC,
                                  @Qualifier("xExchange")DirectExchange xExchange ){
        return BindingBuilder.bind(queueC).to(xExchange).with("XC");
    }
Expiration:到期
controller中增加的代码:
 @GetMapping("/sendExpirationMsg/{message}/{ttlTime}")
    public void sendMsg(@PathVariable("message")String message,
                        @PathVariable("ttlTime")String ttlTime){
        log.info("当前时间:{},发送一条时长{}毫秒ttl信息给队列QC:{}",
                new Date().toString(),ttlTime,message);
        rabbitTemplate.convertAndSend("X","XC",message,msg->{
            //发送消息的时候  延迟时长;Expiration:到期
            msg.getMessageProperties().setExpiration(ttlTime);
            return msg;
        });
    }
测试:
http://localhost:8080/ttl/sendExpirationMsg/你好1/20000
http://localhost:8080/ttl/sendExpirationMsg/你好2/2000

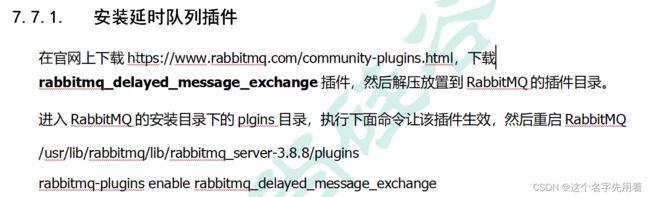
RabbitMQ延迟插件实现延迟队列:

插件下载:
下载地址: https://www.rabbitmq.com/community-plugins.html
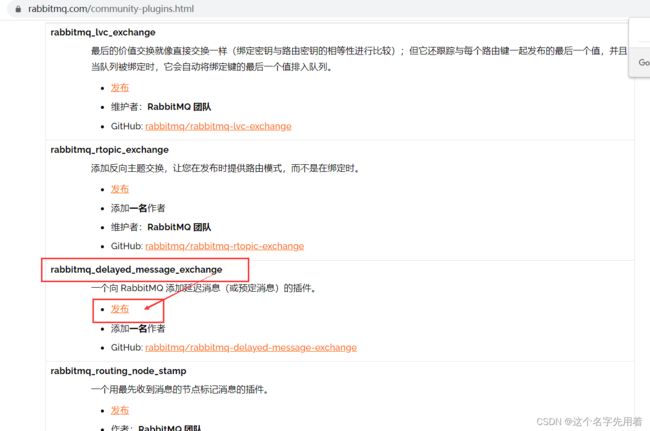
下载插件:rabbitmq_delayed_message_exchange-3.8.17.8f537ac.ez
rabbitmq_delayed_message_exchange-3.8.17.8f537ac.ez延时插件环境:
此版本针对RabbitMQ 3.8.16及以上版本。
此版本需要Erlang 23.2或更高版本,并支持Erlang 24。

#我的环境:
我这里使用centos8系统的
我的rabbitmq版本:3.8.26
我的Erlang版本:24.1.7

手动上传到自己rabbitmq的安装目录的插件目录下:
我的目录:
/usr/lib/rabbitmq/lib/rabbitmq_server-3.8.26/plugins
然后在插件目录下执行命令:rabbitmq-plugins enable rabbitmq_delayed_message_exchange


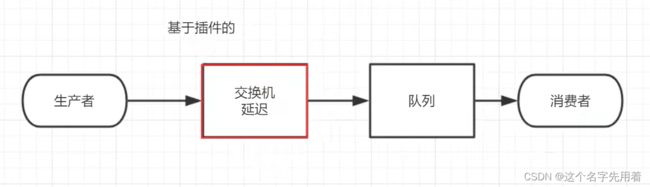
原理图:


配置类:
config.DelayedQueueConfig:
package com.example.springbootrabbitmq.config;
import org.springframework.amqp.core.Binding;
import org.springframework.amqp.core.BindingBuilder;
import org.springframework.amqp.core.CustomExchange;
import org.springframework.amqp.core.Queue;
import org.springframework.beans.factory.annotation.Qualifier;
import org.springframework.context.annotation.Bean;
import org.springframework.context.annotation.Configuration;
import java.util.HashMap;

@Configuration
public class DelayedQueueConfig {
    //队列
    public static final String DELAYED_QUEUE_NAME = "delayed.queue";
    //交换机
    public static final String DELAYED_EXCHANGE_NAME = "delayed.exchange";
    //routing-key
    public static final String DELAYED_ROUTING_KEY = "delayed.routingkey";
    @Bean  //自定义的交换机CustomExchange
    public CustomExchange delayedExchange(){
        HashMap arguments = new HashMap<>();
        arguments.put("x-delayed-type","direct");
        return new CustomExchange(DELAYED_EXCHANGE_NAME,"x-delayed-message",
                true,false,arguments);
    }
    @Bean  //延迟队列
    public Queue delayedQueue(){
        return new Queue(DELAYED_QUEUE_NAME);
    }
    //绑定
    @Bean
    public Binding delayedQueueBindingDelayedExchange(
            @Qualifier("delayedQueue")Queue delayedQueue,
            @Qualifier("delayedExchange")CustomExchange delayedExchange
    ){
      return BindingBuilder.bind(delayedQueue).to(delayedExchange)
              .with(DELAYED_ROUTING_KEY).noargs();
    }
}
custom:风俗,习惯,自定义,顾客
参数:arguments或者parameter

controller发送消息:增加的代码如下:
//开始发送消息:基于插件的消息  及延迟的时间
    @GetMapping("/sendDelayMsg/{message}/{delayTime}")
    public void sendMsg(@PathVariable("message")String message,
                        @PathVariable("delayTime")Integer delayTime){
        log.info("当前时间:{},发送一条时长{}毫秒信息给延迟队列delay.queue:{}",
                new Date().toString(),delayTime,message);
        rabbitTemplate.convertAndSend(DelayedQueueConfig.DELAYED_EXCHANGE_NAME
                , DelayedQueueConfig.DELAYED_ROUTING_KEY,message,(msg)->{
                    //发送消息的时候 延迟时长  ,单位ms
                    msg.getMessageProperties().setDelay(delayTime);
                    return msg;
                });
    }
消费者:consumer.DelayQueueConsumer:
package com.example.springbootrabbitmq.consumer;

import com.example.springbootrabbitmq.config.DelayedQueueConfig;
import lombok.extern.slf4j.Slf4j;
import org.springframework.amqp.core.Message;
import org.springframework.amqp.rabbit.annotation.RabbitListener;
import org.springframework.stereotype.Component;
import java.util.Date;
//消费者,基于插件的延迟消息
@Slf4j
@Component
public class DelayQueueConsumer {
    //监听消息
    @RabbitListener(queues = DelayedQueueConfig.DELAYED_QUEUE_NAME)
    public void receiveDelayQueue(Message message){
        String msg = new String(message.getBody());
        log.info("当前时间:{},收到延迟队列的消息:{}",new Date().toString(),msg);
    }
}
测试:
http://localhost:8080/ttl/sendDelayMsg/come on baby1/20000
http://localhost:8080/ttl/sendDelayMsg/come on baby2/2000

总结:

发布确认高级:

发布确认的springboot版本:

修改yml配置文件:

yml增加配置:spring.rabbitmq.publisher-confirm-type=correlated #关联的,相关的

单词说明:
correlated #关联的,相关的
broker :代理商,中间件
添加配置类:

config.ConfirmConfig:
package com.example.springbootrabbitmq.config;
import org.springframework.amqp.core.*;
import org.springframework.beans.factory.annotation.Qualifier;
import org.springframework.context.annotation.Bean;
import org.springframework.context.annotation.Configuration;
@Configuration
public class ConfirmConfig {
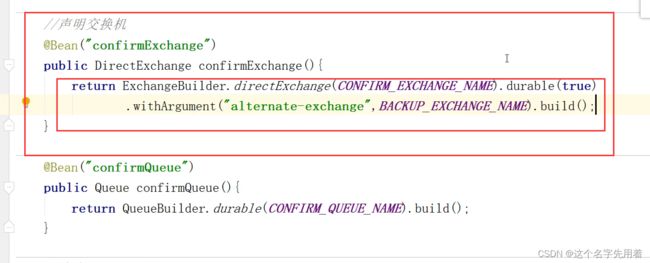
//声明交换机,队列,routingkey 的名字
public static final String CONFIRM_EXCHANGE_NAME = "confirm.exchange";
public static final String CONFIRM_QUEUE_NAME = "confirm.queue";
public static final String CONFIRM_ROUTING_KEY = "key1";
//声明创建交换机
@Bean("confirmExchange")
public DirectExchange confirmExchange(){
return new DirectExchange(CONFIRM_EXCHANGE_NAME);
}
//声明创建队列
@Bean("confirmQueue")
public Queue confirmQueue(){
return QueueBuilder.durable(CONFIRM_QUEUE_NAME).build();
}
//绑定队列到其上游的交换机
@Bean
public Binding queueBindingExchange(@Qualifier("confirmQueue")Queue confirmQueue,
@Qualifier("confirmExchange")DirectExchange confirmExchange){
return BindingBuilder.bind(confirmQueue).to(confirmExchange).with(CONFIRM_ROUTING_KEY);
}
}
controller发消息:
ProducerController:
package com.example.springbootrabbitmq.controller;

import com.example.springbootrabbitmq.config.ConfirmConfig;
import lombok.extern.slf4j.Slf4j;
import org.springframework.amqp.rabbit.core.RabbitTemplate;
import org.springframework.beans.factory.annotation.Autowired;
import org.springframework.boot.autoconfigure.AutoConfigureOrder;
import org.springframework.web.bind.annotation.GetMapping;
import org.springframework.web.bind.annotation.PathVariable;
import org.springframework.web.bind.annotation.RequestMapping;
import org.springframework.web.bind.annotation.RestController;

@RestController
@Slf4j
@RequestMapping("/confirm")
public class ProducerController {
    @Autowired
    private RabbitTemplate rabbitTemplate;
    //发消息
    @GetMapping("/sendMessage/{message}")
    public void sendMessage(@PathVariable("message")String message){
        //发消息:-->先找到要发给的交换-->然后是此交换机的下级漏由key-->然后具体的消息是什么
        rabbitTemplate.convertAndSend(ConfirmConfig.CONFIRM_EXCHANGE_NAME,
                ConfirmConfig.CONFIRM_ROUTING_KEY,message);
        log.info("发送的消息内容是:{}",message);
    }

}
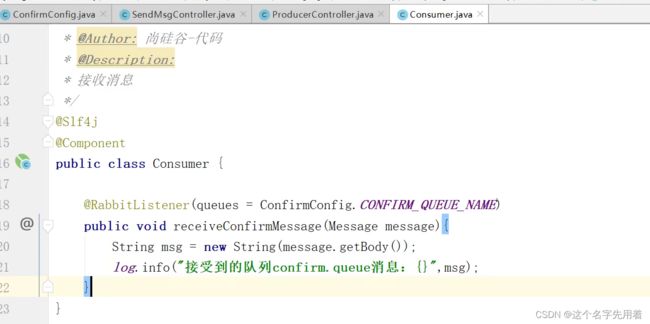
消息的消费方:
consumer.ConfirmConsumer:
package com.example.springbootrabbitmq.consumer;
import com.example.springbootrabbitmq.config.ConfirmConfig;
import lombok.extern.slf4j.Slf4j;
import org.springframework.amqp.core.Message;
import org.springframework.amqp.rabbit.annotation.RabbitListener;
import org.springframework.stereotype.Component;

@Component
@Slf4j
public class ConfirmConsumer {
    //监听队列中的消息,指定队列名字
    @RabbitListener(queues = ConfirmConfig.CONFIRM_QUEUE_NAME)
    public void receiveConfirmMessage(Message message){
        String msg = new String(message.getBody());
        log.info("接收到的队列confirm.queue消息:{}",msg);
    }

}
测试:http://localhost:8080/confirm/sendMessage/呵呵哒
测试通过:

交换机回调接口:
改良:设置交换机回调接口:
config.MyCallBack:
package com.example.springbootrabbitmq.config;

import lombok.extern.slf4j.Slf4j;
import org.springframework.amqp.rabbit.connection.CorrelationData;
import org.springframework.amqp.rabbit.core.RabbitTemplate;
import org.springframework.beans.factory.annotation.Autowired;
import org.springframework.stereotype.Component;
import javax.annotation.PostConstruct;

@Component
@Slf4j  //点进去RabbitTemplate这个类,下载源码,ConfirmCallback是确认回调接口
public class MyCallBack implements RabbitTemplate.ConfirmCallback {
    @Autowired
    private RabbitTemplate rabbitTemplate;
    //  PostConstruct 注释用于在依赖关系注入完成之后需要执行的方法上,以执行任何初始化。
    /*应用 PostConstruct 注释的方法必须遵守以下所有标准:该方法不得有任何参数,除非是在
     EJB 拦截器 (interceptor) 的情况下,根据 EJB 规范的定义,在这种情况下它将带有一个
     InvocationContext 对象 ;该方法的返回类型必须为 void;该方法不得抛出已检查异常;
     应用 PostConstruct 的方法可以是 public、protected、package private 或 private;
     除了应用程序客户端之外,该方法不能是 static;该方法可以是 final;如果该方法抛出未检查异常,
     那么不得将类放入服务中,除非是能够处理异常并可从中恢复的 EJB。
     */
    @PostConstruct  //  PostConstruct 注释用于在依赖关系注入完成之后需要执行的方法上,以执行任何初始化。
    public void init(){
        //setConfirmCallback(ConfirmCallback confirmCallback)
        rabbitTemplate.setConfirmCallback(this); //this代表此类MyCallBack
    }
    /*
    交换机不管是否收到消息的一个回调方法
    correlationData:消息相关的数据
    ack:交换机是否收到消息
    cause:交换机没有收到消息的原因
    */
    @Override
    public void confirm(CorrelationData correlationData, boolean ack, String cause) {
        String id = correlationData != null ? correlationData.getId() : "" ;
        if(ack){
            log.info("交换机ok,收到id为{}的消息",id);
        }else{
            log.info("交换机error,没有收到id为{}的消息,原因是:{}",id,cause);
        }
    }
}


correlation data:相关数据/关联数据
消息生产者:
controller.ProducerController:
package com.example.springbootrabbitmq.controller;

import com.example.springbootrabbitmq.config.ConfirmConfig;
import lombok.extern.slf4j.Slf4j;
import org.springframework.amqp.rabbit.connection.CorrelationData;
import org.springframework.amqp.rabbit.core.RabbitTemplate;
import org.springframework.beans.factory.annotation.Autowired;
import org.springframework.web.bind.annotation.GetMapping;
import org.springframework.web.bind.annotation.PathVariable;
import org.springframework.web.bind.annotation.RequestMapping;
import org.springframework.web.bind.annotation.RestController;

@RestController
@Slf4j
@RequestMapping("/confirm")
public class ProducerController {
    @Autowired
    private RabbitTemplate rabbitTemplate;
    //发消息
    @GetMapping("/sendMessage/{message}")
    public void sendMessage(@PathVariable("message")String message){
        //创建correlationData相关数据
        CorrelationData correlationData = new CorrelationData("1");
        //发消息:-->先找到要发给的交换-->然后是此交换机的下级漏由key-->然后具体的消息是什么
        rabbitTemplate.convertAndSend(ConfirmConfig.CONFIRM_EXCHANGE_NAME+"123",
                ConfirmConfig.CONFIRM_ROUTING_KEY,message,correlationData);
        log.info("发送的消息内容是:{}",message);
    }

}

测试结果:

测试错的队列:
 //发消息
    @GetMapping("/sendMessage/{message}")
    public void sendMessage(@PathVariable("message")String message){
        //----------------1.测试交换机出错的情况-------------
        //创建correlationData相关数据
        CorrelationData correlationData = new CorrelationData("1");
        //发消息:-->先找到要发给的交换-->然后是此交换机的下级漏由key-->然后具体的消息是什么
        rabbitTemplate.convertAndSend(ConfirmConfig.CONFIRM_EXCHANGE_NAME,
                ConfirmConfig.CONFIRM_ROUTING_KEY,message,correlationData);
        log.info("发送的消息内容是:{}",message);
        log.info("------------2.测试队列出错的情况---------------------");
        //创建correlationData相关数据
        CorrelationData correlationData2 = new CorrelationData("22");
        //发消息:-->先找到要发给的交换-->然后是此交换机的下级漏由key-->然后具体的消息是什么
        rabbitTemplate.convertAndSend(ConfirmConfig.CONFIRM_EXCHANGE_NAME,
                ConfirmConfig.CONFIRM_ROUTING_KEY+"22",message+"key22",correlationData2);
        log.info("发送的消息内容是:{}",message+"key22");
    }
然后测试:
![]()
测试结果:

回退消息接口:
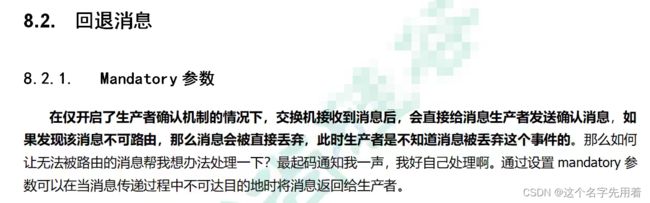
mandatory:强制
yml配置:

注意:这里需要下载源代码后重写方法:参数才能正确显示名称:
config.MyCallBack:
package com.example.springbootrabbitmq.config;

import lombok.extern.slf4j.Slf4j;
import org.springframework.amqp.core.ReturnedMessage;
import org.springframework.amqp.rabbit.connection.CorrelationData;
import org.springframework.amqp.rabbit.core.RabbitTemplate;
import org.springframework.beans.factory.annotation.Autowired;
import org.springframework.stereotype.Component;
import javax.annotation.PostConstruct;

@Component
@Slf4j  //点进去RabbitTemplate这个类,下载源码,ConfirmCallback是确认回调接口
public class MyCallBack implements RabbitTemplate.ConfirmCallback,RabbitTemplate.ReturnsCallback {
    @Autowired
    private RabbitTemplate rabbitTemplate;
    //  PostConstruct 注释用于在依赖关系注入完成之后需要执行的方法上,以执行任何初始化。
    /*应用 PostConstruct 注释的方法必须遵守以下所有标准:该方法不得有任何参数,除非是在
     EJB 拦截器 (interceptor) 的情况下,根据 EJB 规范的定义,在这种情况下它将带有一个
     InvocationContext 对象 ;该方法的返回类型必须为 void;该方法不得抛出已检查异常;
     应用 PostConstruct 的方法可以是 public、protected、package private 或 private;
     除了应用程序客户端之外,该方法不能是 static;该方法可以是 final;如果该方法抛出未检查异常,
     那么不得将类放入服务中,除非是能够处理异常并可从中恢复的 EJB。
     */
    @PostConstruct  //  PostConstruct 注释用于在依赖关系注入完成之后需要执行的方法上,以执行任何初始化。
    public void init(){
        //setConfirmCallback(ConfirmCallback confirmCallback),this代表此类MyCallBack
        rabbitTemplate.setConfirmCallback(this);
        //setReturnsCallback(RabbitTemplate.ReturnsCallback returnCallback),this代表此类MyCallBack
        rabbitTemplate.setReturnsCallback(this);
    }
    /*
    交换机不管是否收到消息的一个回调方法
    correlationData:消息相关的数据
    ack:交换机是否收到消息
    cause:交换机没有收到消息的原因
    */
    @Override
    public void confirm(CorrelationData correlationData, boolean ack, String cause) {
        String id = correlationData != null ? correlationData.getId() : "" ;
        if(ack){
            log.info("交换机ok,收到id为{}的消息",id);
        }else{
            log.info("交换机error,没有收到id为{}的消息,原因是:{}",id,cause);
        }
    }

    @Override //被退回消息的所有内容被包装到这里了ReturnedMessage
    public void returnedMessage(ReturnedMessage returned) {
        log.info("消息{},被交换机{}退回,,应答码(ReplyCode):{},退回的原因是:{},漏由key是{}",
                returned.getMessage(),returned.getExchange(),
                returned.getReplyCode(),returned.getReplyText(),returned.getRoutingKey()
        );
    }
}
运行测试结果:

备份交换机:

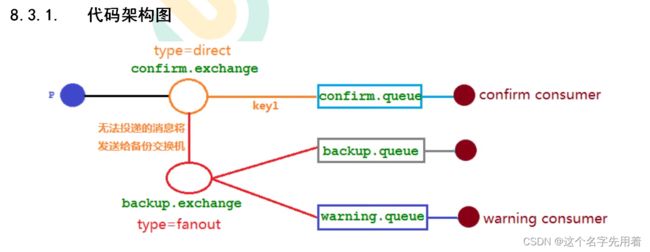
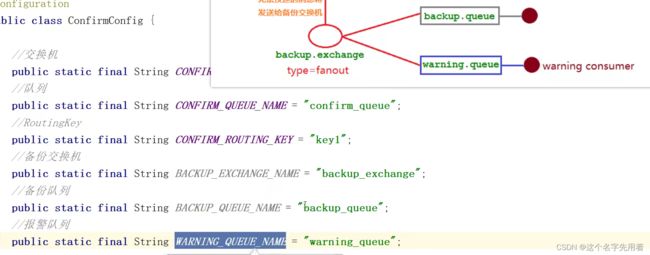
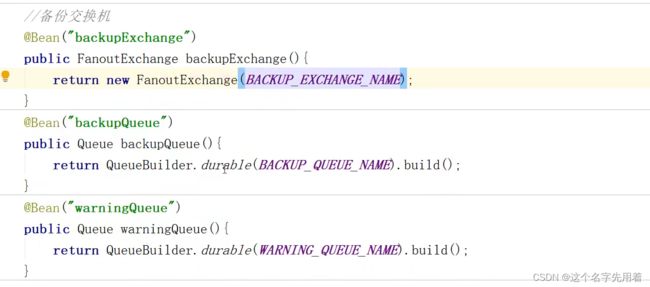

修改:
报警消费者:


结果分析:

其他知识:
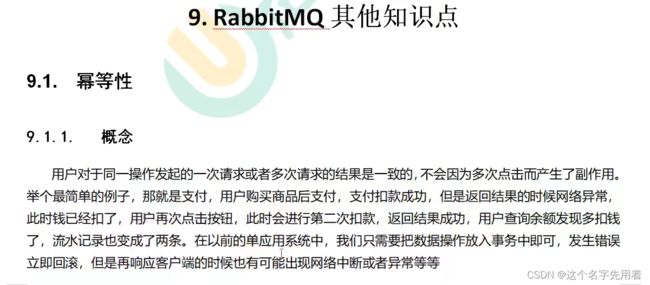
幂等性:


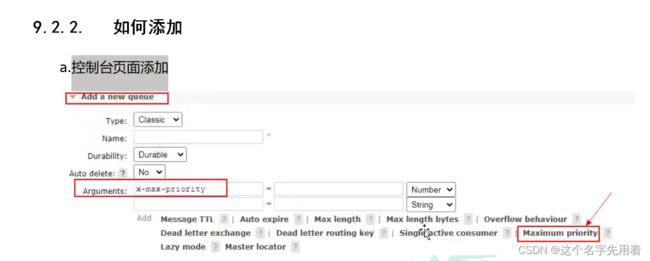
优先级队列:


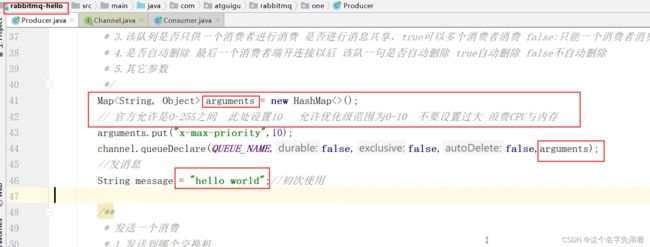
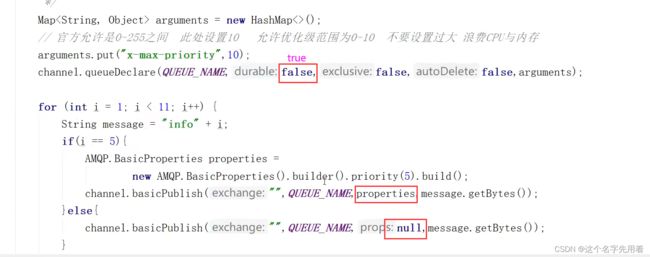
使用优先级队列:


实战:
惰性队列:


