Kafka Producer - 分区机制实战
Kafka Producer - 分区机制实战
上一篇介绍了kafka Producer 生产者发送数据的程序代码,以及对生产者分区机制的相关介绍,今天继续深入的了解下分区机制的原理、测试验证、自定义分区。
在学习之前先在本地机器搭建一个单机版的双节点集群环境,方便后面做测试,另外本机使用的软件版本信息如下:
- JDK17
- kafka_2.13-3.3.1
搭建集群
修改配置
# 1. 在kafka根目录 创建cluster目录
mkdir cluster
# 2. 复制配置文件 模板
cp config/server.properties cluster/server_n1.properties
cp config/server.properties cluster/server_n2.properties
cp config/server.properties cluster/server_n3.properties
# 修改 server_n1.properties 并保存
vim cluster/server_n1.properties
# 更改相关内容如下
broker.id=0
listeners=PLAINTEXT://:9092
log.dirs=/tmp/node1/kafka-logs
# 修改 server_n2.properties 并保存
vim cluster/server_n2.properties
# 更改相关内容如下
broker.id=1
listeners=PLAINTEXT://:9093
log.dirs=/tmp/node2/kafka-logs
# 修改 server_n3.properties 并保存
vim cluster/server_n3.properties
# 更改相关内容如下
broker.id=2
listeners=PLAINTEXT://:9094
log.dirs=/tmp/node3/kafka-logs
启动集群
# 1. 启动zk
./bin/zookeeper-server-start.sh config/zookeeper.properties
# 2. 启动Node1
./bin/kafka-server-start.sh cluster/server_n1.properties
# 3. 启动Node2
./bin/kafka-server-start.sh cluster/server_n2.properties
# 3. 启动Node3
./bin/kafka-server-start.sh cluster/server_n3.properties
创建topic
# 1. 创建一个分区为3的topic
./bin/kafka-topics.sh --create --topic topic_t3 --bootstrap-server localhost:9092 --partitions 3

# 2. 创建完成后,查看主题信息
./bin/kafka-topics.sh --describe --topic topic_t3 --bootstrap-server localhost:9092
测试代码
public class SimpleProducer {

    public static void main(String[] args) throws Exception{
        String topicName = "topic_t3";
        Properties props = new Properties();
        //指定kafka 服务器连接地址
        props.put("bootstrap.servers", "localhost:9092,localhost:9093,localhost:9094");
        // 发送失败 重试次数
        props.put("retries", 0);
        // 消息发送延迟时间 默认为0 表示消息立即发送,单位为毫秒
        props.put("linger.ms", 0);
        // 序列化方式
        props.put("key.serializer", "org.apache.kafka.common.serialization.StringSerializer");
        props.put("value.serializer", "org.apache.kafka.common.serialization.StringSerializer");
        Producer<String, String> producer = new KafkaProducer<>(props);
        for(int i = 0; i < 10; i++) {
                ProducerRecord<String, String> record = new ProducerRecord<>(topicName, "message : " + i);
                Future<RecordMetadata> send = producer.send(record);
                RecordMetadata metadata = send.get();
                System.out.println(String.format("sent record(key=%s value=%s) 分区数: %d, 偏移量: %d, 时间戳: %d",
                        record.key(), record.value(),
                        metadata.partition(),metadata.offset(), metadata.timestamp()
                ));
        }
        System.out.println("Message sent successfully");
        producer.close();
    }
}
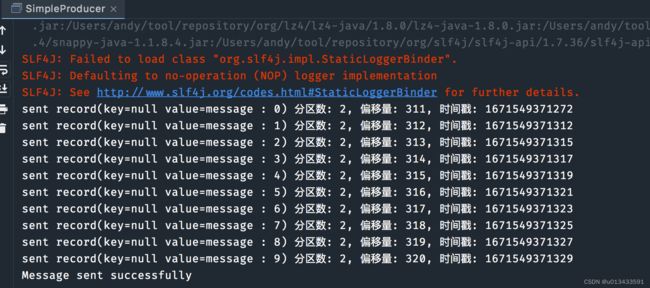
无分区无Key
ProducerRecord<String, String> record = new ProducerRecord<>(topicName, "message : " + i);
注意上面代码,没有指定分区,Record对象也没有指定key值, Kakfa为了内部的性能考虑,会选取其中一个节点进行发送(避免多节点发送数据造成性能损耗),该机制被称为黏性分区
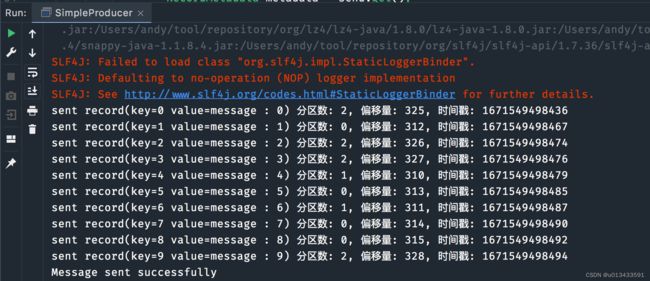
无分区指定Key
// ProducerRecord record = new ProducerRecord<>(topicName, "message : " + i);
// 替换成以下代码
ProducerRecord<String, String> record = new ProducerRecord<>(topicName, String.valueOf(i) ,"message : " + i);
重新执行,测试结果
当key不为空时,Kafka默认使用key的hash值,来计算待发送的分区值,核心代码如下
org.apache.kafka.clients.producer.internals.BuiltInPartitioner#partitionForKey
/*
     * Default hashing function to choose a partition from the serialized key bytes
     */
public static int partitionForKey(final byte[] serializedKey, final int numPartitions) {
  return Utils.toPositive(Utils.murmur2(serializedKey)) % numPartitions;
}
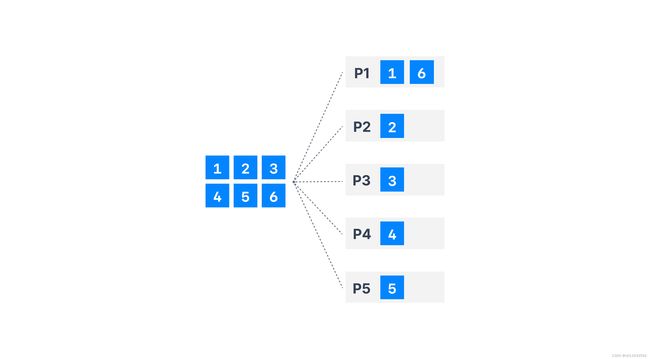
Round-Robin 机制
// 指定轮训分区算法,将数据均匀的打散在不同的节点
props.put("partitioner.class","org.apache.kafka.clients.producer.RoundRobinPartitioner");
测试结果如上,整体的效果图如下
相关配置参数
Kafka 默认给生产者提供了许多的参数,进行分区策略的配置
- partitioner.class - 默认值为null, 显示指定分区的策略,可以是自定义分区机制
- partitioner.ignore.keys - 默认为false, 设置为true时,生产者不会使用键来计算分区,注意:如使用自定义分区,则此设置无效
- partitioner.adaptive.partitioning.enable - 默认为true, 当设置为“true”时,生产者将会想Broker性能好的服务发送更多的消息,。如果为“false”,生产者将尝试统一分发消息。注意:如果使用自定义分区器,则此设置无效
- partitioner.availability.timeout.ms - 默认值为0,如果Broker 在partitioner.availability.timeout时间内无法处理请求,将会视为该分区无效不可用。如果值为0,则禁用此逻辑。注意:如果使用自定义分区器或分区er.adaptive.partitioning,则此设置无效。enable设置为“false”
自定义分区
程序代码
开发者可以选择实现 org.apache.kafka.clients.producer.Partitioner 接口来自定义分区机制,满足特殊的业务场景需求,接下来利用随机算法实现一个自定义分区的功能。该实现么有任何实际的作用,仅仅只是作为学习使用
public class RandomPartitioner implements Partitioner {
    private Random random = new Random();

    public void configure(Map<String, ?> configs) {}

    @Override
    public int partition(String topic, Object key, byte[] keyBytes, Object value, byte[] valueBytes, Cluster cluster) {
        List<PartitionInfo> partitions = cluster.partitionsForTopic(topic);
        int numPartitions = partitions.size();
        return random.nextInt(numPartitions);
    }

    public void close() {}
}
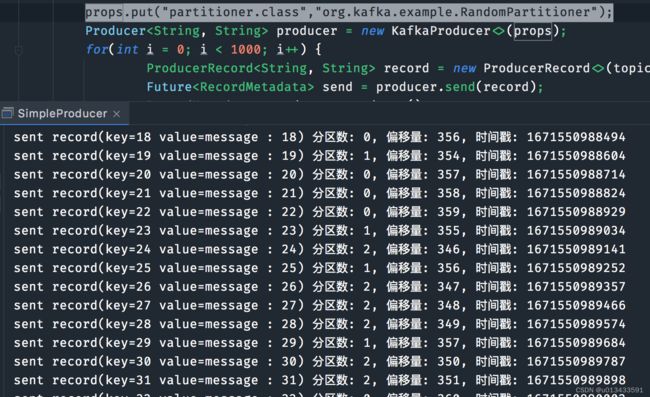
测试验证
// 指定自定义的分区策略实现类
props.put("partitioner.class","org.kafka.example.RandomPartitioner");


