基于python tkinter 制作一个简易的毫米波雷达计算器
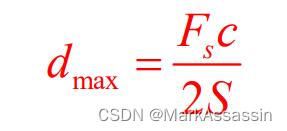
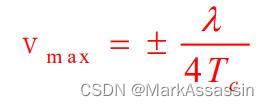
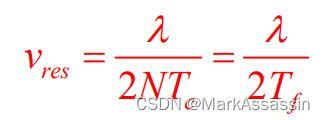
在使用毫米波雷达时,最大距离、距离分辨率、最大速度和速度分辨率。它们的计算公式为:
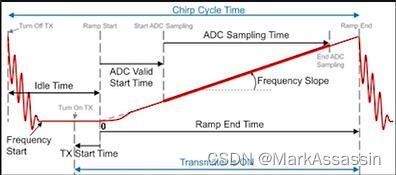
此外,毫米波雷达的原理图可以在mmwave Stdio 中找到,这里我也截了出来以供对照参考:
计算公式有了,接下来就是怎样制作一个计算器的问题了。本文采用的方法是利用python里面的tkinter库,由于制作的GUI界面中笔者还插入了公式和原理图的图片,因此还利用了PIL库。
from tkinter import *
import tkinter as tk
from PIL import Image,ImageTk
创建一个GUI界面,并且将标签、文本框放入其中:
#创建界面
window=tk.Tk()
window.title('毫米波雷达计算器')
window.geometry('1000x600')
window.configure(bg='black')

#标题标签
title=tk.Label(window,text='FMCW雷达chirp计算器',bg='black',font=('Arial',30),fg='white',width=20,height=2)#fg设置字体颜色
title.place(x=10,y=10)

#输入参数标签
label1=tk.Label(window,text='输入参数',bg='black',font=('Arial',12),fg='yellow',width=10,height=1)
label1.place(x=30,y=130)
label1_1=tk.Label(window,text='起始频率',bg='black',font=('Arial',12),fg='white',width=10,height=1)
label1_1.place(x=30,y=155)
label1_2=tk.Label(window,text='斜率',bg='black',font=('Arial',12),fg='white',width=10,height=1)
label1_2.place(x=30,y=180)
label1_3=tk.Label(window,text='空闲时间',bg='black',font=('Arial',12),fg='white',width=10,height=1)
label1_3.place(x=30,y=205)
label1_4=tk.Label(window,text='TX开始时间',bg='black',font=('Arial',12),fg='white',width=10,height=1)
label1_4.place(x=20,y=230)
label1_5=tk.Label(window,text='ADC开始时间',bg='black',font=('Arial',12),fg='white',width=10,height=1)
label1_5.place(x=15,y=255)
label1_6=tk.Label(window,text='斜坡时间',bg='black',font=('Arial',12),fg='white',width=10,height=1)
label1_6.place(x=30,y=280)
label1_7=tk.Label(window,text='ADC点数',bg='black',font=('Arial',12),fg='white',width=10,height=1)
label1_7.place(x=30,y=305)
label1_8=tk.Label(window,text='ADC采样率',bg='black',font=('Arial',12),fg='white',width=10,height=1)
label1_8.place(x=25,y=330)
label1_9=tk.Label(window,text='chirp数',bg='black',font=('Arial',12),fg='white',width=10,height=1)
label1_9.place(x=30,y=355)
label1_10=tk.Label(window,text='周期',bg='black',font=('Arial',12),fg='white',width=10,height=1)
label1_10.place(x=30,y=380)
label1_11=tk.Label(window,text='调频时长ramp',bg='black',font=('Arial',12),fg='white',width=10,height=1)
label1_11.place(x=15,y=405)

#输入数据文本框
entry1_1=tk.Entry(window,width=10)
entry1_1.place(x=115,y=155)
entry1_2=tk.Entry(window,width=10)
entry1_2.place(x=115,y=180)
entry1_3=tk.Entry(window,width=10)
entry1_3.place(x=115,y=205)
entry1_4=tk.Entry(window,width=10)
entry1_4.place(x=115,y=230)
entry1_5=tk.Entry(window,width=10)
entry1_5.place(x=115,y=255)
entry1_6=tk.Entry(window,width=10)
entry1_6.place(x=115,y=280)
entry1_7=tk.Entry(window,width=10)
entry1_7.place(x=115,y=305)
entry1_8=tk.Entry(window,width=10)
entry1_8.place(x=115,y=330)
entry1_9=tk.Entry(window,width=10)
entry1_9.place(x=115,y=355)
entry1_10=tk.Entry(window,width=10)
entry1_10.place(x=115,y=380)
entry1_11=tk.Entry(window,width=10)
entry1_11.place(x=115,y=405)

#输出参数标签
label2=tk.Label(window,text='输出参数',bg='black',font=('Arial',12),fg='yellow',width=10,height=1)
label2.place(x=300,y=130)
# label2_1=tk.Label(window,text='带宽',bg='black',font=('Arial',12),fg='white',width=10,height=1)
# label2_1.place(x=300,y=155)
label2_2=tk.Label(window,text='ADC带宽',bg='black',font=('Arial',12),fg='white',width=10,height=1)
label2_2.place(x=300,y=180)
label2_3=tk.Label(window,text='ADC时间',bg='black',font=('Arial',12),fg='white',width=10,height=1)
label2_3.place(x=300,y=205)
label2_4=tk.Label(window,text='chirp时间',bg='black',font=('Arial',12),fg='white',width=10,height=1)
label2_4.place(x=300,y=230)
label2_5=tk.Label(window,text='帧时间',bg='black',font=('Arial',12),fg='white',width=10,height=1)
label2_5.place(x=300,y=255)
label2_6=tk.Label(window,text='波长',bg='black',font=('Arial',12),fg='white',width=10,height=1)
label2_6.place(x=300,y=280)
label2_7=tk.Label(window,text='最大距离',bg='black',font=('Arial',12),fg='white',width=10,height=1)
label2_7.place(x=300,y=305)
label2_8=tk.Label(window,text='距离分辨',bg='black',font=('Arial',12),fg='white',width=10,height=1)
label2_8.place(x=300,y=330)
label2_9=tk.Label(window,text='最大速度',bg='black',font=('Arial',12),fg='white',width=10,height=1)
label2_9.place(x=300,y=355)
label2_10=tk.Label(window,text='速度分辨',bg='black',font=('Arial',12),fg='white',width=10,height=1)
label2_10.place(x=300,y=380)
# label2_10=tk.Label(window,text='占空比',bg='black',font=('Arial',12),fg='white',width=10,height=1)
# label2_10.place(x=300,y=405)

#输出数据文本框
# text2_1=tk.Text(window,width=10,height=1)
# text2_1.place(x=385,y=155)
text2_2=tk.Text(window,width=10,height=1)
text2_2.place(x=385,y=180)
text2_3=tk.Text(window,width=10,height=1)
text2_3.place(x=385,y=205)
text2_4=tk.Text(window,width=10,height=1)
text2_4.place(x=385,y=230)
text2_5=tk.Text(window,width=10,height=1)
text2_5.place(x=385,y=255)
text2_6=tk.Text(window,width=10,height=1)
text2_6.place(x=385,y=280)
text2_7=tk.Text(window,width=10,height=1)
text2_7.place(x=385,y=305)
text2_8=tk.Text(window,width=10,height=1)
text2_8.place(x=385,y=330)
text2_9=tk.Text(window,width=10,height=1)
text2_9.place(x=385,y=355)
text2_10=tk.Text(window,width=10,height=1)
text2_10.place(x=385,y=380)
# text2_11=tk.Text(window,width=10,height=1)
# text2_11.place(x=385,y=405)

#单位标签
unit1=tk.Label(window,text='单位',bg='black',font=('Arial',12),fg='yellow',width=5,height=1)
unit1.place(x=180,y=130)
unit1_1=tk.Label(window,text='GHz',bg='black',font=('Arial',12),fg='white',width=5,height=1)
unit1_1.place(x=180,y=155)
unit1_2=tk.Label(window,text='MHz/us',bg='black',font=('Arial',12),fg='white',width=5,height=1)
unit1_2.place(x=190,y=180)
unit1_3=tk.Label(window,text='us',bg='black',font=('Arial',12),fg='white',width=5,height=1)
unit1_3.place(x=175,y=205)
unit1_4=tk.Label(window,text='us',bg='black',font=('Arial',12),fg='white',width=5,height=1)
unit1_4.place(x=175,y=230)
unit1_5=tk.Label(window,text='us',bg='black',font=('Arial',12),fg='white',width=5,height=1)
unit1_5.place(x=175,y=255)
unit1_6=tk.Label(window,text='us',bg='black',font=('Arial',12),fg='white',width=5,height=1)
unit1_6.place(x=175,y=280)
unit1_7=tk.Label(window,text='点',bg='black',font=('Arial',12),fg='white',width=5,height=1)
unit1_7.place(x=175,y=305)
unit1_8=tk.Label(window,text='ksps',bg='black',font=('Arial',12),fg='white',width=5,height=1)
unit1_8.place(x=180,y=330)
unit1_9=tk.Label(window,text='个',bg='black',font=('Arial',12),fg='white',width=5,height=1)
unit1_9.place(x=175,y=355)
unit1_10=tk.Label(window,text='ms',bg='black',font=('Arial',12),fg='white',width=5,height=1)
unit1_10.place(x=175,y=380)
unit1_11=tk.Label(window,text='us',bg='black',font=('Arial',12),fg='white',width=5,height=1)
unit1_11.place(x=175,y=405)

unit2=tk.Label(window,text='单位',bg='black',font=('Arial',12),fg='yellow',width=5,height=1)
unit2.place(x=450,y=130)
# unit2_1=tk.Label(window,text='MHz',bg='black',font=('Arial',12),fg='white',width=5,height=1)
# unit2_1.place(x=450,y=155)
unit2_2=tk.Label(window,text='MHz',bg='black',font=('Arial',12),fg='white',width=5,height=1)
unit2_2.place(x=450,y=180)
unit2_3=tk.Label(window,text='us',bg='black',font=('Arial',12),fg='white',width=5,height=1)
unit2_3.place(x=450,y=205)
unit2_4=tk.Label(window,text='us',bg='black',font=('Arial',12),fg='white',width=5,height=1)
unit2_4.place(x=450,y=230)
unit2_5=tk.Label(window,text='us',bg='black',font=('Arial',12),fg='white',width=5,height=1)
unit2_5.place(x=450,y=255)
unit2_6=tk.Label(window,text='mm',bg='black',font=('Arial',12),fg='white',width=5,height=1)
unit2_6.place(x=450,y=280)
unit2_7=tk.Label(window,text='m',bg='black',font=('Arial',12),fg='white',width=5,height=1)
unit2_7.place(x=450,y=305)
unit2_8=tk.Label(window,text='cm',bg='black',font=('Arial',12),fg='white',width=5,height=1)
unit2_8.place(x=450,y=330)
unit2_9=tk.Label(window,text='m/s',bg='black',font=('Arial',12),fg='white',width=5,height=1)
unit2_9.place(x=450,y=355)
unit2_10=tk.Label(window,text='m/s',bg='black',font=('Arial',12),fg='white',width=5,height=1)
unit2_10.place(x=450,y=380)
# unit2_11=tk.Label(window,text='%',bg='black',font=('Arial',12),fg='white',width=5,height=1)
# unit2_11.place(x=450,y=405)
之后的难点有2个:
1.如何将图片放入GUI界面中;
2.怎样将输入数据文本框中的输入参数经过一系列运算得到的值插入到对应的输出数据文本框中。并且设置2个按钮——“计算”和“清空”,输入数据后点击“计算”会进行运算,点击“清空”后会将输出数据文本框中的内容清除掉。
下面依次解决难点:
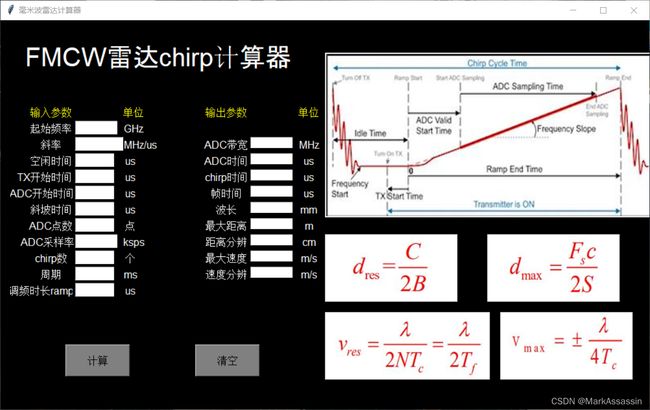
难点一可以利用PIL库与tkinter相结合,图片可以作为一个Label放置在GUI界面中,代码如下:
#插入图片
def load_img():
    img1=Image.open('E:\大三上\毫米波雷达实验\毫米波数据原理图.jpg').resize((500,250))
    img2=Image.open('E:\大三上\毫米波雷达实验\公式1.jpg').resize((200,100))
    img3 = Image.open('E:\大三上\毫米波雷达实验\公式2.jpg').resize((200, 100))
    img4 = Image.open('E:\大三上\毫米波雷达实验\公式3.jpg').resize((250, 100))
    img5 = Image.open('E:\大三上\毫米波雷达实验\公式4.jpg').resize((200, 100))
    global photo1,photo2,photo3,photo4,photo5
    photo1=ImageTk.PhotoImage(img1)
    photo2=ImageTk.PhotoImage(img2)
    photo3 = ImageTk.PhotoImage(img3)
    photo4 = ImageTk.PhotoImage(img4)
    photo5 = ImageTk.PhotoImage(img5)
    tk.Label(window,image=photo1).place(x=500,y=50)
    tk.Label(window,image=photo2).place(x=500,y=330)
    tk.Label(window, image=photo3).place(x=750, y=330)
    tk.Label(window, image=photo4).place(x=500, y=450)
    tk.Label(window, image=photo5).place(x=770, y=450)

load_img()
需要注意的是,Image.open中的图片路径需要自己设置。
在解决难点二之前,我们可以先将“计算”和“清空”2个按钮(Button)放置在GUI界面中:
#计算按钮
button=tk.Button(window,text='计算',bg='grey',font=('Arial',12),width=10,height=2,command=calculate)
button.place(x=100,y=500)

#清空按钮
button1=tk.Button(window,text='清空',bg='grey',font=('Arial',12),width=10,height=2,command=clear)
button1.place(x=300,y=500)
其中要执行的函数——计算(calculate)和清空(clear)稍后展示。至此,运行程序可以得到这样的界面:
接下来完成“计算” 和“清空”函数的编写:
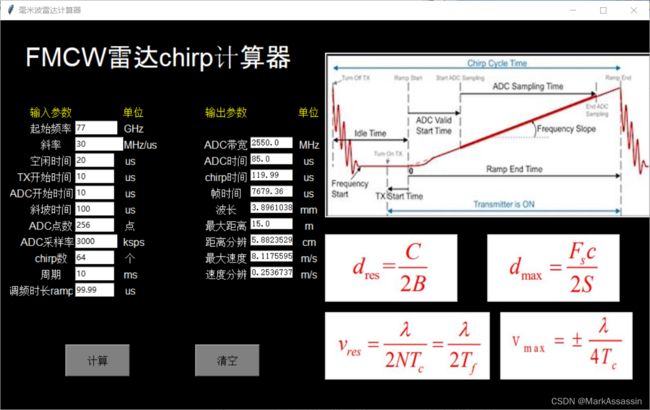
首先利用eval(entry.get())得到输入数据文本框中的数值,之后根据之前给的计算公式用text.insert插入到输出数据文本框中。
#运算函数
def calculate():
    var1=eval(entry1_1.get())#起始频率
    var2=eval(entry1_2.get())#斜率
    var3 = eval(entry1_3.get())#空闲时间
    # var4 = eval(entry1_4.get())#TX开始时间
    # var5 = eval(entry1_5.get())#ADC开始时间
    # var6 = eval(entry1_6.get())#斜坡时间
    var7 = eval(entry1_7.get())#ADC点数
    var8 = eval(entry1_8.get())#ADC采样率
    var9 = eval(entry1_9.get())#chirp数
    # var10 = eval(entry1_10.get())#周期
    var11=eval(entry1_11.get())#调频时长ramp
    text2_2.insert('insert',1/var8*(var7-1)*var2*1000)#ADC带宽
    text2_3.insert('insert',1/var8*(var7-1)*var2*1000/var2)#ADC时间
    text2_4.insert('insert',var3+var11)#chirp时长
    text2_5.insert('insert',(var3+var11)*var9)#帧时间
    text2_6.insert('insert',3/var1*100)#波长
    text2_7.insert('insert',var8*3/(2*var2*10))#最大距离
    text2_8.insert('insert',3*var8/(2*var2*(var7-1))*10)#距离分辨
    text2_9.insert('insert',3/var1*100/(4*(var3+var11))*1000)#最大速度
    text2_10.insert('insert',3/var1*100/(2*var9*(var3+var11))*1000)#速度分辨
清空函数利用了text.delete
#清空函数
def clear():
    #注意,这里要想NORMAL和DISABLE不报错,需要加上from tkinter import *
    # 开启编辑text
    # text2_1.config(state=NORMAL)
    # text2_1.delete("1.0", "end")
    text2_2.config(state=NORMAL)
    text2_2.delete("1.0", "end")
    text2_3.config(state=NORMAL)
    text2_3.delete("1.0", "end")
    text2_4.config(state=NORMAL)
    text2_4.delete("1.0", "end")
    text2_5.config(state=NORMAL)
    text2_5.delete("1.0", "end")
    text2_6.config(state=NORMAL)
    text2_6.delete("1.0", "end")
    text2_7.config(state=NORMAL)
    text2_7.delete("1.0", "end")
    text2_8.config(state=NORMAL)
    text2_8.delete("1.0", "end")
    text2_9.config(state=NORMAL)
    text2_9.delete("1.0", "end")
    text2_10.config(state=NORMAL)
    text2_10.delete("1.0", "end")
输入相应参数后点击“计算”得到:
再点击“清空” 得到:
这样,一个简易毫米波雷达计算器就做好了。
参考文献:
Python GUI 编程(Tkinter) | 菜鸟教程 (runoob.com)
https://blog.csdn.net/m0_50000839/article/details/120078530
https://blog.csdn.net/qq_43082279/article/details/125229159
