opencv 实战案例 (一)
目录:
1、用 Canny 算子检测图像轮廓提取车道线任务(Canny)
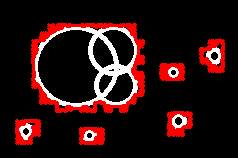
2、用 findContours 发现硬币轮廓任务(Canny+findContours)
3、用概率霍夫变换检测车道线任务(Canny+HoughLines)
4、用最小二乘法拟合车道线任务(Canny+HoughLines+fitLine)
5、用形态学操作提取水平和垂直直线任务(自适应阈值+形态学操作)
6、提取连续区域 物体识别和检测任务(findContours+约束过滤)
7、扫描文档自动切边任务(Canny+findContours+约束过滤)
代码基于:opencv-python (3.4.0.12)
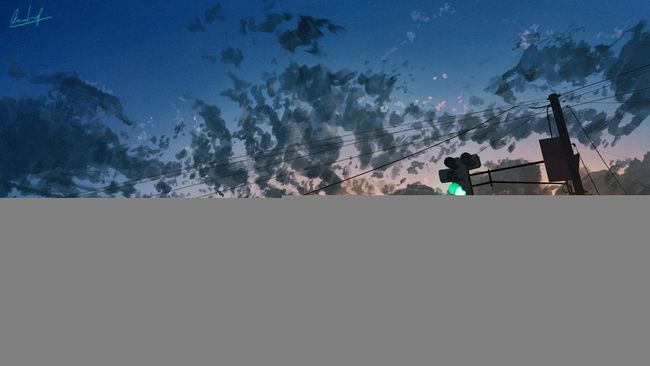
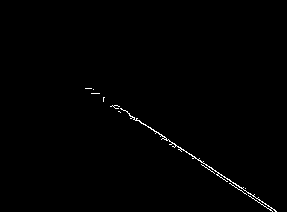
1. 用 Canny 算子检测图像轮廓
介绍: 使用 Canny 算子,需要指定两个阈值,基于两个阈值获得二值分布图的策略(滞后阈值化)。 在低阈值边缘分布图上值保留具有连续路径的边缘点, 同时把那些边缘点连接到属于高阈值边缘分布图的边缘上, 高阈值的边缘点被保留下来,低阈值分布图上的孤立点全部被移除。
import cv2
from PIL import Image
def canny_test():
    raw_ = cv2.imread("1.jpg")
    raw = cv2.cvtColor(raw_,cv2.COLOR_BGR2RGB)
    raw_gray = cv2.cvtColor(raw,cv2.COLOR_RGB2GRAY)
    edges = cv2.Canny(raw_gray,125,350)
    image1 = Image.fromarray(raw.astype('uint8')).convert('RGB')
    display(image1)
    image2 = Image.fromarray(edges.astype('uint8')).convert('RGB')
    display(image2)
canny_test()

2. 发现轮廓
介绍:是基于图像边缘提取基础寻找对象轮廓的方法, 边缘提取的阈值选定会影响最终轮廓发现结果。
步骤: - 输入图像转为灰度图像 - 使用 Canny 进行边缘提取, 得到二值图像 - 使用 findContours 寻找轮廓 - 使用 drawContours 绘制轮廓
import cv2
from PIL import Image
import numpy as np
def findContours_test():
    raw_ = cv2.imread("2.jpg")
    image1 = Image.fromarray(raw_.astype('uint8')).convert('RGB')
    display(image1)
    raw_gray = cv2.cvtColor(raw_ ,cv2.COLOR_BGR2GRAY)
    #全部发现的轮廓对象,该图的拓扑结构
    edges = cv2.Canny(raw_gray,100,200,apertureSize=3)
    image2 = Image.fromarray(edges.astype('uint8')).convert('RGB')
    display(image2)
    _,counts,hierarchy = cv2.findContours(edges,  #输入图像
                                        cv2.RETR_TREE, #轮廓返回模式
                                        cv2.CHAIN_APPROX_NONE) #发现方法
    cv2.drawContours(raw_, #一个三通道图像
                 counts, #全部发现的轮廓
                 -1,    #轮廓索引号 -1就是绘制所有轮廓
                 (255,0,0),  #轮廓颜色
                 1)      #宽度
    image3 = Image.fromarray(raw_.astype('uint8')).convert('RGB')
    display(image3)
findContours_test()


3. 用概率霍夫变换检测直线
import cv2
from PIL import Image
import math
def lineFinder_test():
    raw_ = cv2.imread("1.jpg")
    raw = cv2.cvtColor(raw_,cv2.COLOR_BGR2RGB)
    raw_gray = cv2.cvtColor(raw,cv2.COLOR_RGB2GRAY)
    edges = cv2.Canny(raw_gray,125,350)
    image1 = Image.fromarray(raw.astype('uint8')).convert('RGB')
    display(image1)
    image2 = Image.fromarray(edges.astype('uint8')).convert('RGB')
    display(image2)
    lines = cv2.HoughLinesP(edges,  #输入图像
                           1,       #累加器分辨率
                           np.pi/180,#角度分辨率
                           60,      #确定直线之前收到的最小投票数
                           minLineLength=100, #直线的最小长度
                           maxLineGap=20)     #直线上允许的最大缝隙
    line = lines[:,0,:]
    for x1,y1,x2,y2 in line[:]:
        cv2.line(raw,  #输入图像
                 (x1,y1),  #起点
                 (x2,y2),  #终点
                 (255,0,0), #颜色
                 1)        #宽度
    image1 = Image.fromarray(raw.astype('uint8')).convert('RGB')
    display(image1)
lineFinder_test()


4. 点集的直线拟合
光检测直线还不够,还要精确的估计直线的位置和方向。 首先需要识别出图像中靠近直线的点, 为了提取靠近直线的点集,做法是在黑色图像上画一条白线, 并且穿过用于检测直线的 Canny 轮廓图。
import cv2
from PIL import Image
import math
import numpy as np
# def lineFinder_test():
raw_ = cv2.imread("1.jpg")
raw = cv2.cvtColor(raw_,cv2.COLOR_BGR2RGB)
raw_cp = raw.copy()
raw_gray = cv2.cvtColor(raw,cv2.COLOR_RGB2GRAY)
edges = cv2.Canny(raw_gray,125,350)
image1 = Image.fromarray(raw.astype('uint8')).convert('RGB')
display(image1)
image2 = Image.fromarray(edges.astype('uint8')).convert('RGB')
display(image2)
lines = cv2.HoughLinesP(edges,  #输入图像
                       1,       #累加器分辨率
                       np.pi/180,#角度分辨率
                       60,      #确定直线之前收到的最小投票数
                       minLineLength=100, #直线的最小长度
                       maxLineGap=20)     #直线上允许的最大缝隙
line = lines[:,0,:]
for x1,y1,x2,y2 in line[:]:
    cv2.line(raw,  #输入图像
             (x1,y1),  #起点
             (x2,y2),  #终点
             (255,0,0), #颜色
             1)        #宽度
image1 = Image.fromarray(raw.astype('uint8')).convert('RGB')
display(image1)


#在黑色图像上画一条白线,
#并且穿过用于检测直线的 Canny 轮廓图。结果是包含了与指定直线相关点的图像
one_line = np.zeros(raw.shape,dtype=np.uint8)
cv2.line(one_line,(line[0][0],line[0][1]),(line[0][2],line[0][3]),(255,255,255),3)
#拆分单通道
B,G,R = cv2.split(one_line)
image4 = Image.fromarray(one_line.astype('uint8')).convert('RGB')
display(image4)
#和Canny检测结果做“与”运算
bitwise_and = cv2.bitwise_and(edges,B)
image5 = Image.fromarray(bitwise_and.astype('uint8')).convert('RGB')
display(image5)
points = []
for i in range(bitwise_and.shape[0]):
    for j in range(bitwise_and.shape[1]):
        if bitwise_and[i][j] != 0:
            points.append((i,j))
#拟合直线
points = np.asarray(points)
output = cv2.fitLine(points,  #输入点集 矩阵形式
                     cv2.DIST_L2,      #欧式距离,此时与最小二乘法相同
                     0,            #距离参数,跟所选类型有关系
                     0.01,         #径向精度
                     0.01)         #角度精度
#这个fitLine拟合的有点问题 暂时还没找到原因
image5 = Image.fromarray(raw_cp.astype('uint8')).convert('RGB')
display(image5)
5. 形态学操作-提取水平和垂直直线
步骤: (1)输入彩色图像 (2) 转换为灰度图像 (3) 转换为二值图像 (4)定义结构元素 (5)开操作(腐蚀+膨胀)提取水平与直线
import cv2
from PIL import Image
import math
import numpy as np
# def lineFinder_test():
raw_ = cv2.imread("3.jpg")
raw = cv2.cvtColor(raw_,cv2.COLOR_BGR2RGB)
raw_cp = raw.copy()
raw_gray = cv2.cvtColor(raw,cv2.COLOR_RGB2GRAY)
#edges = cv2.Canny(raw_gray,125,350)
image1 = Image.fromarray(raw.astype('uint8')).convert('RGB')
display(image1)
#image2 = Image.fromarray(edges.astype('uint8')).convert('RGB')
#display(image2)
th2 = cv2.adaptiveThreshold(raw_gray,  #输入为单通道灰度图
                            255,       #超过阈值赋予的值
                            cv2.ADAPTIVE_THRESH_MEAN_C, #阈值计算方法 平均
                            cv2.THRESH_BINARY,   #二值化操作类型
                            15,        #图片中分块的大小
                            -2)        #阈值计算方法中的常数项
image2 = Image.fromarray(th2.astype('uint8')).convert('RGB')
display(image2)

horzion_kernel = cv2.getStructuringElement(cv2.MORPH_RECT,
                                       (raw.shape[1]//16,1))
vertical_kernel = cv2.getStructuringElement(cv2.MORPH_RECT,
                                        (1,raw.shape[0]//16))


h_opening = cv2.morphologyEx(th2, cv2.MORPH_OPEN, horzion_kernel)
v_opening = cv2.morphologyEx(th2, cv2.MORPH_OPEN, vertical_kernel)


image3 = Image.fromarray(h_opening.astype('uint8')).convert('RGB')
display(image3)
image4 = Image.fromarray(v_opening.astype('uint8')).convert('RGB')
display(image4)


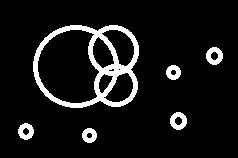
6. 提取连续区域
介绍: 在物体检测和识别程序中,第一步通常是生成二值图像,找到感兴趣物体所在的位置,下一步就是从由1和0的像素集合中提取物体。
import cv2
from PIL import Image
import math
import numpy as np
# def lineFinder_test():
raw_ = cv2.imread("4.jpg")
raw = cv2.cvtColor(raw_,cv2.COLOR_BGR2RGB)
raw_cp = raw.copy()
raw_gray = cv2.cvtColor(raw,cv2.COLOR_RGB2GRAY)

image1 = Image.fromarray(raw_gray.astype('uint8')).convert('RGB')
display(image1)
_,counts,hierarchy = cv2.findContours(raw_gray,  #输入图像
                                    cv2.RETR_EXTERNAL, #轮廓返回模式
                                    cv2.CHAIN_APPROX_NONE) #发现方法
cv2.drawContours(raw_, #一个三通道图像
             counts, #全部发现的轮廓
             -1,    #轮廓索引号 -1就是绘制所有轮廓
             (255,0,0),  #轮廓颜色
             2)      #宽度
image3 = Image.fromarray(raw_.astype('uint8')).convert('RGB')
display(image3)
index_list = []
# print("all : ",len(counts))
for index in range(len(counts)):
#     rect = cv2.minAreaRect(counts[index])
    lenth = cv2.arcLength(counts[index],True)# True对应闭合 False不闭合
#     print(index, lenth)
    if lenth >= 500 or lenth <= 50:
        index_list.append(index)
index_list = index_list[::-1]
for i in index_list:
#     print(i)
    counts.pop(i)

img = np.zeros(raw.shape)
cv2.drawContours(img, #一个三通道图像
             counts, #全部发现的轮廓
             -1,    #轮廓索引号 -1就是绘制所有轮廓
             (255,255,255),  #轮廓颜色
             1)      #宽度
image3 = Image.fromarray(img.astype('uint8')).convert('RGB')
display(image3)

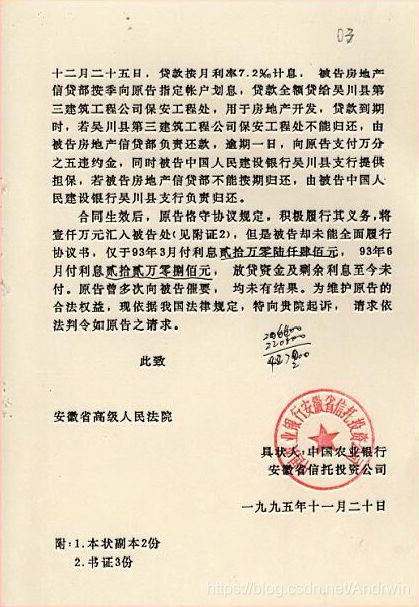
7. 切边
需求:扫描仪扫描到的法律文件,需要切边, 去掉边缘空白,这样看上去才真实, 人工操作成本与时间花费高, 希望程序自动实现,高效、准确。 实现思路:边缘检测 + 轮廓发现或直线检测最大外接矩形。
import cv2
from PIL import Image
import math
import numpy as np
# def lineFinder_test():
raw_ = cv2.imread("5.jpg")
raw = cv2.cvtColor(raw_,cv2.COLOR_BGR2RGB)
raw_gray = cv2.cvtColor(raw,cv2.COLOR_RGB2GRAY)
edges = cv2.Canny(raw_gray,100,200)
image1 = Image.fromarray(raw.astype('uint8')).convert('RGB')
display(image1)
image2 = Image.fromarray(edges.astype('uint8')).convert('RGB')
display(image2)
h = raw.shape[0]
w = raw.shape[1]

_,counts,hierarchy = cv2.findContours(edges,  #输入图像
                                    cv2.RETR_TREE, #轮廓返回模式
                                    cv2.CHAIN_APPROX_NONE) #发现方法
cv2.drawContours(raw_, #一个三通道图像
             counts, #全部发现的轮廓
             -1,    #轮廓索引号 -1就是绘制所有轮廓
             (255,0,0),  #轮廓颜色
             1)      #宽度
image3 = Image.fromarray(raw_.astype('uint8')).convert('RGB')
display(image3)
# print(len(counts))
index_list=[]
for index in range(len(counts)):
    lenth = cv2.arcLength(counts[index],True)
    if lenth < (2*w+2*h)*0.9 or lenth > (2*w+2*h)*0.99:
        index_list.append(index)
index_list=index_list[::-1]
for i in index_list:
    counts.pop(i)
#我觉得像这种有毛边的框,如果它不整齐,就一定会有更长的边界线
#重置周长列表
index_list=[]
for index in range(len(counts)):
    lenth = cv2.arcLength(counts[index],True)
    index_list.append(lenth)
counts.pop(index_list.index(max(index_list)));
for index in range(len(counts)):
    lenth = cv2.arcLength(counts[index],True)
#     print(lenth)
#想着剩下的也差不多 随便拿一个咯 做个nms最好~
#最后一个应该没问题
img = np.zeros(raw.shape,dtype=np.float32)
cv2.drawContours(img, #一个三通道图像
             counts[-1], #全部发现的轮廓
             -1,    #轮廓索引号 -1就是绘制所有轮廓
             (255,255,255),  #轮廓颜色
             1)      #宽度
image3 = Image.fromarray(img.astype('uint8')).convert('RGB')
display(image3)
B,G,R = cv2.split(img)

#捕捉外接矩形获得角坐标
min_rect = cv2.minAreaRect(counts[-1])
print("min_rec =",min_rect)
box = cv2.boxPoints(min_rect)
x, y, w, h = cv2.boundingRect(counts[-1])
cv2.rectangle(img, (x, y), (x + w, y + h), (0, 255, 0), 2)
image3 = Image.fromarray(img.astype('uint8')).convert('RGB')
display(image3)
result = raw[y:y+h,x:x+w]
image3 = Image.fromarray(result.astype('uint8')).convert('RGB')
display(image3)