文本生成(二)【NLP论文复现】Relative position representations 相对位置编码突破Bert的文本长度限制!
Relative position representations 相对位置编码突破Bert文本512长度的限制
- 前言
- Self-Attention with Relative Position Representations
- NEZHA
- How to build Relative Position
-
- Get Relative Position Embedding
- Send Relative Position to Self-attention
- 使用NEZHA实现法律长文摘要生成
-
- 关键句抽取模型
-
- DGCNN
- 代码实现
- 生成模型
-
- BIO Copy
- 稀疏Softmax
- 模型创建与训练
- 总结
- 参考资料
- 代码地址
前言
论文原文:
Self-Attention with Relative Position Representations
NEZHA: NEURAL CONTEXTUALIZED REPRESENTATION FOR CHINESE LANGUAGE UNDERSTANDING
最近在研究苏神的《SPACES:“抽取-生成”式长文本摘要(法研杯总结)》
面向法律领域裁判文书的长文本摘要生成,涉及到长文的输入与输出,其输入加输出长度远超过bert限定的512,(Bert的postion_embedding是在预训练过程中训练好的,最长为512)。因此需要寻找解决突破输入长度限制的方法,目前了解到的解决方案:
- Bert层次编码
- T5模型相对位置编码
- NEZHA相对位置编码
本文选择了华为的NEZHA模型的相对位置编码作为复现目标,先比T5来说,NEZHA沿用了 Self-attention with relative position representations 文中的相对位置编码方法,实现起来较为简单,并不需要给模型增加额外的可训练参数,问题在于增加了模型的计算量。
Self-Attention with Relative Position Representations
- position_embedding的意义:position_embedding表征了token在输入中的位置信息,该位置信息主要在self-attention阶段被利用,具体可以理解为,在self-attention阶段,我们希望attention不仅要考虑word-embedding的信息,同时也要考虑到Q与K的位置关系。
- 不同于Transformer的绝对位置编码,论文作者希望将原来从first input传入的position_embedding 转移到self-attention中,并希望模型能在训练的过程中学习到这相对位置编码参数,最后作出假设:Residual connections help propagate position information to higher layers.
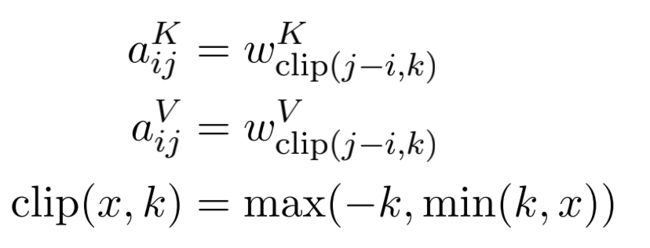
- 论文将token之间相对位置输入建模为一个有向的、全联接的图模型, 希望通过直接创建两组边关系aVij and aKij 分别适用于attention中的QK点积计算,与V与softmax结果的点积计算,由此可以避免一些多余的线性变换。
- V与softmax结果的点积计算,将相对位置信息传递给下游任务:


This extension is presumably important for tasks where information about the edge types selected by a given attention head is useful to downstream encoder or decoder layers. - attention中的QK点积计算,通过相对位置信息影响注意力分布:

model will consider edges when determining compatibility - 对相对位置编码距离进行截断,将其最大相对位置设置为固定值K:

We hypothesized that precise relative position information is not useful beyond a
certain distance. - 更有效的计算:
- 多头attention共享一组相对位置编码,we reduce the space complexity of storing relative position representations from O(hn2da) to O(n2da) by sharing them across each heads. Additionally, relative position representations can be shared across sequences.
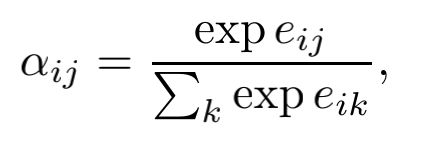
- 当不考虑相对位置编码时,原有的QKattend可以通过矩阵点积的方式实现并行计算,但当我们在eij的计算公式,对于不同的i 我们需要给不同的Wj 加上对应aij,这不利于用矩阵惩罚的广播机制,论文通过如下变换解决了并行计算的问题:

式子的左半部分与原attention相同,可以通过矩阵乘法并行计算,观察式子的右半部分我们可以发现,对于eij部分的计算已经与K无关,我们可以分开计算两部分后再相加,右半部分我们可以通过 i 次并行的 j * d · d * 1 = j * 1 矩阵乘法得到可以与左半部分对位相加的 e_ij 矩阵,以此加快了模型的计算速度。
勉强一看的示意图:
NEZHA
这里只阐述NEZHA的相对位置编码方法,模型的其他细节还是看论文来的实在啦~
- 前言中也说道:Bert模型之所以限制了输入token的长度要小于512,原因在于bert的postition_embedding是与word_embedding相加后输入到encode层中,虽然与transformer一样,都是绝对位置编码,但bert的postition_embedding是初始化后可以训练的参数,在预训练过程中得到,因此固定的参数大小使得当给入一个大于512的postition_id后无法在embedding矩阵中找到对应的向量。
- 因此可以思考,既然绝对位置编码的意义在于捕获token的相对位置关系,那么我们可以直接对token的相对位置进行编码,NEZHA模型就是在相对位置编码的基础上诞生的MLM预训练模型。
- 与上一篇论文不同的是,NEZHA相对位置编码是sinusoidal functions计算出的固定值,这使得模型可以延展到处理更长长度的句子,具体如下:

- That is, each dimension of the positional encoding corresponds to a sinusoid, and the sinusoidal functions for different dimensions have different wavelengths. In the above equations, dz is equal to the hidden size per head of the NEZHA model (i.e., the hidden size divided by the number of heads). The wavelengths form a geometric progression from 2π to 10000 · 2π. We choose the fixed sinusoidal functions mainly because it may allow the model to extrapolate to sequence lengths longer than the ones encountered during training.
- 用 aij 表示 i 到 j 的相对位置编码,其本质是一个n维的向量。位置编码上每一维的值沿用了sinusoidal functions来计算,j 代表 Self-attention中Q的位置,i 代表K的位置,k表示该位置编码向量上的第k维,dz则与一个attention-head的hidden_size对齐,由此我们就构建好了相对位置编码矩阵,且该矩阵在训练过程中固定不变。
- 论文沿用了Self-Attention with Relative Position Representations的相对位置编码在Attention中的计算方法。
How to build Relative Position
Tensorflow-GPU 2.0.0
Transformers 3.1.0
Get Relative Position Embedding
class Sinusoidal(tf.keras.initializers.Initializer):
    def __call__(self, shape, dtype=None):
        """
        Sin-Cos形式的位置向量
        用于创建relative position embedding
        后续通过计算位置差来对embedding进行查询 得到相对位置向量
        embedding的shape 为[max_k(最大距离),deep(相对位置向量长度)]
        """
        vocab_size, depth = shape
        embeddings = np.zeros(shape)
        for pos in range(vocab_size):
            for i in range(depth // 2):
                theta = pos / np.power(10000, 2. * i / depth)
                embeddings[pos, 2 * i] = np.sin(theta)
                embeddings[pos, 2 * i + 1] = np.cos(theta)
        return embeddings

class RelativePositionEmbedding(tf.keras.layers.Layer):
	'''
	input_dim: max_k 对最大相对距离进行截断
	output_dim:与最后的eij相加,由于各个head之间共享相对位置变量,
	因此该参数为 hidden_size / head_num = head_size
	embeddings_initializer:初始化的权重,此处使用Sinusoidal()
	'''
    def __init__(
        self, input_dim, output_dim, embeddings_initializer=None, **kwargs
    ):
        super(RelativePositionEmbedding, self).__init__(**kwargs)
        self.input_dim = input_dim
        self.output_dim = output_dim
        self.embeddings_initializer = embeddings_initializer

    def build(self, input_shape):
        super(RelativePositionEmbedding, self).build(input_shape)
        self.embeddings = self.add_weight(
            name='embeddings',
            shape=(self.input_dim, self.output_dim),
            initializer = self.embeddings_initializer,
            trainable=False
            # 此处注意设置trainable = False 固定相对位置编码
        )

    def call(self, inputs):
    	'''
    	(l,l) 根据embedding查表得到相对位置编码矩阵 (l,l,d)
    	'''
        pos_ids = self.compute_position_ids(inputs)
        return K.gather(self.embeddings, pos_ids)

    def compute_position_ids(self, inputs):
    	'''
    	通过传入的hidden_size (b,l,h)
    	根据长度计算相对位置矩阵(l,l)(k个相对位置值)
    	'''
        q, v = inputs
        # 计算位置差
        q_idxs = K.arange(0, K.shape(q)[1], dtype='int32')
        q_idxs = K.expand_dims(q_idxs, 1)
        v_idxs = K.arange(0, K.shape(v)[1], dtype='int32')
        v_idxs = K.expand_dims(v_idxs, 0)
        pos_ids = v_idxs - q_idxs
        # 后处理操作
        max_position = (self.input_dim - 1) // 2
        pos_ids = K.clip(pos_ids, -max_position, max_position)
        pos_ids = pos_ids + max_position
        return pos_ids
Send Relative Position to Self-attention
- 使用相对位置编码后,我们不再需要在input阶段,在word_embedding上加上预训练好的position,因此我们需要改变 TFBertEmbeddings 的计算逻辑,具体需要添加的语句如下:
class TFBertEmbeddings(tf.keras.layers.Layer):
    """Construct the embeddings from word, position and token_type embeddings."""

    def __init__(self, config, **kwargs):
        super().__init__(**kwargs)

        if config.model_type:
            self.model_type = config.model_type

    def _embedding(self, input_ids, position_ids, token_type_ids, inputs_embeds, training=False):

        if self.model_type == 'NEZHA':
            embeddings = inputs_embeds + token_type_embeddings
            '''
            当我们的模型类型是NEZHA时,是需要将word_embedding和token_embeddings相加即可
            '''
        else:
            position_embeddings = tf.cast(self.position_embeddings(position_ids), inputs_embeds.dtype)
            embeddings = inputs_embeds + position_embeddings + token_type_embeddings
        embeddings = self.LayerNorm(embeddings)
        embeddings = self.dropout(embeddings, training=training)
        return embeddings
- 同时我们需要修改TFBertSelfAttention类的attention计算逻辑,把相对位置编码的计算加入:
class TFBertSelfAttention(tf.keras.layers.Layer):
    def __init__(self, config, **kwargs):
        super().__init__(**kwargs)
        self.attention_head_size = int(config.hidden_size / config.num_attention_heads)

		'''
		通过RelativePositionEmbedding 创建一个最大距离为129,输出为
		attention_head_size,以Sinusoidal function 编码的相对位置编码矩阵
		'''
        if config.model_type:
            self.model_type = config.model_type
            if self.model_type == 'NEZHA':
                self.position_bias = RelativePositionEmbedding(129,self.attention_head_size,Sinusoidal())

    def call(self, hidden_states, attention_mask, head_mask, output_attentions, training=False):
        attention_scores = tf.matmul(
            query_layer, key_layer, transpose_b=True
        )  # (batch size, num_heads, seq_len_q, seq_len_k)

       	'''
       	通过 tf.einsum('bhjd,jkd->bhjk', query_layer, position_bias)
       	即可一步完成上文所述的相对位置编码矩阵与Q矩阵的计算。
       	b: batch_size
       	h: head_num
       	j: seq_len_q
       	d: attention_head_size
       	k: seq_len_k
       	'''
        if self.model_type == 'NEZHA':
            position_bias = self.position_bias([hidden_states,hidden_states])
            attention_scores = attention_scores + tf.einsum('bhjd,jkd->bhjk', query_layer, position_bias)

        dk = tf.cast(shape_list(key_layer)[-1], attention_scores.dtype)  # scale attention_scores
        attention_scores = attention_scores / tf.math.sqrt(dk)

        if attention_mask is not None:
            attention_scores = attention_scores + attention_mask
        attention_probs = tf.nn.softmax(attention_scores, axis=-1)
        attention_probs = self.dropout(attention_probs, training=training)
        # Mask heads if we want to
        if head_mask is not None:
            attention_probs = attention_probs * head_mask
        context_layer = tf.matmul(attention_probs, value_layer)

        '''
        与v * softmax结果 进行计算,逻辑相同
        '''
        if self.model_type == 'NEZHA':
            context_layer = context_layer + tf.einsum('bhjk,jkd->bhjd', attention_probs, position_bias)

        context_layer = tf.transpose(context_layer, perm=[0, 2, 1, 3])
        context_layer = tf.reshape(
            context_layer, (batch_size, -1, self.all_head_size)
        )  # (batch_size, seq_len_q, all_head_size)
        outputs = (context_layer, attention_probs) if output_attentions else (context_layer,)
        return outputs
- 恭喜,到此已经可以轻轻松松实现相对位置编码了
- 当你需要使用相对位置编码时,在创建config后,添加该语句即可:
    config = BertConfig.from_json_file(config_path)
    config.model_type = 'NEZHA'
- 此时你创建的Bert类模型,不再受限制与512的长度,只要你的GPU顶的住,长度任您选择。
使用NEZHA实现法律长文摘要生成
该部分主要参考苏神的建模思路,只调几个比较有意思的点进行讲述,完整修改后的代码已经公开在个人github上了,同样对bertkeras的移植到transformer框架进行了调试。
关键句抽取模型

- 对原文句子进行分割后,通过bert提取句子特征,按原文顺序输入DGCNN后对每个句子是否为摘要关键句进行标注。
DGCNN
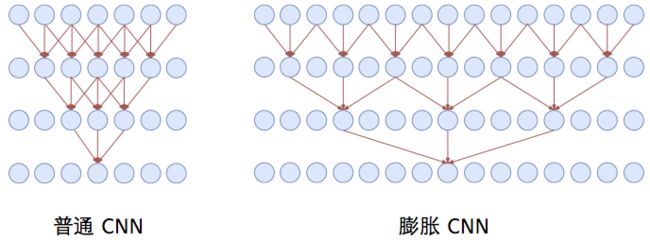
- DGCNN是苏神仍较为频繁使用的基础神经网络框架,其示意图与优点如下:


- 用GCNN的一个好处是梯度消失的风险更低,因为有一个卷积是不加任意激活函数的,没加激活函数的这部分卷积不容易梯度消失。
- 残差结构,并不只是为了解决梯度消失,而是使得信息能够在多通道传输。
- 为了使得CNN模型能够捕捉更远的的距离,并且又不至于增加模型参数,使用了膨胀卷积。
代码实现
class ResidualGatedConv1D(tf.keras.layers.Layer):
    """
    门控卷积
    filters:卷积核个数
    kernel_size:1D卷积大小
    dilation_rate:卷积膨胀率(长度)
    """
    def __init__(self, filters, kernel_size, dilation_rate=1, **kwargs):
        super(ResidualGatedConv1D, self).__init__(**kwargs)
        self.filters = filters
        self.kernel_size = kernel_size
        self.dilation_rate = dilation_rate
        self.supports_masking = True

    def build(self, input_shape):
        super(ResidualGatedConv1D, self).build(input_shape)
        self.conv1d = tf.keras.layers.Conv1D(
            filters=self.filters * 2,
            kernel_size=self.kernel_size,
            dilation_rate=self.dilation_rate,
            padding='same',
        )
        self.layernorm = tf.keras.layers.LayerNormalization()
        if self.filters != input_shape[-1]:
            self.dense = tf.keras.layers.Dense(self.filters, use_bias=False)
        self.alpha = self.add_weight(
            name='alpha', shape=[1], initializer='zeros'
        )

    def call(self, inputs, mask=None):
        if mask is not None:
            mask = K.cast(mask, K.floatx())
            inputs = inputs * mask[:, :, None]
        outputs = self.conv1d(inputs)
        # 2*filters 相当于两组filters来 一组*sigmoid(另一组)
        gate = K.sigmoid(outputs[..., self.filters:])
        outputs = outputs[..., :self.filters] * gate
        outputs = self.layernorm(outputs)
        if hasattr(self, 'dense'):
            #用于对象是否包含对应的属性值
            inputs = self.dense(inputs)
        return inputs + self.alpha * outputs
纯手绘示意图,配合代码食用:
生成模型

BIO Copy
Copy 机制可以保证摘要与原始文本的忠实程度,避免出现专业性错误,这在实际使用中是相当必要的。
- 训练阶段:我们只需要给数据作为标注,并作为输入传入,通过loss_layer进行loss计算即可。
- 至于预测阶段,对于每一步,我们先预测标签zt,如果zt是O,那么不用改变,如果zt是B,那么在token的分布中mask掉所有不在原文中的token,如果zt是I,那么在token的分布中mask掉所有不能组成原文中对应的n-gram的token。也就是说,解码的时候还是一步步解码,并不是一次性生成一个片段,但可以通过mask的方式,保证BI部分位置对应的token是原文中的一个片段。
- AutoRegressiveDecoder子类具体实现代码如下,已加入更多注释:
class AutoTitle(AutoRegressiveDecoder):
    """seq2seq解码器
    """
    def get_ngram_set(self, x, n):
        """生成ngram合集,返回结果格式是:
        {(n-1)-gram: set([n-gram的第n个字集合])}
        """
        result = {}
        for i in range(len(x) - n + 1):
            k = tuple(x[i:i + n])
            if k[:-1] not in result:
                result[k[:-1]] = set()
            result[k[:-1]].add(k[-1])
        return result

    @AutoRegressiveDecoder.wraps(default_rtype='logits', use_states=True)
    def predict(self, inputs, output_ids, states):
        ids,seg_id,mask_att = inputs
        ides_temp = ids.copy()
        seg_id_temp = seg_id.copy()
        mask_att_temp = mask_att.copy()
        len_out_put = len(output_ids[0])
        for i in range(len(ids)):
            get_len = len(np.where(ids[i] != 0)[0])
            end_ = get_len + len_out_put
            ides_temp[i][get_len:end_] = output_ids[i]
            seg_id_temp[i][get_len:end_] = np.ones_like(output_ids[i])
            mask_att_temp[i] = unilm_mask_single(seg_id_temp[i])
        prediction = self.last_token(end_-1).predict([ides_temp,seg_id_temp,mask_att_temp])
        '''
        假设现在的topK = 2 所以每次只predict 二组的可能输出 len(ides_temp) = 2
        那我们初始化[0,0] 代表每一组输出组目前的ngram情况
        1. 当目前组输出的label为0时:没有输出限制,则从所有字典中选择输出,states = label = 0
        2. 当目前组输出的label为1时:输出限制为B,则从所有输入中选择输出,states = label = 1
        3. 当目前组输出的label为2时:输出限制为I,若目前 states=0,则说明之前未输出B,则I无效,将lable=2 mask掉
        若目前 states + 1 = n >= 2,则有效,且目前处于n-gram状态,要输出的值与输入中n个连续的字组成ngram + 1,
        则考虑目前已经输出的 n-1 个字符是否属于输入中的连续片断,若是则将该片断对应的后续子集作为候选集
        若否,则退回至 1 - gram
        注意:states在每次predict后都会被保存
        '''
        if states is None:
            states = [0]
        elif len(states) == 1 and len(ides_temp) > 1:
            states = states * len(ides_temp)

        # 根据copy标签来调整概率分布
        probas = np.zeros_like(prediction[0]) - 1000  # 最终要返回的概率分布 初始化负数
        for i, token_ids in enumerate(inputs[0]):
            if states[i] == 0:
                prediction[1][i, 2] *= -1  # 0不能接2 mask掉 2这个值
            label = prediction[1][i].argmax()  # 当前label
            if label < 2:
                states[i] = label #[1,0]
            else:
                states[i] += 1 #如果当前

            if states[i] > 0:
                ngrams = self.get_ngram_set(token_ids, states[i])
                '''
                if satates = 1 :开头
                因此 ngrams = 1 所有的token
                prefix = 全场 跳到 1garm
                if satates > 1 说明这个地方的label = 2 前需要和前面几个2与1组成n garm
                则 ngrams = n 所有的token组合
                prefix = output_ids 的最后 n-1 个 token
                若存在 在 就是指定集合下的候选集
                '''
                prefix = tuple(output_ids[i, 1 - states[i]:])
                if prefix in ngrams:  # 如果确实是适合的ngram
                    candidates = ngrams[prefix]
                else:  # 没有的话就退回1gram
                    ngrams = self.get_ngram_set(token_ids, 1)
                    candidates = ngrams[tuple()]
                    states[i] = 1
                candidates = list(candidates)
                probas[i, candidates] = prediction[0][i, candidates]
            else:
                probas[i] = prediction[0][i]
            idxs = probas[i].argpartition(-10)
            probas[i, idxs[:-10]] = -1000
            #把probas最小的k_sparse的值mask掉???
        return probas, states

    def generate(self,text,tokenizer,maxlen,topk=1):
        max_c_len = maxlen - self.maxlen
        input_dict = tokenizer(text,max_length=max_c_len,truncation=True,padding=True)
        token_ids = input_dict['input_ids']
        segment_ids = input_dict['token_type_ids']
        ids = np.zeros((1,maxlen),dtype='int32')
        seg_id = np.zeros((1,maxlen),dtype='int32')
        mask_att = np.zeros((1,maxlen,maxlen),dtype='int32')
        len_ = len(token_ids)
        ids[0][:len_] = token_ids
        seg_id[0][:len_] = segment_ids
        mask_id = unilm_mask_single(seg_id[0])
        mask_att[0] = mask_id
        output_ids = self.beam_search([ids,seg_id,mask_att],topk=topk)  # 基于beam search
        return tokenizer.decode(output_ids)
稀疏Softmax

- 其中Ωk是将s1,s2,…,sn从大到小排列后前k个元素的下标集合。说白了,我们提出的Sparse Softmax就是在计算概率的时候,只保留前k个,后面的直接置零,k是人为选择的超参数,这次比赛中我们选择了k=10。在算交叉熵的时候,则将原来的对全体类别logsumexp操作,改为只对最大的k个类别进行,其中t代表目标类别。
- 为什么稀疏化之后会有效呢?这可能是稀疏化避免了Softmax的过度学习问题。
- 公示推理与代码:
    def compute_seq2seq_loss(self,inputs,k_sparse,mask=None):
        y_true, y_mask, y_pred ,_,_ = inputs
        y_mask = tf.cast(y_mask,y_pred.dtype)
        y_true = y_true[:, 1:]  # 目标token_ids
        y_mask = y_mask[:, 1:]  # segment_ids,刚好指示了要预测的部分
        y_pred = y_pred[:, :-1]  # 预测序列,错开一位
        pos_loss = tf.gather(y_pred,y_true[..., None],batch_dims=len(tf.shape(y_true[..., None]))-1)[...,0]
        y_pred = tf.nn.top_k(y_pred, k=k_sparse)[0]
        neg_loss = tf.math.reduce_logsumexp(y_pred, axis=-1)
        loss = neg_loss - pos_loss
        loss = K.sum(loss * y_mask) / K.sum(y_mask)
        return loss
模型创建与训练
同时创建两个模型,一个用来预测,一个用来训练。
def build_model(pretrained_path,config,MAX_LEN,vocab_size,keep_tokens):
    ids = tf.keras.layers.Input((MAX_LEN,), dtype=tf.int32)
    token_id = tf.keras.layers.Input((MAX_LEN,), dtype=tf.int32)
    att = tf.keras.layers.Input((MAX_LEN,MAX_LEN), dtype=tf.int32)
    label = tf.keras.layers.Input((MAX_LEN,), dtype=tf.int32)

    config.output_hidden_states = True
    bert_model = TFBertModel.from_pretrained(pretrained_path,config=config,from_pt=True)
    bert_model.bert.set_input_embeddings(tf.gather(bert_model.bert.embeddings.word_embeddings,keep_tokens))
    x, _ , hidden_states = bert_model(ids,token_type_ids=token_id,attention_mask=att)
    layer_1 = hidden_states[-1]
    label_out = tf.keras.layers.Dense(3,activation='softmax')(layer_1)
    word_embeeding = bert_model.bert.embeddings.word_embeddings
    embeddding_trans = tf.transpose(word_embeeding)
    sof_output = tf.matmul(layer_1,embeddding_trans)
    output = CrossEntropy([2,4])([ids,token_id,sof_output,label,label_out])
    model_pred = tf.keras.models.Model(inputs=[ids,token_id,att],outputs=[sof_output,label_out])
    model = tf.keras.models.Model(inputs=[ids,token_id,att,label],outputs=output)
    optimizer = tf.keras.optimizers.Adam(learning_rate=1e-5)
    model.compile(optimizer=optimizer)
    model.summary()
    return model , model_pred

def main():
    pretrained_path = '*******'
    vocab_path = os.path.join(pretrained_path,'vocab.txt')
    new_token_dict, keep_tokens = load_vocab(vocab_path,simplified=True,startswith=['[PAD]', '[UNK]', '[CLS]', '[SEP]'])
    tokenizer = BertTokenizer(new_token_dict)
    vocab_size = tokenizer.vocab_size
    config_path = os.path.join(pretrained_path,'config.json')
    config = BertConfig.from_json_file(config_path)
    config.model_type = 'NEZHA'
    MAX_LEN = 1024
    batch_size = 8
    data = load_data('sfzy_seq2seq.json')
    fold = 0
    num_folds = 100
    train_data = data_split(data, fold, num_folds, 'train')
    valid_data = data_split(data, fold, num_folds, 'valid')
    train_generator = data_generator(train_data,batch_size,MAX_LEN,tokenizer)
    model,model_pred = build_model(pretrained_path,config,MAX_LEN,vocab_size,keep_tokens)
    autotitle = AutoTitle(start_id=None, end_id=new_token_dict['[SEP]'],maxlen=512,model=model_pred)
    evaluator = Evaluator(valid_data,autotitle,tokenizer,MAX_LEN)
    epochs = 50
    model.fit_generator(train_generator.forfit(),steps_per_epoch=len(train_generator),epochs=epochs,callbacks=[evaluator])
总结
通过相对位置编码,我可以创建输入长度为1024的模型了!但是由于attention的范围从512增加到了1024,整个内存的计算量从n 变成了n2。也导致我的小显卡根本跑不动,有条件的朋友可以尝试一下~
参考资料
[1] Self-Attention with Relative Position Representations
[2] NEZHA: NEURAL CONTEXTUALIZED REPRESENTATION FOR CHINESE LANGUAGE UNDERSTANDING
[3] 苏剑林. (Jan. 01, 2021). 《SPACES:“抽取-生成”式长文本摘要(法研杯总结) 》[Blog post]. Retrieved from https://www.kexue.fm/archives/8046
代码地址
https://github.com/zhengyanzhao1997/TF-NLP-model/tree/main/model/train/NEZHA