MTCNN人脸检测与对齐和FaceNet人脸识别
一 MTCNN算法结构
MTCNN算法是一种基于深度学习的人脸检测和人脸对齐方法,它可以同时完成人脸检测和人脸对齐的任务,相比于传统的算法,它的性能更好,检测速度更快。
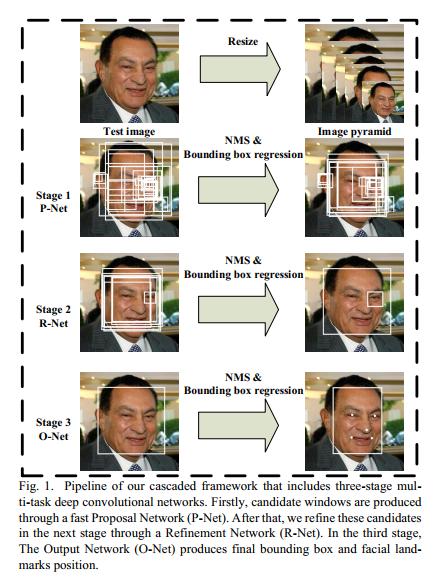
MTCNN算法包含三个子网络:Proposal Network(P-Net)、Refine Network(R-Net)、Output Network(O-Net),这三个网络对人脸的处理依次从粗到细。
在使用这三个子网络之前,需要使用图像金字塔将原始图像缩放到不同的尺度,然后将不同尺度的图像送入这三个子网络中进行训练,目的是为了可以检测到不同大小的人脸,从而实现多尺度目标检测。
1、P-Net网络
P-Net的主要目的是为了生成一些候选框,我们通过使用P-Net网络,对图像金字塔图像上不同尺度下的图像的每一个12×1212×12区域都做一个人脸检测(实际上在使用卷积网络实现时,一般会把一张h×wh×w的图像送入P-Net中,最终得到的特征图每一点都对应着一个大小为12×1212×12的感受野,但是并没有遍历全一张图像每一个12×1212×12的图像)。
P-Net的输入是一个12×12×312×12×3的RGB图像,在训练的时候,该网络要判断这个12×1212×12的图像中是否存在人脸,并且给出人脸框的回归和人脸关键点定位;
在测试的时候输出只有NN个边界框的4个坐标信息和score,当然这4个坐标信息已经使用网络的人脸框回归进行校正过了,score可以看做是分类的输出(即人脸的概率):
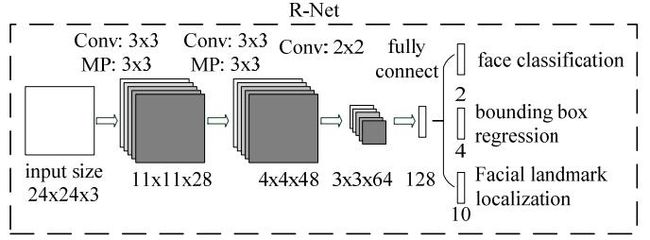
- 网络的第一部分输出是用来判断该图像是否包含人脸,输出向量大小为1×1×21×1×2,也就是两个值,即图像是人脸的概率和图像不是人脸的概率。这两个值加起来严格等于1,之所以使用两个值来表示,是为了方便定义交叉熵损失函数。
- 网络的第二部分给出框的精确位置,一般称为框回归。P-Net输入的12×1212×12的图像块可能并不是完美的人脸框的位置,如有的时候人脸并不正好为方形,有可能12×1212×12的图像偏左或偏右,因此需要输出当前框位置相对完美的人脸框位置的偏移。这个偏移大小为1×1×41×1×4,即表示框左上角的横坐标的相对偏移,框左上角的纵坐标的相对偏移、框的宽度的误差、框的高度的误差。
- 网络的第三部分给出人脸的5个关键点的位置。5个关键点分别对应着左眼的位置、右眼的位置、鼻子的位置、左嘴巴的位置、右嘴巴的位置。每个关键点需要两维来表示,因此输出是向量大小为1×1×101×1×10。
2、R-Net
由于P-Net的检测时比较粗略的,所以接下来使用R-Net进一步优化。R-Net和P-Net类似,不过这一步的输入是前面P-Net生成的边界框,不管实际边界框的大小,在输入R-Net之前,都需要缩放到24×24×324×24×3。网络的输出和P-Net是一样的。这一步的目的主要是为了去除大量的非人脸框。
3、O-Net
进一步将R-Net的所得到的区域缩放到48×48×348×48×3,输入到最后的O-Net,O-Net的结构与P-Net类似,只不过在测试输出的时候多了关键点位置的输出。输入大小为48×48×348×48×3的图像,输出包含PP个边界框的坐标信息,score以及关键点位置。
从P-Net到R-Net,再到最后的O-Net,网络输入的图像越来越大,卷积层的通道数越来越多,网络的深度也越来越深,因此识别人脸的准确率应该也是越来越高的。同时P-Net网络的运行速度越快,R-Net次之、O-Net运行速度最慢。之所以使用三个网络,是因为一开始如果直接对图像使用O-Net网络,速度会非常慢。实际上P-Net先做了一层过滤,将过滤后的结果再交给R-Net进行过滤,最后将过滤后的结果交给效果最好但是速度最慢的O-Net进行识别。这样在每一步都提前减少了需要判别的数量,有效地降低了计算的时间。
1、人脸检测损失函数
在针对人脸检测的问题,对于输入样本xi,我们使用交叉熵代价函数:
其中yidet表示样本的真实标签,pi表示网络输出为人脸的概率。
2、框回归
对于目标框的回归,我们采用的是欧氏距离:
其中yi^box表示网络输出之后得到的边界框的坐标,yibox是目标的真实边界框。
3、关键点损失函数
对于关键点,我们也采用的是欧氏距离:
其中yi^landmark表示网络输出之后得到的关键点的坐标,yilandmark是关键点的真实坐标。
4、总损失
把上面三个损失函数按照不同的权重联合起来:
其中N是训练样本的总数,αj表示各个损失所占的权重,在P-Net和R-net中,设置αdet=1,αbox=0.5,αlandmark=0.5,在O-Net中,设置αdet=1,αbox=0.5,αlandmark=1,βij∈{0,1}表示样本类型指示符。
5、训练数据
该算法训练数据来源于wider和celeba两个公开的数据库,wider提供人脸检测数据,在大图上标注了人脸框groundtruth的坐标信息,celeba提供了5个landmark点的数据。根据参与任务的不同,将训练数据分为四类:
- 负样本:滑动窗口和Ground True的IOU小于0.3;
- 正样本:滑动窗口和Ground True的IOU大于0.65;
- 中间样本:滑动窗口和Ground True的IOU大于0.4小于0.65;
- 关键点:包含5个关键点做标的;
上面滑动窗口指的是:通过滑动窗口或者随机采样的方法获取尺寸为12×12的框:
wider数据集,数据可以从http://mmlab.ie.cuhk.edu.hk/projects/WIDERFace/地址下载。该数据集有32,203张图片,共有93,703张脸被标记,如下图所示:
celeba人脸关键点检测的训练数据,数据可从http://mmlab.ie.cuhk.edu.hk/archive/CNN_FacePoint.htm地址下载。该数据集包含5,590张 LFW数据集的图片和7,876张从网站下载的图片。
二、人脸识别
在上面我们已经介绍了人脸检测,人脸检测是人脸相关任务的前提,人脸相关的任务主要有以下几种:
- 人脸跟踪(视频中跟踪人脸位置变化);
- 人脸验证(输入两张人脸,判断是否属于同一人);
- 人脸识别(输入一张人脸,判断其属于人脸数据库记录中哪一个人);
- 人脸聚类(输入一批人脸,将属于同一人的自动归为一类);
Google工程师Florian Schroff,Dmitry Kalenichenko,James Philbin提出了人脸识别FaceNet模型,该模型没有用传统的softmax的方式去进行分类学习,而是抽取其中某一层作为特征,学习一个从图像到欧式空间的编码方法,然后基于这个编码再做人脸识别、人脸验证和人脸聚类等。人脸识别效果如下图所示,其中横线上表示的数字是人脸间的距离,当人脸距离小于1.06可看作是同一个人。
下面我们来详细介绍人脸识别技术:当我们通过MTCNN网络检测到人脸区域图像时,我们使用深度卷积网络,将输入的人脸图像转换为一个向量的表示,也就是所谓的特征。
那我们如何对人脸提取特征?我们先来回忆一下VGG16网络,输入的是图像,经过一系列卷积计算、全连接网络之后,输出的是类别概率。
在通常的图像应用中,可以去掉全连接层,使用卷积层的最后一层当做图像的“特征”,如上图中的conv5_3。但如果对人脸识别问题同样采用这样的方法,即,使用卷积层最后一层做为人脸的“向量表示”,效果其实是不好的。如何改进?我们之后再谈,这里先谈谈我们希望这种人脸的“向量表示”应该具有哪些性质。
在理想的状况下,我们希望“向量表示”之间的距离就可以直接反映人脸的相似度:
- 对于同一个人的人脸图像,对应的向量的欧几里得距离应该比较小;
- 对于不同人的人脸图像,对应的向量之间的欧几里得距离应该比较大;
例如:设人脸图像为x1,x2对应的特征为f(x1),f(x2),当x1,x2对应是同一个人的人脸时,f(x1),f(x2)的距离 应该很小,而当x1,x2对应的不是同一个人的人脸时,f(x1),f(x2)的距离应该很大。
在原始的VGG16模型中,我们使用的是softmax损失,softmax是类别间的损失,对于人脸来说,每一类就是一个人。尽管使用softmax损失可以区别每个人,但其本质上没有对每一类的向量表示之间的距离做出要求。
举个例子,使用CNN对MNIST进行分类,我们设计一个特殊的卷积网络,让最后一层的向量变为2维,此时可以画出每一类对应的2维向量表示的图(图中一种颜色对应一种类别):
上图是我们直接使用softmax训练得到的结果,它就不符合我们希望特征具有的特点:
-
我们希望同一类对应的向量表示尽可能接近。但这里同一类(如紫色),可能具有很大的类间距离;
-
我们希望不同类对应的向量应该尽可能远。但在图中靠中心的位置,各个类别的距离都很近;
对于人脸图像同样会出现类似的情况,对此,有很改进方法。这里介绍其中两种:三元组损失函数,中心损失函数。
1、三元组损失
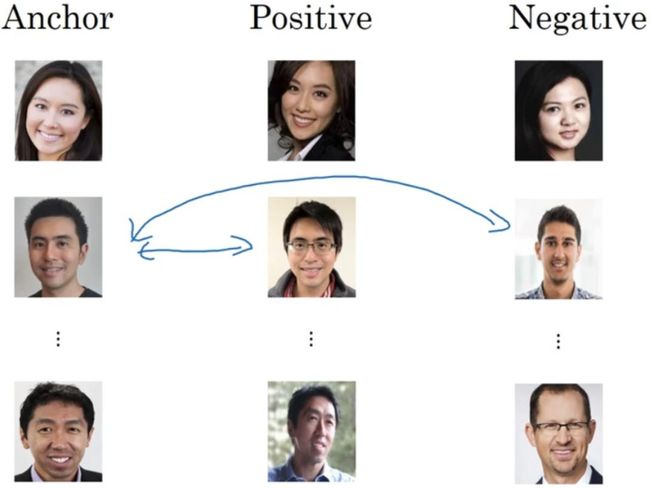
三元组损失函数的原理:既然目标是特征之间的距离应该具备某些性质,那么我们就围绕这个距离来设计损失。具体的,我们每次都在训练数据中抽出三张人脸图像,第一张图像标记为![]() ,第二章图像标记为
,第二章图像标记为![]() ,第三张图像标记为
,第三张图像标记为![]() 。在这样一个"三元组"中,
。在这样一个"三元组"中,![]() 和
和![]() 对应的是同一个人的图像,而
对应的是同一个人的图像,而![]() 是另外一个人的人脸图像。因此距离∥f(
是另外一个人的人脸图像。因此距离∥f(![]() )−f(
)−f(![]() )∥2应该很小,而距离∥f(
)∥2应该很小,而距离∥f(![]() i)−f(
i)−f(![]() )∥2应该很大。严格来说,三元组损失要求满足以下不等式:
)∥2应该很大。严格来说,三元组损失要求满足以下不等式:
即相同人脸间的距离平方至少要比不同人脸间的距离平方小α(取平方主要是为了方便求导),据此,设计损失函数为:
这样的话,当三元组的距离满足∥f(![]() )−f(
)−f(![]() )∥2+α<∥f(
)∥2+α<∥f(![]() i)−f(
i)−f(![]() )∥2时,损失Li=0。当距离不满足上述不等式时,就会有值为∥f(
)∥2时,损失Li=0。当距离不满足上述不等式时,就会有值为∥f(![]() )−f(
)−f(![]() )∥2+α - ∥f(
)∥2+α - ∥f(![]() i)−f(
i)−f(![]() )∥2的损失,此外,在训练时会固定∥f(x)∥2=1,以确保特征不会无限的"远离"。
)∥2的损失,此外,在训练时会固定∥f(x)∥2=1,以确保特征不会无限的"远离"。
三元组损失直接对距离进行优化,因此可以解决人脸的特征表示问题。但是在训练过程中,三元组的选择非常地有技巧性。如果每次都是随机选择三元组,虽然模型可以正确的收敛,但是并不能达到最好的性能。如果加入"难例挖掘",即每次都选择最难分辨率的三元组进行训练,模型又往往不能正确的收敛。对此,又提出每次都选择那些"半难"的数据进行训练,让模型在可以收敛的同时也保持良好的性能。此外,使用三元组损失训练人脸模型通常还需要非常大的人脸数据集,才能取得较好的效果。
总结一下,训练这个三元组损失你需要取你的训练集,然后把它做成很多三元组:
更多关于三元组损失的定义和解释可参考这篇博客https://www.cnblogs.com/xiaojianliu/articles/9938767.html
三元组损失的定义在src/facenet.py中,对应的函数为triplet_loss():
-
def triplet_loss(anchor, positive, negative, alpha): -
"""Calculate the triplet loss according to the FaceNet paper -
Args: -
anchor: the embeddings for the anchor images. -
positive: the embeddings for the positive images. -
negative: the embeddings for the negative images. -
Returns: -
the triplet loss according to the FaceNet paper as a float tensor. -
""" -
with tf.variable_scope('triplet_loss'): -
pos_dist = tf.reduce_sum(tf.square(tf.subtract(anchor, positive)), 1) -
neg_dist = tf.reduce_sum(tf.square(tf.subtract(anchor, negative)), 1) -
basic_loss = tf.add(tf.subtract(pos_dist,neg_dist), alpha) -
loss = tf.reduce_mean(tf.maximum(basic_loss, 0.0), 0) -
return loss
输入的anchor、positive、negative分别为随机选取的人脸样本的特征、anchor的正样本特征、anchor的负样本特征,它们的形状都是[batch_size,feature_size]。batch_size很好理解,feature_size是网络学习的人脸特征的维数。对应到三元组损失的公式Li=[∥f(xia)−f(xip)∥2+α−∥f(xia)−f(xin)∥2]中的话,anchor每一行就是一个xia,positive的每行就是相应正样本的xip,negative每行就是负样本xin。先来分别计算正样本和负样本到anchor的L2距离。变量pos_dist就是anchor到各自正样本之间的距离‖f(xia−f(xip)‖2,变量neg_dist是anchor到负样本的距离‖f(xia)−f(xin)‖2。接下来,用pos_dist减去neg_dist再加上一个α,最终损失只计算大于0的这部分,这和公式Li是完全一致的。
2、中心损失
与三元组损失不同,中心损失不直接对距离进行优化,它保留了原有的分类模型,但又为每个类(在人脸模型中,一个类就对应一个人)指定了一个类别中心。同一类的图像对应的特征都应该尽量靠近自己的类别中心,不同类的类别中心尽量远离。与三元组损失函数,使用中心损失训练人脸模型不需要使用特别的采样方法,而且利用较少的图像就可以达到与单元组损失相似的效果。下面我们一起来学习中心损失的定义:
设输入的人脸图像为xi,该人脸对应的类别是yi,对每个类别都规定一个类别中心,记作cyi。希望每个人脸图像对应的特征f(xi)都尽可能接近中心cyi。因此定义损失函数为:
多张图像的中心损失就是将它们的值累加:
这是一个非常简单的定义。不过还有一个问题没有解决,那就是如何确定每个类别的中cyi呢?从理论上来说,类别yi的最佳中心应该是它对应所有图片的特征的平均值。但如果采用这样的定义,那么在每一次梯度下降时,都要对所有图片计算一次cyi,计算复杂度太高了。针对这种情况,不妨近似处理下,在初始阶段,先随机确定cyi,接着在每个batch内,使用Li=∥f(xi)−cyi∥2对当前batch内的cyi也计算梯度,并使得该梯度更新cyi,此外,不能只使用中心损失来训练分类模型,还需要加入softmax损失,也就是说,损失最后由两部分组成,即L=Lsoftmax+λLcenterLλ是一个超参数。
最后来总结使用中心损失来训练人脸模型的过程。首先随机初始化各个中心cyi,接着不断地取出batch进行训练,在每个batch中,使用总的损失L,除了使用神经网络模型的参数对模型进行更新外,也对cyi进行计算梯度,并更新中心的位置。
中心损失可以让训练处的特征具有"内聚性"。还是以MNIST的例子来说,在未加入中心损失时,训练的结果不具有内聚性。在加入中心损失后,得到的特征如下:
当中心损失的权重λλ越大时,生成的特征就会具有越明显的"内聚性"。
中心损失的定义,同样是位于src/facenet.py中,对应的函数是center_loss():
-
def center_loss(features, label, alfa, nrof_classes): -
"""Center loss based on the paper "A Discriminative Feature Learning Approach for Deep Face Recognition" -
(http://ydwen.github.io/papers/WenECCV16.pdf) -
""" -
#nrof_features就是feature_size,即CNN计算得到的人脸的维数 -
nrof_features = features.get_shape()[1] -
#centers为变量,它是各个类别对应的类别中心 -
centers = tf.get_variable('centers', [nrof_classes, nrof_features], dtype=tf.float32, -
initializer=tf.constant_initializer(0), trainable=False) -
#根据label,取出features中每一个样本对应的类别中心 -
label = tf.reshape(label, [-1]) -
#centers_batch形状和features一致,[batch_size,feature_size] -
centers_batch = tf.gather(centers, label) -
#计算类别中心和各个样本特征的差距diff -
#diff用来更新各个类别中心的位置 -
#计算diff时用到的alfa是一个超参数,它可以控制中心位置的更新幅度 -
diff = (1 - alfa) * (centers_batch - features) -
#使用diff来更新中心 -
centers = tf.scatter_sub(centers, label, diff) -
#计算loss -
loss = tf.reduce_mean(tf.square(features - centers_batch)) -
#返回loss和更新后的中心 -
return loss, centers
三、人脸识别的实现
下面我们会介绍一个经典的人脸识别系统-谷歌人脸识别系统facenet,该网络主要包含两部分:
- MTCNN部分:用于人脸检测和人脸对齐,输出160×160大小的图像;
- CNN部分:可以直接将人脸图像(默认输入是160×160)映射到欧几里得空间,空间距离的长度代表了人脸图像的相似性。只要该映射空间生成、人脸识别,验证和聚类等任务就可以轻松完成;
先去GitHub下载facenet源码:https://github.com/davidsandberg/facenet
1、导入所需的包
-
import tensorflow as tf -
import sklearn -
import scipy -
import cv2 -
import h5py -
import matplotlib -
import PIL -
import requests -
import psutil
如若哪个包没有报错,对应安装上就好了。
2、配置facenet环境
将src文件夹添加到环境变量PYTHONPATH(临时的环境变量),若要设置永久的环境变量,可以到计算机——属性——高级系统设置——环境变量——系统变量——path,将路径添加到path中。添加环境变量是为了系统在当前路径下找不到你需要的模块时,会从环境变量路径中搜索。关于环境变量的添加具体可参考这篇博客https://blog.csdn.net/Tona_ZM/article/details/79463284
-
import sys -
print(sys.path) -
#添加临时环境变量,导入第三方模块,系统在当前目录下找不到会在环境变量里找 -
sys.path.append('E:\\360MoveData\\Users\\Administrator\\Desktop\\python_DL\\6.人脸检测和人脸识别\\src')
3、下载LFW数据集
接下来将会讲解如何使用已经训练好的模型在LFW(Labeled Faces in the Wild)数据库上测试,不过我还需要先来介绍一下LFW数据集。
LFW数据集是由美国马赛诸塞大学阿姆斯特分校计算机实验室整理的人脸检测数据集,是评估人脸识别算法效果的公开测试数据集。LFW数据集共有13233张jpeg格式图片,属于5749个不同的人,其中有1680人对应不止一张图片,每张图片尺寸都是250×250,并且被标示出对应的人的名字。LFW数据集中每张图片命名方式为"lfw/name/name_xxx.jpg",这里"xxx"是前面补零的四位图片编号。例如,前美国总统乔治布什的第十张图片为"lfw/George_W_Bush/George_W_Bush_0010.jpg"。
数据集的下载地址为:http://vis-www.cs.umass.edu/lfw/lfw.tgz,下载完成后,解压数据集,打开打开其中一个文件夹,如下:
新建datasets/lfw/raw文件夹,将lfw数据集解压到raw文件夹下,我的datasets文件夹是和src同一路径下。
4、LFW数据集预处理(LFW数据库上的人脸检测和对齐)
我们需要将检测所使用的数据集校准为和训练模型所使用的数据集大小一致(160×160),转换后的数据集存储在lfw_mtcnnpy_160文件夹内,处理的第一步是使用MTCNN网络进行人脸检测和对齐,并缩放到160×160。
MTCNN的实现主要在文件夹src/align中,文件夹的内容如下:
- detect_face.py:定义了MTCNN的模型结构,由P-Net、R-Net、O-Net组成,这三个网络已经提供了预训练的模型,模型数据分别对应文件det1.npy、det2.npy、det3.npy。
- align_dataset_matcnn.py:是使用MTCNN的模型进行人脸检测和对齐的入口代码。
- 该文件夹下还有两个文件align_dataset.py和align_dlib.py,他们都是使用dlib中的传统方法对人脸进行检测,性能比MTCNN稍差,在这里不再展开描述
使用脚本align_dataset_mtcnn.py对LFW数据库进行人脸检测和对齐的方法通过在jupyter notebook中运行如下代码:
-
run src/align/align_dataset_mtcnn.py \ -
datasets/lfw/raw \ -
datasets/lfw/lfw_mtcnnpy_160 \ -
--image_size 160 --margin 32 \ -
--random_order
如果是在anaconda prompt中运行,将run改为python。
该命令会创建一个datasets/lfw/lfw_mtcnnpy_160的文件夹,并将所有对齐好的人脸图像存放到这个文件夹中,数据的结构和原先的datasets/lfw/raw一样。参数--image_size 160 --margin 32的含义是在MTCNN检测得到的人脸框的基础上缩小32像素(训练时使用的数据偏大),并缩放到160×160大小,因此最后得到的对齐后的图像都是160×160像素的,这样的话,就成功地从原始图像中检测并对齐了人脸。
下面我们来简略的分析一下align_dataset_mtcnn.py源文件,先上源代码如下,然后我们来解读一下main()函数
-
"""Performs face alignment and stores face thumbnails in the output directory.""" -
# MIT License -
# -
# Copyright (c) 2016 David Sandberg -
# -
# Permission is hereby granted, free of charge, to any person obtaining a copy -
# of this software and associated documentation files (the "Software"), to deal -
# in the Software without restriction, including without limitation the rights -
# to use, copy, modify, merge, publish, distribute, sublicense, and/or sell -
# copies of the Software, and to permit persons to whom the Software is -
# furnished to do so, subject to the following conditions: -
# -
# The above copyright notice and this permission notice shall be included in all -
# copies or substantial portions of the Software. -
# -
# THE SOFTWARE IS PROVIDED "AS IS", WITHOUT WARRANTY OF ANY KIND, EXPRESS OR -
# IMPLIED, INCLUDING BUT NOT LIMITED TO THE WARRANTIES OF MERCHANTABILITY, -
# FITNESS FOR A PARTICULAR PURPOSE AND NONINFRINGEMENT. IN NO EVENT SHALL THE -
# AUTHORS OR COPYRIGHT HOLDERS BE LIABLE FOR ANY CLAIM, DAMAGES OR OTHER -
# LIABILITY, WHETHER IN AN ACTION OF CONTRACT, TORT OR OTHERWISE, ARISING FROM, -
# OUT OF OR IN CONNECTION WITH THE SOFTWARE OR THE USE OR OTHER DEALINGS IN THE -
# SOFTWARE. -
from __future__ import absolute_import -
from __future__ import division -
from __future__ import print_function -
from scipy import misc -
import sys -
import os -
import argparse -
import tensorflow as tf -
import numpy as np -
import facenet -
import align.detect_face -
import random -
from time import sleep -
#args:参数,关键字参数 -
def main(args): -
sleep(random.random()) -
#设置对齐后的人脸图像存放的路径 -
output_dir = os.path.expanduser(args.output_dir) -
if not os.path.exists(output_dir): -
os.makedirs(output_dir) -
# Store some git revision info in a text file in the log directory保存一些配置参数等信息 -
src_path, _ = os.path.split(os.path.realpath(__file__)) -
facenet.store_revision_info(src_path, output_dir, ' '.join(sys.argv)) -
#获取lfw数据集 获取每个类别名称以及该类别下所有图片的绝对路径 -
dataset = facenet.get_dataset(args.input_dir) -
print('Creating networks and loading parameters') -
#建立MTCNN网络,并预训练(即使用训练好的网络初始化参数) -
with tf.Graph().as_default(): -
gpu_options = tf.GPUOptions(per_process_gpu_memory_fraction=args.gpu_memory_fraction) -
sess = tf.Session(config=tf.ConfigProto(gpu_options=gpu_options, log_device_placement=False)) -
with sess.as_default(): -
pnet, rnet, onet = align.detect_face.create_mtcnn(sess, None) -
minsize = 20 # minimum size of face -
threshold = [0.6, 0.7, 0.7] # three steps's threshold -
factor = 0.709 # scale factor -
# Add a random key to the filename to allow alignment using multiple processes -
random_key = np.random.randint(0, high=99999) -
bounding_boxes_filename = os.path.join(output_dir, 'bounding_boxes_%05d.txt' % random_key) -
#每个图片中人脸所在的边界框写入记录文件中 -
with open(bounding_boxes_filename, "w") as text_file: -
nrof_images_total = 0 -
nrof_successfully_aligned = 0 -
if args.random_order: -
random.shuffle(dataset) -
#获取每一个人,以及对应的所有图片的绝对路径 -
for cls in datase -
#每一个人对应的输出文件夹 -
output_class_dir = os.path.join(output_dir, cls.name) -
if not os.path.exists(output_class_dir): -
os.makedirs(output_class_dir) -
if args.random_order: -
random.shuffle(cls.image_paths) -
#遍历每一张图片 -
for image_path in cls.image_paths: -
nrof_images_total += 1 -
filename = os.path.splitext(os.path.split(image_path)[1])[0] -
output_filename = os.path.join(output_class_dir, filename + '.png') -
print(image_path) -
if not os.path.exists(output_filename): -
try: -
img = misc.imread(image_path) -
except (IOError, ValueError, IndexError) as e: -
errorMessage = '{}: {}'.format(image_path, e) -
print(errorMessage) -
else: -
if img.ndim < 2: -
print('Unable to align "%s"' % image_path) -
text_file.write('%s\n' % (output_filename)) -
continue -
if img.ndim == 2: -
img = facenet.to_rgb(img) -
img = img[:, :, 0:3] -
#人脸检测,bounding_boxes表示边界框,形状为[n,5],5对应x1,y1,x2,y2,score -
#人脸关键点坐标形状为[n,10],左右眼、鼻子、左右嘴角五个位置,每个位置对应一个x和y所以有10个参数 -
bounding_boxes, _ = align.detect_face.detect_face(img, minsize, pnet, rnet, onet, threshold, factor) -
#边界框个数 -
nrof_faces = bounding_boxes.shape[0] -
if nrof_faces > 0: -
#【n,4】人脸框 -
det = bounding_boxes[:, 0:4] -
img_size = np.asarray(img.shape)[0:2] -
if nrof_faces > 1: -
#一张图片中检测多个人脸 -
bounding_box_size = (det[:, 2] - det[:, 0]) * (det[:, 3] - det[:, 1]) -
img_center = img_size / 2 -
offsets = np.vstack([(det[:, 0] + det[:, 2]) / 2 - img_center[1], (det[:, 1] + det[:, 3]) / 2 - img_center[0]]) -
offset_dist_squared = np.sum(np.power(offsets, 2.0), 0) -
index = np.argmax(bounding_box_size - offset_dist_squared * 2.0) # some extra weight on the centering -
det = det[index, :] -
det = np.squeeze(det) -
bb = np.zeros(4, dtype=np.int32) -
#边界框缩小margin区域,并进行裁切后缩放到统一尺寸 -
bb[0] = np.maximum(det[0] - args.margin / 2, 0) -
bb[1] = np.maximum(det[1] - args.margin / 2, 0) -
bb[2] = np.minimum(det[2] + args.margin / 2, img_size[1]) -
bb[3] = np.minimum(det[3] + args.margin / 2, img_size[0]) -
#print(bb) -
cropped = img[bb[1]:bb[3], bb[0]:bb[2], :] -
scaled = misc.imresize(cropped, (args.image_size, args.image_size), interp='bilinear') -
nrof_successfully_aligned += 1 -
misc.imsave(output_filename, scaled) -
text_file.write('%s %d %d %d %d\n' % (output_filename, bb[0], bb[1], bb[2], bb[3])) -
else: -
print('Unable to align "%s"' % image_path) -
text_file.write('%s\n' % (output_filename)) -
print('Total number of images: %d' % nrof_images_total) -
print('Number of successfully aligned images: %d' % nrof_successfully_aligned) -
def parse_arguments(argv): -
#解析命令行参数 -
parser = argparse.ArgumentParser() -
#定义参数 input_dir、output_dir为外部参数名 -
parser.add_argument('input_dir', type=str, help='Directory with unaligned images.') -
parser.add_argument('output_dir', type=str, help='Directory with aligned face thumbnails.') -
parser.add_argument('--image_size', type=int, -
help='Image size (height, width) in pixels.', default=182) -
parser.add_argument('--margin', type=int, -
help='Margin for the crop around the bounding box (height, width) in pixels.', default=44) -
parser.add_argument('--random_order', -
help='Shuffles the order of images to enable alignment using multiple processes.', action='store_true') -
parser.add_argument('--gpu_memory_fraction', type=float, -
help='Upper bound on the amount of GPU memory that will be used by the process.', default=1.0) -
#解析 -
return parser.parse_args(argv) -
if __name__ == '__main__': -
main(parse_arguments(sys.argv[1:]))
- 首先加载LFW数据集;
- 建立MTCNN网络,并预训练(即使用训练好的网络初始化参数),Google Facenet的作者在建立网络时,自己重写了CNN网络所需的各个组件,包括conv层,MaxPool层,Softmax层等等,由于作者写的比较复杂。有兴趣的同学看看MTCNN 的 TensorFlow 实现这篇博客,博主使用Keras重新实现了MTCNN网络,也比较好懂代码链接:https://github.com/FortiLeiZhang/model_zoo/tree/master/TensorFlow/mtcnn;
- 调用align.detect_face.detect_face()函数进行人脸检测,返回校准后的人脸边界框的位置、score、以及关键点坐标;
- 对人脸框进行处理,从原图中裁切(先进行了边缘扩展32个像素)、以及缩放(缩放到160×160 )等,并保存相关信息到文件;
关于人脸检测的具体细节可以查看detect_face()函数,代码也比较长,这里我放上代码,具体细节部分可以参考MTCNN 的 TensorFlow 实现这篇博客。
-
def detect_face(img, minsize, pnet, rnet, onet, threshold, factor): -
# im: input image -
# minsize: minimum of faces' size -
# pnet, rnet, onet: caffemodel -
# threshold: threshold=[th1 th2 th3], th1-3 are three steps's threshold -
# fastresize: resize img from last scale (using in high-resolution images) if fastresize==true -
factor_count=0 -
total_boxes=np.empty((0,9)) -
points=[] -
h=img.shape[0] -
w=img.shape[1] -
#最小值 假设是250x250 -
minl=np.amin([h, w]) -
#假设最小人脸 minsize=20,由于我们P-Net人脸检测窗口大小为12x12, -
#因此必须缩放才能使得检测窗口检测到完整的人脸 m=0.6 -
m=12.0/minsize -
minl=minl*m -
# creat scale pyramid不同尺度金字塔,保存每个尺度缩放尺度系数0.6 0.6*0.7 ... -
scales=[] -
while minl>=12: -
scales += [m*np.power(factor, factor_count)] -
minl = minl*factor -
factor_count += 1 -
# first stage -
for j in range(len(scales)): -
#缩放图像 -
scale=scales[j] -
hs=int(np.ceil(h*scale)) -
ws=int(np.ceil(w*scale)) -
#归一化【-1,1】之间 -
im_data = imresample(img, (hs, ws)) -
im_data = (im_data-127.5)*0.0078125 -
img_x = np.expand_dims(im_data, 0) -
img_y = np.transpose(img_x, (0,2,1,3)) -
out = pnet(img_y) -
out0 = np.transpose(out[0], (0,2,1,3)) -
out1 = np.transpose(out[1], (0,2,1,3)) -
#输出为【n,9】前4位为人脸框在原图中的位置,第5位为判断为人脸的概率,后4位为框回归的值 -
boxes, _ = generateBoundingBox(out1[0,:,:,1].copy(), out0[0,:,:,:].copy(), scale, threshold[0]) -
# inter-scale nms非极大值抑制,然后保存剩下的bb -
pick = nms(boxes.copy(), 0.5, 'Union') -
if boxes.size>0 and pick.size>0: -
boxes = boxes[pick,:] -
total_boxes = np.append(total_boxes, boxes, axis=0) -
#图片按照所有scale走完一遍,会得到在原图上基于不同scale的所有bb,然后对这些bb再进行一次NMS -
#并且这次的NMS的threshold要提高 -
numbox = total_boxes.shape[0] -
if numbox>0: -
pick = nms(total_boxes.copy(), 0.7, 'Union') -
total_boxes = total_boxes[pick,:] -
#使用回归框校准bb,框回归:框左上角的横坐标的相对偏移、框左上角的纵坐标的相对偏移、框的宽度的误差、框的高度的误差 -
regw = total_boxes[:,2]-total_boxes[:,0] -
regh = total_boxes[:,3]-total_boxes[:,1] -
qq1 = total_boxes[:,0]+total_boxes[:,5]*regw -
qq2 = total_boxes[:,1]+total_boxes[:,6]*regh -
qq3 = total_boxes[:,2]+total_boxes[:,7]*regw -
qq4 = total_boxes[:,3]+total_boxes[:,8]*regh -
#【n,8】 -
total_boxes = np.transpose(np.vstack([qq1, qq2, qq3, qq4, total_boxes[:,4]])) -
#把每一个bb转换为正方形 -
total_boxes = rerec(total_boxes.copy()) -
total_boxes[:,0:4] = np.fix(total_boxes[:,0:4]).astype(np.int32) -
#把超过原图边界的坐标裁切以下,这时得到真正原图上bb(bounding box)的坐标 -
dy, edy, dx, edx, y, ey, x, ex, tmpw, tmph = pad(total_boxes.copy(), w, h) -
numbox = total_boxes.shape[0] -
if numbox>0: -
# second stage R-NET对于P-NET输出的bb,缩放到24x24 -
tempimg = np.zeros((24,24,3,numbox)) -
for k in range(0,numbox): -
tmp = np.zeros((int(tmph[k]),int(tmpw[k]),3)) -
tmp[dy[k]-1:edy[k],dx[k]-1:edx[k],:] = img[y[k]-1:ey[k],x[k]-1:ex[k],:] -
if tmp.shape[0]>0 and tmp.shape[1]>0 or tmp.shape[0]==0 and tmp.shape[1]==0: -
tempimg[:,:,:,k] = imresample(tmp, (24, 24)) -
else: -
return np.empty() -
#标准化【-1,1】 -
tempimg = (tempimg-127.5)*0.0078125 -
#转置【n,24,24,3】 -
tempimg1 = np.transpose(tempimg, (3,1,0,2)) -
out = rnet(tempimg1) -
out0 = np.transpose(out[0]) -
out1 = np.transpose(out[1]) -
score = out1[1,:] -
ipass = np.where(score>threshold[1]) -
total_boxes = np.hstack([total_boxes[ipass[0],0:4].copy(), np.expand_dims(score[ipass].copy(),1)]) -
mv = out0[:,ipass[0]] -
if total_boxes.shape[0]>0: -
pick = nms(total_boxes, 0.7, 'Union') -
total_boxes = total_boxes[pick,:] -
total_boxes = bbreg(total_boxes.copy(), np.transpose(mv[:,pick])) -
total_boxes = rerec(total_boxes.copy()) -
numbox = total_boxes.shape[0] -
if numbox>0: -
# third stage -
total_boxes = np.fix(total_boxes).astype(np.int32) -
dy, edy, dx, edx, y, ey, x, ex, tmpw, tmph = pad(total_boxes.copy(), w, h) -
tempimg = np.zeros((48,48,3,numbox)) -
for k in range(0,numbox): -
tmp = np.zeros((int(tmph[k]),int(tmpw[k]),3)) -
tmp[dy[k]-1:edy[k],dx[k]-1:edx[k],:] = img[y[k]-1:ey[k],x[k]-1:ex[k],:] -
if tmp.shape[0]>0 and tmp.shape[1]>0 or tmp.shape[0]==0 and tmp.shape[1]==0: -
tempimg[:,:,:,k] = imresample(tmp, (48, 48)) -
else: -
return np.empty() -
tempimg = (tempimg-127.5)*0.0078125 -
tempimg1 = np.transpose(tempimg, (3,1,0,2)) -
out = onet(tempimg1) -
#关键点 -
out0 = np.transpose(out[0]) -
#框回归 -
out1 = np.transpose(out[1]) -
#人脸概率 -
out2 = np.transpose(out[2]) -
score = out2[1,:] -
points = out1 -
ipass = np.where(score>threshold[2]) -
points = points[:,ipass[0]] -
#[n,5] -
total_boxes = np.hstack([total_boxes[ipass[0],0:4].copy(), np.expand_dims(score[ipass].copy(),1)]) -
mv = out0[:,ipass[0]] -
w = total_boxes[:,2]-total_boxes[:,0]+1 -
h = total_boxes[:,3]-total_boxes[:,1]+1 -
#人脸关键点 -
points[0:5,:] = np.tile(w,(5, 1))*points[0:5,:] + np.tile(total_boxes[:,0],(5, 1))-1 -
points[5:10,:] = np.tile(h,(5, 1))*points[5:10,:] + np.tile(total_boxes[:,1],(5, 1))-1 -
if total_boxes.shape[0]>0: -
total_boxes = bbreg(total_boxes.copy(), np.transpose(mv)) -
pick = nms(total_boxes.copy(), 0.7, 'Min') -
total_boxes = total_boxes[pick,:] -
points = points[:,pick] -
#返回bb:[n,5]x1,y1,x2,y2,score,和关键点[n,10] -
return total_boxes, points
5、使用已有模型验证LFW数据集准确率
项目的原作者提供了两个预训练的模型,分别是基于CASIA-WebFace和VGGFace2人脸库训练的,下载地址:https://github.com/davidsandberg/facenet:
不过这两个模型需要才能下载,这里给其中一个模型的百度网盘的链接:链接: 预训练模型百度网盘地址 密码: 12mh
这里我们使用的预训练模型是基于数据集MS-Celeb-1M的,并且使用的卷积网络结构是Inception ResNet v1,训练好的模型在LFW上可以达到99.2%左右的准确率。在src同一路径下新建models/facenet/model-20170512-110547,将下载的模型解压到其中,如图所示:
- model.meta:模型文件,该文件保存了metagraph信息,即计算图的结构;
- model.ckpt.data:权重文件,该文件保存了graph中所有遍历的数据;
- model.ckpt.index:该文件保存了如何将meta和data匹配起来的信息;
- pb文件:将模型文件和权重文件整合合并为一个文件,主要用途是便于发布,详细内容可以参考博客https://blog.csdn.net/yjl9122/article/details/78341689;
- 一般情况下还会有个checkpoint文件,用于保存文件的绝对路径,告诉TF最新的检查点文件(也就是上图中后三个文件)是哪个,保存在哪里,在使用tf.train.latest_checkpoint加载的时候要用到这个信息,但是如果改变或者删除了文件中保存的路径,那么加载的时候会出错,找不到文件;
到这里、我们的准备工作已经基本完成,测试数据集LFW,模型、程序都有了,我们接下来开始评估模型的准确率。
-
run src/validate_on_lfw.py \ -
datasets/lfw/lfw_mtcnnpy_160 \ -
models/facenet/model-20170512-110547/
LFW数据集主要测试人脸识别的准确率,该数据库从中随机选择了6000对人脸组成了人脸辨识图片对,其中3000对属于同一个人2张人脸照片,3000对属于不同的人每人1张人脸照片。测试过程LFW给出一对照片,询问测试中的系统两张照片是不是同一个人,系统给出“是”或“否”的答案。通过6000对人脸测试结果的系统答案与真实答案的比值可以得到人脸识别准确率。 这个集合被广泛应用于评价 face verification算法的性能。
测试过程概述:
通过MS-Celeb-1M数据集对Inception ResNet V1网络进行训练后,得到训练好的模型和参数,即用该训练好的模型提取特征,相当于用卷积神经网络自动提取能够识别人脸的特征,而不用自己去定义和摸索一些像LBP一样的特征。
(1) 在原始LFW数据集中,截取人脸图像并保存(MTCNN)。
(2) 通过python,matlab,或者C++,构建训练时的网络结构并加载训练好的模型。
(3) 将截取的人脸送入网络,每个人脸都可以得到网络前向运算的最终结果,一般为一个N维向量,并保存,建议以原图像名称加一个后缀命名。
(4) LFW提供了6000对人脸验证txt文件,pairs.txt,其中第1个300人是同一个人的两幅人脸图像;第2个300人是两个不同人的人脸图像。按照该list,在(3)保存的数据中,找到对比人脸对应的N维特征向量。
(5) 通过欧式距离计算两张人脸的相似度。同脸和异脸分别保存到各自对应的得分向量中。
(6) 同脸得分向量按照从小到大排序,异脸向量按照从大到小排序。
(7) FAR(错误接受率)从0~1,按照万分之一的单位,利用排序后的向量,求FRR(错误拒绝率)或者TPR(ture positive ratio)。
(8) 根据7可绘制ROC曲线。
阈值确定:
(1) 将测试人脸对分为10组,用来确定阈值并验证精度。
(2) 自己拟定一个人脸识别相似度阈值范围,在这个范围内逐个确认在某一阈值下,选取其中1组数据统计同脸判断错误和异脸判定错误的个数。
(3) 选择错误个数最少的那个阈值,用剩余9组,判断识别精度。
(4) 步骤(2)和(3)执行10次,将每次(3)获取的精度进行累加并求平均,得到最终判定精度。
其中也可以用下述方式替换
自己拟定一个人脸识别相似度阈值范围,在这个范围内逐个确认在某一阈值下,针对所有人脸对统计同脸判断错误和异脸判定错误的个数,从而计算得出判定精度。
pairs.txt 官方介绍
第一行:300表示的是300个匹配图片(相同的人),10表示的是重复十次
Abel_Pacheco 1 4 表示这个文件夹的Abel_Pacheco_0001.jpg 和Abel_Pacheco_0004.jpg
300行以后 开始不匹配图片(不同的人)
一共重复10次构成完整的pairs.txt,因此一共3000 mached, 3000个no_mached
得出准确率的思路就是:(正确判断出 matche的次数+正确判断 no_mached的次数) / 6000
关于lfw准确率测试可参考这篇博客https://blog.csdn.net/jobbofhe/article/details/79416661#commentsedit
6、在自己的数据上使用已有的模型
实际应用过程中,我们有时候还会关心如何在自己的图像上应用已有模型。下面我们以计算人脸之间的距离为例,演示如何将模型应用到自己的数据上。
假设我们现在有三张图片,我们把他们存放在src同一目录的test_imgs目录下,文件分别叫做1.jpg,2.jpg,3.jpg。这三张图像中各包含有一个人的人脸,我们希望计算它们两两之间的距离。使用src/compare.py文件来实现。
-
run src/compare.py \ -
models/facenet/model-20170512-110547/ \ -
test_imgs/1.jpg test_imgs/2.jpg test_imgs/3.jpg -
>>Images: -
0: test_imgs/1.jpg -
1: test_imgs/2.jpg -
2: test_imgs/3.jpg -
Distance matrix -
0 1 2 -
0 0.0000 0.7269 1.1284 -
1 0.7269 0.0000 1.0913 -
2 1.1284 1.0913 0.0000
我们会发现同一个人的图片,测试得到的距离值偏小,而不同的人测试得到的距离偏大。正常情况下同一个人测得距离应该小于1,不同人测得距离应该大于1。在选取测试照片时,我们尽量要选取脸部较为清晰并且端正的图片,并且要与训练数据具有相同分布的图片,即尽量选取一些外国人的图片进行测试,因为该模型训练的数据都是外国人。要想在华人脸上有更好的识别效果,最好是自己重新训练模型,拿华人的脸进行训练。
compare.py源码如下:
-
"""Performs face alignment and calculates L2 distance between the embeddings of images.""" -
# MIT License -
# -
# Copyright (c) 2016 David Sandberg -
# -
# Permission is hereby granted, free of charge, to any person obtaining a copy -
# of this software and associated documentation files (the "Software"), to deal -
# in the Software without restriction, including without limitation the rights -
# to use, copy, modify, merge, publish, distribute, sublicense, and/or sell -
# copies of the Software, and to permit persons to whom the Software is -
# furnished to do so, subject to the following conditions: -
# -
# The above copyright notice and this permission notice shall be included in all -
# copies or substantial portions of the Software. -
# -
# THE SOFTWARE IS PROVIDED "AS IS", WITHOUT WARRANTY OF ANY KIND, EXPRESS OR -
# IMPLIED, INCLUDING BUT NOT LIMITED TO THE WARRANTIES OF MERCHANTABILITY, -
# FITNESS FOR A PARTICULAR PURPOSE AND NONINFRINGEMENT. IN NO EVENT SHALL THE -
# AUTHORS OR COPYRIGHT HOLDERS BE LIABLE FOR ANY CLAIM, DAMAGES OR OTHER -
# LIABILITY, WHETHER IN AN ACTION OF CONTRACT, TORT OR OTHERWISE, ARISING FROM, -
# OUT OF OR IN CONNECTION WITH THE SOFTWARE OR THE USE OR OTHER DEALINGS IN THE -
# SOFTWARE. -
from __future__ import absolute_import -
from __future__ import division -
from __future__ import print_function -
from scipy import misc -
import tensorflow as tf -
import numpy as np -
import sys -
import os -
import argparse -
import facenet -
import align.detect_face -
def main(args): -
images = load_and_align_data(args.image_files, args.image_size, args.margin, args.gpu_memory_fraction) -
with tf.Graph().as_default(): -
with tf.Session() as sess: -
# 载入模型 -
facenet.load_model(args.model) -
# images_placeholder是输入图像的占位符,后面把image传给它 -
images_placeholder = tf.get_default_graph().get_tensor_by_name("input:0") -
#embeddings是卷积网络最后输出的特征 -
embeddings = tf.get_default_graph().get_tensor_by_name("embeddings:0") -
#phase_train_placeholder占位符决定了现在是不是训练阶段 -
phase_train_placeholder = tf.get_default_graph().get_tensor_by_name("phase_train:0") -
# 计算特征 -
feed_dict = {images_placeholder: images, phase_train_placeholder: False} -
emb = sess.run(embeddings, feed_dict=feed_dict) -
#print(emb)#可将计算的特征打印出来,facenet提取出的特征是128维的 -
#nrof_images是图片总数目 -
nrof_images = len(args.image_files) -
#简单地打印图片名称 -
print('Images:') -
for i in range(nrof_images): -
print('%1d: %s' % (i, args.image_files[i])) -
print('') -
# 打印距离矩阵 -
print('Distance matrix') -
print(' ', end='') -
for i in range(nrof_images): -
print(' %1d ' % i, end='') -
print('') -
for i in range(nrof_images): -
print('%1d ' % i, end='') -
for j in range(nrof_images): -
dist = np.sqrt(np.sum(np.square(np.subtract(emb[i, :], emb[j, :])))) -
print(' %1.4f ' % dist, end='') -
print('') -
def load_and_align_data(image_paths, image_size, margin, gpu_memory_fraction): -
minsize = 20 # minimum size of face -
threshold = [0.6, 0.7, 0.7] # three steps's threshold -
factor = 0.709 # scale factor -
print('Creating networks and loading parameters') -
with tf.Graph().as_default(): -
gpu_options = tf.GPUOptions(per_process_gpu_memory_fraction=gpu_memory_fraction) -
sess = tf.Session(config=tf.ConfigProto(gpu_options=gpu_options, log_device_placement=False)) -
with sess.as_default(): -
pnet, rnet, onet = align.detect_face.create_mtcnn(sess, None) -
#nrof_samples是图片总数目,image_paths存储了这些图片的路径 -
nrof_samples = len(image_paths) -
#img_list中存储了对齐后的图像 -
img_list = [None] * nrof_samples -
for i in range(nrof_samples): -
#读入图像 -
img = misc.imread(os.path.expanduser(image_paths[i])) -
img_size = np.asarray(img.shape)[0:2] -
#使用P-NET,R-NET,O-NET,即MTCNN检测并对齐图像,检测的结果存入bounding_boxes -
bounding_boxes, _ = align.detect_face.detect_face(img, minsize, pnet, rnet, onet, threshold, factor) -
#对于检测出的bounding_boxes,减去margin(在MTCNN检测得到的人脸框的基础上缩小32像素(训练时使用的数据偏大)) -
det = np.squeeze(bounding_boxes[0, 0:4]) -
bb = np.zeros(4, dtype=np.int32) -
bb[0] = np.maximum(det[0] - margin / 2, 0) -
bb[1] = np.maximum(det[1] - margin / 2, 0) -
bb[2] = np.minimum(det[2] + margin / 2, img_size[1]) -
bb[3] = np.minimum(det[3] + margin / 2, img_size[0]) -
#裁剪出人脸区域,并缩放到卷积神经网络输入的大小 -
cropped = img[bb[1]:bb[3], bb[0]:bb[2], :] -
aligned = misc.imresize(cropped, (image_size, image_size), interp='bilinear') -
prewhitened = facenet.prewhiten(aligned) -
img_list[i] = prewhitened -
images = np.stack(img_list) -
return images -
def parse_arguments(argv): -
parser = argparse.ArgumentParser() -
parser.add_argument('model', type=str, -
help='Could be either a directory containing the meta_file and ckpt_file or a model protobuf (.pb) file') -
parser.add_argument('image_files', type=str, nargs='+', help='Images to compare') -
parser.add_argument('--image_size', type=int, -
help='Image size (height, width) in pixels.', default=160) -
parser.add_argument('--margin', type=int, -
help='Margin for the crop around the bounding box (height, width) in pixels.', default=44) -
parser.add_argument('--gpu_memory_fraction', type=float, -
help='Upper bound on the amount of GPU memory that will be used by the process.', default=1.0) -
return parser.parse_args(argv) -
if __name__ == '__main__': -
main(parse_arguments(sys.argv[1:]))
- 首先使用MTCNN网络对原始测试图片进行检测和对齐,即得到[n,160,160,3]的输出;
- 从模型文件(meta,ckpt文件)中加载facenet网络;
- 把处理后的测试图片输入网络,得到每个图像的特征,对特征计算两两之间的距离以得到人脸之间的相似度;
四、重新训练模型
从头训练一个新模型需要非常多的数据集,这里我们以CASIA-WebFace为例,这个 dataset 在原始地址已经下载不到了,而且这个 dataset 据说有很多无效的图片,所以这里我们使用的是清理过的数据库。该数据库可以在百度网盘有下载:下载地址,提取密码为 3zbb
这个数据库有 10575 个类别494414张图像,每个类别都有各自的文件夹,里面有同一个人的几张或者几十张不等的脸部图片。我们先利用MTCNN 从这些照片中把人物的脸框出来,然后交给下面的 Facenet 去训练。
下载好之后,解压到datasets/casia/raw目录下
其中每个文件夹代表一个人,文件夹保存这个人的所有人脸图片。与LFW数据集类似,我们先利用MTCNN对原始图像进行人脸检测和对齐
-
run src/align/align_dataset_mtcnn.py \ -
datasets/casia/raw \ -
datasets/casia/casia_maxpy_mtcnnpy_182 \ -
--image_size 182 --margin 44 \
对齐后的图像保存在路径datasets/casia/casia_maxpy_mtcnnpy_182下,每张图像的大小都是182×182。而最终网络的输入是160×160,之所以先生成182×182的图像,是为了留出一定的空间给数据增强的裁切环节。我们会在182×182的图像上随机裁切出160×160的区域,再送入神经网络进行训练。
运行如下命令进行训练:
-
run src/train_softmax.py \ -
--logs_base_dir logs/facenet/ \ -
--models_base_dir models/facenet/ \ -
--data_dir datasets/casia/casia_maxpy_mtcnnpy_182 \ -
--image_size 160 \ -
--model_def models.inception_resnet_v1 \ -
--lfw_dir datasets/lfw/lfw_mtcnnpy_160 \ -
--optimizer RMSPROP \ -
--learning_rate -1 \ -
--max_nrof_epochs 80 \ -
--keep_probability 0.8 \ -
--random_crop --random_flip \ -
--learning_rate_schedule_file data/learning_rate_schedule_classifier_casia.txt \ -
--weight_decay 5e-5 \ -
--center_loss_factor 1e-2 \ -
--center_loss_alfa 0.9
上面命令中有很多参数,我们来一一介绍。首先是文件src/train_softmax.py文件,它采用中心损失和softmax损失结合来训练模型,其中参数如下:
也就是说一开始一直使用0.1作为
- --logs_base_dir./logs:将会把训练日志保存到./logs中,在运行时,会在./logs文件夹下新建一个以当前时间命名的文讲夹。最终的日志会保存在这个文件夹中,所谓的日志文件,实际上指的是tf中的events文件,它主要包含当前损失、当前训练步数、当前学习率等信息。后面我们会使用TensorBoard查看这些信息;
- --models_base_dir ./models:最终训练好的模型保存在./models文件夹下,在运行时,会在./models文件夹下新建一个以当前时间命名的文讲夹,并用来保存训练好的模型;
- --data_dir ../datasets/casis/casia_maxpy_mtcnnpy_182:指定训练所使用的数据集的路径,这里使用的就是刚才对齐好的CASIA-WebFace人脸数据;
- --image_size 160:输入网络的图片尺寸是160×160大小;
- --mode_def models.inception_resnet_v1:指定了训练所使用的卷积网络是inception_resnet_v1网络。项目所支持的网络在src/models目录下,包含inception_resnet_v1,inception_resnet_v2和squeezenet三个模型,前两个模型较大,最后一个模型较小。如果在训练时出现内存或者显存不足的情况可以尝试使用sequeezenet网络,也可以修改batch_size 大小为32或者64(默认是90);
- --lfw_dir ../datasets/lfw/lfw_mtcnnpy_160:指定了LFW数据集的路径。如果指定了这个参数,那么每训练完一个epoch,就会在LFW数据集上执行一次测试,并将测试的准确率写入到日志文件中;
- --optimizer RMSPROP :指定训练使用的优化方法;
- --learning_rate -1:指定学习率,指定了负数表示忽略这个参数,而使用后面的--learning_rate_schedule_file参数规划学习率;
- --max_nrof_epochs 80:指定训练轮数epoch;
- --keep_probability 0.8:在全连接层,加入dropout,这个参数表示dropout中连接被保持的概率。
- --random_crop:表明在数据增强时使用随机裁切;
- --random_flip :表明在数据增强时使用随机翻转;
- --learning_rate_schedule_file data/learning_rate_schedule_classifier_casia.txt:在之前指定了--learning_rate -1,因此最终的学习率将由参数--learning_rate_schedule_file决定。这个参数指定一个文件data/learning_rate_schedule_classifier_casia.txt,该文件内容如下:
-
# Learning rate schedule -
# Maps an epoch number to a learning rate -
0: 0.05 -
60: 0.005 -
80: 0.0005 -
91: -1
-
- --weight_decay 5e-5:正则化系数;
- --center_loss_factor 1e-2 :中心损失和Softmax损失的平衡系数;
- --center_loss_alfa 0.9:中心损失的内部参数;
除了上面我们使用到的参数,还有许多参数,下面介绍一些比较重要的:
- pretrained_model :models/20180408-102900 预训练模型,使用预训练模型可以加快训练速度(微调时经常使用到);
- batch_size:batch大小,越大,需要的内存也会越大;
- random_rotate:表明在数据增强时使用随机旋转;


