springboot+openFeign+nacos开发实战
前面说了dubbo+nocas开发实战,现在来说下springboot+openFeign+nacos开发实战。
文章目录
- 什么是Feign
- Nacos环境准备
- Nacos与openFegin整合
- 项目管理规范
- openFeign整合nacos案例
-
- 创建服务提供者模块
- 创建服务消费者模块
- 负载均衡实例
-
- 什么是Ribbon
- Ribbon 的几种负载均衡算法
- 负载均衡测试
- 本文小结
什么是Feign
Feign 是声明式 Web 服务客户端,它使编写 Web 服务客户端更加容易。Feign 不做任何请求处理,通过处理注解相关信息生成 Request,并对调用返回的数据进行解码,从而实现 简化 HTTP API 的开发。
Nacos环境准备
启动nacos,本文使用的是nacos1.4.3版本
打开nacos的控制面板
Nacos与openFegin整合
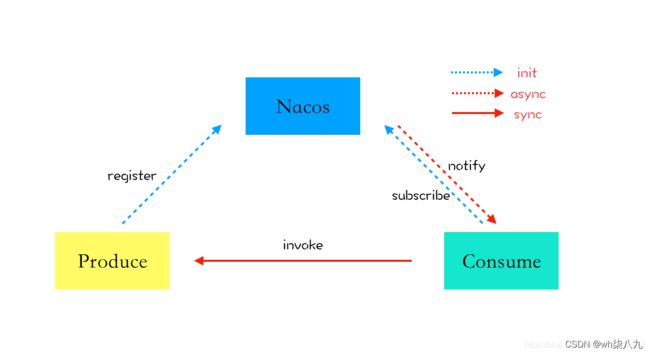
为了方便大家理解,这里写出对应的生产方、消费方 Demo 代码,以及使用的注册中心。
项目管理规范
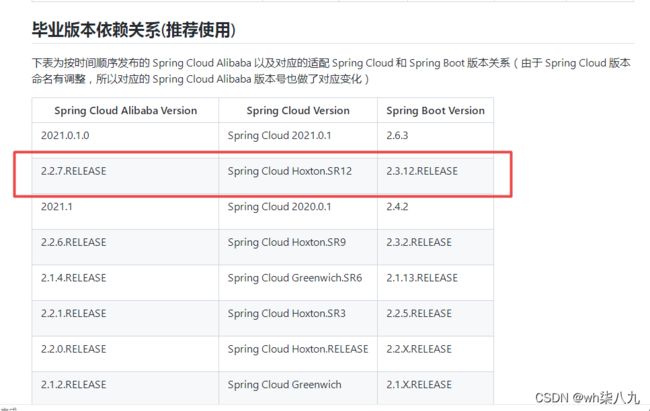
springboot,netflix和cloud alibaba之间有版本之间的对应关系,本文选择的版本如下
为了后续方便使用SpringCloud Alibaba进行开发, 首先创建一个pom类型的父项目, 主要用于项目技术栈版本管理, 创建一个maven项目,名称为spring-cloud-alibaba-example, 去除src文件, 修改pom文件
<project xmlns="http://maven.apache.org/POM/4.0.0"
         xmlns:xsi="http://www.w3.org/2001/XMLSchema-instance"
         xsi:schemaLocation="http://maven.apache.org/POM/4.0.0 http://maven.apache.org/xsd/maven-4.0.0.xsd">
    <modelVersion>4.0.0modelVersion>

    <groupId>ah.widethgroupId>
    <artifactId>spring-cloud-alibaba-exampleartifactId>
    <version>1.0-SNAPSHOTversion>

    <parent>
        <groupId>org.springframework.bootgroupId>
        <artifactId>spring-boot-starter-parentartifactId>
        <version>2.3.12.RELEASEversion>
        <relativePath/>
    parent>

    <packaging>pompackaging>

    <properties>
        <project.build.sourceEncoding>UTF-8project.build.sourceEncoding>
        <java.version>1.8java.version>
        <spring-cloud.version>Hoxton.SR12spring-cloud.version>
        <com-alibaba-cloud.version>2.2.7.RELEASEcom-alibaba-cloud.version>
    properties>


    <dependencyManagement>
        <dependencies>
            <dependency>
                <groupId>org.springframework.cloudgroupId>
                <artifactId>spring-cloud-dependenciesartifactId>
                <version>${spring-cloud.version}version>
                <type>pomtype>
                <scope>importscope>
            dependency>

            <dependency>
                <groupId>com.alibaba.cloudgroupId>
                <artifactId>spring-cloud-alibaba-dependenciesartifactId>
                <version>${com-alibaba-cloud.version}version>
                <type>pomtype>
                <scope>importscope>
            dependency>
        dependencies>
    dependencyManagement>
project>
后续创建的项目都放到此目录下, 只需要声明groupId和artifactId, 会自动引用父项目spring-cloud-alibaba-example的版本。与其说是父项目, 不如说是根项目: 因为下面每学习一个新的技术, 就会新建一个真正的父项目, 而在对应的父项目下面又会创建许多的子项目
openFeign整合nacos案例
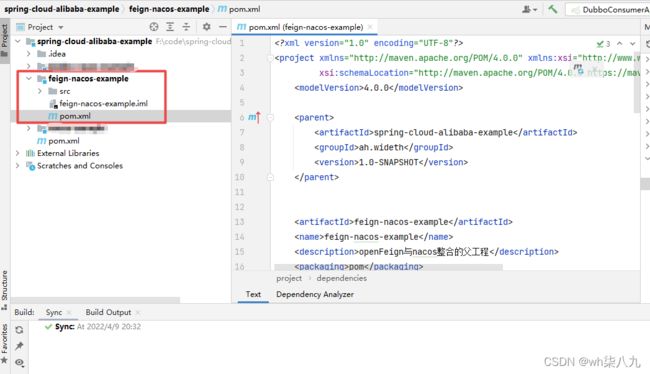
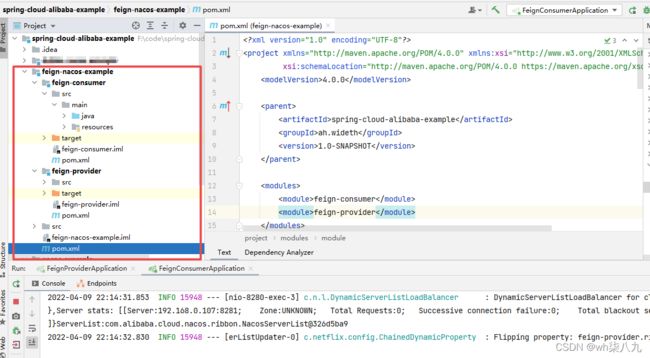
本文的案例是在上文dubbo整合nacos开发实例的基础之上继续编写的。下面开始创建我们的项目,贴上我的目录结构。
父工程pom文件
<project xmlns="http://maven.apache.org/POM/4.0.0" xmlns:xsi="http://www.w3.org/2001/XMLSchema-instance"
         xsi:schemaLocation="http://maven.apache.org/POM/4.0.0 https://maven.apache.org/xsd/maven-4.0.0.xsd">
    <modelVersion>4.0.0modelVersion>

    <parent>
        <artifactId>spring-cloud-alibaba-exampleartifactId>
        <groupId>ah.widethgroupId>
        <version>1.0-SNAPSHOTversion>
    parent>

    <modules>
        <module>feign-consumermodule>
        <module>feign-providermodule>
    modules>


    <artifactId>feign-nacos-exampleartifactId>
    <name>feign-nacos-examplename>
    <description>openFeign与nacos整合的父工程description>
    <packaging>pompackaging>

    <properties>
        <java.version>1.8java.version>
        <project.build.sourceEncoding>utf-8project.build.sourceEncoding>
        <project.reporting.outputEncoding>UTF-8project.reporting.outputEncoding>
        <nacos.version>1.4.1nacos.version>
    properties>


    <dependencies>

        <dependency>
            <groupId>com.alibaba.cloudgroupId>
            <artifactId>spring-cloud-starter-alibaba-nacos-discoveryartifactId>

            <exclusions>
                <exclusion>
                    <artifactId>nacos-clientartifactId>
                    <groupId>com.alibaba.nacosgroupId>
                exclusion>
            exclusions>
        dependency>


        <dependency>
            <groupId>com.alibaba.nacosgroupId>
            <artifactId>nacos-clientartifactId>
            <version>${nacos.version}version>
        dependency>

        <dependency>
            <groupId>org.springframework.cloudgroupId>
            <artifactId>spring-cloud-starter-openfeignartifactId>
        dependency>


    dependencies>

project>
创建服务提供者模块
pom文件
<project xmlns="http://maven.apache.org/POM/4.0.0" xmlns:xsi="http://www.w3.org/2001/XMLSchema-instance"
         xsi:schemaLocation="http://maven.apache.org/POM/4.0.0 https://maven.apache.org/xsd/maven-4.0.0.xsd">
    <modelVersion>4.0.0modelVersion>

    <parent>
        <artifactId>feign-nacos-exampleartifactId>
        <groupId>ah.widethgroupId>
        <version>1.0-SNAPSHOTversion>
    parent>

    <artifactId>feign-providerartifactId>
    <name>feign-providername>
    <description>feign整合nacos的服务提供者模块description>

    <properties>
        <java.version>1.8java.version>
        <project.build.sourceEncoding>utf-8project.build.sourceEncoding>
        <project.reporting.outputEncoding>UTF-8project.reporting.outputEncoding>
    properties>

    <dependencies>

        <dependency>
            <groupId>org.springframework.bootgroupId>
            <artifactId>spring-boot-starter-webartifactId>
        dependency>


    dependencies>

    <build>
        <plugins>
            <plugin>
                <groupId>org.springframework.bootgroupId>
                <artifactId>spring-boot-maven-pluginartifactId>
            plugin>
        plugins>
    build>

project>
application.yml配置文件
server:
  port: 8281

spring:
  application:
    name: feign-provider
  cloud:  #nacos注册中心地址的配置法
    nacos:
      discovery:
        server-addr: localhost:8848  # nacos 注册中心的地址

# Endpoint 本身对外界隐藏显示,我们需要在配置里面开启对 Endponit 的显示支持。
# exposure.include:对外界保留哪些 Endpoint,若是所有则使用* ;
management:
  endpoints:
    web:
      exposure:
        include: "*"
服务提供者启动类
package ah.wideth;

import org.springframework.boot.SpringApplication;
import org.springframework.boot.autoconfigure.SpringBootApplication;
import org.springframework.cloud.client.discovery.EnableDiscoveryClient;

@EnableDiscoveryClient  //开启服务的注册与发现
@SpringBootApplication
public class FeignProviderApplication {

    public static void main(String[] args) {

        SpringApplication.run(FeignProviderApplication.class, args);
        System.out.println("服务提供者8281启动了!!");
    }

}
controller接口调用测试
package ah.wideth.controller;

import org.springframework.beans.factory.annotation.Value;
import org.springframework.web.bind.annotation.GetMapping;
import org.springframework.web.bind.annotation.RestController;

/***
 * 服务提供
 * 者测试接口
 */
@RestController
public class ProviderController {

    @Value("${server.port}")
    private  String  serverPort;

    @Value("${spring.application.name}")
    private  String  serverName;

    @GetMapping("/hello")
    public String hello(){

        return serverName +":" + serverPort;
    }
}
测试结果
创建服务消费者模块
pom文件
<project xmlns="http://maven.apache.org/POM/4.0.0" xmlns:xsi="http://www.w3.org/2001/XMLSchema-instance"
         xsi:schemaLocation="http://maven.apache.org/POM/4.0.0 https://maven.apache.org/xsd/maven-4.0.0.xsd">
    <modelVersion>4.0.0modelVersion>

    <parent>
        <artifactId>feign-nacos-exampleartifactId>
        <groupId>ah.widethgroupId>
        <version>1.0-SNAPSHOTversion>
    parent>

    <artifactId>feign-consumerartifactId>
    <name>feign-consumername>
    <description>feign整合nacos的服务消费者模块description>

    <properties>
        <java.version>1.8java.version>
        <project.build.sourceEncoding>utf-8project.build.sourceEncoding>
        <project.reporting.outputEncoding>UTF-8project.reporting.outputEncoding>
    properties>

    <dependencies>

        <dependency>
            <groupId>org.springframework.bootgroupId>
            <artifactId>spring-boot-starter-webartifactId>
        dependency>

    dependencies>

    <build>
        <plugins>
            <plugin>
                <groupId>org.springframework.bootgroupId>
                <artifactId>spring-boot-maven-pluginartifactId>
            plugin>
        plugins>

    build>
project>
application.yml配置文件
server:
  port: 8280

spring:
  application:
    name: feign-consumer
  cloud:  #nacos注册中心地址的配置
    nacos:
      discovery:
        server-addr: localhost:8848  # nacos 注册中心的地址
服务消费者启动类
package ah.wideth;

import org.springframework.boot.SpringApplication;
import org.springframework.boot.autoconfigure.SpringBootApplication;
import org.springframework.cloud.client.discovery.EnableDiscoveryClient;
import org.springframework.cloud.openfeign.EnableFeignClients;

@EnableFeignClients
@EnableDiscoveryClient
@SpringBootApplication
public class FeignConsumerApplication {

    public static void main(String[] args) {

        SpringApplication.run(FeignConsumerApplication.class, args);
        System.out.println("服务消费者8280启动了!!");
    }

}
定义 FeignClient 消费服务接口
package ah.wideth.service;

import org.springframework.cloud.openfeign.FeignClient;
import org.springframework.web.bind.annotation.GetMapping;

// 服务生产者的服务名
@FeignClient(value = "feign-provider")
public interface FeignNacosClient {

    @GetMapping(value = "/hello")
    String sayHello();
}
controller服务调用接口
package ah.wideth.controller;

import ah.wideth.service.FeignNacosClient;
import org.springframework.beans.factory.annotation.Autowired;
import org.springframework.web.bind.annotation.GetMapping;
import org.springframework.web.bind.annotation.RestController;


@RestController
public class FeignConsumerController {

    @Autowired
    private FeignNacosClient feignNacosClient;

    @GetMapping("/test")
    public String test() {

        String result = feignNacosClient.sayHello();
        return result;
    }

}
打开Nacos控制面板查看注册中心中的服务
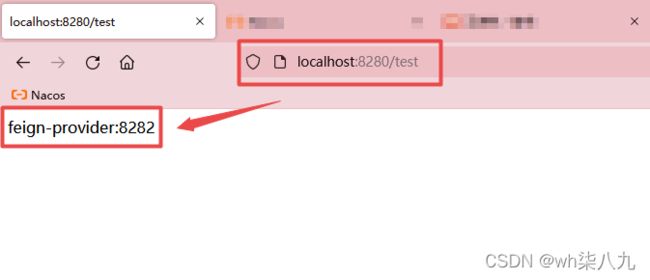
消费者调用生产者测试
负载均衡实例
什么是Ribbon
Ribbon 是 Netflix 公司开源的一款负载均衡组件,负载均衡的行为在客户端发生
一般而言,SpringCloud 构建以及使用时,会使用 Ribbon 作为客户端负载均衡工具。但是不会独立使用,而是结合 RestTemplate 以及 Feign 使用,Feign 底层集成了 Ribbon,不用额外的配置,开箱即用
Ribbon 的几种负载均衡算法
负载均衡,不管 Nginx 还是 Ribbon 都需要其算法的支持,如果我没记错的话 Nginx 使用的是 轮询和加权轮询算法。而在 Ribbon 中有更多的负载均衡调度算法,其默认是使用的 RoundRobinRule 轮询策略。
- RoundRobinRule:轮询策略。Ribbon 默认采用的策略。若经过一轮轮询没有找到可用的 provider,其最多轮询 10 轮。若最终还没有找到,则返回 null。
- RandomRule:随机策略,从所有可用的 provider 中随机选择一个。
- RetryRule:重试策略。先按照 RoundRobinRule 策略获取 provider,若获取失败,则在指定的时限内重试。默认的时限为 500 毫秒。
还有很多,这里不一一举例了,你最需要知道的是默认轮询算法,并且可以更换默认的负载均衡算法,只需要在配置文件中做出修改就行。
providerName:
  ribbon:
    NFLoadBalancerRuleClassName: com.netflix.loadbalancer.RandomRule
当然,在 Ribbon 中你还可以自定义负载均衡算法,你只需要实现 IRule 接口,然后修改配置文件或者自定义 Java Config 类。
负载均衡测试
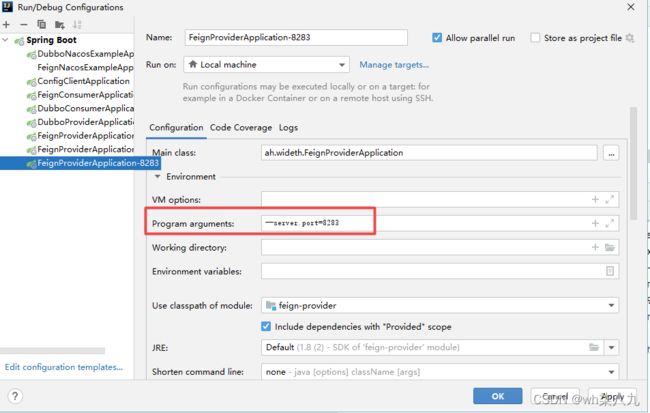
创建3个服务生产者,测试负载均衡
nacos控制面板查看服务实例
消费者调用
本文小结
本文编写了一个例子来对openFeign整合nacos进行服务调用的例子。


