树莓派4b人脸识别
本文基于python的face_recognition库,记录一下我的操作过程。
原文Github :https://github.com/ageitgey/face_recognition
一、环境搭建
暂时不知道会不会和其他环境有冲突,我这里的环境(基本还没装什么其他东西。。。)
接着上一篇写,我使用的系统是Ubuntu mate 20.4.
1,首先安装一下opencv
sudo apt install cmakesudo pip3 install opencv-python有需要按Y/N的按Y,等它自动安装好了
2,安装dilb
在安装dilb之前,一定要确保安装了cmake,不然编译不了
sudo pip3 install dlib过程很慢,我的树莓派4b-4g,编译了40多分钟,只要不出先错误,等着就行了。
3,安装face_recognition
sudo pip3 install face_recognition这一步很快。简单测试一下:
python3
>>import face_recognition
如果没有报错的话,那就成功了。
二、测试一下
这是我自己的操作,也可以看原文档:
原文:https://github.com/ageitgey/face_recognition/blob/master/README.md
1,运行demo1,照片识别
mkdir known_face

mkdir unknown_face
在这两个目录里面分别放入,已知的人照片,要识别的照片。可以使用原项目里的Barack Obama,和Joe biden,也可以用自己的照片,都可以。
终端输入(或者建一个.Sh文件):
face_recognition ./known_face/ ./unknown_face/这样会输出,文件名+识别出的人名(known_face里面的图片名字)或者unknown
/unknown_face/unknown.jpg,Barack Obama
/unknown_face/unknown.jpg,unknown_person
face_recognition ./known_face/ ./unknown_face/ | cut -d ',' -f2这样就没有文件名了,只有人名。
Barack Obama
unknown_person
face_recognition --show-distance true ./known_face/ ./unknown_face/ | cut -d ',' -f2这样可以输出识别人名+识别得分
Barack Obama,0.378542298956785
unknown_person,None
这三种用哪个都可以,看自己需求了,自己决定吧。。。
上面都是命令行操作就行,下面的话就需要连接树莓派桌面了。
没什么难度。
树莓派终端输入:
sudo apt install xrdp等待安装结束,就可以使用win10自带的远程桌面连接了。
Win10,搜索桌面连接,打开,输入树莓派ip,然后在出现的登录界面输入,用户名,密码。
就可以看到树莓派桌面了。
接着往下说。
2.运行demo2,视频人脸识别
源代码:https://github.com/ageitgey/face_recognition/blob/master/examples/facerec_from_video_file.py
复制具体视频,两张照片的文件到自己的
路径和源文件的不太一样,找到自己的文件路径,注意换一下
执行一下:
python3 facerec_from_video_file.py时间比较久,还好有进度输出,能看到程序没死。。
完成后,生成output.avi,打开可以看到,这个人,已经识别出来了,脸上画上了框。没什么难度,自己操作吧
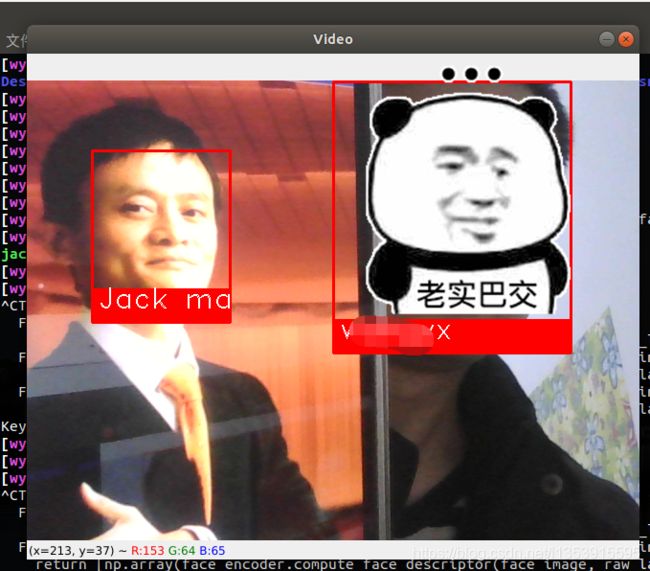
4,运行demo3,摄像头实时识别
源程序:https://github.com/ageitgey/face_recognition/blob/master/examples/facerec_from_webcam_faster.py
这里要求摄像头已安装好,过程可以看我另一篇文章CSDN
然后还是,注意一下已知face照片路径,这里可以加上自己照片了,摄像头对着自己,识别的话比较方便。
这里基本功能是实现了。但是每次添加要识别的人都要添加照片路径,都要改代码,有点麻烦啊
我是这样做的,先扫描已知face照片路径,根据照片名,创建对应的对象。
def get_name_dict(image_list):
    for image_name in image_list:
        pic_name_pinyin = ''
        pic_name = lp(image_name.split('.')[0])
        for i in pic_name:
            pic_name_pinyin += i
        name_dict[pic_name_pinyin] = [image_name.split('.')[0],0]


def get_audio(image_name):  #语音合成,用的是百度ai的接口。具体使用方法自行百度。最好还是用自己的吧,因为万一我的APP_ID停了呢
    APP_ID = '23644607'
    API_KEY = 'TwQs1vzHOTAierfQEARk3jGS'
    SECRET_KEY = '7vdbgAFjFgxGRN6gqpjLG9aT4KIyYSrW'

    client = AipSpeech(APP_ID, API_KEY, SECRET_KEY)
    name = name_dict[image_name][0]
    result_name = f'{name},欢迎你!'

    result = client.synthesis(result_name, 'zh', 1, {'vol':10, 'per':0})

    if not isinstance(result_name, dict):
        with open(f'/home/wyx/code/face_rec/audio/{image_name}.mp3', 'wb') as f:
            f.write(result)


def get_image(image_path, image_list):
    for image in image_list:
        if ".jpg" not in image: #这里加一个判断是因为有可能你给的已知照片不合格,识别出的数据为空,就会出现列表索引超限的错误
            continue
        image_load = face_recognition.load_image_file(image_path+image)
        if len(image_load)!=0:
            image_face_encoding = face_recognition.face_encodings(image_load)[0]
            known_face_encodings.append(image_face_encoding)
            pic_name_pinyin = ''
            pic_name = lp(image.split('.')[0])
            for i in pic_name:
                pic_name_pinyin += i
            known_face_names.append(pic_name_pinyin)

# 列表初始化
name_dict = {}
known_face_encodings = []
known_face_names = []

# 遍历给定路径下的照片,照片文件名是中文名字.jpg
image_path="/home/wyx/code/face_rec/known_face/"
image_list = os.listdir(image_path)


get_name_dict(image_list) # 根据遍历出来的中文照片名,生成一个'名字拼音':中文名这样格式的字典。
for name_key in name_dict:
        get_audio(name_key) #为什么一定要用中文的照片名呢,以为我要为每个已知人自动生成一段欢迎语音
get_image(image_path, image_list) #已知face的检测,数据记录,为下面的识别作参照物
这样就实现了,只需要添加照片,程序不用动,就能识别新添加的人,当然程序是要重新执行的哈。
这里贴一下完整程序:实时人脸识别,每次识别到人脸,都会中文语音播报,xxx,欢迎你,最快20秒(可修改)再次播报此人。没有的包,自行安装。。
import face_recognition
import cv2
import time
import numpy as np
from playsound import playsound
from datetime import datetime
import os
from aip import AipSpeech
from pypinyin import lazy_pinyin as lp


def get_name_dict(image_list):
    for image_name in image_list:
        pic_name_pinyin = ''
        pic_name = lp(image_name.split('.')[0])
        for i in pic_name:
            pic_name_pinyin += i
        name_dict[pic_name_pinyin] = [image_name.split('.')[0],0]

def get_audio(image_name):
    APP_ID = '23644607'
    API_KEY = 'TwQs1vzHOTAierfQEARk3jGS'
    SECRET_KEY = '7vdbgAFjFgxGRN6gqpjLG9aT4KIyYSrW'

    client = AipSpeech(APP_ID, API_KEY, SECRET_KEY)
    name = name_dict[image_name][0]
    result_name = f'{name},欢迎你!'

    result = client.synthesis(result_name, 'zh', 1, {'vol':10, 'per':0})

    if not isinstance(result_name, dict):
        with open(f'/home/wyx/code/face_rec/audio/{image_name}.mp3', 'wb') as f:
            f.write(result)


def get_image(image_path, image_list):
    for image in image_list:
        if ".jpg" not in image:
            continue
        image_load = face_recognition.load_image_file(image_path+image)
        if len(image_load)!=0:
            image_face_encoding = face_recognition.face_encodings(image_load)[0]
            known_face_encodings.append(image_face_encoding)
            pic_name_pinyin = ''
            pic_name = lp(image.split('.')[0])
            for i in pic_name:
                pic_name_pinyin += i
            known_face_names.append(pic_name_pinyin)


def main():

    image_list = os.listdir(image_path)
    get_name_dict(image_list)
    get_image(image_path, image_list)
    for name_key in name_dict:
        get_audio(name_key)

    # Initialize some variables
    face_locations = []
    face_encodings = []
    face_names = []
    process_this_frame = True

    # Get a reference to webcam #0 (the default one)
    video_capture = cv2.VideoCapture(0)

    while True:
        # Grab a single frame of video
        ret, frame = video_capture.read()

        # Resize frame of video to 1/4 size for faster face recognition processing
        small_frame = cv2.resize(frame, (0, 0), fx=0.25, fy=0.25)

        # Convert the image from BGR color (which OpenCV uses) to RGB color (which face_recognition uses)
        rgb_small_frame = small_frame[:, :, ::-1]

        # Only process every other frame of video to save time
        if process_this_frame:
            # Find all the faces and face encodings in the current frame of video
            face_locations = face_recognition.face_locations(rgb_small_frame)
            face_encodings = face_recognition.face_encodings(rgb_small_frame, face_locations)

            face_names = []
            for face_encoding in face_encodings:
                # See if the face is a match for the known face(s)
                matches = face_recognition.compare_faces(known_face_encodings, face_encoding)
                name = "Unknown"

                # Or instead, use the known face with the smallest distance to the new face
                face_distances = face_recognition.face_distance(known_face_encodings, face_encoding)
                best_match_index = np.argmin(face_distances)
                if matches[best_match_index]:
                    name = known_face_names[best_match_index]

                face_names.append(name)

        process_this_frame = not process_this_frame

        # Display the results
        for (top, right, bottom, left), name in zip(face_locations, face_names):
            # Scale back up face locations since the frame we detected in was scaled to 1/4 size
            top *= 4
            right *= 4
            bottom *= 4
            left *= 4

            # Draw a box around the face
            cv2.rectangle(frame, (left, top - 15), (right, bottom + 20), (0, 0, 255), 2)

            # Draw a label with a name below the face
            cv2.rectangle(frame, (left, bottom - 15), (right, bottom + 20), (0, 0, 255), cv2.FILLED)
            font = cv2.FONT_HERSHEY_DUPLEX
            cv2.putText(frame, name, (left + 6, bottom + 5), font, 1.0, (255, 255, 255), 1)


        # Display the resulting image
        cv2.imshow('Video', frame)


        for image in name_dict:
            if image in face_names :
                frame_t = datetime.now()
                if name_dict[image][1] == 0:
                    name_dict[image][1] = frame_t
                    playsound(f'/home/wyx/code/face_rec/audio/{image}.mp3')
                elif (frame_t - name_dict[image][1]).seconds > 20 :
                    playsound(f'/home/wyx/code/face_rec/audio/{image}.mp3')
                    frame_t = datetime.now()
                    name_dict[image][1] = frame_t

        # Hit 'q' on the keyboard to quit!
        if cv2.waitKey(1) & 0xFF == ord('q'):
            break

    # Release handle to the webcam
    video_capture.release()
    cv2.destroyAllWindows()

if __name__== '__main__':

    image_path="/home/wyx/code/face_rec/known_face/"
    name_dict = {}
    known_face_encodings = []
    known_face_names = []

    main()
有不对的地方请指正,谢谢!
我又想加点什么,比如识别后做点什么操作呀,控制一下步进电机转动(开门)?指示灯闪烁?想法有了,还没具体去做。嗯,这几天有空去试一下。