吸烟行为检测
项目概述
yolov5详解
优化方法
项目概述
项目的目标是设计出一个模型,用于检测普通大楼内外的行人是否存在吸烟的行为。项目硬件限制较大,需要用单个或数个GPU监控小区数百个摄像头,视频的取样频率只能达到一秒或者数秒一帧,因此基于时序的行为识别算法并不适用。经过初步考虑决定使用目标检测算法对图片中的香烟进行检测,目前精度较高且速度高部署方便的大概只有yolov5,因此本项目采取yolov5-4.0版本进行。https://github.com/ultralytics/yolov5/tree/v4.0
方案概述
初步方案是直接利用目标检测检出图像中的香烟部分,当检测成功,即判定该图片中有吸烟行为。数据集来源1:华录杯吸烟打电话竞赛https://dev.ehualu.com/dev/home/competition/competitionDetail?competitionId=3
该数据集中基本能确认照片中存在吸烟行为,但是没有对烟的位置进行标记,有些图片比较模糊,甚至只能看到烟民吐出的烟雾。因此需要手动挑选图片并用labelImg对烟的位置进行标记。如下图
数据集来源2:https://github.com/CVUsers/Smoke-Detect-by-YoloV5 作者开源了其标注的数据集集香烟目标检测的代码及模型。观察其数据集发现,数据的香烟目标占图片的面积比较大,因此对于这个数据集来说检测的难度没有华录杯那个数据集的高,数据集示例如下图。
初步方案是组合这两个数据集训练一个只检测香烟的yolov5模型。但是这样简单的组合会带来一些问题,将会在后两章中详述。下边先对yolov5的思想及代码作一个尽量详细的解读。
YOLOv5解读
下边将结合代码解读yolo的结构以及核心思想,主要解读train.py中的train函数。
首先作者用以下代码确认好训练存储目录、训练epochs等参数
save_dir, epochs, batch_size, total_batch_size, weights, rank = \
        Path(opt.save_dir), opt.epochs, opt.batch_size, opt.total_batch_size, opt.weights, opt.global_rank
其中opt是利用parser.parse_args()解析出的命令行参数,Path是一个python标准库,其很多功能都与os有重叠,可以基本代替os来使用,因为是第一次碰见,所以不太熟悉。
wdir = save_dir / 'weights'
wdir.mkdir(parents=True, exist_ok=True)  # make dir
last = wdir / 'last.pt'
best = wdir / 'best.pt'
results_file = save_dir / 'results.txt'
此段代码创建模型存储目录等,路径可以用save_dir/ 字符串来对两个字符串进行合并,是第一次见的用法。详情可以查阅pathlib的用法。
   with open(save_dir / 'hyp.yaml', 'w') as f:
        yaml.dump(hyp, f, sort_keys=False)
    with open(save_dir / 'opt.yaml', 'w') as f:
        yaml.dump(vars(opt), f, sort_keys=False)
此处将保存模型使用的全部超参数以及命令行参数,方便日后进行查看。
   with open(opt.data) as f:
        data_dict = yaml.load(f, Loader=yaml.FullLoader)  # data dict
    with torch_distributed_zero_first(rank):
        check_dataset(data_dict)  # check
此处读取数据集的信息,并检查数据集是否存在,如果不存在则执行命令进行下载
    pretrained = weights.endswith('.pt')
    if pretrained:
        with torch_distributed_zero_first(rank):
            attempt_download(weights)  # download if not found locally
        ckpt = torch.load(weights, map_location=device)  # load checkpoint
        if hyp.get('anchors'):
            ckpt['model'].yaml['anchors'] = round(
                hyp['anchors'])  # force autoanchor
        model = Model(opt.cfg or ckpt['model'].yaml,
                      ch=3, nc=nc).to(device)  # create
        exclude = ['anchor'] if opt.cfg or hyp.get(
            'anchors') else []  # exclude keys
        state_dict = ckpt['model'].float().state_dict()  # to FP32
        state_dict = intersect_dicts(
            state_dict, model.state_dict(), exclude=exclude)  # intersect
        model.load_state_dict(state_dict, strict=False)  # load
此处将对模型进行初始化,一般我们在使用时都是用作者预训练好的模型的。此处代码逻辑为,先读取预训练模型,再用其结构初始化一个新的模型,再将新模型中的参数设置为预训练模型中的参数,除了自定义的层以及最后分类的层以外。
    pg0, pg1, pg2 = [], [], []  # optimizer parameter groups
    for k, v in model.named_modules():
        if hasattr(v, 'bias') and isinstance(v.bias, nn.Parameter):
            pg2.append(v.bias)  # biases
        if isinstance(v, nn.BatchNorm2d):
            pg0.append(v.weight)  # no decay
        elif hasattr(v, 'weight') and isinstance(v.weight, nn.Parameter):
            pg1.append(v.weight)  # apply decay

    if opt.adam:
        optimizer = optim.Adam(pg0, lr=hyp['lr0'], betas=(
            hyp['momentum'], 0.999))  # adjust beta1 to momentum
    else:
        optimizer = optim.SGD(
            pg0, lr=hyp['lr0'], momentum=hyp['momentum'], nesterov=True)

    # add pg1 with weight_decay
    optimizer.add_param_group(
        {'params': pg1, 'weight_decay': hyp['weight_decay']})
    optimizer.add_param_group({'params': pg2})  # add pg2 (biases)
    logger.info('Optimizer groups: %g .bias, %g conv.weight, %g other' %
                (len(pg2), len(pg1), len(pg0)))
    del pg0, pg1, pg2
此处将初始化优化器策略,将根据模型的参数位置不同而设置不同的策略。对于BatchNorm层和bias参数设置正常优化,而对于其他参数设置L2正则化weight_decay。
    lf = one_cycle(1, hyp['lrf'], epochs)  # cosine 1->hyp['lrf']
    scheduler = lr_scheduler.LambdaLR(optimizer, lr_lambda=lf)
此处设置学习率的优化策略,将学习率随着one_cycle函数变化而变化,根据作者定义的参数,函数定义如下:
( 1 − c o s ( π ∗ x / 300 ) / 2 ) ∗ − 0.8 + 1 (1-cos(\pi *x/300)/2)*-0.8+1 (1−cos(π∗x/300)/2)∗−0.8+1
函数图像如下,在0-300区间是逐步下降的。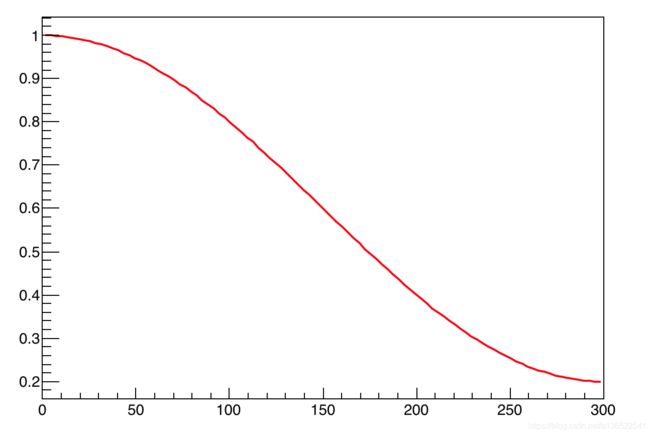
start_epoch, best_fitness = 0, 0.0
    if pretrained:
        # Optimizer
        if ckpt['optimizer'] is not None:
            optimizer.load_state_dict(ckpt['optimizer'])
            best_fitness = ckpt['best_fitness']

        # Results
        if ckpt.get('training_results') is not None:
            with open(results_file, 'w') as file:
                file.write(ckpt['training_results'])  # write results.txt

        # Epochs
        start_epoch = ckpt['epoch'] + 1
        if opt.resume:
            assert start_epoch > 0, '%s training to %g epochs is finished, nothing to resume.' % (
                weights, epochs)
        if epochs < start_epoch:
            logger.info('%s has been trained for %g epochs. Fine-tuning for %g additional epochs.' %
                        (weights, ckpt['epoch'], epochs))
            epochs += ckpt['epoch']  # finetune additional epochs

        del ckpt, state_dict
此处用于判定是否需要恢复训练,如果训练过程中断的话保存的pt文件会包含中断前的epoch信息,当再次训练时可以延续之前的训练策略。
    gs = int(model.stride.max())  # grid size (max stride)
    # number of detection layers (used for scaling hyp['obj'])
    nl = model.model[-1].nl
    # verify imgsz are gs-multiples
    imgsz, imgsz_test = [check_img_size(x, gs) for x in opt.img_size]
由于yolo的Grid Cell大小必须为图片大小的整数倍,因此设置函数check_img_size,如果输入的img_size不是GridCell整数倍的话,将其变为GridCell整数倍。
ema = ModelEMA(model) if rank in [-1, 0] else None

    # DDP mode
    if cuda and rank != -1:
        model = DDP(model, device_ids=[
                    opt.local_rank], output_device=opt.local_rank)

    # Trainloader
    dataloader, dataset = create_dataloader(train_path, imgsz, batch_size, gs, opt,
                                            hyp=hyp, augment=True, cache=opt.cache_images, rect=opt.rect, rank=rank,
                                            world_size=opt.world_size, workers=opt.workers,
                                            image_weights=opt.image_weights, quad=opt.quad)
    mlc = np.concatenate(dataset.labels, 0)[:, 0].max()  # max label class
    nb = len(dataloader)  # number of batches
    assert mlc < nc, 'Label class %g exceeds nc=%g in %s. Possible class labels are 0-%g' % (
        mlc, nc, opt.data, nc - 1)
此处代码为利用create_dataloader创建数据集和dataloader,当然里边的步骤是很复杂的,回头有时间的话会详细解读里边的策略。
ModelEMA是创建了一个模型参数滑动平均的类,用于使模型在训练时的参数波动不那么剧烈,更加鲁棒。滑动平均详情可以查看https://www.jianshu.com/p/f99f982ad370
   if rank in [-1, 0]:
        ema.updates = start_epoch * nb // accumulate  # set EMA updates

        if not opt.resume:
            labels = np.concatenate(dataset.labels, 0)
            c = torch.tensor(labels[:, 0])  # classes
            # cf = torch.bincount(c.long(), minlength=nc) + 1.  # frequency
            # model._initialize_biases(cf.to(device))
            if plots:
                plot_labels(labels, save_dir, loggers)
                if tb_writer:
                    tb_writer.add_histogram('classes', c, 0)

            # Anchors
            if not opt.noautoanchor:
                check_anchors(dataset, model=model,
                              thr=hyp['anchor_t'], imgsz=imgsz)
此处代码关键在于check_anchors函数,其用于调整yolo自带的anchors,使之更加适应数据集,调整的策略将在之后进行深入研究。
    hyp['cls'] *= nc / 80.  # scale hyp['cls'] to class count
    # scale hyp['obj'] to image size and output layers
    hyp['obj'] *= imgsz ** 2 / 640. ** 2 * 3. / nl
    model.nc = nc  # attach number of classes to model
    model.hyp = hyp  # attach hyperparameters to model
    model.gr = 1.0  # iou loss ratio (obj_loss = 1.0 or iou)
    model.class_weights = labels_to_class_weights(
        dataset.labels, nc).to(device) * nc  # attach class weights
    model.names = names
这里只是将一些超参数进行复制,其中labels_to_class_weights函数是用于计算每一个类别其样本数量占总体样本的权重。
	t0 = time.time()
    # number of warmup iterations, max(3 epochs, 1k iterations)
    nw = max(round(hyp['warmup_epochs'] * nb), 1000)
    # nw = min(nw, (epochs - start_epoch) / 2 * nb)  # limit warmup to < 1/2 of training
    maps = np.zeros(nc)  # mAP per class
    # P, R, [email protected], [email protected], val_loss(box, obj, cls)
    results = (0, 0, 0, 0, 0, 0, 0)
    scheduler.last_epoch = start_epoch - 1  # do not move
    scaler = amp.GradScaler(enabled=cuda)
此处代码也只是声明一下变量,包括warmup的次数,在训练时如果迭代次数小于warmup次数的话所作的处理稍微有点不一样。另外是amp.GradScaler声明了一个混合精度训练模块。目前较大型的流行网络都可以采用混合精度训练,可以有效减少内存,提高训练速度同时保留大部分的精度。
for epoch in range(start_epoch, epochs):
        model.train()
        mloss = torch.zeros(4, device=device)  # mean losses
        if rank != -1:
            dataloader.sampler.set_epoch(epoch)
        pbar = enumerate(dataloader)
        logger.info(('\n' + '%10s' * 8) % ('Epoch', 'gpu_mem',
                                           'box', 'obj', 'cls', 'total', 'targets', 'img_size'))
        if rank in [-1, 0]:
            pbar = tqdm(pbar, total=nb)  # progress bar
        optimizer.zero_grad()
此处开始进入训练了,中间跳过了一些默认没有执行的代码。主要声明了一个dataloader的迭代器。
for i, (imgs, targets, paths, _) in pbar:
            # number integrated batches (since train start)
            ni = i + nb * epoch
            imgs = imgs.to(device, non_blocking=True).float() / \
                255.0  # uint8 to float32, 0-255 to 0.0-1.0

            # Warmup
            if ni <= nw:
                xi = [0, nw]  # x interp
                # model.gr = np.interp(ni, xi, [0.0, 1.0])  # iou loss ratio (obj_loss = 1.0 or iou)
                accumulate = max(1, np.interp(
                    ni, xi, [1, nbs / total_batch_size]).round())
                for j, x in enumerate(optimizer.param_groups):
                    # bias lr falls from 0.1 to lr0, all other lrs rise from 0.0 to lr0
                    x['lr'] = np.interp(
                        ni, xi, [hyp['warmup_bias_lr'] if j == 2 else 0.0, x['initial_lr'] * lf(epoch)])
                    if 'momentum' in x:
                        x['momentum'] = np.interp(
                            ni, xi, [hyp['warmup_momentum'], hyp['momentum']])
此处开始对dataloader进行循环,首先将图片归一化并放到GPU中,之后判断迭代次数如果小于设定次数(1000)的话采取warmup策略。稍具体来说就是训练刚开始时设定一个比较小的学习率,然后再逐渐增大到模型设定的比较大的学习率。有论文验证过这样子可以避免模型由于刚开始学习率过大不熟悉数据集导致过拟合。
            with amp.autocast(enabled=cuda):
                pred = model(imgs)  # forward
                loss, loss_items = compute_loss(pred, targets.to(
                    device), model)  # loss scaled by batch_size
                if rank != -1:
                    loss *= opt.world_size  # gradient averaged between devices in DDP mode
                if opt.quad:
                    loss *= 4.
            # Backward
            scaler.scale(loss).backward()

            # Optimize
            if ni % accumulate == 0:
                scaler.step(optimizer)  # optimizer.step
                scaler.update()
                optimizer.zero_grad()
                if ema:
                    ema.update(model)
此处代码包括,为模型推理后计算loss,计算loss的过程也是yolo的核心思想之一。之后会回头研究。之后是用于计算梯度及更新参数。需要注意的是并不是每一次迭代都更新参数。yolo设定的batchsize是64,而默认的batchsize是16,因此必须每迭代4次再将梯度累计更新参数。设置一个比较小的batch_size有助于减少显存消耗。
        lr = [x['lr'] for x in optimizer.param_groups]  # for tensorboard
        scheduler.step()

        # DDP process 0 or single-GPU
        if rank in [-1, 0]:
            # mAP
            if ema:
                ema.update_attr(
                    model, include=['yaml', 'nc', 'hyp', 'gr', 'names', 'stride', 'class_weights'])
            final_epoch = epoch + 1 == epochs

            # Write
            with open(results_file, 'a') as f:
                # P, R, [email protected], [email protected], val_loss(box, obj, cls)
                f.write(s + '%10.4g' * 7 % results + '\n')
            if len(opt.name) and opt.bucket:
                os.system('gsutil cp %s gs://%s/results/results%s.txt' %
                          (results_file, opt.bucket, opt.name))

            # Log
            tags = ['train/box_loss', 'train/obj_loss', 'train/cls_loss',  # train loss
                    'metrics/precision', 'metrics/recall', 'metrics/mAP_0.5', 'metrics/mAP_0.5:0.95',
                    'val/box_loss', 'val/obj_loss', 'val/cls_loss',  # val loss
                    'x/lr0', 'x/lr1', 'x/lr2']  # params
            for x, tag in zip(list(mloss[:-1]) + list(results) + lr, tags):
                if tb_writer:
                    tb_writer.add_scalar(tag, x, epoch)  # tensorboard
                if wandb:
                    wandb.log({tag: x})  # W&B

            # Update best mAP
            # weighted combination of [P, R, [email protected], [email protected]]
            fi = fitness(np.array(results).reshape(1, -1))
            if fi > best_fitness:
                best_fitness = fi

            # Save model
            save = (not opt.nosave) or (final_epoch and not opt.evolve)
            if save:
                with open(results_file, 'r') as f:  # create checkpoint
                    ckpt = {'epoch': epoch,
                            'best_fitness': best_fitness,
                            'training_results': f.read(),
                            'model': ema.ema,
                            'optimizer': None if final_epoch else optimizer.state_dict(),
                            'wandb_id': wandb_run.id if wandb else None}

                # Save last, best and delete
                torch.save(ckpt, last)
                if best_fitness == fi:
                    torch.save(ckpt, best)
                del ckpt
此处为每一个epoch完成后进行的工作,包括对学习率策略的更新,参数滑动平均的更新,写入模型推理的一些指标,以及保存模型。至此train函数的大致作用已经讲述完毕。下一节将会讲述模型的结果。
模型详解
train.py中的模型定义在92行的
model = Model(opt.cfg or ckpt['model'].yaml,
                      ch=3, nc=nc).to(device)
此类通过读取命令行载入的cfg文件或者通过pt文件载入得到的yaml文件来获得模型结构,再用Model类解析此结构后返回model对象。
此类定义在yolo.py的65行起,下边解析Model类的初始化及前向过程。
class Model(nn.Module):
	def __init__(self, cfg='yolov5s.yaml', ch=3, nc=None):  # model, input channels, number of classes
        super(Model, self).__init__()
        if isinstance(cfg, dict):
            self.yaml = cfg  # model dict
        else:  # is *.yaml
            import yaml  # for torch hub
            self.yaml_file = Path(cfg).name
            with open(cfg) as f:
                self.yaml = yaml.load(f, Loader=yaml.FullLoader)  # model dict

        # Define model
        ch = self.yaml['ch'] = self.yaml.get('ch', ch)  # input channels
        if nc and nc != self.yaml['nc']:
            logger.info('Overriding model.yaml nc=%g with nc=%g' % (self.yaml['nc'], nc))
            self.yaml['nc'] = nc  # override yaml value
        self.model, self.save = parse_model(deepcopy(self.yaml), ch=[ch])  # model, savelist
        self.names = [str(i) for i in range(self.yaml['nc'])]  # default names
此处代码主要为读取配置文件,设定好input channel和output channel,然后用parse_model读取配置文件生成好Sequential layer。下边详解各层parse_model的意义。
def parse_model(d, ch):  # model_dict, input_channels(3)
    logger.info('\n%3s%18s%3s%10s  %-40s%-30s' % ('', 'from', 'n', 'params', 'module', 'arguments'))
    anchors, nc, gd, gw = d['anchors'], d['nc'], d['depth_multiple'], d['width_multiple']
    na = (len(anchors[0]) // 2) if isinstance(anchors, list) else anchors  # number of anchors
    no = na * (nc + 5)  # number of outputs = anchors * (classes + 5)

    layers, save, c2 = [], [], ch[-1]  # layers, savelist, ch out
    for i, (f, n, m, args) in enumerate(d['backbone'] + d['head']):  # from, number, module, args
        m = eval(m) if isinstance(m, str) else m  # eval strings
        for j, a in enumerate(args):
            try:
                args[j] = eval(a) if isinstance(a, str) else a  # eval strings
            except:
                pass

        n = max(round(n * gd), 1) if n > 1 else n  # depth gain
        if m in [Conv, Bottleneck, SPP, DWConv, MixConv2d, Focus, CrossConv, BottleneckCSP, C3]:
            c1, c2 = ch[f], args[0]

            # Normal
            # if i > 0 and args[0] != no:  # channel expansion factor
            #     ex = 1.75  # exponential (default 2.0)
            #     e = math.log(c2 / ch[1]) / math.log(2)
            #     c2 = int(ch[1] * ex ** e)
            # if m != Focus:

            c2 = make_divisible(c2 * gw, 8) if c2 != no else c2

            # Experimental
            # if i > 0 and args[0] != no:  # channel expansion factor
            #     ex = 1 + gw  # exponential (default 2.0)
            #     ch1 = 32  # ch[1]
            #     e = math.log(c2 / ch1) / math.log(2)  # level 1-n
            #     c2 = int(ch1 * ex ** e)
            # if m != Focus:
            #     c2 = make_divisible(c2, 8) if c2 != no else c2

            args = [c1, c2, *args[1:]]
            if m in [BottleneckCSP, C3]:
                args.insert(2, n)
                n = 1
        elif m is nn.BatchNorm2d:
            args = [ch[f]]
        elif m is Concat:
            c2 = sum([ch[x if x < 0 else x + 1] for x in f])
        elif m is Detect:
            args.append([ch[x + 1] for x in f])
            if isinstance(args[1], int):  # number of anchors
                args[1] = [list(range(args[1] * 2))] * len(f)
        elif m is Contract:
            c2 = ch[f if f < 0 else f + 1] * args[0] ** 2
        elif m is Expand:
            c2 = ch[f if f < 0 else f + 1] // args[0] ** 2
        else:
            c2 = ch[f if f < 0 else f + 1]

        m_ = nn.Sequential(*[m(*args) for _ in range(n)]) if n > 1 else m(*args)  # module
        t = str(m)[8:-2].replace('__main__.', '')  # module type
        np = sum([x.numel() for x in m_.parameters()])  # number params
        m_.i, m_.f, m_.type, m_.np = i, f, t, np  # attach index, 'from' index, type, number params
        logger.info('%3s%18s%3s%10.0f  %-40s%-30s' % (i, f, n, np, t, args))  # print
        save.extend(x % i for x in ([f] if isinstance(f, int) else f) if x != -1)  # append to savelist
        layers.append(m_)
        ch.append(c2)
    return nn.Sequential(*layers), sorted(save)
该函数通过读取配置文件生成模型的各层layer,在for循环之前定义好输入、输出层数。gd,gw分别是控制模型深度和模型宽度的参数,yolov5s/m/l/x其唯二的不同就是模型的深度和宽度。
进入for循环后,每一次读取4个参数。f对应的是输入的layer下标,一般取-1,指最后一个layer,其有时为列表,因为需要最后一个layer及前面某一层layer。n指的是当前该结构应当重复的次数。如第三层的n为3,因此对应的C3结构将重复构建3次并串联(n需要与gd相乘后才是真实的重复次数)。m对应的是模块名字。args是模块需要使用的参数,读取配置完成后,利用nn.Sequential(*[m(*args) for _ in range(n)]) if n > 1 else m(*args) 得到对应的layer。最后返回的是所有layer合并以及一个记录了每层layer其输入层的index的savelist。感觉这个savelist其实可以不需要,因为每一个layer已经有一个成员m_.f记录了每一个layer的输入index。下边讲解一下模型结构中的一些特殊结构。
模型结构
Focus
Focus的代码如下:
class Focus(nn.Module):
    # Focus wh information into c-space
    def __init__(self, c1, c2, k=1, s=1, p=None, g=1, act=True):  # ch_in, ch_out, kernel, stride, padding, groups
        super(Focus, self).__init__()
        self.conv = Conv(c1 * 4, c2, k, s, p, g, act)
        # self.contract = Contract(gain=2)

    def forward(self, x):  # x(b,c,w,h) -> y(b,4c,w/2,h/2)
        return self.conv(torch.cat([x[..., ::2, ::2], x[..., 1::2, ::2], x[..., ::2, 1::2], x[..., 1::2, 1::2]], 1))
图片首先是输入Focus结构。一般的卷积是直接将卷积核作用到图片矩阵上,但是Focus结构是先将矩阵切片,再将卷积核作用到切片后的矩阵上,切片后的通道数是切片前的4倍,因此输入通道数要乘以4.如下图,图片来源可看水印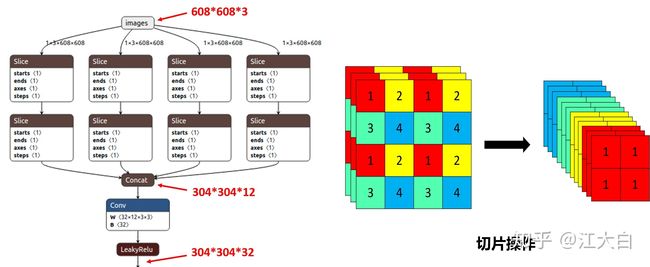
Bottleneck
Bottleneck的代码如下
class Bottleneck(nn.Module):
    # Standard bottleneck
    def __init__(self, c1, c2, shortcut=True, g=1, e=0.5):  # ch_in, ch_out, shortcut, groups, expansion
        super(Bottleneck, self).__init__()
        c_ = int(c2 * e)  # hidden channels
        self.cv1 = Conv(c1, c_, 1, 1)
        self.cv2 = Conv(c_, c2, 3, 1, g=g)
        self.add = shortcut and c1 == c2

    def forward(self, x):
        return x + self.cv2(self.cv1(x)) if self.add else self.cv2(self.cv1(x))
操作的示意图如下,图片来源可看水印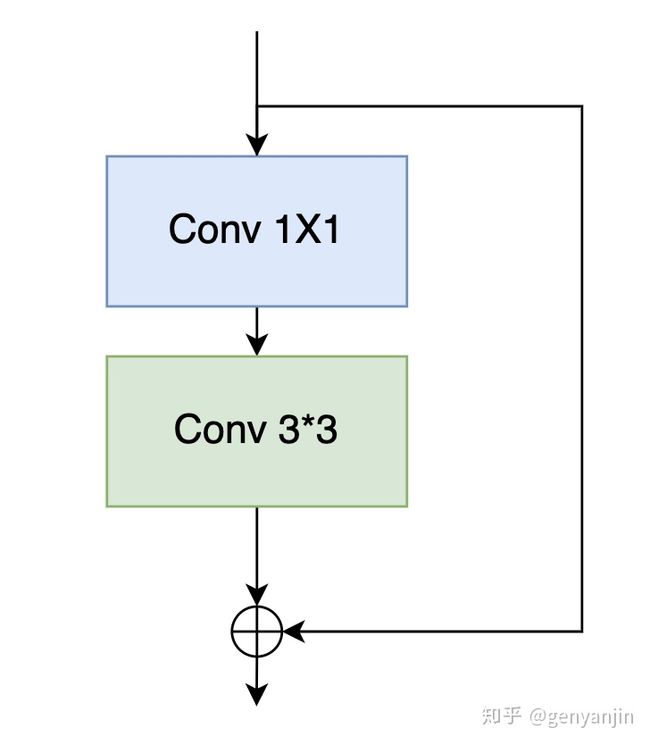
对Bottleneck的结构还不是十分熟悉,初步查了一下其与Resnet的残差结构是相似的,但是中间添加了一个1x1卷积,是可以减少相同结构的Resnet的网络参数,训练也相对更加容易。
C3
C3层的代码如下
class C3(nn.Module):
    # CSP Bottleneck with 3 convolutions
    def __init__(self, c1, c2, n=1, shortcut=True, g=1, e=0.5):  # ch_in, ch_out, number, shortcut, groups, expansion
        super(C3, self).__init__()
        c_ = int(c2 * e)  # hidden channels
        self.cv1 = Conv(c1, c_, 1, 1)
        self.cv2 = Conv(c1, c_, 1, 1)
        self.cv3 = Conv(2 * c_, c2, 1)  # act=FReLU(c2)
        self.m = nn.Sequential(*[Bottleneck(c_, c_, shortcut, g, e=1.0) for _ in range(n)])
        # self.m = nn.Sequential(*[CrossConv(c_, c_, 3, 1, g, 1.0, shortcut) for _ in range(n)])

    def forward(self, x):
        return self.cv3(torch.cat((self.m(self.cv1(x)), self.cv2(x)), dim=1))
其网络结构示意图如下,图片来源:https://blog.csdn.net/Q1u1NG/article/details/107511465图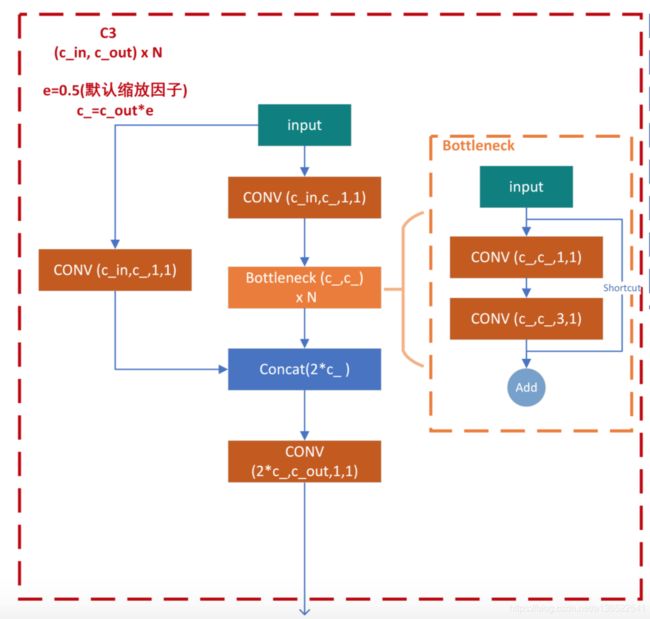
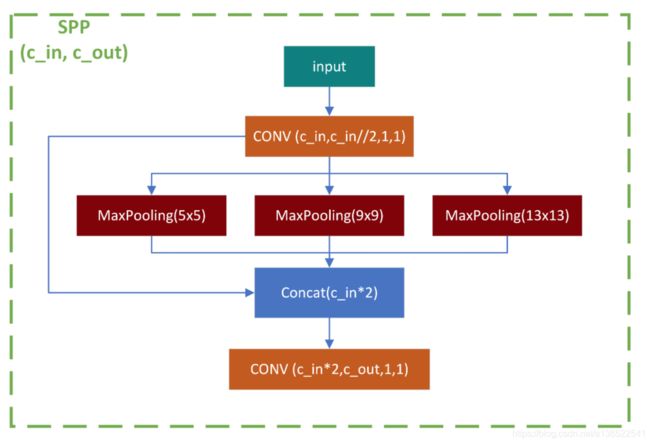
SPP
SPP层代码如下
class SPP(nn.Module):
    # Spatial pyramid pooling layer used in YOLOv3-SPP
    def __init__(self, c1, c2, k=(5, 9, 13)):
        super(SPP, self).__init__()
        c_ = c1 // 2  # hidden channels
        self.cv1 = Conv(c1, c_, 1, 1)
        self.cv2 = Conv(c_ * (len(k) + 1), c2, 1, 1)
        self.m = nn.ModuleList([nn.MaxPool2d(kernel_size=x, stride=1, padding=x // 2) for x in k])

    def forward(self, x):
        x = self.cv1(x)
        return self.cv2(torch.cat([x] + [m(x) for m in self.m], 1))
Detect
Detect层的结构是比较复杂的,其与前两代yolo是有些改进的,但是因为是第一次看yolo源码,因此暂时还搞不清楚改进在何处。
detect类的源码如下
class Detect(nn.Module):
    stride = None  # strides computed during build
    export = False  # onnx export

    def __init__(self, nc=80, anchors=(), ch=()):  # detection layer
        super(Detect, self).__init__()
        self.nc = nc  # number of classes
        self.no = nc + 5  # number of outputs per anchor
        self.nl = len(anchors)  # number of detection layers
        self.na = len(anchors[0]) // 2  # number of anchors
        self.grid = [torch.zeros(1)] * self.nl  # init grid
        a = torch.tensor(anchors).float().view(self.nl, -1, 2)
        self.register_buffer('anchors', a)  # shape(nl,na,2)
        self.register_buffer('anchor_grid', a.clone().view(self.nl, 1, -1, 1, 1, 2))  # shape(nl,1,na,1,1,2)
        self.m = nn.ModuleList(nn.Conv2d(x, self.no * self.na, 1) for x in ch)  # output conv

    def forward(self, x):
        # x = x.copy()  # for profiling
        z = []  # inference output
        self.training |= self.export
        for i in range(self.nl):
            x[i] = self.m[i](x[i])  # conv
            bs, _, ny, nx = x[i].shape  # x(bs,255,20,20) to x(bs,3,20,20,85)
            x[i] = x[i].view(bs, self.na, self.no, ny, nx).permute(0, 1, 3, 4, 2).contiguous()

            if not self.training:  # inference
                if self.grid[i].shape[2:4] != x[i].shape[2:4]:
                    self.grid[i] = self._make_grid(nx, ny).to(x[i].device)

                y = x[i].sigmoid()
                y[..., 0:2] = (y[..., 0:2] * 2. - 0.5 + self.grid[i].to(x[i].device)) * self.stride[i]  # xy
                y[..., 2:4] = (y[..., 2:4] * 2) ** 2 * self.anchor_grid[i]  # wh
                z.append(y.view(bs, -1, self.no))

        return x if self.training else (torch.cat(z, 1), x)
类首先定义了一些变量,包括预测类数nc,每一个anchor的输出维度no(类数+5:x,y,w,h,conf),预测层次nl,默认的话是3层,对应输入是3个不同尺寸的层次(128,256,512)。grid是网格化矩阵,用于在预测时将输出转化为方框的坐标。anchor_grid是anchor框的大小坐标,用于将输出转化为w,h,stride是在计算x,y坐标时用到的步长,默认值是8,16,32。ModuleList对应的是3个卷积模块,输入分别对应128,256,512,输出的通道是一样的,是每一个anchor的输出维度85乘以anchor数3。当模型是在进行推理时,才需要用到grid等参数将输出转化为方框坐标,否则直接返回输出张量,用于和groundtruth计算损失函数。下边将首先解读图片和Label的处理,然后研读一下损失函数的计算方式和代码。
数据集处理
数据集处理的代码位于datasets.py的LoadImagesAndLabels中,下边放上代码并解读。
def __init__(self, path, img_size=640, batch_size=16, augment=False, hyp=None, rect=False, image_weights=False,
                 cache_images=False, single_cls=False, stride=32, pad=0.0, rank=-1):
		self.img_size = img_size
        self.augment = augment
        self.hyp = hyp
        self.image_weights = image_weights
        self.rect = False if image_weights else rect
        self.mosaic = self.augment and not self.rect  # load 4 images at a time into a mosaic (only during training)
        self.mosaic_border = [-img_size // 2, -img_size // 2]
        self.stride = stride

        try:
            f = []  # image files
            for p in path if isinstance(path, list) else [path]:
                p = Path(p)  # os-agnostic
                if p.is_dir():  # dir
                    f += glob.glob(str(p / '**' / '*.*'), recursive=True)
                elif p.is_file():  # file
                    with open(p, 'r') as t:
                        t = t.read().strip().splitlines()
                        parent = str(p.parent) + os.sep
                        f += [x.replace('./', parent) if x.startswith('./') else x for x in t]  # local to global path
                else:
                    raise Exception('%s does not exist' % p)
            self.img_files = sorted([x.replace('/', os.sep) for x in f if x.split('.')[-1].lower() in img_formats])
            assert self.img_files, 'No images found'
        except Exception as e:
            raise Exception('Error loading data from %s: %s\nSee %s' % (path, e, help_url)
类开始首先初始化一些变量,包括img_size图像大小,augment是否图像增强,hyp超参数,image_weights没发现用法,rect是指是否采用矩形训练,mosaic指是否采用mosaic型数据增强,stride是步长。
之后进行try内部,此段代码是用于读取包含训练图片地址的txt文件。
# Check cache
        self.label_files = img2label_paths(self.img_files)  # labels
        cache_path = Path(self.label_files[0]).parent.with_suffix('.cache')  # cached labels
        if cache_path.is_file():
            cache = torch.load(cache_path)  # load
            if cache['hash'] != get_hash(self.label_files + self.img_files) or 'results' not in cache:  # changed
                cache = self.cache_labels(cache_path)  # re-cache
        else:
            cache = self.cache_labels(cache_path)  # cache

        # Display cache
        [nf, nm, ne, nc, n] = cache.pop('results')  # found, missing, empty, corrupted, total
        desc = f"Scanning '{cache_path}' for images and labels... {nf} found, {nm} missing, {ne} empty, {nc} corrupted"
        tqdm(None, desc=desc, total=n, initial=n)
        assert nf > 0 or not augment, f'No labels found in {cache_path}. Can not train without labels. See {help_url}'

        # Read cache
        cache.pop('hash')  # remove hash
        labels, shapes = zip(*cache.values())
        self.labels = list(labels)
        self.shapes = np.array(shapes, dtype=np.float64)
        self.img_files = list(cache.keys())  # update
        self.label_files = img2label_paths(cache.keys())  # update
        if single_cls:
            for x in self.labels:
                x[:, 0] = 0
此段代码是用于处理读取txt文件后的数据。首先会判断本地上是否存在包含图片和label信息的cache文件,如果不存在则会检查每一个图片以及标签是否有效,并存储在cache文件中,同时存储对应hash值,用于下次训练的时候可以加快读取速度,此处对应hash值就是所有图片和标签的大小之和。之后将cache中的图片地址和标签数据存储的labels,shapes,img_files,label_files文件中。
__init__函数在此后的代码默认都没有执行,因此就暂不解读了。
样本提取
样本提取的代码在datasets.py下LoadImagesAndLabels的__getitem__方法中,代码如下
def __getitem__(self, index):
		index = self.indices[index]  # linear, shuffled, or image_weights

        hyp = self.hyp
        mosaic = self.mosaic and random.random() < hyp['mosaic']
        if mosaic:
            # Load mosaic
            img, labels = load_mosaic(self, index)
            shapes = None

            # MixUp https://arxiv.org/pdf/1710.09412.pdf
            if random.random() < hyp['mixup']:
                img2, labels2 = load_mosaic(self, random.randint(0, self.n - 1))
                r = np.random.beta(8.0, 8.0)  # mixup ratio, alpha=beta=8.0
                img = (img * r + img2 * (1 - r)).astype(np.uint8)
                labels = np.concatenate((labels, labels2), 0)

        else:
            # Load image
            img, (h0, w0), (h, w) = load_image(self, index)

            # Letterbox
            shape = self.batch_shapes[self.batch[index]] if self.rect else self.img_size  # final letterboxed shape
            img, ratio, pad = letterbox(img, shape, auto=False, scaleup=self.augment)
            shapes = (h0, w0), ((h / h0, w / w0), pad)  # for COCO mAP rescaling

            # Load labels
            labels = []
            x = self.labels[index]
            if x.size > 0:
                # Normalized xywh to pixel xyxy format
                labels = x.copy()
                labels[:, 1] = ratio[0] * w * (x[:, 1] - x[:, 3] / 2) + pad[0]  # pad width
                labels[:, 2] = ratio[1] * h * (x[:, 2] - x[:, 4] / 2) + pad[1]  # pad height
                labels[:, 3] = ratio[0] * w * (x[:, 1] + x[:, 3] / 2) + pad[0]
                labels[:, 4] = ratio[1] * h * (x[:, 2] + x[:, 4] / 2) + pad[1]
代码首先判断是否使用mosaic型数据增强,此法是将数张图片进行拼接,用于提升模型的鲁棒性。如果用mosaic的话则利用load_mosaic函数读取图片和标签并将其混合,关于mosaic的详细说明可以看这里https://blog.csdn.net/weixin_44791964/article/details/105996954。要注意到的是由于目标在经过mosaic型数据增强后会变得更小,因此可以有利于检测小目标,但是如果目标本身就很小的话,可能会造成模型泛化能力变差,因此如果数据集中有大量小目标的话,可以取消mosaic型数据增强。
        else:
            # Load image
            img, (h0, w0), (h, w) = load_image(self, index)

            # Letterbox
            shape = self.batch_shapes[self.batch[index]] if self.rect else self.img_size  # final letterboxed shape
            img, ratio, pad = letterbox(img, shape, auto=False, scaleup=self.augment)
            shapes = (h0, w0), ((h / h0, w / w0), pad)  # for COCO mAP rescaling

            # Load labels
            labels = []
            x = self.labels[index]
            if x.size > 0:
                # Normalized xywh to pixel xyxy format
                labels = x.copy()
                labels[:, 1] = ratio[0] * w * (x[:, 1] - x[:, 3] / 2) + pad[0]  # pad width
                labels[:, 2] = ratio[1] * h * (x[:, 2] - x[:, 4] / 2) + pad[1]  # pad height
                labels[:, 3] = ratio[0] * w * (x[:, 1] + x[:, 3] / 2) + pad[0]
                labels[:, 4] = ratio[1] * h * (x[:, 2] + x[:, 4] / 2) + pad[1]

		if self.augment:
            # Augment imagespace
            if not mosaic:
                img, labels = random_perspective(img, labels,
                                                 degrees=hyp['degrees'],
                                                 translate=hyp['translate'],
                                                 scale=hyp['scale'],
                                                 shear=hyp['shear'],
                                                 perspective=hyp['perspective'])

            # Augment colorspace
            augment_hsv(img, hgain=hyp['hsv_h'], sgain=hyp['hsv_s'], vgain=hyp['hsv_v'])

            # Apply cutouts
            # if random.random() < 0.9:
            #     labels = cutout(img, labels)

        nL = len(labels)  # number of labels
        if nL:
            labels[:, 1:5] = xyxy2xywh(labels[:, 1:5])  # convert xyxy to xywh
            labels[:, [2, 4]] /= img.shape[0]  # normalized height 0-1
            labels[:, [1, 3]] /= img.shape[1]  # normalized width 0-1

        if self.augment:
            # flip up-down
            if random.random() < hyp['flipud']:
                img = np.flipud(img)
                if nL:
                    labels[:, 2] = 1 - labels[:, 2]

            # flip left-right
            if random.random() < hyp['fliplr']:
                img = np.fliplr(img)
                if nL:
                    labels[:, 1] = 1 - labels[:, 1]

        labels_out = torch.zeros((nL, 6))
        if nL:
            labels_out[:, 1:] = torch.from_numpy(labels)

        # Convert
        img = img[:, :, ::-1].transpose(2, 0, 1)  # BGR to RGB, to 3x416x416
        img = np.ascontiguousarray(img)

        return torch.from_numpy(img), labels_out, self.img_files[index], shapes
此段在训练时如果采取默认超参数是不会执行的,此段用于读取图片后,用letterbox的方法来缩放图片及填充,据作者说是能够有效减少计算量,缩短推理时间。letterbox的详细解释可以参考https://zhuanlan.zhihu.com/p/172121380。据我的初步理解,不用letterbox的时候会将图片的长边缩放到640,短边按照对应系数缩放后再填充到640。但是这样有时会导致填充量过多造成计算浪费。因此采用letterbox方法后,同样将长边缩放到640,但是短边按照对应系数缩放后只填充少量空白至短边长为32的倍数。因为yolo进行了5次下采样,因此用32的倍数的话刚好能够计算完整。
之后的处理包括,labels的转换,数据增强等。此处用到的数据增强包括:左右翻转、水平翻转、hsv变换、还有在random_perspective中的各项包括旋转,缩放,平移,剪切。
最后函数返回的是各个图像处理后的矩阵、label,图像地址以及图像的一系列大小信息。
下一步很重要的就是训练过程中的loss计算,其函数运用出现在train.py的332行中的compute_loss中,其定义在loss.py中,下边详述该函数的定义。
损失函数
def compute_loss(p, targets, model):  # predictions, targets, model
    device = targets.device
    lcls, lbox, lobj = torch.zeros(1, device=device), torch.zeros(1, device=device), torch.zeros(1, device=device)
    tcls, tbox, indices, anchors = build_targets(p, targets, model)  # targets
    h = model.hyp  # hyperparameters
此处一开始就出现一个很重要的函数build_targets,因此首先对它进行分析,分析清楚了才有助于下边具体各项loss的计算。部分信息来源https://zhuanlan.zhihu.com/p/183838757
def build_targets(p, targets, model):
    # Build targets for compute_loss(), input targets(image,class,x,y,w,h)
    det = model.module.model[-1] if is_parallel(model) else model.model[-1]  # Detect() module
    na, nt = det.na, targets.shape[0]  # number of anchors, targets
    tcls, tbox, indices, anch = [], [], [], []
    gain = torch.ones(7, device=targets.device)  # normalized to gridspace gain
    ai = torch.arange(na, device=targets.device).float().view(na, 1).repeat(1, nt)  # same as .repeat_interleave(nt)
    targets = torch.cat((targets.repeat(na, 1, 1), ai[:, :, None]), 2)  # append anchor indices

    g = 0.5  # bias
    off = torch.tensor([[0, 0],
                        [1, 0], [0, 1], [-1, 0], [0, -1],  # j,k,l,m
                        # [1, 1], [1, -1], [-1, 1], [-1, -1],  # jk,jm,lk,lm
                        ], device=targets.device).float() * g  # offsets

    for i in range(det.nl):
        anchors = det.anchors[i]
        gain[2:6] = torch.tensor(p[i].shape)[[3, 2, 3, 2]]  # xyxy gain

        # Match targets to anchors
        t = targets * gain
首先定义了na和nt分别为anchor数目3,以及目标数目。在我自己进行debug时,一个batch的16个图片总共有111个target,因此这里的nt就是111了,当然每个batch这个数字都是不一样的。
此处函数输入的target就是模型的标签值,维度是1116,第二维度中前5个分别就是x,y,w,h,cls,而第6个是在dataloader中定义的,显示该目标位于batch中的图片下标。
在执行targets = torch.cat((targets.repeat(na, 1, 1), ai[:, :, None]), 2) 该行代码后,targets维度变为3111*7。代码将原targets重复了3次,之后用于表示和3个anchor进行匹配,最后一个维度添加了当前匹配的anchor下标。
之后进行循环,det.nl为3,代表在3个不同尺度上进行预测。gain的2-6个元素变为特征图尺寸的维度,与targets相乘之后可以将targets中的归一化方框坐标数值化为特征图尺寸下的坐标,成为变量t。
		if nt:
            r = t[:, :, 4:6] / anchors[:, None]  # wh ratio
            j = torch.max(r, 1. / r).max(2)[0] < model.hyp['anchor_t']  # compare
            # j = wh_iou(anchors, t[:, 4:6]) > model.hyp['iou_t']  # iou(3,n)=wh_iou(anchors(3,2), gwh(n,2))
            t = t[j]  # filter
此处计算r得出target的宽度高度与anchor的比例。然后筛选一下,如果这个比例过高超出了设定阈值(默认4),则认定这个target与anchor的匹配度不高,在此尺度下认为是背景。筛选完成后剩余141个目标,但是之前提到该batch总共只有111个目标,因此是有一些目标是匹配了多个anchor的。
            gxy = t[:, 2:4]  # grid xy
            gxi = gain[[2, 3]] - gxy  # inverse
            j, k = ((gxy % 1. < g) & (gxy > 1.)).T
            l, m = ((gxi % 1. < g) & (gxi > 1.)).T
            j = torch.stack((torch.ones_like(j), j, k, l, m))
            t = t.repeat((5, 1, 1))[j]
            offsets = (torch.zeros_like(gxy)[None] + off[:, None])[j]
此处gxy得到target相对于左上角的xy坐标,gxi得到target相对于右下角的坐标。
之后两行筛选出gxy和gxi大于1的坐标,以及与网格框的四周距离小于0.5的下标。之后初始化这些下标的偏置量offset。
        b, c = t[:, :2].long().T  # image, class
        gxy = t[:, 2:4]  # grid xy
        gwh = t[:, 4:6]  # grid wh
        gij = (gxy - offsets).long()
        gi, gj = gij.T  # grid xy indices

        # Append
        a = t[:, 6].long()  # anchor indices
        indices.append((b, a, gj.clamp_(0, gain[3] - 1), gi.clamp_(0, gain[2] - 1)))  # image, anchor, grid indices
        tbox.append(torch.cat((gxy - gij, gwh), 1))  # box
        anch.append(anchors[a])  # anchors
        tcls.append(c)  # class
    return tcls, tbox, indices, anch
最后是记录函数需要返回的内容,tcls记录每一个正样本的类别,indices记录图片下标、anchor下标、以及正样本匹配的网格下标,tbox记录正样本的中心点与匹配网格的的offset以及w,h,anch记录正样本所匹配的anchor。
此处保存的目标中心点的offset除了匹配的网格外,还通过计算j,k,m,l那行代码筛选出最靠近目标中心点的两个网格点,并保留目标中心与这两个网格点的offset,作者认为此法可以用于增加正样本数量,方便回归。此处有个疑问,如果可以增加正样本数量的话,不如把中心网格的上下左右邻居网格都用上,不清楚这样的效果十分可以。
build_target函数已经解析完成,下边可以回到compute_loss函数中了。
    BCEcls = nn.BCEWithLogitsLoss(pos_weight=torch.tensor([h['cls_pw']], device=device))  # weight=model.class_weights)
    BCEobj = nn.BCEWithLogitsLoss(pos_weight=torch.tensor([h['obj_pw']], device=device))

    # Class label smoothing https://arxiv.org/pdf/1902.04103.pdf eqn 3
    cp, cn = smooth_BCE(eps=0.0)

    # Focal loss
    g = h['fl_gamma']  # focal loss gamma
    if g > 0:
        BCEcls, BCEobj = FocalLoss(BCEcls, g), FocalLoss(BCEobj, g)

    # Losses
    nt = 0  # number of targets
    no = len(p)  # number of outputs
    balance = [4.0, 1.0, 0.3, 0.1, 0.03]  # P3-P7
此处首先定义了分类和object的损失函数,都是采用BCEWithLogitsLoss。cp,cn分别代表正样本和负样本的label,此处分别是1和0。之后是判断超参数中fl_gamma是否大于0,如果是的话将分类和object的损失函数换为focal loss,默认是不换的。focal loss可有助于解决困难样本的学习。详情可以查看https://www.cnblogs.com/king-lps/p/9497836.html
    for i, pi in enumerate(p):  # layer index, layer predictions
        b, a, gj, gi = indices[i]  # image, anchor, gridy, gridx
        tobj = torch.zeros_like(pi[..., 0], device=device)  # target obj

        n = b.shape[0]  # number of targets
        if n:
            nt += n  # cumulative targets
            ps = pi[b, a, gj, gi]  # prediction subset corresponding to targets

            # Regression
            pxy = ps[:, :2].sigmoid() * 2. - 0.5
            pwh = (ps[:, 2:4].sigmoid() * 2) ** 2 * anchors[i]
            pbox = torch.cat((pxy, pwh), 1)  # predicted box
            iou = bbox_iou(pbox.T, tbox[i], x1y1x2y2=False, CIoU=True)  # iou(prediction, target)
            lbox += (1.0 - iou).mean()  # iou loss

            # Objectness
            tobj[b, a, gj, gi] = (1.0 - model.gr) + model.gr * iou.detach().clamp(0).type(tobj.dtype)  # iou ratio

            # Classification
            if model.nc > 1:  # cls loss (only if multiple classes)
                t = torch.full_like(ps[:, 5:], cn, device=device)  # targets
                t[range(n), tcls[i]] = cp
                lcls += BCEcls(ps[:, 5:], t)  # BCE

            # Append targets to text file
            # with open('targets.txt', 'a') as file:
            #     [file.write('%11.5g ' * 4 % tuple(x) + '\n') for x in torch.cat((txy[i], twh[i]), 1)]

        lobj += BCEobj(pi[..., 4], tobj) * balance[i]  # obj loss

    s = 3 / no  # output count scaling
    lbox *= h['box'] * s
    lobj *= h['obj']
    lcls *= h['cls'] * s
    bs = tobj.shape[0]  # batch size

    loss = lbox + lobj + lcls
    return loss * bs, torch.cat((lbox, lobj, lcls, loss)).detach()
之后对预测值进行循环,一般是循环3次。初始化target中的图片下标、anchor下标、以及对应的网格下标。当标签中存在target时,获取预测值中与target下标一致的子集放到ps中。之后计算预测值的xywh以及与之对应的target的IOU。此处计算IOU时有多种计算方法,各有优缺点,详细可以查看https://zhuanlan.zhihu.com/p/143747206。
然后计算了object loss中的target真值,此处用的是iou值作为target的真值,看了若干博主还是不太理解此处为何不能用1而要用iou值。如果预测得并不准确那这个真值岂不是也不准确了?
后来某一天思考终于明白了object loss各种target真值的含义。从代码可以看到tobj再初始化的时候是全部设为0值,也就是初始化默认图片中没有object。之后再根据build_target中得出的下标将tobj中相应位置设为预测方框与真实方框的IOU值。至于此处为何不将真值设为1而设为IOU值,我的理解是此处tobj的真值为此预测框所能得到的最佳置信度,只有当预测框与ground truth框的IOU越大,对应的tobj的真值才能越高。
然后是进行分类损失的定义,此处将标签化为one-hot矩阵后再与预测值进行loss的计算。
之后根据当前计算的层数不同,得出的object loss要乘上一个权重因子balance,这个权重分别为4,1,0.3,表示对于小object其损失是比较看重的。
最后是给box loss,object loss,cls loss进行权重分配,根据默认的超参数,此处权重分别为0.05,1,0.01875,对于box和cls,还要乘上一个s因子,这个因子随着类别数增多而减少。由此可以看出object的损失占到了总损失的绝大部分。
至此,yolov5的训练框架已大致讲述完毕。之后讲述一下训练好之后碰到的问题以及解决方案。
碰到的问题
模型训练完成后,在验证集上的mAP能够达到0.77左右。但是在实际使用时发现,模型的错判现象颇为严重,如下图。许多身上的服装挂饰(如口罩眼镜)及手机等均与香烟有类似形状。
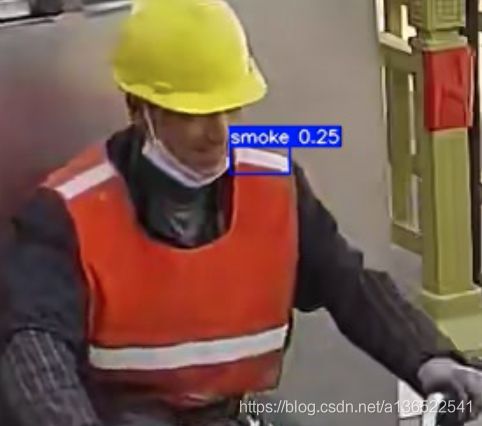

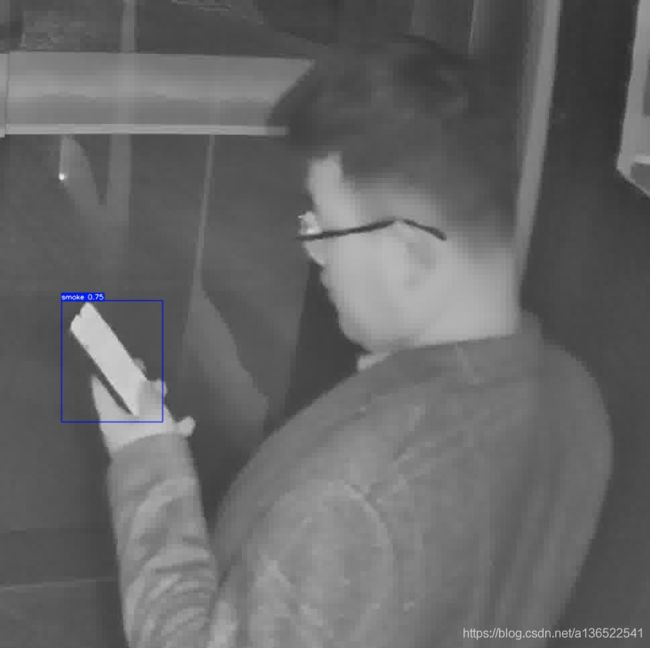
在真实的视频监控场景中,真正吸烟的场景可能不多,大概一天只有数人。而如果误判率不能降低到很低水平的话,每天可能产生成百上千的虚警,使得方案基本无法使用。
方案1
误判率可以通过提高得分阈值减少一部分,但是这个不是很好的办法,因为有些误判的香烟得分依然很高,而且提高阈值有可能会把真正的香烟去掉。
方案2
另外一个方案是通过改变误判报警方式,目前的方案是大概每隔一秒对视频帧采样一次,判断是否存在吸烟行为。如果通过采取多帧视频采样再进行综合判断的话误判的几率能够大大降低。比如连续两次或多次采样,都判断为有香烟存在时才报警,或者10次采样其中有5次判断香烟存在才报警,等等。这种方案对于徘徊在摄像头区域一直抽烟的情况会有很大的改善,对于在摄像头附近一闪而过的吸烟行为效果可能不佳。
方案3
第三种方案是将模型判断为吸烟的方框区域保存下来,训练一个分类器判断其是否真实为香烟。这种方案可以将一些不太像香烟的区域扣除掉,例如上方例子的第一和第三张图,但是对于第二和第四张图,其区域与香烟有一定的相似之处可能较难分辨。
在保存吸烟的方框区域时,还可以将方框适当放大,引入附近的环境信息。因为香烟一般位于人体的手部或者头部区域附近,有些误判的香烟其实是水管、扫把,如下图。通过放大方框,分类器应该能够学习到香烟区域附近是否存在人手或头的信息,从而提高准确率。
方案4
还有一种方法是可以训练一个同时鉴别头、手、烟的模型。因为香烟绝大部分情况只会在手上或者嘴上叼着,因此通过模型判断香烟区域是否与头部或手部区域存在交叉,从而降低误判率。但是此法有可能降低香烟的召回率,因为香烟的检测需要依赖头部和手部的检测,人脸或者手部严重遮挡时,将会降低香烟的检测率。而有一些情况的误判是无法去除的,如人物的眼镜、口罩均容易误判成香烟,手上的手机、钥匙也与香烟有很相近的特征容易误判。
方案5
此方案为利用多任务网络,因为发现训练后的同时检测头、手、烟的模型,其香烟检测的召回率和精确率都比单独检测香烟的模型要低,所以想在yolov5基础上构建一个多任务网络来分别检测头、手、烟。目前的想法是,模型的backbone可以不用改变,在head处分出3个分支来分别检测头、手、烟。目前这个方案还没有实施,暂不知道效果如何。
方案6
为了提高香烟的检测能力,可以制作一些不同的香烟形状的照片,随机旋转及放大缩小后贴到训练集图片的随机位置上。此法在其他类别的目标检测上取得过不错的成功,在此处暂没尝试,不清楚效果如何。
小结
本文简述了利用目标检测对香烟的检测的大致流程以及碰到的难点。详细讲述了yolov5的代码流程及其核心思想,对目标检测网络的设计有了一个大致的认识。
目前在简单的场景下,香烟的检测准确率还是挺高的。但是在一些复杂的使用场景中,如监控摄像头,很多时候连人眼都无法容易判断出是否存在香烟,此时模型的误判率高得不可接受,因此提出了各种解决方法。但是误判率过高的情况依然只能缓解,暂时无法得到最终的解决。
