SpringBoot整合AMQP
SpringBoot整合AMQP
文章目录
- SpringBoot整合AMQP
- 前言
- 一、JMS、AMQP概念以及区别
- 二、RabbitMQ简介
- 三、互联网大厂为什么选择RabbitMQ
- 四、RabbitMQ的一些核心概念
- 五、RabbitMQ的部署安装
- 六、SpingBoot集成rabbitmq实战
-
- 1、创建项目,导入依赖包
- 2、添加配置
- 3、rabbitmq的四种exchange策略
前言
消息队列(Message Queue)是一种进程间或者线程间的异步通信方式。使用消息队列,消息生产者会将消息保存在消息队列中,知道消息消费者来取走它。实现服务的解耦合,并提高系统的可靠性和扩展性。
目前常用的开源消息队列有很多,RabbitMQ、ActiveMQ、Redis、Kafka等,也就是常说的消息中间件。
本篇文章以RabbitMQ为例,实战整合RabbitMQ。
一、JMS、AMQP概念以及区别
- JMS
JMS即Java消息服务(Java Message Service)应用程序接口,是一个Java平台中关于面向消息中间件(MOM)的API,用于在两个应用程序之间,或分布式系统中发送消息,进行异步通信。Java消息服务是一个与具体平台无关的API,绝大多数中间件提供商都对JMS提供支持。JMS与ActiveMQ的关系类似于JDBC与JDBC驱动的关系。
JMS包括两种消息模型:点对点、发布者/订阅者;
点对点式: – 消息发送者发送消息,消息代理将其放入一个队列中,消息接收者从队列中获取消息内容, 消息读取后被移出队列 – 消息只有唯一的发送者和接受者,但并不是说只能有一个接收者
发布订阅式: – 发送者(发布者)发送消息到主题,多个接收者(订阅者)监听(订阅)这个主题,那么 就会在消息到达时同时收到消息
JMS仅支持JAVA平台,不支持跨平台、跨语言。
- AMQP
AMQP,即Advanced Message Queuing Protocol,一个提供统一消息服务的应用层标准高级消息队列协议,是应用层协议的一个开放标准,为面向消息的中间件设计。基于此协议的客户端与消息中间件可传递消息,并不受客户端/中间件不同产品,不同的开发语言等条件的限制。例如RabbitMQ消息中间件。
- 两者区别
JMS是定义了统一的接口,来对消息操作进行统一;
AMQP是通过规定协议来统一数据交互的格式,
JMS限定了必须使用Java语言;
AMQP只是协议,不规定实现方式,因此是跨语言的。
JMS规定了两种消息模型;而AMQP的消息模型更加丰富。
二、RabbitMQ简介
RabbitMQ 是一个开源的消息代理和队列服务器,用来通过普通协议在完全不同的应用之间共享数据(RabbitMQ能够实现跨语言跨平台的机制,),RabbitMQ是使用Erlang语言来编写的,并且RabbitMQ是基于AMQP协议的.
三、互联网大厂为什么选择RabbitMQ
即RabbitMQ的优点
- 开源、性能优秀、稳定性保障
- 提供可靠性消息投递模式(confirm)、返回模式(return)
- 与SpringAMQP完美的整合、扩展性变得更强、API丰富
- 集群模式丰富、表达式配置、HA(高可用)模式、镜像队列模型
- 保证数据不丢失的前提下做到高可靠性、可用性
四、RabbitMQ的一些核心概念
- publisher
消息的生产者(发布者),发送消息的程序就是生产者。- message
消息,由消息头和消息体组成,消息头存放的是路由键(routing-key)还有一些其他的,消息体则是我们自己设置的需要发送的消息了。- exchange
交换机,用来接受生产者发送的信息并通过一定规则路由到指定的消息队列(queue)。- binding
绑定,用于消息队列和交换机之间的关联。- queue
消息队列,用来存放生产者发送的消息队列,简单来说就是一个容器,消费者可以从此接受到消息。- consumer
消息的消费者,接受消息的即是消费者。
五、RabbitMQ的部署安装
因为RabbitMQ是使用erLang编写,需要先安装erLang环境,再安装RabbitMQ。
- erLang环境安装
#找包
https://packagecloud.io/rabbitmq/erlang找到对应的rpm包
#下载
wget --content-disposition https://packagecloud.io/rabbitmq/erlang/packages/el/7/erlang-22.3.4.16-1.el7.x86_64.rpm/download.rpm
#安装依赖
yum install -y make gcc gcc-c++ m4 openssl openssl-devel ncurses-devel unixODBC unixODBC-devel java java-devel socat
#通过yum安装本地的rpm包
yum localinstall erlang-23.3.1-1.el7.x86_64.rpm
#验证
- RabbitMQ安装
RabbitMQ RPM包下载地址:https://github.com/rabbitmq/rabbitmq-server/releases
#下载rpm包
wget https://github.com/rabbitmq/rabbitmq-server/releases/download/v3.8.12/rabbitmq-server-3.8.12-1.el7.noarch.rpm
#导入KEY
rpm --import https://www.rabbitmq.com/rabbitmq-release-signing-key.asc
#使用 yum 进行本地安装,运行命令
yum localinstall rabbitmq-server-3.8.12-1.el7.noarch.rpm
#启动服务
systemctl start rabbitmq-server
#查看服务状态
systemctl status rabbitmq-server
添加web管理插件
rabbitmq-plugins enable rabbitmq_management
重启服务
systemctl restart rabbitmq-server
默认情况下,访问RabbitMQ服务的用户名和密码都是"guest",这个账户有限制,默认只能通过本地网络(如localhost)访问,远程网络访问受限,使用默认的用户 guest / guest (此也为管理员用户)登陆,会发现无法登陆,报错:User can only log in via localhost。那是因为默认是限制了guest用户只能在本机登陆,也就是只能登陆localhost:15672。所以在实现生产和消费消息之前,需要另外添加一个用户,并设置相应的访问权限
添加另一个用户admin
rabbitmqctl add_user admin admin
給admin所有权限
rabbitmqctl set_permissions -p / admin “." ".” “.*”
设置用户为管理员角色
rabbitmqctl set_user_tags admin administrator
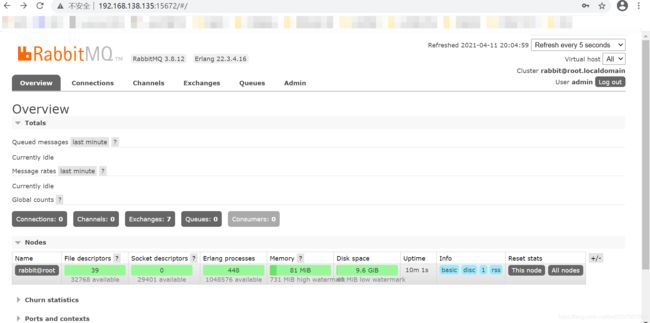
访问http://192.168.138.135:15672/,通过admin/admin,成功登录。
六、SpingBoot集成rabbitmq实战
1、创建项目,导入依赖包
springboot为AMQP提供了自动化配置的依赖,直接导入即可。
	<dependencies>
		<dependency>
			<groupId>org.springframework.boot</groupId>
			<artifactId>spring-boot-starter-amqp</artifactId>
		</dependency>
		<dependency>
			<groupId>org.springframework.boot</groupId>
			<artifactId>spring-boot-starter-test</artifactId>
		</dependency>
	</dependencies>
2、添加配置
application.properties配置文件中添加配置
spring.rabbitmq.host=192.168.138.136
spring.rabbitmq.port=5672
spring.rabbitmq.username=admin
spring.rabbitmq.password=admin
3、rabbitmq的四种exchange策略
四种策略分别为Direct、Fanout、Topic、Header。在rabbitmq中,所有消息生产者提供的消息都会交给exchang进行再分配,exchange会根据不同策略分配到对应Queue中。
- 1、Direct
DirectExchange策略是将消息对接绑定到一个DirectExchange上,当一条消息到达DirectExchange时,会将消息发送到对应的Queue队列中
package com.yangxf.demoRabbitMQ.config;

import org.springframework.amqp.core.Binding;
import org.springframework.amqp.core.BindingBuilder;
import org.springframework.amqp.core.DirectExchange;
import org.springframework.amqp.core.Queue;
import org.springframework.context.annotation.Bean;
import org.springframework.context.annotation.Configuration;

/**
 * 〈RabbitMQ的四种策略之Direct策略配置〉
 *
 * @author linwd
 * @create 2021/5/3
 * @since 1.0.0
 */
@Configuration
public class RabbitDirectConfig {

    public final static String DIRECTNAME="admin-direct";

    /**
     * 创建队列
     * @return
     */
    @Bean
    Queue queue(){
        return new Queue("hello-queue");
    }

    /**
     * 如果使用direct策略该配置可以省略
     * @return
     */
    @Bean
    DirectExchange directExchange(){
        return new DirectExchange(DIRECTNAME,true,false);
    }
    /**
     * 如果使用direct策略该配置可以省略
     * @return
     */
    @Bean
    Binding binding(){
        return BindingBuilder.bind(queue()).to(directExchange()).with("direct");
    }


}
/**
* FileName: DirectReceiver
* Author: linwd
* Date: 2021/5/3 11:36
* Description: Direct策略的接收
* History:
*
package com.yangxf.demoRabbitMQ.receiver;
import org.springframework.amqp.rabbit.annotation.RabbitListener;
import org.springframework.stereotype.Component;
/**
* 〈一句话功能简述〉
* 〈Direct策略的接收〉
*
* @author linwd
* @create 2021/5/3
* @since 1.0.0
*/
@Component
public class DirectReceiver {
@RabbitListener(queues = "hello-queue")
public void handle1(String msg){
System.out.println("DirectReceiver:"+msg);
}
}
测试模块
package com.yangxf.demoRabbitMQ;

import org.junit.jupiter.api.Test;
import org.junit.runner.RunWith;
import org.springframework.amqp.rabbit.core.RabbitTemplate;
import org.springframework.beans.factory.annotation.Autowired;
import org.springframework.boot.test.context.SpringBootTest;
import org.springframework.test.context.junit4.SpringRunner;

@SpringBootTest
@RunWith(SpringRunner.class)
class DemoRabbitMqApplicationTests {

	@Autowired
	RabbitTemplate rabbitTemplate;
	@Test
	void directTest() {
		rabbitTemplate.convertAndSend("hello-queue", "hello direct");
	}
}
- 2、Fanout
FanoutExchange策略是把所有到达的消息转发给你所有与它绑定的Queue,在这种策略中,routingKey将不起作用。
package com.yangxf.demoRabbitMQ.config;

import org.springframework.amqp.core.Binding;
import org.springframework.amqp.core.BindingBuilder;
import org.springframework.amqp.core.FanoutExchange;
import org.springframework.amqp.core.Queue;
import org.springframework.context.annotation.Bean;
import org.springframework.context.annotation.Configuration;

/**
 * 〈RabbitMQ的Fanout策略的配置〉

 * 〈简单理解类似于nginx负载均衡中nginx服务的角色〉
 *
 * @author linwd
 * @create 2021/5/3
 * @since 1.0.0
 */
@Configuration
public class RabbitFanoutConfig {

    public final static String FANOUTCHANGE="admin-fanout";

    @Bean
    Queue queueOne(){
        return new Queue("queue-one");
    }

    @Bean
    Queue queueTwo(){
        return new Queue("queue-two");
    }

    @Bean
    FanoutExchange fanoutExchange(){
        return new FanoutExchange(FANOUTCHANGE,true,false);
    }

    @Bean
    Binding bindingOne(){
        return BindingBuilder.bind(queueOne()).to(fanoutExchange());
    }

    @Bean
    Binding bindingTwo(){
        return BindingBuilder.bind(queueTwo()).to(fanoutExchange());
    }

}
package com.yangxf.demoRabbitMQ.receiver;

import org.springframework.amqp.rabbit.annotation.RabbitListener;
import org.springframework.stereotype.Component;

/**
 * 〈一句话功能简述〉

 * 〈Fanout策略的发送〉
 *
 * @author linwd
 * @create 2021/5/3
 * @since 1.0.0
 */
@Component
public class FanoutReciver {

    @RabbitListener(queues = "queue-one")
    public void handle1(String msg){
        System.out.println("FanoutReciver:handle1:"+msg);
    }

    @RabbitListener(queues = "queue-two")
    public void handle2(String msg){
        System.out.println("FanoutReciver:handle2:"+msg);
    }
}
package com.yangxf.demoRabbitMQ;

import com.yangxf.demoRabbitMQ.config.RabbitFanoutConfig;
import org.junit.jupiter.api.Test;
import org.junit.runner.RunWith;
import org.springframework.amqp.rabbit.core.RabbitTemplate;
import org.springframework.beans.factory.annotation.Autowired;
import org.springframework.boot.test.context.SpringBootTest;
import org.springframework.test.context.junit4.SpringRunner;

@SpringBootTest
@RunWith(SpringRunner.class)
class DemoRabbitMqApplicationTests {

	@Autowired
	RabbitTemplate rabbitTemplate;

	@Test
	void fanoutTest() {
		rabbitTemplate.convertAndSend(RabbitFanoutConfig.FANOUTCHANGE,null, "hello fanout");
	}
}
- 3、Topic
Topic策略中,Queue通过routingKey绑定在TopicExchange策略上,当消息到达TopicExchange后,根据routingKey将消息路由到一个或者多个Queue队列上,比较灵活。
package com.yangxf.demoRabbitMQ.config;

import org.springframework.amqp.core.Binding;
import org.springframework.amqp.core.BindingBuilder;
import org.springframework.amqp.core.Queue;
import org.springframework.amqp.core.TopicExchange;
import org.springframework.context.annotation.Bean;
import org.springframework.context.annotation.Configuration;

/**
 * 〈一句话功能简述〉

 * 〈RabbitMQ的Topic策略〉
 *
 * @author linwd
 * @create 2021/5/3
 * @since 1.0.0
 */
@Configuration
public class RabbitTopicConfig {
    public final static String TOPICNAME="admin-topic";

    @Bean
    TopicExchange topicExchange(){
        return new TopicExchange(TOPICNAME,true,false);
    }
    @Bean
    Queue xiaomi(){
        return new Queue("xiaomi");
    }

    @Bean
    Queue huawei(){
        return new Queue("huawei");
    }

    @Bean
    Queue phone(){
        return new Queue("phone");
    }

    /**
     * routingKey以xiaomi开头的
     * @return
     */
    @Bean
    Binding bindingXiaomi(){
        return BindingBuilder.bind(xiaomi()).to(topicExchange()).with("xiaomi.#");
    }
    /**
     * routingKey以huawei开头的
     * @return
     */
    @Bean
    Binding bindingHuawei(){
        return BindingBuilder.bind(huawei()).to(topicExchange()).with("huawei.#");
    }
    /**
     * routingKey包含phone的
     * @return
     */
    @Bean
    Binding bindingPhone(){
        return BindingBuilder.bind(phone()).to(topicExchange()).with("#.phone.#");
    }

}
/**
* FileName: TopicReceiver
* Author: linwd
* Date: 2021/5/3 15:35
* Description:
* History:
*
package com.yangxf.demoRabbitMQ.receiver;
import org.springframework.amqp.rabbit.annotation.RabbitListener;
import org.springframework.stereotype.Component;
/**
* 〈Topic策略发送信息〉
* 〈〉
*
* @author linwd
* @create 2021/5/3
* @since 1.0.0
*/
@Component
public class TopicReceiver {
@RabbitListener(queues = "phone")
public void handle1(String msg){
System.out.println("PhoneTopicReceiver:"+msg);
}
@RabbitListener(queues = "xiaomi")
public void handle2(String msg){
System.out.println("XiaomiTopicReceiver:"+msg);
}
@RabbitListener(queues = "huawei")
public void handle3(String msg){
System.out.println("HuaweiTopicReceiver:"+msg);
}
}
package com.yangxf.demoRabbitMQ;

import com.yangxf.demoRabbitMQ.config.RabbitFanoutConfig;
import com.yangxf.demoRabbitMQ.config.RabbitTopicConfig;
import org.junit.jupiter.api.Test;
import org.junit.runner.RunWith;
import org.springframework.amqp.rabbit.core.RabbitTemplate;
import org.springframework.beans.factory.annotation.Autowired;
import org.springframework.boot.test.context.SpringBootTest;
import org.springframework.test.context.junit4.SpringRunner;

@SpringBootTest
@RunWith(SpringRunner.class)
class DemoRabbitMqApplicationTests {

	@Autowired
	RabbitTemplate rabbitTemplate;
	@Test
	void directTest() {
		rabbitTemplate.convertAndSend("hello-queue", "hello direct");
	}

	@Test
	void fanoutTest() {
		rabbitTemplate.convertAndSend(RabbitFanoutConfig.FANOUTCHANGE,null, "hello fanout");
	}
	@Test
	void topicTest() {
		rabbitTemplate.convertAndSend(RabbitTopicConfig.TOPICNAME,"xiaomi.news", "小米新闻");
		rabbitTemplate.convertAndSend(RabbitTopicConfig.TOPICNAME,"huawei.news", "华为新闻");
		rabbitTemplate.convertAndSend(RabbitTopicConfig.TOPICNAME,"xiaomi.phone", "小米手机");
		rabbitTemplate.convertAndSend(RabbitTopicConfig.TOPICNAME,"huawei.phone", "华为手机");
		rabbitTemplate.convertAndSend(RabbitTopicConfig.TOPICNAME,"phone.news", "手机新闻");

	}

}


