RPN架构及其PyTorch实现
RPN(Region Proposal Network)
-
-
- 引言
- RPN架构
-
- RPN
- Anchor 生成
- Proposals 的选择
- loss 的计算
- FPN for RPN
-
- RPN网络对于正负样本的选择
- FPN for Fast R-CNN
- RPN架构及其Pytorch实现
-
- 基于RPN产生~20k个候选框
- ~20k个候选框(1):RPN
- ~20k个候选框(2):Fast R-CNN
- RPN主体部分
- RPN部分的损失函数
-
引言
由于
RPN架构
RPN
- Anchor 的生成方法
- 如何选择 anchor 做为 proposals
- loss 的计算, 在计算 loss 之前需要从 anchor 中选择正负样本
其实RPN本身就可以做为目标检测的 Head
Anchor 生成
那么 proposal是如何产生的呢?是通过 RPNHead对 Anchor 的预测得分和位置回归得到的。Anchor 是在 feature_map 的 每一个位置生成多个不同大小不同长宽比的矩形框。而且对于不同层的 feature_map 他们的感受野是不一样的,所以设置的 anchor 的大小也不一样 比如下面的参数定义了在五层不同大小的feature_map 上生成的 anchor 大小分别为 32,64,256,512。 这里是对应到输入图像大小上的边长。由于 anchor 的生成是提前定义的,所以相当于超参数一样,所以也有些方法来改进 这里的anchor 的生成方法。
Proposals 的选择
PRNHead会预测在 feanture_map 的每个点上给每一个 anchor 预测一个前景得分。同时还会预测对应的位置。Proposal 的选择有两步,第一步是在每一层的 feature_map 上选择一定数量得分最高的 anchor, 然后对所有的选择做 NMS,NMS的结果选择前 n 个作为最终的 proposal。
逻辑相对简单,但是在pytorch 里相当于要遍历每张图的每个 feature_map,还有就是一些特殊情况的处理,比如对超出图像边缘的 anchor 做剪切等。
loss 的计算
要计算 loss 就需要有标注数据, 这里的预测对象是 anchor 的得分和位置回归,我们有的是真实目标的位置和标签。所以在 Fast R-CNN中,定了一个策略(规则)来对所有的 anchor 打上标签。策略和 iou相关,这里的可以简单看下 iou的计算方法,其想法是假设他们相交,尝试去计算相交区域的左上角和右下角,当这个区域有边小于零的时候表示他们不相交区域为 0。
area1 = box_area(boxes1)
area2 = box_area(boxes2)
lt = torch.max(boxes1[:, None, :2], boxes2[:, :2]) # [N,M,2]
rb = torch.min(boxes1[:, None, 2:], boxes2[:, 2:]) # [N,M,2]
wh = (rb - lt).clamp(min=0) # [N,M,2]
inter = wh[:, :, 0] * wh[:, :, 1] # [N,M]
iou = inter / (area1[:, None] + area2 - inter)
return iou
有了样本还需要计算回归的目标参数,然后再计算 loss,loss的计算和proposals的生成是没有直接相关的,通过 loss的反向传播来修改得分来得到更好的 proposal 所以很多计算都只是在训练过程中用到,比如对 anchor 打上标签的操作。
接下来的内容最好联系下图Faster R-CNN网络进行学习
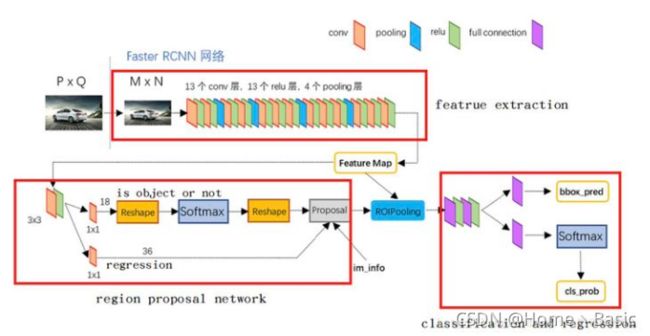
先在图像上进行完特征提取操作后,得到FPN的结果,结果即FPN最终经过3x3卷积融合输出后的几层特征图,即得上图中的Feature Map。接着,在FPN的结果Feature Map上进行操作:像Faster R-CNN中的RPN一样,先在上进行3×3的卷积操作,然后在此结果上,两支并行的1×1卷积核分别卷积出来分类(前背景)与框位置信息(xywh)。
然后我们把RPN的结果拿出来进行RoIpooling后进行分类。
RPN即一个用于目标检测的一系列滑动窗口。具体地,RPN是先进行3×3,然后跟着两条并行的1×1卷积,分布产生前背景分类和框位置回归,我们把这个组合叫做网络头部network head。
FPN for RPN
RPN即一个用于目标检测的一系列滑动窗口。具体地,RPN是先进行3×3,然后跟着两条并行的1×1卷积,分布产生前背景分类和框位置回归,我们把这个组合叫做网络头部network head。
但是前背景分类与框位置回归是在anchor的基础上进行的,简言之即我们先人为定义一些框,然后RPN基于这些框进行调整即可。在SSD中anchor叫prior,更形象一些。为了回归更容易,anchor在Faster R-CNN中预测了3种大小scale,宽高3种比率ratio{1:1,1:2,2:1},共3*3=9种anchor框。
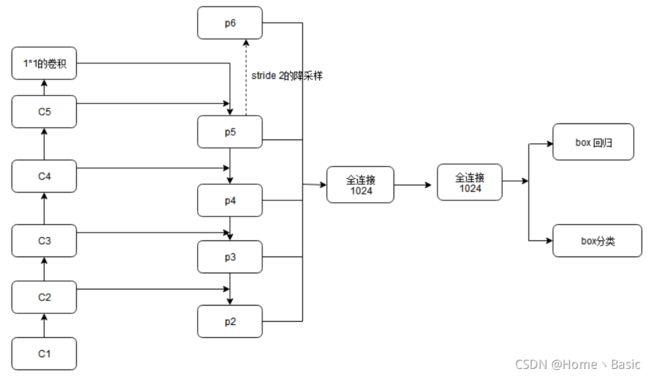
在FPN中我们同样用了一个3×3和两个并行的1×1,但是是在每个level上都进行了RPN这种操作。既然FPN已经有不同大小的特征scale了,那么我们就没必要像Faster R-CNN一样采用3种大小scale的anchor了,因此固定每层特征图对应的anchor尺寸,再采用3种比率的框就行。也就是说,作者在每一个金字塔层级应用了单尺度的anchor,{P2, P3, P4, P5, P6}分别对应的anchor尺度为{32*32, 64*64, 128*128, 256*256, 512*512 },当然目标不可能都是正方形,因此仍然使用三种比例```{1:2, 1:1, 2:1}````,所以金字塔结构中共有15种anchors。
RPN网络对于正负样本的选择
RPN网络在训练时需要有anchor是前景或背景的标签。因此,需要对anchor进行label分类,将其分为正负样本。其原理和Faster R-CNN里一样。
具体方法如下:anchor与gt的IoU>0.7就是正样本(label=1),IoU<0.3是负样本(label=0),其余介于0.3和0.7直接抛弃,不参与训练(label=-1)。例如,在Faster R-CNN中拿256个anchors训练后得到W×H×9个roi。
此外,每个级level的头部的参数是共享的,共享的原因是实验验证出来的。实验证明,虽然每级的feature大小不一样,但是共享与不共享头部参数的准确率是相似的。这个结果也说明了其实金字塔的每级level都有差不多相似的语义信息,而不是普通网络那样语义信息区别很大。
FPN for Fast R-CNN
RPN网络提取到特征后,Fast R-CNN用RoIpool抽取出RoI后进行分类,Fast R-CNN中RoIpooling用来提取特征。Fast R-CNN在单scale特征上有好的表现。为了使用FPN,需要把各个scale的RoI赋给金字塔级level。Fast R-CNN中的ROI Pooling层使用RPN的结果和特征图作为输入。经过特征金字塔,我们得到了许多特征图,作者认为,不同层次的特征图上包含的物体大小也不同,因此,不同尺度的ROI,使用不同特征层作为ROI pooling层的输入。大尺度ROI就用后面一些的金字塔层,比如P5;小尺度ROI就用前面一点的特征层,比如P4。
对于原图上W×H 的RoI,需要选择一层的feature map来对他RoIpooling,选择的feature map的层数P_k的选择依据是:
224是ImageNet预训练的大小,k0是基准值,设置为5或4,代表P5层的输出(原图大小就用P5层),W和H是ROI区域的长和宽,假设ROI是112 * 112的大小,那么k = k0-1 = 5-1 = 4,意味着该ROI应该使用P4的特征层。k值做取整处理。这意味着如果RoI的尺度变小(比如224的1/2),那么它应该被映射到一个精细的分辨率水平。
import torch
import torch.nn.functional as F
import torch.nn as nn

class FPN(nn.Module):
    def __init__(self,in_channel_list,out_channel):
        super(FPN, self).__init__()
        self.inner_layer=[]
        self.out_layer=[]
        for in_channel in in_channel_list:
            self.inner_layer.append(nn.Conv2d(in_channel,out_channel,1))
            self.out_layer.append(nn.Conv2d(out_channel,out_channel,kernel_size=3,padding=1))
        # self.upsample=nn.Upsample(size=, mode='nearest')
    def forward(self,x):
        head_output=[]
        corent_inner=self.inner_layer[-1](x[-1])
        head_output.append(self.out_layer[-1](corent_inner))
        for i in range(len(x)-2,-1,-1):
            pre_inner=corent_inner
            corent_inner=self.inner_layer[i](x[i])
            size=corent_inner.shape[2:]
            pre_top_down=F.interpolate(pre_inner,size=size)
            add_pre2corent=pre_top_down+corent_inner
            head_output.append(self.out_layer[i](add_pre2corent))
        return list(reversed(head_output))

if __name__ == '__main__':
    fpn=FPN([10,20,30],5)
    x=[]
    x.append(torch.rand(1, 10, 64, 64))
    x.append(torch.rand(1, 20, 16, 16))
    x.append(torch.rand(1, 30, 8, 8))
    c=fpn(x)
    print(c)
RPN架构及其Pytorch实现
基于RPN产生~20k个候选框
先来看产生这H×W×9个Anchor的代码。
首先针对特征图的左上角顶点产生 9 个 Anchor。
# 针对特征图左上角顶点产生anchor
def generate_base_anchor(base_size=16, ratios=None, anchor_scale=None):
    """
    这里假设得到的特征图的大小为w×h,每个位置共产生9个anchor,所以一共产生的anchor
    数为w×h×9。原论文中anchor的比例为1:2、2:1和1:1,尺度为128、256和512(相对于
    原图而言)。所以在16倍下采样的特征图的上的实际尺度为8、16和32。
    """
    # anchor的比例和尺度
    if anchor_scale is None:
        anchor_scale = [8, 16, 32]
    if ratios is None:
        ratios = [0.5, 1, 2]
    # 特征图的左上角位置映射回原图的位置
    py = base_size / 2
    px = base_size / 2
    # 初始化变量(9,4),这里以特征图的最左上角顶点为例产生anchor
    base_anchor = np.zeros((len(ratios) * len(anchor_scale), 4), dtype=np.float32)
    # 循环产生9个anchor
    for i in range(len(ratios)):
        for j in range(len(anchor_scale)):
            # 生成高和宽(相对于原图而言)
            # 以i=0、j=0为例,h=16×8×(0.5)^1/2、w=16×8×1/0.5,则h×w=128^2
            h = base_size * anchor_scale[j] * np.sqrt(ratios[i])
            w = base_size * anchor_scale[j] * np.sqrt(1. / ratios[i])
            # 当前生成的anchor的索引(0~8)
            index = i * len(anchor_scale) + j
            # 计算anchor的左上角和右下角坐标
            base_anchor[index, 0] = py - h / 2
            base_anchor[index, 1] = px - w / 2
            base_anchor[index, 2] = py + h / 2
            base_anchor[index, 3] = px + w / 2
    # 相对于原图大小的anchor(x_min,y_min,x_max,y_max)
    return base_anchor
调用上面函数,看一下打印的结果:
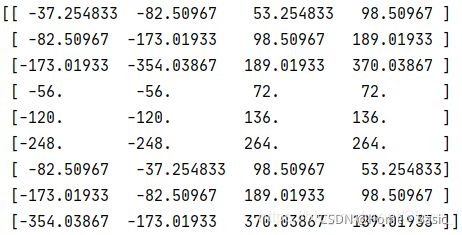
以结果图的第一行为例说明(现在先不用在意那些越界的Anchor)。首先计算它的宽和高:

然后计算它的面积:
![]()
由该Anchor的宽高和面积我们可以看到,它是尺寸为128、比例为1:2的Anchor。上面函数是针对特征图的左上角顶点映射回原图产生的Anchor,我们需要整幅特征图的结果。则定义如下函数:
def generate_all_base_anchor(base_anchor, feat_stride, height, width):
    """
    height*feat_stride/width*feat_stride相当于原图的高/宽,相当于从0开始,
    每隔feat_stride=16采样一个位置,这相当于在16倍下采样的特征图上逐步采样。这
    个过程用于确定每组anchor的中心点位置。
    """
    # 纵向偏移量[0,16,32,...]
    shift_y = np.arange(0, height * feat_stride, feat_stride)
    # 横向偏移量[0,16,32,...]
    shift_x = np.arange(0, width * feat_stride, feat_stride)
    # np.meshgrid的作用是将两个一维向量变为两个二维矩阵。其中,返回的第一个二维
    # 矩阵的行向量为第一个参数、重复次数为第二个参数的长度;第二个二维矩阵的列向量
    # 为第二个参数、重复次数为第一个参数的长度。即得到的shift_x和shift_y如下:
    # shift_x = [[0,16,32,...],
    #            [0,16,32,...],
    #            [0,16,32,...],
    #            ...]
    # shift_y = [[0, 0, 0,... ],
    #            [16,16,16,...],
    #            [32,32,32,...],
    #            ...]
    # 注意此时shift_x和shift_y都等于特征图的尺度,且每一个位置的之对应于特征图上
    # 的一个点,两个矩阵的值的组合对应于特征图上的点映射回原图的左上角坐标。
    shift_x, shift_y = np.meshgrid(shift_x, shift_y)
    # np.ravel()将矩阵展开成一个一维向量,即shift_x和shift_y展开后的形式分别为:
    # [0,16,32,...,0,16,32,..,0,16,32,...],(1,w*h)
    # [0,0,0,...,16,16,16,...,32,32,32,...],(1,w*h)
    # axis=0相当于按行堆叠,得到的形状为(4,w*h);
    # axis=1相当于按列堆叠,得到的形状为(w*h,4)。该语句得到的shift的值为:
    # [[0,  0, 0,  0],
    #  [16, 0, 16, 0],
    #  [32, 0, 32, 0],
    #  ...]
    shift = np.stack((shift_y.ravel(), shift_x.ravel(),
                      shift_y.ravel(), shift_x.ravel()), axis=1)

    # 每个位置anchor数
    num_anchor_per_loc = base_anchor.shape[0]
    # 获取特征图上的总位置数
    num_loc = shift.shape[0]
    # 用generate_base_anchor产生的左上角位置的anchor加上偏移量即可得到
    # 后面anchor的信息(这里只针对anchor中心点位置的改变,不改变anchor的
    # 宽和高)。我们首先定义最终anchor的形状,我们知道应该为w*h*9,则所有
    # anchor的存储的变量为(w*h*9,4)。首先将首位置产生的anchor形状改变为
    # (1,9,4),再将shift的形状改变为(1,w*h,4)。并通过transpose函数改变
    # shift的形状为(w*h,1,4),然后使用广播机制将二者相加,即二者的形状分
    # 别为(1,num_anchor_per_loc,4)+(num_loc,1,4),最终相加得到的结果
    # 形状为(num_loc,num_anchor_per_loc,4)。这里,相加的第一项为:
    # [[[x_min_0,y_min_0,x_max_0,y_max_0],
    #   [x_min_1,y_min_1,x_max_1,y_max_1],
    #   ...,
    #   [x_min_8,y_min_8,x_max_8,y_max_8]]]
    # 相加的第二项为:
    # [[[0,  0, 0,  0]],
    #  [[0, 16, 0, 16]],
    #  [[0, 32, 0, 32]],
    #  ...]
    # 在相加的过程中,我们首先将两个加数展开成目标形状。具体地,第一个则可以
    # 展开为:
    # [[[x_min_0,y_min_0,x_max_0,y_max_0],
    #   [x_min_1,y_min_1,x_max_1,y_max_1],
    #   ...,
    #   [x_min_8,y_min_8,x_max_8,y_max_8]],
    #  [[x_min_0,y_min_0,x_max_0,y_max_0],
    #   [x_min_1,y_min_1,x_max_1,y_max_1],
    #   ...,
    #   [x_min_8,y_min_8,x_max_8,y_max_8]],
    #  [[x_min_0,y_min_0,x_max_0,y_max_0],
    #   [x_min_1,y_min_1,x_max_1,y_max_1],
    #   ...,
    #   [x_min_8,y_min_8,x_max_8,y_max_8]],
    #   ...]
    # 第二个可以展开为:
    # [[[0,  0, 0,  0],
    #   [0,  0, 0,  0],
    #   ...],
    #  [[0, 16, 0, 16],
    #   [0, 16, 0, 16],
    #   ...],
    #  [[0, 32, 0, 32],
    #  [0, 32, 0, 32],
    #  ...],
    #  ...]
    # 现在二者维度一致,可以直接相加。得到的结果的形状为:
    # (num_loc,num_anchor_per_loc,4)
    anchor = base_anchor.reshape((1, num_anchor_per_loc, 4)) + \
             shift.reshape((1, num_loc, 4)).transpose((1, 0, 2))
    # 将anchor的形状reshape为最终的形状(num_loc*num_anchor_per_loc,4)。
    anchor = anchor.reshape((num_loc * num_anchor_per_loc, 4)).astype(np.float32)
    return anchor
上面代码都有非常详细的注释,我们再来看其中几个比较重要的函数。
np.arange(start=0, end, step=1):以步长为step生成[start, end)范围内的一个等差数组。如:

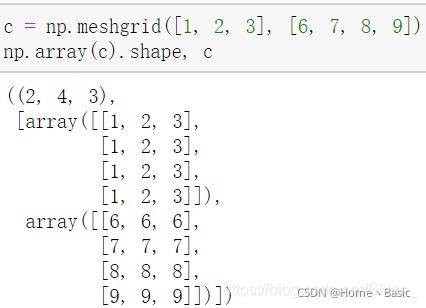
np.meshgrid(x, y):以向量x和向量y为基础返回一个(2, y.length(), x.length())矩阵。这里,如果参数不是一维向量,该函数会首先将其按行展开为一维向量。并且,元素的展开方式有所不同:第一个参数按行展开,第二个参数按列展开。如:

np.stack(arrays, axis=0):在axis=0的维度上将arrays进行堆叠。我们首先以一维向量为例:
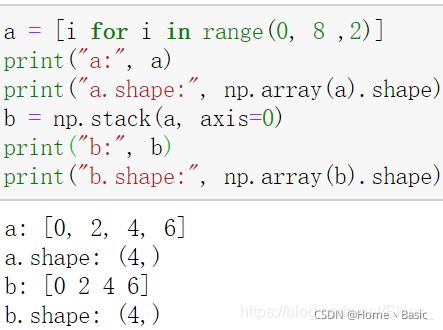
由于a只有一维,在对自身使用stack函数时不会产生变化。现在做如下变化:

我们可以看到,当axis=0时,相当于将a按行堆叠;当axis=1时,相当于将a按列堆叠。其他高维的向量亦如此。
transpose():将矩阵按照某种规律转置,转置方法由具体的参数而定。如:
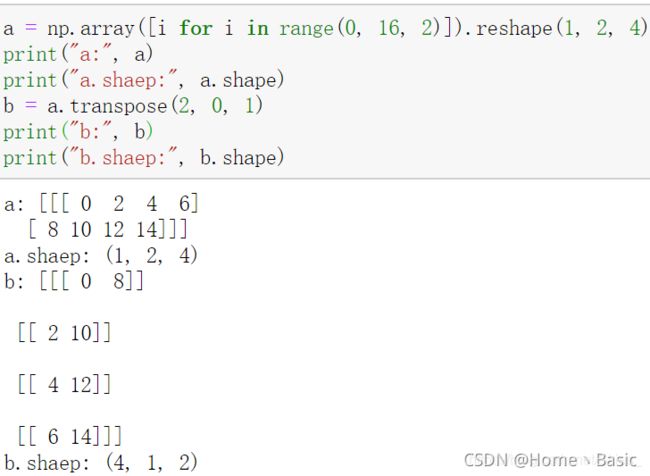
我们首先将a 的形状固定为(1, 2, 4),此时调用函数transpose得到b。由于原a.shape = (1, 2, 3)分别对应于第零维、第一维和第二维,即0、1、2;transpose(2,0,1)相当于把原第零维的元素放到第二个位置、将第一维的元素放到第三个位置、将第二维的元素放到第一个位置,即对应于shape: (1, 2, 4)=>(4, 1, 2)。其他的变换亦如此。
~20k个候选框(1):RPN

由RPN产生约20000个候选框后,一方面,挑选出一部分用于训练 RPN。具体地,从约20000个候选框中选出256个候选框,即128个正样本和128个负样本。
挑选过程如下:
- 对于每个真实框,选择和他具有最大交并比的候选框作为正样本。显然,由于图中的标注目标偏少,无法满足训练要求,我们再进行以下步骤;
- 对于剩下的候选框,如果其和某个真实框的交并比大于设定的阈值,我们也认为它的正样本;
- 同时设定一个负样本阈值,如果候选框同真实框的交兵比小于阈值,则作为负样本。
—注意,在选择正样本和负样本时,要严格满足数量的要求。
class AnchorTargetCreator(object):
    def __init__(self, n_sample=256, pos_iou_thresh=0.7, neg_iou_thresh=0.3, pos_ratio=0.5):
        # 总样本采样数
        self.n_sample = n_sample
        # 正、负样本的阈值
        self.pos_iou_thresh = pos_iou_thresh
        self.neg_iou_thresh = neg_iou_thresh
        # 正负样本采样比率
        self.pos_ratio = pos_ratio

    def __call__(self, bbox, anchor, img_size):
        img_H, img_W = img_size
        # ~20k个anchor
        n_anchor = len(anchor)
        # 只保留合法的Anchor
        inside_index = _get_inside_index(anchor, img_H, img_W)
        anchor = anchor[inside_index]
        # 返回每个anchor与bbox对应的最大交并比索引以及正负样本采样结果
        argmax_ious, label = self._create_label(inside_index, anchor, bbox)
        # 计算回归目标
        loc = bbox2loc(anchor, bbox[argmax_ious])
        # 根据索引得到候选框
        label = _unmap(label, n_anchor, inside_index, fill=-1)
        loc = _unmap(loc, n_anchor, inside_index, fill=0)
        return loc, label

    def _create_label(self, inside_index, anchor, bbox):
        # label: 1表示正样本索引,0表示负样本,-1表示忽略
        label = np.empty((len(inside_index),), dtype=np.int32)
        label.fill(-1)
        # 返回每个anchor与bbox对应的最大交并比和索引以及由第一步产生的正样本索引
        argmax_ious, max_ious, gt_argmax_ious = self._calc_ious(anchor, bbox, inside_index)
        # 最大交并比小于阈值,首先选择为负样本
        label[max_ious < self.neg_iou_thresh] = 0
        # 第一步产生的正样本
        label[gt_argmax_ious] = 1
        # 第二步产生的正样本
        label[max_ious >= self.pos_iou_thresh] = 1
        # 如果正样本数量大于128,再次随机采样
        n_pos = int(self.pos_ratio * self.n_sample)
        pos_index = np.where(label == 1)[0]
        if len(pos_index) > n_pos:
            disable_index = np.random.choice(
                pos_index, size=(len(pos_index) - n_pos), replace=False)
            label[disable_index] = -1
        # 如果负样本数量大于128,再次随机采样
        n_neg = self.n_sample - np.sum(label == 1)
        neg_index = np.where(label == 0)[0]
        if len(neg_index) > n_neg:
            disable_index = np.random.choice(
                neg_index, size=(len(neg_index) - n_neg), replace=False)
            label[disable_index] = -1
        return argmax_ious, label

    def _calc_ious(self, anchor, bbox, inside_index):
        # 计算anchor和bbox之间的交并比,返回形状为(len(anchor),len(bbox))
        # 即一个二维矩阵反应anchor与bbox两两之间的交并比大小
        ious = bbox_iou(anchor, bbox)
        # 对于每一个anchor,求出与之有最大交并比的bbox的索引
        # axis=1按列求最大值,返回形状为(1,len(bbox))
        argmax_ious = ious.argmax(axis=1)
        max_ious = ious[np.arange(len(inside_index)), argmax_ious]
        # 对于每一个bbox,求出与之有最大交并比的anchor的索引
        # axis=0按行求最大值,返回形状为(len(anchor),1)
        gt_argmax_ious = ious.argmax(axis=0)
        gt_max_ious = ious[gt_argmax_ious, np.arange(ious.shape[1])]
        # 对应于挑选正样本的第一步,与bbox有最大交并比的anchor为正样本,得到其索引
        gt_argmax_ious = np.where(ious == gt_max_ious)[0]
        return argmax_ious, max_ious, gt_argmax_ious
其中,bbox2loc为根据真实框和候选框计算偏移的函数。公式如下:
![]()
def bbox2loc(src_bbox, dst_bbox):
    # 预测框(xmin,ymin,xmax,ymax) => (x,y,w,h)
    height = src_bbox[:, 2] - src_bbox[:, 0]
    width = src_bbox[:, 3] - src_bbox[:, 1]
    ctr_y = src_bbox[:, 0] + 0.5 * height
    ctr_x = src_bbox[:, 1] + 0.5 * width
    # 真实框(xmin,ymin,xmax,ymax) => (x,y,w,h)
    base_height = dst_bbox[:, 2] - dst_bbox[:, 0]
    base_width = dst_bbox[:, 3] - dst_bbox[:, 1]
    base_ctr_y = dst_bbox[:, 0] + 0.5 * base_height
    base_ctr_x = dst_bbox[:, 1] + 0.5 * base_width
    # 极小值,保证除数不为零
    eps = np.finfo(height.dtype).eps
    height = np.maximum(height, eps)
    width = np.maximum(width, eps)
    # 套公式
    dy = (base_ctr_y - ctr_y) / height
    dx = (base_ctr_x - ctr_x) / width
    dh = np.log(base_height / height)
    dw = np.log(base_width / width)
    # 将结果堆叠
    loc = np.vstack((dy, dx, dh, dw)).transpose()
    return loc
~20k个候选框(2):Fast R-CNN
由RPN产生约20000个候选框后,另一方面,挑选出一部分用于训练Fast-RCNN。这里,在训练阶段和推理阶段所挑选处理的候选框的数量不同。在训练阶段,挑选出约12k个候选框,利用非极大值抑制得到约2k个候选框;在推理阶段,挑选出约6k个候选框,利用非极大值抑制得到约 0.3k个候选框。这里挑选的规则是候选框的分类置信度。
class ProposalCreator:
    def __init__(self, parent_model, nms_thresh=0.7, n_train_pre_nms=12000, n_train_post_nms=2000,
                 n_test_pre_nms=6000, n_test_post_nms=300, min_size=16):
        self.parent_model = parent_model
        self.nms_thresh = nms_thresh
        self.n_train_pre_nms = n_train_pre_nms
        self.n_train_post_nms = n_train_post_nms
        self.n_test_pre_nms = n_test_pre_nms
        self.n_test_post_nms = n_test_post_nms
        self.min_size = min_size

    def __call__(self, loc, score, anchor, img_size, scale=1.):
        # 训练阶段和推理阶段使用不同数量的候选框
        if self.parent_model.training:
            n_pre_nms = self.n_train_pre_nms
            n_post_nms = self.n_train_post_nms
        else:
            n_pre_nms = self.n_test_pre_nms
            n_post_nms = self.n_test_post_nms
        # 根据偏移得到anchor的实际信息
        roi = loc2bbox(anchor, loc)
        # 将预测框的宽高限定在预设的范围内
        roi[:, slice(0, 4, 2)] = np.clip(
            roi[:, slice(0, 4, 2)], 0, img_size[0])
        roi[:, slice(1, 4, 2)] = np.clip(
            roi[:, slice(1, 4, 2)], 0, img_size[1])
        min_size = self.min_size * scale
        hs = roi[:, 2] - roi[:, 0]
        ws = roi[:, 3] - roi[:, 1]
        keep = np.where((hs >= min_size) & (ws >= min_size))[0]
        roi = roi[keep, :]
        score = score[keep]
        # 排序,得到高置信度部分的候选框
        order = score.ravel().argsort()[::-1]
        if n_pre_nms > 0:
            order = order[:n_pre_nms]
        roi = roi[order, :]
        score = score[order]
        # nms过程,这里不详细展开.pytorch1.2+可以通过from torchvision.ops import nms导入直接使用
        keep = nms(torch.from_numpy(roi).cuda(), torch.from_numpy(score).cuda(), self.nms_thresh)
        if n_post_nms > 0:
            keep = keep[:n_post_nms]
        roi = roi[keep.cpu().numpy()]
        # 返回生成的候选框
        return roi
在最终经由非极大值抑制挑选出候选框后,后面的工作就是Fast-RCNN的内容,这里不再介绍。其中,loc2bbox函数就是bbox2loc函数的逆过程,即根据偏移得到真实框值。
RPN主体部分
RPN共有两个方向的输出。一方面是在RPN部分通过卷积得到两个分支,分别为分类和回归;另一方面产生候选区域作为 Fast-RCNN部分的输入。下面是具体的代码:
class RegionProposalNetwork(nn.Module):
    def __init__(self, in_channels=512, mid_channels=512, ratios=[0.5, 1, 2],
                 anchor_scales=[8, 16, 32], feat_stride=16,
                 proposal_creator_params=dict(), ):
        super(RegionProposalNetwork, self).__init__()
        # 特征图左上角顶点对应的anchor
        self.anchor_base = generate_anchor_base(anchor_scales=anchor_scales, ratios=ratios)
        # 下采样倍数
        self.feat_stride = feat_stride
        # 产生Fast RCNN的候选框
        self.proposal_layer = ProposalCreator(self, **proposal_creator_params)
        n_anchor = self.anchor_base.shape[0]
        self.conv1 = nn.Conv2d(in_channels, mid_channels, 3, 1, 1)
        self.score = nn.Conv2d(mid_channels, n_anchor * 2, 1, 1, 0)
        self.loc = nn.Conv2d(mid_channels, n_anchor * 4, 1, 1, 0)
        # 权重初始化
        normal_init(self.conv1, 0, 0.01)
        normal_init(self.score, 0, 0.01)
        normal_init(self.loc, 0, 0.01)

    def forward(self, x, img_size, scale=1.):
        n, _, hh, ww = x.shape
        # 产生所有的anchor
        anchor = _enumerate_shifted_anchor(np.array(self.anchor_base), self.feat_stride, hh, ww)
        n_anchor = anchor.shape[0] // (hh * ww)
        # rpn部分的回归分支
        h = F.relu(self.conv1(x))
        rpn_locs = self.loc(h)
        rpn_locs = rpn_locs.permute(0, 2, 3, 1).contiguous().view(n, -1, 4)
        # rpn部分的分类分支
        rpn_scores = self.score(h)
        rpn_scores = rpn_scores.permute(0, 2, 3, 1).contiguous()
        rpn_softmax_scores = F.softmax(rpn_scores.view(n, hh, ww, n_anchor, 2), dim=4)
        rpn_fg_scores = rpn_softmax_scores[:, :, :, :, 1].contiguous()
        rpn_fg_scores = rpn_fg_scores.view(n, -1)
        rpn_scores = rpn_scores.view(n, -1, 2)
        # 产生rois部分
        rois = list()
        roi_indices = list()
        for i in range(n):
            roi = self.proposal_layer(
                rpn_locs[i].cpu().data.numpy(),
                rpn_fg_scores[i].cpu().data.numpy(),
                anchor, img_size,
                scale=scale)
            batch_index = i * np.ones((len(roi),), dtype=np.int32)
            rois.append(roi)
            roi_indices.append(batch_index)
        rois = np.concatenate(rois, axis=0)
        roi_indices = np.concatenate(roi_indices, axis=0)
        return rpn_locs, rpn_scores, rois, roi_indices, anchor
RPN部分的损失函数
其中,第一部分是分类损失, N_{cls}表示分类分支总计算的样本数。这里, RPN和 Fast R-CNN部分的数值不同;第二部分是回归损失,N_{cls}表示回归分支总计算的样本数。其中,在回归损失部分乘了一个 p_i^*表示回归损失只针对正样本。且分类损失部分使用的交叉熵损失,回归损失部分使用的是SmoothL1损失。
def _smooth_l1_loss(x, t, in_weight, sigma):
    # 相当于公式中的1/β
    sigma2 = sigma ** 2
    # 相当于公式中的|x|
    diff = in_weight * (x - t)
    abs_diff = diff.abs()
    # 相当于公式中的判断条件
    flag = (abs_diff.data < (1. / sigma2)).float()
    # 根据|x|的范围选择不同分支计算
    y = (flag * (sigma2 / 2.) * (diff ** 2) +
         (1 - flag) * (abs_diff - 0.5 / sigma2))
    return y.sum()

def _fast_rcnn_loc_loss(pred_loc, gt_loc, gt_label, sigma):
    in_weight = torch.zeros(gt_loc.shape).cuda()
    in_weight[(gt_label > 0).view(-1, 1).expand_as(in_weight).cuda()] = 1
    loc_loss = _smooth_l1_loss(pred_loc, gt_loc, in_weight.detach(), sigma)
    # 通过总参与计算的样本数将损失值归一化
    loc_loss /= ((gt_label >= 0).sum().float())
    return loc_loss
然后是计算RPN部分的损失函数的主体部分:
class FasterRCNNTrainer(nn.Module):
    def __init__(self, faster_rcnn):
        super(FasterRCNNTrainer, self).__init__()
        self.faster_rcnn = faster_rcnn
        # smoothl1损失函数的参数
        self.rpn_sigma = 3
        # 得到rpn部分参与损失计算的样本
        self.anchor_target_creator = AnchorTargetCreator()

    def forward(self, imgs, bboxes, labels, scale):
        # 只支持batch_size=1的计算
        n = bboxes.shape[0]
        if n != 1:
            raise ValueError('Currently only batch size 1 is supported.')
        _, _, H, W = imgs.shape
        img_size = (H, W)
        # 经cnn产生的特征图
        features = self.faster_rcnn.extractor(imgs)
        # 经rpn产生的候选框
        rpn_locs, rpn_scores, rois, roi_indices, anchor = \
            self.faster_rcnn.rpn(features, img_size, scale)
        # Since batch size is one, convert variables to singular form
        bbox = bboxes[0]
        rpn_score = rpn_scores[0]
        rpn_loc = rpn_locs[0]
        # rpn_loss
        gt_rpn_loc, gt_rpn_label = self.anchor_target_creator(
            at.tonumpy(bbox), anchor, img_size)
        gt_rpn_label = at.totensor(gt_rpn_label).long()
        gt_rpn_loc = at.totensor(gt_rpn_loc)
        # 回归损失,调用自定义的smoothl1损失函数
        rpn_loc_loss = _fast_rcnn_loc_loss(
            rpn_loc, gt_rpn_loc, gt_rpn_label.data, self.rpn_sigma)
        # 分类损失,调用pytorch自带的交叉熵损失函数
        rpn_cls_loss = F.cross_entropy(rpn_score, gt_rpn_label.cuda(), ignore_index=-1)
        _gt_rpn_label = gt_rpn_label[gt_rpn_label > -1]
        _rpn_score = at.tonumpy(rpn_score)[at.tonumpy(gt_rpn_label) > -1]
        return rpn_loc_loss, rpn_cls_loss


