【 uniapp - 黑马优购 | 首页】小程序首页全局配置(home、网络请求、轮播图、分类...)


个人名片:
作者简介:一名大二在校生,讨厌编程
❄️个人主页:小新爱学习.
个人WeChat:hmmwx53
️系列专栏:️
- 零基础学Java——小白入门必备
- 重识C语言——复习回顾
- 计算机网络体系———深度详讲
- 微信小程序开发——实战开发
- 基于黑马优选的小程序开发实战教程
每日一句:努力的意义是给所爱之人一个美好的未来!
文章目录
- 3. 首页
-
- 3.0 创建 home 分支
- 3.1 配置网络请求
- 3.2 轮播图区域
-
- 3.2.1 请求轮播图的数据
- 3.2.2 渲染轮播图的 UI 结构
- 3.2.3 配置小程序分包
- 3.2.4 点击轮播图跳转到商品详情页面
- 3.2.5 封装 uni.$showMsg() 方法
- 3.3 分类导航区域
-
- 3.3.1 获取分类导航的数据
- 3.3.2 渲染分类导航的 UI 结构
- 3.3.2 点击第一项,切换到分类页面
- 3.4 楼层区域
-
- 3.4.1 获取楼层数据
- 3.4.2 渲染楼层的标题
- 3.4.3 渲染楼层里的图片
- 3.4.4 点击楼层图片跳转到商品列表页
- 3.5 分支的合并与提交
3. 首页
3.0 创建 home 分支
运行如下的命令,基于 master 分支在本地创建 home 子分支,用来开发和 home 首页相关的功能:
git checkout -b home
3.1 配置网络请求
由于平台的限制,小程序项目中不支持 axios,而且原生的 wx.request() API 功能较为简单,不支持拦截器等全局定制的功能。因此,建议在 uni-app 项目中使用 @escook/request-miniprogram 第三方包发起网络数据请求。
请参考
@escook/request-miniprogram的官方文档进行安装、配置、使用
官方文档:https://www.npmjs.com/package/@escook/request-miniprogram
最终,在项目的 main.js 入口文件中,通过如下的方式进行配置:
import { $http } from '@escook/request-miniprogram'

uni.$http = $http
// 配置请求根路径
$http.baseUrl = 'https://www.uinav.com'

// 请求开始之前做一些事情
$http.beforeRequest = function (options) {
  uni.showLoading({
    title: '数据加载中...',
  })
}

// 请求完成之后做一些事情
$http.afterRequest = function () {
  uni.hideLoading()
}
3.2 轮播图区域
3.2.1 请求轮播图的数据
实现步骤:
1. 在 data 中定义轮播图的数组
2. 在 onLoad 生命周期函数中调用获取轮播图数据的方法
3. 在 methods 中定义获取轮播图数据的方法
示例代码:
export default {
  data() {
    return {
      // 1. 轮播图的数据列表,默认为空数组
      swiperList: [],
    }
  },
  onLoad() {
    // 2. 在小程序页面刚加载的时候,调用获取轮播图数据的方法
    this.getSwiperList()
  },
  methods: {
    // 3. 获取轮播图数据的方法
    async getSwiperList() {
      // 3.1 发起请求
      const { data: res } = await uni.$http.get('/api/public/v1/home/swiperdata')
      // 3.2 请求失败
      if (res.meta.status !== 200) {
        return uni.showToast({
          title: '数据请求失败!',
          duration: 1500,
          icon: 'none',
        })
      }
      // 3.3 请求成功,为 data 中的数据赋值
      this.swiperList = res.message
    },
  },
}
3.2.2 渲染轮播图的 UI 结构
- 渲染 UI 结构:
<template>
  <view>

    <swiper :indicator-dots="true" :autoplay="true" :interval="3000" :duration="1000" :circular="true">

      <swiper-item v-for="(item, i) in swiperList" :key="i">
        <view class="swiper-item">

          <image :src="item.image_src">image>
        view>
      swiper-item>
    swiper>
  view>
template>
- 美化 UI 结构:
3.2.3 配置小程序分包
分包可以减少小程序首次启动时的加载时间
为此,我们在项目中,把 tabBar 相关的 4 个页面放到主包中,其它页面(例如:商品详情页、商品列表页)放到分包中。在 uni-app 项目中,配置分包的步骤如下:
-
在项目根目录中,创建分包的根目录,命名为
subpkg -
在
pages.json中,和pages节点平级的位置声明subPackages节点,用来定义分包相关的结构:
{
  "pages": [
    {
      "path": "pages/home/home",
      "style": {}
    },
    {
      "path": "pages/cate/cate",
      "style": {}
    },
    {
      "path": "pages/cart/cart",
      "style": {}
    },
    {
      "path": "pages/my/my",
      "style": {}
    }
  ],
  "subPackages": [
    {
      "root": "subpkg",
      "pages": []
    }
  ]
}
- 在
subpkg目录上鼠标右键,点击新建页面选项,并填写页面的相关信息:
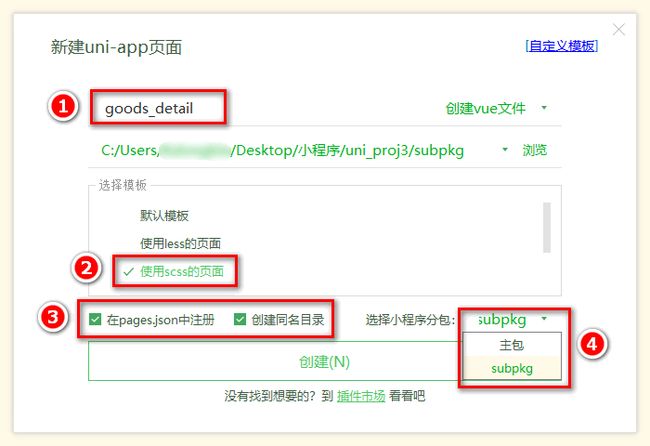
3.2.4 点击轮播图跳转到商品详情页面
将 view 组件,改造为 navigator 导航组件,并动态绑定 url 属性 的值。
- 改造之前的 UI 结构:
<swiper-item v-for="(item, i) in swiperList" :key="i">
  <view class="swiper-item">

    <image :src="item.image_src">image>
  view>
swiper-item>
- 改造之后的 UI 结构:
<swiper-item v-for="(item, i) in swiperList" :key="i">
    <navigator class="swiper-item" :url="'/subpkg/goods_detail/goods_detail?goods_id=' + item.goods_id">

      <image :src="item.image_src">image>
    navigator>
swiper-item>
3.2.5 封装 uni.$showMsg() 方法
当数据请求失败之后,经常需要调用 uni.showToast({ /* 配置对象 */ }) 方法来提示用户。此时,可以在全局封装一个 uni.$showMsg() 方法,来简化 uni.showToast() 方法的调用。具体的改造步骤如下:
- 在 main.js 中,为 uni 对象挂载自定义的 $showMsg() 方法:
// 封装的展示消息提示的方法
uni.$showMsg = function (title = '数据加载失败!', duration = 1500) {
  uni.showToast({
    title,
    duration,
    icon: 'none',
  })
}
- 今后,在需要提示消息的时候,直接调用 uni.$showMsg() 方法即可:
async getSwiperList() {
   const { data: res } = await uni.$http.get('/api/public/v1/home/swiperdata')
   if (res.meta.status !== 200) return uni.$showMsg()
   this.swiperList = res.message
}
3.3 分类导航区域
3.3.1 获取分类导航的数据
实现思路:
-
定义
data数据 -
在
onLoad中调用获取数据的方法 -
在
methods中定义获取数据的方法
示例代码如下:
export default {
  data() {
    return {
      // 1. 分类导航的数据列表
      navList: [],
    }
  },
  onLoad() {
    // 2. 在 onLoad 中调用获取数据的方法
    this.getNavList()
  },
  methods: {
    // 3. 在 methods 中定义获取数据的方法
    async getNavList() {
      const { data: res } = await uni.$http.get('/api/public/v1/home/catitems')
      if (res.meta.status !== 200) return uni.$showMsg()
      this.navList = res.message
    },
  },
}
3.3.2 渲染分类导航的 UI 结构
- 定义如下的 UI 结构:
<view class="nav-list">
   <view class="nav-item" v-for="(item, i) in navList" :key="i">
     <image :src="item.image_src" class="nav-img">image>
   view>
view>
- 通过如下的样式美化页面结构:
.nav-list {
  display: flex;
  justify-content: space-around;
  margin: 15px 0;

  .nav-img {
    width: 128rpx;
    height: 140rpx;
  }
}
3.3.2 点击第一项,切换到分类页面
- 为
nav-item绑定点击事件处理函数:
<view class="nav-list">
  <view class="nav-item" v-for="(item, i) in navList" :key="i" @click="navClickHandler(item)">
    <image :src="item.image_src" class="nav-img">image>
  view>
view>
- 定义
navClickHandler事件处理函数:
// nav-item 项被点击时候的事件处理函数
navClickHandler(item) {
  // 判断点击的是哪个 nav
  if (item.name === '分类') {
    uni.switchTab({
      url: '/pages/cate/cate'
    })
  }
}
3.4 楼层区域
3.4.1 获取楼层数据
实现思路:
-
定义
data数据 -
在
onLoad中调用获取数据的方法 -
在
methods中定义获取数据的方法
示例代码如下:
export default {
  data() {
    return {
      // 1. 楼层的数据列表
      floorList: [],
    }
  },
  onLoad() {
    // 2. 在 onLoad 中调用获取楼层数据的方法
    this.getFloorList()
  },
  methods: {
    // 3. 定义获取楼层列表数据的方法
    async getFloorList() {
      const { data: res } = await uni.$http.get('/api/public/v1/home/floordata')
      if (res.meta.status !== 200) return uni.$showMsg()
      this.floorList = res.message
    },
  },
}
3.4.2 渲染楼层的标题
- 定义如下的
UI结构:
<view class="floor-list">

  <view class="floor-item" v-for="(item, i) in floorList" :key="i">

    <image :src="item.floor_title.image_src" class="floor-title">image>
  view>
view>
- 美化楼层标题的样式:
.floor-title {
  height: 60rpx;
  width: 100%;
  display: flex;
}
3.4.3 渲染楼层里的图片
- 定义楼层图片区域的
UI结构:
<view class="floor-img-box">

  <view class="left-img-box">
    <image :src="item.product_list[0].image_src" :style="{width: item.product_list[0].image_width + 'rpx'}" mode="widthFix">image>
  view>

  <view class="right-img-box">
    <view class="right-img-item" v-for="(item2, i2) in item.product_list" :key="i2" v-if="i2 !== 0">
      <image :src="item2.image_src" mode="widthFix" :style="{width: item2.image_width + 'rpx'}">image>
    view>
  view>
view>
- 美化楼层图片区域的样式:
.right-img-box {
  display: flex;
  flex-wrap: wrap;
  justify-content: space-around;
}

.floor-img-box {
  display: flex;
  padding-left: 10rpx;
}
3.4.4 点击楼层图片跳转到商品列表页
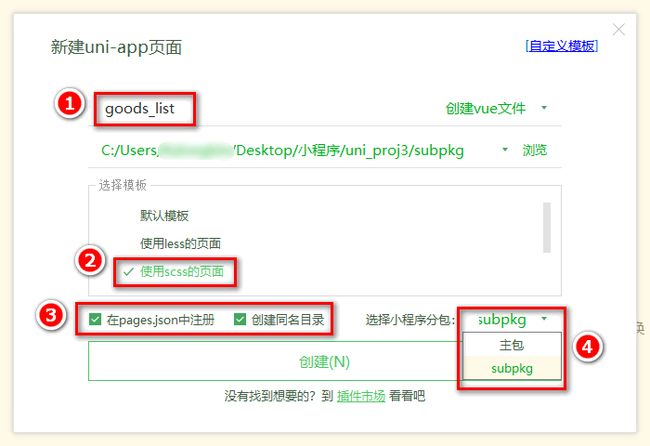
- 在
subpkg分包中,新建goods_list页面
- 楼层数据请求成功之后,通过双层
forEach循环,处理URL地址:
// 获取楼层列表数据
async getFloorList() {
  const { data: res } = await uni.$http.get('/api/public/v1/home/floordata')
  if (res.meta.status !== 200) return uni.$showMsg()

  // 通过双层 forEach 循环,处理 URL 地址
  res.message.forEach(floor => {
    floor.product_list.forEach(prod => {
      prod.url = '/subpkg/goods_list/goods_list?' + prod.navigator_url.split('?')[1]
    })
  })

  this.floorList = res.message
}
- 把图片外层的
view组件,改造为navigator组件,并动态绑定url属性 的值:
<!-- 楼层图片区域 -->
<view class="floor-img-box">
  <!-- 左侧大图片的盒子 -->
  <navigator class="left-img-box" :url="item.product_list[0].url">
    <image :src="item.product_list[0].image_src" :style="{width: item.product_list[0].image_width + 'rpx'}" mode="widthFix"></image>
  </navigator>
  <!-- 右侧 4 个小图片的盒子 -->
  <view class="right-img-box">
    <navigator class="right-img-item" v-for="(item2, i2) in item.product_list" :key="i2" v-if="i2 !== 0" :url="item2.url">
      <image :src="item2.image_src" mode="widthFix" :style="{width: item2.image_width + 'rpx'}"></image>
    </navigator>
  </view>
</view>
3.5 分支的合并与提交
- 将本地的 home 分支进行本地的 commit 提交:
git add .
git commit -m "完成了 home 首页的开发"
- 将本地的 home 分支推送到远程仓库进行保存:
git push -u origin home
- 将本地的 home 分支合并到本地的 master 分支:
git checkout master
git merge home
- 删除本地的 home 分支:
git branch -d home
