mmdetection使用步骤
mmdetection使用步骤
- 1、准备
-
- 1.1软件
- 1.2Conda 虚拟环境中Python包版本
- 2、环境配置
-
- 2.1 需要的介绍
- 2.2 环境安装
-
- 2.2.0 版本选择
- 2.2.1 VS2019安装
- 2.2.2 conda虚拟环境
- 2.2.3 pytorch 安装
- 2.2.4 安装其他必要的Python包
- 2.2.5 安装mmcv
- 2.2.6 安装mmdetection
- 2.2.7 安装 apex
- 2.2.8 拉取代码
- 2.2.9 测试工程
- 2.2.10 常见问题
- 3 训练自己的数据集
-
- 3.1 修改工程
- 3.2 开始训练
- 4 测试
1、准备
1.1软件
Windows 11(我的设备:拯救者y7000p i7-11800H RTX3060 6G独显 )
PyCharm
Cuda + cudnn(cuda:11.5.1 cudnn:8.3.3.40)
Python 3.6+(python 3.8)
Anaconda
VS2019
1.2Conda 虚拟环境中Python包版本
Pytorch 1.8.2
mmcv 1.3.17
mmdetection 2.20.0
2、环境配置
2.1 需要的介绍
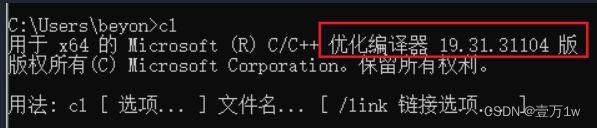
- VS 2019 :用里面的一个编译软件去编译文件,用于安装mmcv,因为mmcv没有提供编译好的可用于windows的文件。(注意只能安装2017-2019版本,不然在编译mmcv时会报错,只装C++部分即可)。
- MMDetection:是一个基于 PyTorch 的目标检测开源工具箱。但是依赖 mmcv,支持 pytorch 1.5+。
- mmcv:类似OpenCV,是一个开源的面向计算机视觉的基础库,高质量实现CUDA算子,使用它的话需要 python 3.6+
2.2 环境安装
2.2.0 版本选择
VS 2019 建议安装2019版本。
MMDetection:2.20.0 (地址:https://github.com/open-mmlab/mmdetection/blob/master/docs/en/get_started.md)
mmcv:1.3.17 (参考:https://github.com/open-mmlab/mmdetection/blob/master/docs/en/get_started.md)由 VS的编译工具 cl 编译得到。
注:2.20.0版本可能会无法使用,最后退回2.11.0版本
2.2.1 VS2019安装
直接去VS官网下载,第一步下载的时候可能需要,后面下载的时候不用,安装时只勾选桌面端的C++部分就可以。
- 添加环境变量到系统环境变量->Path下,地址在安装目录下(根据自己的安装位置):D:\install_in_D\VS2019\2019\Community\VC\Tools\MSVC\14.29.30133\bin\Hostx86\x64
- 验证是否可用:
2.2.2 conda虚拟环境
-
方案一(直接创建)
直接创建:conda create -n swin_det python=3.8
激活conda环境:activate swin_det -
方案二(指定目录创建)
指定目录创建:如在 E:\Python\Pytorch\STOD 目录下执行下面的命令:
执行:conda create --prefix=E:\Python\Pytorch\STOD\swin_det python=3.8
激活 conda 环境:activate E:\Python\Pytorch\STOD\swin_det
2.2.3 pytorch 安装
官网地址:https://pytorch.org/
安装:pip3 install torch==1.8.2+cu111 torchvision==0.9.2+cu111 torchaudio===0.8.2 -f https://download.pytorch.org/whl/lts/1.8/torch_lts.html
指定阿里源 (国内一般需要) -i http://mirrors.aliyun.com/pypi/simple/ --trusted-host mirrors.aliyun.com
2.2.4 安装其他必要的Python包
在虚拟环境下执行:pip install cython matplotlib opencv-python timm -i http://mirrors.aliyun.com/pypi/simple/ --trusted-host mirrors.aliyun.com
2.2.5 安装mmcv
-
项目地址:https://github.com/open-mmlab/mmcv/blob/master/README_zh-CN.md
-
进入之前创建的conda环境跟目录内:如:
E:\Python\Pytorch\STOD\swin_det -
克隆指定版本的 mmcv代码(或者clone master 之后再checkout)。
git clone -b v1.3.17 [email protected]:open-mmlab/mmcv.git(需要你在github配置了密钥,没有配置的话使用https链接克隆) -
此时环境内就有 mmcv的文件夹。
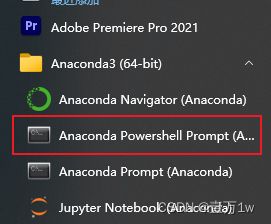
打开 conda的power shell(一定要用这个)!!!
-
进入到 conda环境目录,激活conda 环境
直接创建的conda环境的使用:conda activate swin_det
指定了conda环境路径的使用:conda activate .\mmdet_swin
进入mmcv目录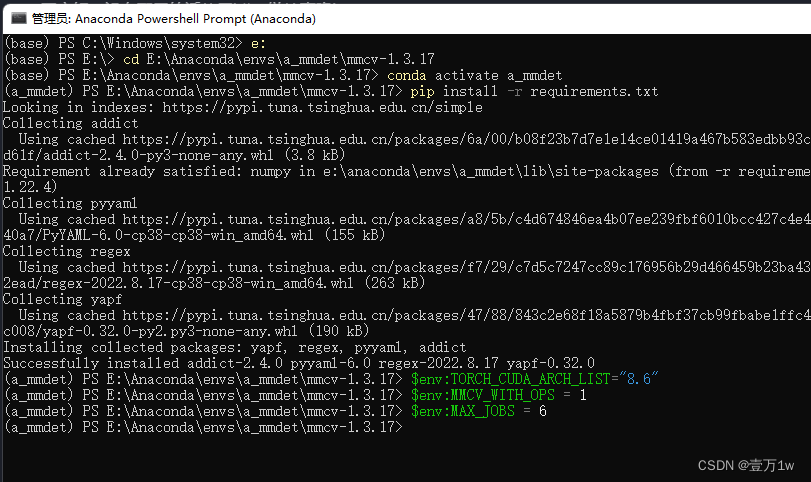
-
进入到 mmcv 目录下,执行
pip install -r requirements.txt来安装mmcv所需的python包 -
配置环境变量:应该是因为在安装mmcv时用到。
$env:TORCH_CUDA_ARCH_LIST="8.6"8.6为显卡算力(我的就是8.6)
$env:MMCV_WITH_OPS = 1
$env:MAX_JOBS = 6根据CPU核心数设置(其实我是8核心,不大于你CPU核心应该就没事)
-
运行:
python setup.py build_ext(这步包括下面的一步就会用到之前VS中的cl工具) -
运行:
python setup.py develop -
验证:
codna list 会看到 mmcv-full(记得确定一下版本对不对 1.3.17)
2.2.6 安装mmdetection
-
进入之前创建的conda环境目录内:如我的目录:
E:\Python\Pytorch\STOD\swin_det,确保已经激活了conda虚拟环境 -
克隆mmdetection 的代码,找到要拉取的版本后 git clone(或者clone master 之后再checkout),地址:https://github.com/open-mmlab/mmdetection/tree/v2.20.0
-
git clone -b v2.20.0 [email protected]:open-mmlab/mmdetection.git(需要你在github配置了密钥,没有配置的话使用https链接克隆) -
进入 mmdetection的代码目录,安装mmdetection所需的python包,执行:
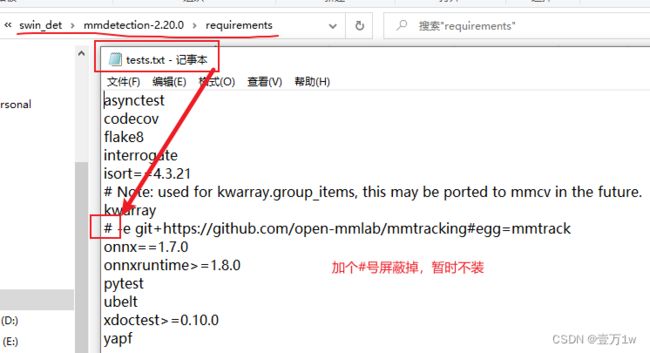
pip install -r requirements.txt -i http://mirrors.aliyun.com/pypi/simple/ --trusted-host mirrors.aliyun.com(会在下载mmtrack时候出错,这是某个测试环境需要的包,暂时不管它,把它屏蔽掉,再运行上面命令)。
屏蔽方式:
-
安装 mmdetection,执行 :
python setup.py develop(过程中安装了pycocotools,但是最后发现用不到) -
验证
pip list可以看到 mmdet(记得确定一下版本对不对 2.20.0)
注:apex可以尝试直接用pip装,但是不是确定是否可用,可以尝试。
2.2.7 安装 apex
- 进入之前创建的conda环境目录内
- 激活conda 环境
clone apex 项目:https://github.com/NVIDIA/apex
进入 apex 文件夹
执行:python setup.py install
pip list 能看见 apex (0.1版本,只有这一个版本)
注:安装的apex会在训练模型时候有一个警告内容如下:(但实际没啥影响)
fused_weight_gradient_mlp_cuda module not found. gradient accumulation fusion with weight gradient computation disabled
2.2.8 拉取代码
地址:https://github.com/SwinTransformer/Swin-Transformer-Object-Detection
设置工程所用环境为前面准备好的虚拟环境
2.2.9 测试工程
下载权值文件:(直接丢在项目根目录下)
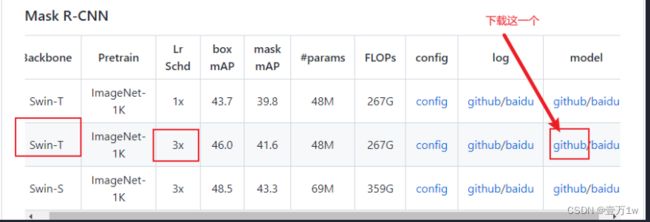
验证执行如下命令:
python demo/image_demo.py demo/demo.jpg configs/swin/mask_rcnn_swin_tiny_patch4_window7_mstrain_480-800_adamw_3x_coco.py mask_rcnn_swin_tiny_patch4_window7.pth
成功的话 能看到实例图片,当 mask_rcnn_swin_tiny_patch4_window7.pth 不在项目根目录下的时候,需要在前面指定具体位置。
2.2.10 常见问题
- Q1:TypeError: MaskRCNN: SwinTransformer: init() got an unexpected keyword argument ‘embed_dim’
- A1:在虚拟环境下,进入Swin-Transformer-Object-Detection 项目目录,执行:
python setup.py develop - 此时会发现 mmdetection被换了版本,变为了 2.11.0,我也没办法,最终使用的并不是开始设想的2.20.0
3 训练自己的数据集
3.1 修改工程
- 设置类别:修改
configs/base/models/mask_rcnn_swin_fpn.py中num_classes为自己数据集的类别(有两处需要修改) - 配置权重信息:修改
configs/base/default_runtime.py中的interval,loadfrom
interval:dict(interval=1) # 表示多少个 epoch 验证一次,然后保存一次权重信息
loadfrom:表示加载哪一个训练好的权重,可以直接写绝对路径如:load_from = r"E:\Python\Pytorch\Swin-Transformer-Object-Detection\mask_rcnn_swin_tiny_patch4_window7.pth" - 修改训练尺寸大小:如果显存够的话可以不改(基本都运行不起来),文件位置为:
configs/swin/mask_rcnn_swin_tiny_patch4_window7_mstrain_480-800_adamw_3x_coco.py- 修改所有的 img_scale 为 :
img_scale = [(224, 224)]或者img_scale = [(256, 256)]或者 480,512等(32的倍数)。 - 同时
configs/base/datasets/coco_instance.py中的img_scale也要改成img_scale = [(224, 224)]或者其他值
- 修改所有的 img_scale 为 :
- 配置数据集路径:
configs/base/datasets/coco_instance.py文件的最上面指定了数据集的路径,因此在项目下新建data/coco目录,下面四个子目录 annotations和test2017,train2017,val2017。
修改该文件下的 train val test 的路径为自己新建的路径:
train=dict(
        type=dataset_type,
        ann_file=data_root + 'annotations/instances_train2017.json',
        img_prefix=data_root + 'train2017/',
        pipeline=train_pipeline),
    val=dict(
        type=dataset_type,
        ann_file=data_root + 'annotations/instances_val2017.json',
        img_prefix=data_root + 'val2017/',
        pipeline=test_pipeline),
    test=dict(
        type=dataset_type,
        ann_file=data_root + 'annotations/instances_test2017.json',
        img_prefix=data_root + 'test2017/',
        pipeline=test_pipeline))
- 修改 batch size 和 线程数:根据自己的显存和CPU来设置
samples_per_gpu=2,  # batch size
workers_per_gpu=2,  # 每个GPU对应线程数 可以大一些
- 修改分类数组:
mmdet/datasets/coco.py
CLASSES中填写自己的分类:CLASSES = ('person', 'bicycle', 'car')
3.2 开始训练
执行:python tools/train.py configs\swin\mask_rcnn_swin_tiny_patch4_window7_mstrain_480-800_adamw_3x_coco.py
4 测试
- 添加一个自己的图片在demo目录下,
执行:python demo/image_demo.py demo/000019.jpg configs\swin\mask_rcnn_swin_tiny_patch4_window7_mstrain_480-800_adamw_3x_coco.py work_dirs/mask_rcnn_swin_tiny_patch4_window7_mstrain_480-800_adamw_3x_coco/latest.pth
latest.pth 就是自己训练好的最新的权重文件,默认会放在workdir下。
- 不输出实例分割图
demo/image_demo.py做如下修改:
# test a single image
result = inference_detector(model, args.img)
new_result = result[0]
# show the results
show_result_pyplot(model, args.img, new_result, score_thr=args.score_thr)
- 训练
cascade_mask_rcnn_swin
- 与之前训练
maskrcnn_swin一样,但是如果是单卡多修改如下部分 configs/swin/cascade_mask_rcnn_swin_small_patch4_window7_mstrain_480-800_giou_4conv1f_adamw_3x_coco.py文件中,所有的 SyncBN 改为 BN。