- 集合之Map(一)
青柠过敏
javaspring开发语言
今天接着看看源码,Map是一个抽象接口,和昨天的Set很像。常见接口:size(),isEmpty(),containsKey(有个s),containsValue(s),Vget(Objectkey)(根据key获取value),Vput(Kkey,Vvalue);(传入值),Vremove(Objectkey)根据key删除,如果map包含null,那么如果没找到,则会抛出Unsupporte
- 12.12【java exp4】react table全局搜索tailwindcss 布局 (Layout) css美化 3. (rowId: number
CQU_JIAKE
CQUCSjavascript前端react.js
reacttable创建一个下拉菜单,允许用户选择要搜索的列。创建一个输入框,用于输入搜索关键词。根据用户的选择,动态地应用过滤器到指定的列全局搜索importReactfrom'react';import{useTable,useFilters,useGlobalFilter,useSortBy,usePagination}from'react-table';//自定义过滤组件functionC
- Spring Boot项目开发常见问题及解决方案(上)
小芬熊
面试学习路线阿里巴巴springboot后端java
启动相关问题问题1:项目启动时报错“找不到主类”在使用SpringBoot打包成可执行JAR文件后启动,有时会遇到这个头疼的问题。通常是因为打包配置有误或者项目结构不符合要求。解决方案:首先,检查pom.xml(Maven项目)或build.gradle(Gradle项目)中的打包插件配置。确保spring-boot-maven-plugin(Maven示例)配置正确,比如:org.springf
- Kotlin第十六讲---实战通过委托完成SharedPreferences封装
奇舞移动
jscssjava编程语言javascript
内容简介前面讲解了Kotlin具有类委托和属性委托。接下来我给大家分享1个实战技巧,使用属性委托来完成SharedPreferences的封装。前景介绍说起SharedPreferences在Android中是一种常用的本地化存储数据的方案。以前Java封装都是将SharedPreferences封装成单利,原因就是SharedPreferences对象创建过程会解析xml文件,这个过程比较耗性能
- JAVA论文相关技术介绍(JAVA技术)
Curry Peng
java开发语言
3.JAVA技术Java是一种广泛使用的编程语言,具有以下显著特点和优势:面向对象编程(OOP):支持封装、继承和多态等特性,使代码更具模块化、可维护性和可扩展性。平台独立性:Java程序可以在不同的操作系统和硬件平台上运行,只需安装相应的Java运行环境(JRE)。安全性:提供了强大的安全机制,包括访问控制、字节码验证等,确保程序的安全性和稳定性。丰富的类库:拥有大量预先编写好的类和接口,涵盖了
- 从 0 开始使用 cursor 开发一个移动端跨平台应用程序
沐怡旸
reactnative
1.安装必要的工具和环境在开始之前,确保你的开发环境已经安装了以下工具:a.安装Node.js和npmReactNative依赖Node.js和npm(NodePackageManager)。你可以从Node.js官网下载并安装最新版本。b.安装PythonReactNative的Android开发需要Python。确保你已经安装了Python2.7或Python3.x。c.安装Java环境Rea
- Spring Boot 性能优化:如何解决高并发下的瓶颈问题?
zhyoobo
springboot性能优化后端
一、高并发场景的挑战与诊断方法论1.1典型性能瓶颈四层模型在2000+QPS的电商秒杀场景中,SpringBoot应用常面临四层压力传导:网络层瓶颈TCP连接耗尽导致SYN队列溢出(Linux默认仅1024个)SSL握手消耗大量CPU资源(RSA2048单次握手约需10ms)HTTP/1.1的队头阻塞问题(单个连接只能顺序处理请求)应用层瓶颈线程池配置不当引发的上下文切换风暴(默认Tomcat线程
- Goose开源程序本地机上 AI 代理,能够从头到尾自动执行复杂的开发任务。Goose 不仅可以提供代码建议,还可以自主构建整个项目、编写和执行代码、调试故障、编排工作流程以及与外部 API 交互
struggle2025
策略模式人工智能交互
一、软件下载文末提供程序和源码下载Goose是您的机上AI代理,能够从头到尾自动执行复杂的开发任务。Goose不仅可以提供代码建议,还可以自主构建整个项目、编写和执行代码、调试故障、编排工作流程以及与外部API交互。无论您是在构建想法原型、优化现有代码,还是管理复杂的工程管道,goose都能适应您的工作流程并精确执行任务。goose专为实现最大的灵活性而设计,可与任何LLMAPI配合使用,并与支持
- Servlet
NGC2237999
servlet
JavaSE与JavaEEJavaSE(StandardEdition)和JavaEE(EnterpriseEdition)是Java平台的两个主要版本,它们各自有不同的用途和功能。JavaSE(标准版)定义:JavaSE是Java的标准基础版,提供了核心功能和库,用于开发一般的应用程序,如桌面应用和小型工具。主要特性:包含Java语言的基本语法和标准库(如集合框架、IO操作、网络编程等)。适合开
- 理工超市-多用户注册
泛轻舟963
java
理工超市-多用户注册packageshiyanbaogao;importjava.util.Scanner;publicclassBaoGaoDemo04{ staticGoods[]goodsList=newGoods[50]; staticCustomerManagerusesManager=newCustomerManager(); privatestaticString
- MyBatis 学习经验分享
吱屋猪_
mybatis学习经验分享
MyBatis是一个广泛使用的Java持久层框架,它为开发者提供了灵活、易用的数据库操作方式。与Hibernate等全自动化ORM(对象关系映射)框架不同,MyBatis采用了更精细的控制,允许开发者在SQL语句和Java对象之间进行映射。通过它,开发者可以直接编写SQL查询,灵活处理数据库操作,并且仍然享受到框架提供的简化工作流程。以下是我在学习MyBatis过程中的一些经验分享。1.理解MyB
- Spring Boot 启动参数终极解析:如何优雅地控制你的应用?
jiajia651304
springboot后端java
SpringBoot启动参数终极解析:如何优雅地控制你的应用?在使用SpringBoot开发应用时,我们通常需要根据不同的环境(开发、测试、生产)或特定需求调整启动参数,例如:修改默认端口指定不同的配置文件控制JVM内存大小传递自定义参数那么,SpringBoot提供了哪些方式来配置这些启动参数?今天我们就来详细解析SpringBoot启动参数的各种用法,并附带代码示例,让你可以灵活掌控应用的启动
- python函数支持哪些参数类型_Python函数的几种参数类型
weixin_39965283
以下代码均以Python3为基础理解。初识Python函数大部分常见的语言如C、Java、PHP、C#、JavaScript等属于C系语言,Python不属于他们中的一员(ruby亦然)。在这些语言中,Python也属于比较新奇的一派,就函数来说,它没有大括号,用def关键字定义一个函数,定义后用:然后换行tab指定函数函数的范围,当然也不存在什么分号。作为一个函数,那个它肯定是有参数的,Pyth
- TypeScript模块 vs JavaScript模块:现代化开发的模块化之道
念九_ysl
typescript前端typescript
一、模块化开发的重要性在当今前端开发领域,模块化已成为构建可维护、可扩展应用程序的基石。无论是小型项目还是企业级应用,良好的模块化设计都能显著提升代码的可读性和复用性。让我们通过一个简单对比示例开始:JavaScript实现://math.jsexportfunctionadd(a,b){returna+b}//app.jsimport{add}from'./math.js';console.lo
- Springboot中的@ConditionalOnBean注解:使用指南与最佳实践
上官美丽
javaspringbootjavamybatis
在使用SpringBoot进行开发时,大家应该都听说过条件注解(ConditionalAnnotations)。其中的@ConditionalOnBean注解就很有趣,它帮助开发者在特定条件下创建和注入Bean,让你的应用更加灵活。今天就来聊聊这个注解的使用场景、工作原理以及最佳实践!什么是@ConditionalOnBean注解?@ConditionalOnBean是SpringBoot中提供的
- 怎样用Java实现快速排序与找到数组中第k小的值?
上官美丽
java算法排序算法
大家好,今天我们来聊聊在Java中如何实现快速排序算法,以及如何利用这个排序算法来找到一个数组中的第k小的值。这两个主题在算法和数据结构的学习中都非常重要,理解这些内容对编写高效程序有很大的帮助!快速排序(QuickSort)是一种非常流行的排序算法,因为它在平均情况下表现得非常迅速。它的基本思路是通过一个“基准”值将数组分为两部分,然后递归对这两部分进行排序。听起来简单吧!接下来,我们深入了解一
- Maven Deploy Plugin如何使用?
上官美丽
javamavenjava
在Java开发中,Maven是一个非常重要的构建工具。它不仅可以管理项目的依赖关系,还能帮助我们打包和发布项目。在Maven中,deploy插件是一个很实用的功能,它可以将构建好的项目发布到远程仓库。今天,就来聊聊如何使用MavenDeployPlugin,帮助你更好地掌握这个工具!什么是MavenDeployPlugin?MavenDeployPlugin是Maven的一部分,主要用于将构建好的
- 深入理解Ajax原理
lfsf802
前端技术ajaxxmlhttprequestjavascript服务器asynchronous
1.概念ajax的全称是AsynchronousJavaScriptandXML,其中,Asynchronous是异步的意思,它有别于传统web开发中采用的同步的方式。2.理解同步异步异步传输是面向字符的传输,它的单位是字符;而同步传输是面向比特的传输,它的单位是桢,它传输的时候要求接受方和发送方的时钟是保持一致的。举个例子来说同步和异步,同步就好像我们买楼一次性支付,而异步就是买楼分期付款。所以
- Spring Boot 3 新特性实战:从理论到实践
潘多编程
网络java开发语言
引言SpringBoot自发布以来,凭借其简洁的配置和强大的功能,迅速成为Java开发者的首选框架。随着SpringBoot3的发布,开发者们迎来了更多令人兴奋的新特性。本文将深入探讨SpringBoot3的新特性,并通过实战示例展示如何在实际项目中应用这些新功能。1.支持Java17SpringBoot3全面支持Java17,这是Java生态系统中的一个重要里程碑。Java17带来了许多新特性,
- 【 <二> 丹方改良:Spring 时代的 JavaWeb】之 Spring MVC 的核心组件:DispatcherServlet 的工作原理
Foyo Designer
springmvcjavaservletHandlerMappingViewResolver
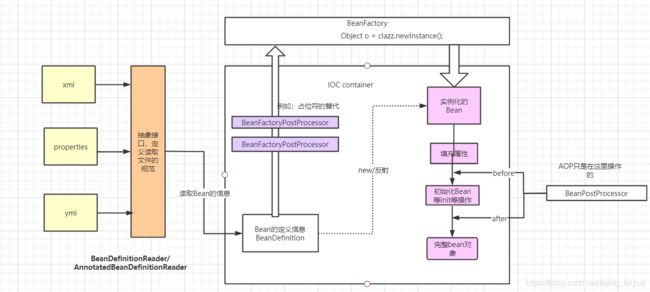
点击此处查看合集https://blog.csdn.net/foyodesigner/category_12907601.html?fromshare=blogcolumn&sharetype=blogcolumn&sharerId=12907601&sharerefer=PC&sharesource=FoyoDesigner&sharefrom=from_link一、DispatcherServ
- Spring中的循环依赖问题是什么?
上官美丽
javaidejavaspringboot
在使用Spring框架进行开发时,可能会遇到一个比较棘手的问题,那就是循环依赖。说到循环依赖,很多人可能会感到有些困惑,难道这个问题真的有那么复杂吗?其实,理解循环依赖并不是很难。我们可以从Spring的依赖注入机制入手,看看循环依赖是如何产生的,以及如何解决这个问题,让项目运行得更加顺利。**什么是循环依赖呢?**简单来说,循环依赖就是在两个或多个Bean之间相互引用的情况。举个例子,假设有两个
- springboot独立邮件服务器,后端篇-SpringBoot–自定义域名发送邮件
洋莞成
前言最近的一个小项目用到了邮件发送的功能,由于自己实现一套SMTP比较复杂,于是借助第三方如QQ邮箱或网易邮箱或Gmail等邮件系统实现此功能,在开发过程中我使用了网易邮箱,并申请了免费的网易企业邮箱实现自定义域名发送邮件。邮件协议SMTPSMTP(SimpleMailTransferProtocol)即简单邮件传输协议是一个在互联网上传输电子邮件的标准。POPPOP(PostOfficeProt
- springboot日志可视化_使用 SpringBoot Admin 监控你的 SpringBoot 程序
weixin_39622568
springboot日志可视化
1.SpringBootAdmin是什么SpringBootAdmin是由codecentric组织开发的开源项目,使用SpringBootAdmin可以管理和监控你的SpringBoot项目。它分为客户端和服务端两部分,客户端添加到你的SpringBoot应用增加暴漏相关信息的HTTP接口,然后注册到SpringBootAdmin服务端,这一步骤可以直接向服务端注册,也可以通过Eureka或者C
- springboot+kafka+邮件发送(最佳实践)
weixin_30347335
大数据java数据库
导读集成spring-kafka,生产者生产邮件message,消费者负责发送引入线程池,多线程发送消息多邮件服务器配置定时任务生产消息;计划邮件发送实现过程导入依赖1.85.1.382.1.51.3.22.8.23.4org.springframework.bootspring-boot-starterorg.springframework.bootspring-boot-starter-tes
- Hive与Spark的UDF:数据处理利器的对比与实践
窝窝和牛牛
hivesparkhadoop
文章目录Hive与Spark的UDF:数据处理利器的对比与实践一、UDF概述二、HiveUDF解析实现原理代码示例业务应用三、SparkUDF剖析-JDBC方式使用SparkThriftServer设置通过JDBC使用UDFSparkUDF的Java实现(用于JDBC方式)通过beeline客户端连接使用业务应用场景四、Hive与SparkUDF在JDBC模式下的对比五、实际部署与最佳实践六、总结
- springboot邮件发送与接收读取(真实使用)
dgqvhtlwq472235338
java测试ui
发送邮件org.springframework.bootspring-boot-starter-freemarkerorg.springframework.bootspring-boot-starter-mailorg.springframework.bootspring-boot-starter-webspring:mail:port:25username:****password:****pr
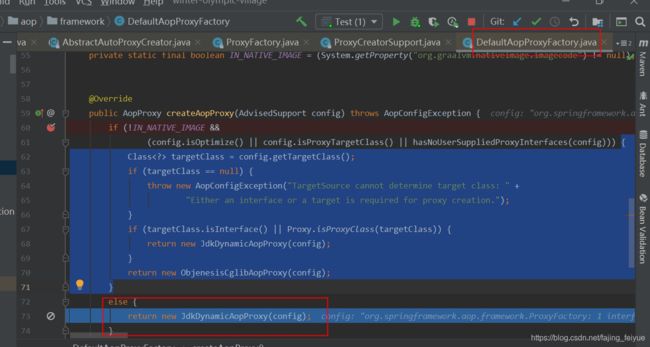
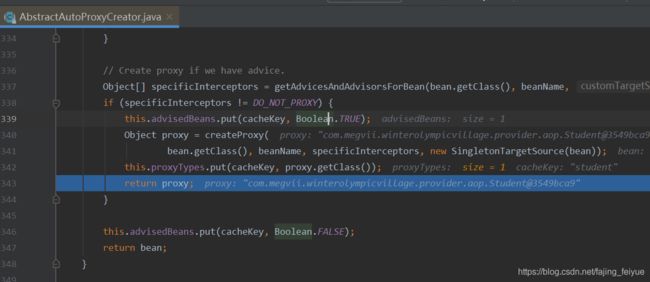
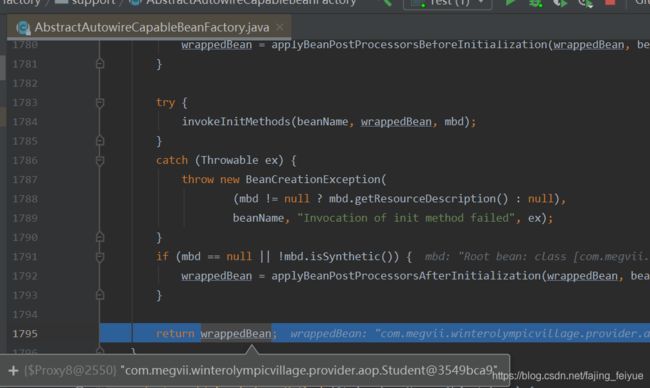
- Java动态代理模式深度解析
Vic10101
Java性能优化开发实战项目总结java代理模式开发语言
1.动态代理基础1.1核心组件Proxy类:动态生成代理对象的工厂类,核心方法为newProxyInstance()。InvocationHandler接口:代理逻辑的处理器,所有方法调用会转发到其invoke()方法。1.2实现步骤定义接口:代理基于接口实现。publicinterfaceUserService{voidaddUser(Stringusername);}实现类(真实对象):pub
- springboot使用163发送自定义html格式的邮件
星月前端
springboothtmljava
springboot使用163发送html格式的邮件效果:下面直接开始教学注册邮箱,生成授权码获取163邮箱的授权码,可以按照以下步骤操作:登录163邮箱打开浏览器,访问163邮箱登录页面。使用你的邮箱账号和密码登录。进入邮箱设置登录后,点击页面右上角的“设置”图标(通常是一个齿轮图标)。在菜单中选择“POP3/SMTP/IMAP”选项。开启SMTP服务在“POP3/SMTP/IMAP”设置页面中
- java--(StringBuilder)
qq_44766305
java开发语言
上一节我们讲解了String,这一节我们来讲解StringBuilder。同样让我们带着疑问来学习:1.什么是StringBuilder?2.为什么要有StringBuilder?一、什么是StringBuilder?StringBuilder可以看成是一个容器,创建之后里面的内容是可变的。二、为什么要有StringBuilder?回答这个问题之前,让我们先看一个例子:publicclassdem
- java 多态
qq_44766305
java开发语言
面向对象三大特性:封装、继承、多态,今天我们来讲解多态定义:同类型的对象表现出不同的形态这听起来有点抽象,我们举个具体的例子:假设你开了一家宠物店,提供宠物寄养的服务,于是你规定可以给寄养所有的波斯猫,附近的居民都把宠物寄养在这里://参数是哈士奇类型,执行功能是寄养publicvoidfoster(波斯猫a);但是,这样会出现一个问题,不同居民可能会带不同的种类的猫还有的宠物过来寄养,可是你的寄
- 解线性方程组
qiuwanchi
package gaodai.matrix;
import java.util.ArrayList;
import java.util.List;
import java.util.Scanner;
public class Test {
public static void main(String[] args) {
Scanner scanner = new Sc
- 在mysql内部存储代码
annan211
性能mysql存储过程触发器
在mysql内部存储代码
在mysql内部存储代码,既有优点也有缺点,而且有人倡导有人反对。
先看优点:
1 她在服务器内部执行,离数据最近,另外在服务器上执行还可以节省带宽和网络延迟。
2 这是一种代码重用。可以方便的统一业务规则,保证某些行为的一致性,所以也可以提供一定的安全性。
3 可以简化代码的维护和版本更新。
4 可以帮助提升安全,比如提供更细
- Android使用Asynchronous Http Client完成登录保存cookie的问题
hotsunshine
android
Asynchronous Http Client是android中非常好的异步请求工具
除了异步之外还有很多封装比如json的处理,cookie的处理
引用
Persistent Cookie Storage with PersistentCookieStore
This library also includes a PersistentCookieStore whi
- java面试题
Array_06
java面试
java面试题
第一,谈谈final, finally, finalize的区别。
final-修饰符(关键字)如果一个类被声明为final,意味着它不能再派生出新的子类,不能作为父类被继承。因此一个类不能既被声明为 abstract的,又被声明为final的。将变量或方法声明为final,可以保证它们在使用中不被改变。被声明为final的变量必须在声明时给定初值,而在以后的引用中只能
- 网站加速
oloz
网站加速
前序:本人菜鸟,此文研究总结来源于互联网上的资料,大牛请勿喷!本人虚心学习,多指教.
1、减小网页体积的大小,尽量采用div+css模式,尽量避免复杂的页面结构,能简约就简约。
2、采用Gzip对网页进行压缩;
GZIP最早由Jean-loup Gailly和Mark Adler创建,用于UNⅨ系统的文件压缩。我们在Linux中经常会用到后缀为.gz
- 正确书写单例模式
随意而生
java 设计模式 单例
单例模式算是设计模式中最容易理解,也是最容易手写代码的模式了吧。但是其中的坑却不少,所以也常作为面试题来考。本文主要对几种单例写法的整理,并分析其优缺点。很多都是一些老生常谈的问题,但如果你不知道如何创建一个线程安全的单例,不知道什么是双检锁,那这篇文章可能会帮助到你。
懒汉式,线程不安全
当被问到要实现一个单例模式时,很多人的第一反应是写出如下的代码,包括教科书上也是这样
- 单例模式
香水浓
java
懒汉 调用getInstance方法时实例化
public class Singleton {
private static Singleton instance;
private Singleton() {}
public static synchronized Singleton getInstance() {
if(null == ins
- 安装Apache问题:系统找不到指定的文件 No installed service named "Apache2"
AdyZhang
apachehttp server
安装Apache问题:系统找不到指定的文件 No installed service named "Apache2"
每次到这一步都很小心防它的端口冲突问题,结果,特意留出来的80端口就是不能用,烦。
解决方法确保几处:
1、停止IIS启动
2、把端口80改成其它 (譬如90,800,,,什么数字都好)
3、防火墙(关掉试试)
在运行处输入 cmd 回车,转到apa
- 如何在android 文件选择器中选择多个图片或者视频?
aijuans
android
我的android app有这样的需求,在进行照片和视频上传的时候,需要一次性的从照片/视频库选择多条进行上传
但是android原生态的sdk中,只能一个一个的进行选择和上传。
我想知道是否有其他的android上传库可以解决这个问题,提供一个多选的功能,可以使checkbox之类的,一次选择多个 处理方法
官方的图片选择器(但是不支持所有版本的androi,只支持API Level
- mysql中查询生日提醒的日期相关的sql
baalwolf
mysql
SELECT sysid,user_name,birthday,listid,userhead_50,CONCAT(YEAR(CURDATE()),DATE_FORMAT(birthday,'-%m-%d')),CURDATE(), dayofyear( CONCAT(YEAR(CURDATE()),DATE_FORMAT(birthday,'-%m-%d')))-dayofyear(
- MongoDB索引文件破坏后导致查询错误的问题
BigBird2012
mongodb
问题描述:
MongoDB在非正常情况下关闭时,可能会导致索引文件破坏,造成数据在更新时没有反映到索引上。
解决方案:
使用脚本,重建MongoDB所有表的索引。
var names = db.getCollectionNames();
for( var i in names ){
var name = names[i];
print(name);
- Javascript Promise
bijian1013
JavaScriptPromise
Parse JavaScript SDK现在提供了支持大多数异步方法的兼容jquery的Promises模式,那么这意味着什么呢,读完下文你就了解了。
一.认识Promises
“Promises”代表着在javascript程序里下一个伟大的范式,但是理解他们为什么如此伟大不是件简
- [Zookeeper学习笔记九]Zookeeper源代码分析之Zookeeper构造过程
bit1129
zookeeper
Zookeeper重载了几个构造函数,其中构造者可以提供参数最多,可定制性最多的构造函数是
public ZooKeeper(String connectString, int sessionTimeout, Watcher watcher, long sessionId, byte[] sessionPasswd, boolea
- 【Java命令三】jstack
bit1129
jstack
jstack是用于获得当前运行的Java程序所有的线程的运行情况(thread dump),不同于jmap用于获得memory dump
[hadoop@hadoop sbin]$ jstack
Usage:
jstack [-l] <pid>
(to connect to running process)
jstack -F
- jboss 5.1启停脚本 动静分离部署
ronin47
以前启动jboss,往各种xml配置文件,现只要运行一句脚本即可。start nohup sh /**/run.sh -c servicename -b ip -g clustername -u broatcast jboss.messaging.ServerPeerID=int -Djboss.service.binding.set=p
- UI之如何打磨设计能力?
brotherlamp
UIui教程ui自学ui资料ui视频
在越来越拥挤的初创企业世界里,视觉设计的重要性往往可以与杀手级用户体验比肩。在许多情况下,尤其对于 Web 初创企业而言,这两者都是不可或缺的。前不久我们在《右脑革命:别学编程了,学艺术吧》中也曾发出过重视设计的呼吁。如何才能提高初创企业的设计能力呢?以下是 9 位创始人的体会。
1.找到自己的方式
如果你是设计师,要想提高技能可以去设计博客和展示好设计的网站如D-lists或
- 三色旗算法
bylijinnan
java算法
import java.util.Arrays;
/**
问题:
假设有一条绳子,上面有红、白、蓝三种颜色的旗子,起初绳子上的旗子颜色并没有顺序,
您希望将之分类,并排列为蓝、白、红的顺序,要如何移动次数才会最少,注意您只能在绳
子上进行这个动作,而且一次只能调换两个旗子。
网上的解法大多类似:
在一条绳子上移动,在程式中也就意味只能使用一个阵列,而不使用其它的阵列来
- 警告:No configuration found for the specified action: \'s
chiangfai
configuration
1.index.jsp页面form标签未指定namespace属性。
<!--index.jsp代码-->
<%@taglib prefix="s" uri="/struts-tags"%>
...
<s:form action="submit" method="post"&g
- redis -- hash_max_zipmap_entries设置过大有问题
chenchao051
redishash
使用redis时为了使用hash追求更高的内存使用率,我们一般都用hash结构,并且有时候会把hash_max_zipmap_entries这个值设置的很大,很多资料也推荐设置到1000,默认设置为了512,但是这里有个坑
#define ZIPMAP_BIGLEN 254
#define ZIPMAP_END 255
/* Return th
- select into outfile access deny问题
daizj
mysqltxt导出数据到文件
本文转自:http://hatemysql.com/2010/06/29/select-into-outfile-access-deny%E9%97%AE%E9%A2%98/
为应用建立了rnd的帐号,专门为他们查询线上数据库用的,当然,只有他们上了生产网络以后才能连上数据库,安全方面我们还是很注意的,呵呵。
授权的语句如下:
grant select on armory.* to rn
- phpexcel导出excel表简单入门示例
dcj3sjt126com
PHPExcelphpexcel
<?php
error_reporting(E_ALL);
ini_set('display_errors', TRUE);
ini_set('display_startup_errors', TRUE);
if (PHP_SAPI == 'cli')
die('This example should only be run from a Web Brows
- 美国电影超短200句
dcj3sjt126com
电影
1. I see. 我明白了。2. I quit! 我不干了!3. Let go! 放手!4. Me too. 我也是。5. My god! 天哪!6. No way! 不行!7. Come on. 来吧(赶快)8. Hold on. 等一等。9. I agree。 我同意。10. Not bad. 还不错。11. Not yet. 还没。12. See you. 再见。13. Shut up!
- Java访问远程服务
dyy_gusi
httpclientwebservicegetpost
随着webService的崛起,我们开始中会越来越多的使用到访问远程webService服务。当然对于不同的webService框架一般都有自己的client包供使用,但是如果使用webService框架自己的client包,那么必然需要在自己的代码中引入它的包,如果同时调运了多个不同框架的webService,那么就需要同时引入多个不同的clien
- Maven的settings.xml配置
geeksun
settings.xml
settings.xml是Maven的配置文件,下面解释一下其中的配置含义:
settings.xml存在于两个地方:
1.安装的地方:$M2_HOME/conf/settings.xml
2.用户的目录:${user.home}/.m2/settings.xml
前者又被叫做全局配置,后者被称为用户配置。如果两者都存在,它们的内容将被合并,并且用户范围的settings.xml优先。
- ubuntu的init与系统服务设置
hongtoushizi
ubuntu
转载自:
http://iysm.net/?p=178 init
Init是位于/sbin/init的一个程序,它是在linux下,在系统启动过程中,初始化所有的设备驱动程序和数据结构等之后,由内核启动的一个用户级程序,并由此init程序进而完成系统的启动过程。
ubuntu与传统的linux略有不同,使用upstart完成系统的启动,但表面上仍维持init程序的形式。
运行
- 跟我学Nginx+Lua开发目录贴
jinnianshilongnian
nginxlua
使用Nginx+Lua开发近一年的时间,学习和实践了一些Nginx+Lua开发的架构,为了让更多人使用Nginx+Lua架构开发,利用春节期间总结了一份基本的学习教程,希望对大家有用。也欢迎谈探讨学习一些经验。
目录
第一章 安装Nginx+Lua开发环境
第二章 Nginx+Lua开发入门
第三章 Redis/SSDB+Twemproxy安装与使用
第四章 L
- php位运算符注意事项
home198979
位运算PHP&
$a = $b = $c = 0;
$a & $b = 1;
$b | $c = 1
问a,b,c最终为多少?
当看到这题时,我犯了一个低级错误,误 以为位运算符会改变变量的值。所以得出结果是1 1 0
但是位运算符是不会改变变量的值的,例如:
$a=1;$b=2;
$a&$b;
这样a,b的值不会有任何改变
- Linux shell数组建立和使用技巧
pda158
linux
1.数组定义 [chengmo@centos5 ~]$ a=(1 2 3 4 5) [chengmo@centos5 ~]$ echo $a 1 一对括号表示是数组,数组元素用“空格”符号分割开。
2.数组读取与赋值 得到长度: [chengmo@centos5 ~]$ echo ${#a[@]} 5 用${#数组名[@或
- hotspot源码(JDK7)
ol_beta
javaHotSpotjvm
源码结构图,方便理解:
├─agent Serviceab
- Oracle基本事务和ForAll执行批量DML练习
vipbooks
oraclesql
基本事务的使用:
从账户一的余额中转100到账户二的余额中去,如果账户二不存在或账户一中的余额不足100则整笔交易回滚
select * from account;
-- 创建一张账户表
create table account(
-- 账户ID
id number(3) not null,
-- 账户名称
nam