Windows/Ubuntu搭建RTMP服务器+OBS推流+VLC拉流
文章目录
- 搭建RTMP服务器
-
- Windows
-
- 1.下载资源
- 2.启动服务器
- 3.查看服务器状态
- 4.其它nginx命令
- Ubuntu
-
- 1.先下载安装 nginx 和 nginx-rtmp 编译依赖工具
- 2. 创建一个工作目录,并切换到工作目录
- 3.下载 nginx 和 nginx-rtmp源码
- 4. 解压 nginx 和 nginx-rtmp安装包
- 5. 编译安装
- 6. 安装nginx init脚本
- 7. 启动nginx
- 8. 配置 Nginx-rtmp 服务器
- OBS推流
-
- 设置
- VLC拉流
- 参考资料
本文包括分别在Windows和Ubuntu搭建RTMP服务器的资源和步骤,两者选一个就可,启动Windows比较简单,Ubuntu适合作为服务器一直开着。之后是OBS推流+VLC拉流,完成整个流程。
搭建RTMP服务器
Windows
1.下载资源
可以选择直接下载
链接:https://pan.baidu.com/s/1ELOP2O-tA_Gxo4rIBT-6dA?pwd=5o0w 提取码:5o0w
也可以选择按照Windows搭建RTMP服务器+OBS推流+VLC拉流进行操作。
2.启动服务器
在带有nginx.exe的目录下打开命令行(cmd)界面,输入
nginx.exe -c conf\nginx.conf
3.查看服务器状态
在浏览器输入http://localhost/stat,看到类似下图就表示上述过程没有问题了。

4.其它nginx命令
nginx.exe -s stop    //快速终止服务器,可能不保存相关信息
nginx.exe -s quit    //完整有序停止服务器,保存相关信息
nginx.exe -s reload  //重新载入Nginx,当配置信息修改,需要重新载入这些配置时使用此命令
如果发现启动后cmd卡住了,可以再开一个新的cmd,使用结束命令,然后直接把原来的关掉就好了。
Ubuntu
1.先下载安装 nginx 和 nginx-rtmp 编译依赖工具
sudo apt-get install build-essential libpcre3 libpcre3-dev libssl-dev
2. 创建一个工作目录,并切换到工作目录
mkdir ~/working
cd ~/working
这样可以防止其他东西对我们造成干扰和困惑。
3.下载 nginx 和 nginx-rtmp源码
wget http://nginx.org/download/nginx-1.20.0.tar.gz
wget https://github.com/arut/nginx-rtmp-module/archive/master.zip
也可以选择使用网盘下载
链接:https://pan.baidu.com/s/1uFm4yRmOWaEp8Vq-3SadRw?pwd=0h0u 提取码:0h0u
4. 解压 nginx 和 nginx-rtmp安装包
先安装unzip工具
sudo apt-get install unzip
tar -zxvf nginx-1.20.0.tar.gz
unzip master.zip
5. 编译安装
cd nginx-1.20.0
./configure --with-http_ssl_module --add-module=../nginx-rtmp-module-master
make && make install
6. 安装nginx init脚本
vim /etc/init.d/nginx
写入以下代码
#!/bin/bash
# nginx Startup script for the Nginx HTTP Server
# it is v.0.0.2 version.
# chkconfig: - 85 15
# description: Nginx is a high-performance web and proxy server.
#              It has a lot of features, but it's not for everyone.
# processname: nginx
# pidfile: /var/run/nginx.pid
# config: /usr/local/nginx/conf/nginx.conf


#注意:这里的三个变量需要根据具体的环境而做修改。
nginxd=/usr/local/nginx/sbin/nginx
nginx_config=/usr/local/nginx/conf/nginx.conf
nginx_pid=/var/run/nginx.pid


RETVAL=0
prog="nginx"

# Check that networking is up.
[ -x $nginxd ] || exit 0
# Start nginx daemons functions.
start() {
if [ -e $nginx_pid ];then
   echo "nginx already running...."
   exit 1
fi
   echo -n $"Starting $prog: "
   $nginxd -c ${nginx_config}
   RETVAL=$?
   echo
   [ $RETVAL = 0 ]
   return $RETVAL
}
# Stop nginx daemons functions.
stop() {
  echo -n $"Stopping $prog: "
  $nginxd -s stop
  RETVAL=$?
  echo
  [ $RETVAL = 0 ] && rm -f /var/lock/subsys/nginx $nginx_pid
}
# reload nginx service functions.
reload() {
  echo -n $"Reloading $prog: "
  kill -HUP `cat ${nginx_pid}`
  RETVAL=$?
  echo
}
# See how we were called.
case "$1" in
  start)
          start
          ;;
  stop)
          stop
          ;;
  reload)
          reload
          ;;
  restart)
          stop
          start
          ;;
  status)
          status $prog
          RETVAL=$?
          ;;
  *)
          echo $"Usage: $prog {start|stop|restart|reload|status|help}"
          exit 1
esac
exit $RETVAL
为所有用户添加权限
sudo chmod a+x /etc/init.d/nginx
7. 启动nginx
/etc/init.d/nginx start
之后再windows电脑上可以浏览http://本机ip地址:80

8. 配置 Nginx-rtmp 服务器
vim /usr/local/nginx/conf/nginx.conf
在最下面添加下面代码:
rtmp {

    server {

            listen 1935;

            chunk_size 4096;


            application live {

                    live on;

                    record off;

hls on;

hls_path /usr/share/nginx/html/hls;

hls_fragment 2s;


                    exec ffmpeg -i rtmp://localhost/live/$name -threads 1 -c:v libx264 -profile:v baseline -b:v 350K -s 640x360 -f flv -c:a aac -ac 1 -strict -2 -b:a 56k rtmp://localhost/live360p/$name;

            }

            application live360p {

                    live on;

                    record off;

        }

application hls360p {

                live on;

                hls on;

                hls_path /usr/share/nginx/html/hls2;

hls_fragment 2s;

            }

    }
需要创建hls的目录:
mkdir -p /usr/share/nginx/html/hls
之后重启nginx服务,
/etc/init.d/nginx restart
就是把启动的start换成了restart
OBS推流
官方下载地址:https://obsproject.com/
设置
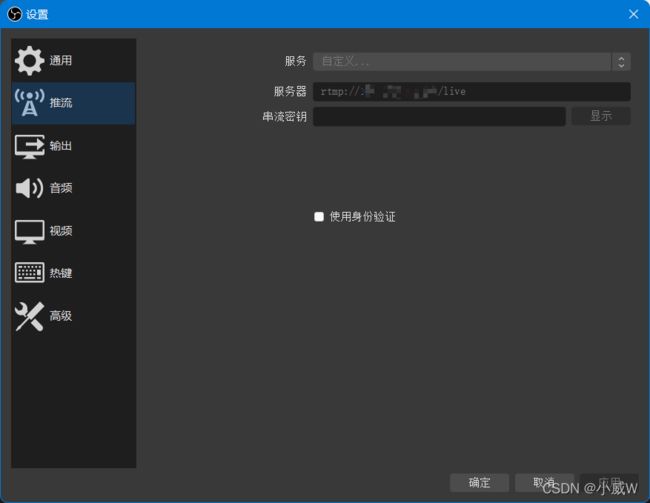
修改推流中的服务器为rtmp://ip/live。其中ip是你自己的服务器的ip地址。
点击主界面中的开始推流

完成!(如果设置有误的话,这个开始推流是点不动的。)
VLC拉流
下载VLC:https://www.videolan.org/
点击 媒体 ——> 打开网络串流

在网络URL中写入自己的 rtmp url (下图中被马赛克掉的是自己的ip地址,换成自己的即可)。
参考资料
【obs调试】如何使用obs在哔哩哔哩开播+画质调试
Windows搭建RTMP服务器+OBS推流+VLC拉流
Ubuntu 搭建Nginx-RTMP流媒体服务器


