python-CST MWS自动采样
python-CST MWS自动采样
- 前言
-
- (==未经允许不要转载,更不要抄袭,谢谢。==) 做天线设计的时候经常会用到cst进行仿真,有时候需要大量的CST仿真数据,一部分结构参数要求是随机生成的或者是指定的数据组合,这样就没办法使用扫参功能。CST自带了vba编程环境,可以使用vba来控制cst实现自动仿真,而python驱动CST仿真的方法就是在history list中添加vba block。我写了一个简单的采样代码,虽然执行之后在CST 的history list中有被标红,但是是可以执行的。如果有大佬能提供一些指导,感激不尽!
- 一、天线结构
- 二、使用步骤
-
- 1.引入库
- 2.生成采样点
- 3.连接CST并设置采样频率
- 4.开始采样
- 总结
前言
提示:这里可以添加本文要记录的大概内容:
(未经允许不要转载,更不要抄袭,谢谢。)
做天线设计的时候经常会用到cst进行仿真,有时候需要大量的CST仿真数据,一部分结构参数要求是随机生成的或者是指定的数据组合,这样就没办法使用扫参功能。CST自带了vba编程环境,可以使用vba来控制cst实现自动仿真,而python驱动CST仿真的方法就是在history list中添加vba block。我写了一个简单的采样代码,虽然执行之后在CST 的history list中有被标红,但是是可以执行的。如果有大佬能提供一些指导,感激不尽!
提示:以下是本篇文章正文内容,下面案例可供参考
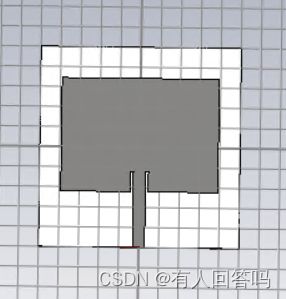
一、天线结构
二、使用步骤
1.引入库
import sys
sys.path.append(r"path\CST Studio Suite 2020\AMD64\python_cst_libraries")#找到cst的安装位置并找到相应的文件夹位置
import os
import numpy as np
import cst.interface
from smt.sampling_methods import LHS
import pandas as pd
(SMT)是一个Python包,它包含代理建模方法、采样技术和基准功能。这个包提供了一个代理项库简单易用并有助于实现其他方法的模型。(https://www.cnpython.com/pypi/smt)
2.生成采样点
# 采样变量
nums = 80  # 样本个数
v_nums = 5  # 变量个数
# 改变s、y0、lf、wp、lp
xlimits = np.array([[0.1, 1.0], [5.0, 13.0], [5.0, 20.0], [30.0, 40.0], [20.0, 30.0]])  # 变量范围
sampling = LHS(xlimits=xlimits)  # 生成样本
x_data = sampling(nums)  # LHS生成采样点
data_sample = np.zeros([nums, v_nums + 1])  # 用于保存采样结果
采样方法为拉丁超立方采样,能够同时保持小样本数量和样本均匀性。
3.连接CST并设置采样频率
# 模型监视器频率
f_min = 2.5;
f_max = 3.5;

# 目标cst文件路径
project_path = (r'path\example.cst')
line_break = '\n'  # 换行符,后面用于VBA代码的拼接用

# 连接接口
cst = cst.interface.DesignEnvironment()
mws = cst.open_project(project_path)
modeler = mws.modeler  # 此种类为3D建模器提供了接口

# 设置频率
sCommand = 'Solver.FrequencyRange "%f","%f"' % (f_min, f_max)
modeler.add_to_history('define frequency', sCommand)

# 设置远场监视
sCommand = ['With Monitor',
        '.Reset',
        '.Domain "Frequency"',
        '.FieldType "Farfield"',
        '.ExportFarfieldSource "False"',
        '.UseSubvolume "False"',
        '.Coordinates "Structure"',
        '.SetSubvolume "-35", "28", "-25", "25", "-2.3", "9.2"',
        '.SetSubvolumeOffset "10", "10", "10", "10", "10", "10" ',
        '.SetSubvolumeInflateWithOffset "False" ',
        '.SetSubvolumeOffsetType "FractionOfWavelength" ',
        '.EnableNearfieldCalculation "True" ',
        '.CreateUsingLinearStep "%f", "%f", "%f"' % (f_min, f_max, 0.1),
        'End With']
sCommand = line_break.join(sCommand)
modeler.add_to_history('define farfield monitor (using linear step)', sCommand)
4.开始采样
for i in range(len(x_data)):
# 删除当前结果
    modeler.add_to_history('delete result', 'DeleteResults')
    mws.save()#保存
    # 修改参数并更新
    sCommand = 'StoreParameter("s", %f)' % x_data[i][0]
    y0Command = 'StoreParameter("y0", %f)' % x_data[i][1]
    lfCommand = 'StoreParameter("lf", %f)' % x_data[i][2]
    wpCommand = 'StoreParameter("wp", %f)' % x_data[i][3]
    lpCommand = 'StoreParameter("lp", %f)' % x_data[i][4]

    modeler.add_to_history('change parameter s', sCommand)
    modeler.add_to_history('change parameter y0', y0Command)
    modeler.add_to_history('change parameter lf', lfCommand)
    modeler.add_to_history('change parameter wp', wpCommand)
    modeler.add_to_history('change parameter lp', lpCommand)

    #modeler.add_to_history('Update Structure','RebuildOnParametricChange("True","False")')
    #modeler.add_to_history('Update Structure','Parametric Update')#更新,F7

    modeler.run_solver()  # 开始仿真

    # 获取结果S参数保存到文件夹Sparameters
    sCommand = ['SelectTreeItem ("1D Results\S-Parameters\S1,1")',
                'With ASCIIExport',
                '.Reset',
                '.FileName ("path\\Sparameters%d.csv")' %i,
                '.Execute',
                'End With']
    sCommand = line_break.join(sCommand)
    modeler.add_to_history('Get S-parameters', sCommand)
总结
在采样部分注释掉的两个语句RebuildOnParametricChange和Parametric Update都是用来代替在cst中修改参数之后按f7对结构进行更新的操作,但是两种办法都不能执行,大概意思是这两个语句不能在控制宏中使用,但是matlab中是能够直接使用RebuildOnParametricChange语句的。
虽然有一些问题,但是整个模型是能够实现自动采样的,在设置好的文件夹中能够看到采样好的文件。后续如果有好办法能够解决上述问题的话我会继续更新的。
