Python 如何优雅地生成 HTML 文档 Dominate
引言
工作中有需要创建一个 HTML 报告,比如测试用例运行报告等。如何优雅地,简洁地创建 HTML 文档,经过一番调研,发现 Python 中的 Dominate 最佳。本文通过介绍 Donimate 的用法,最后再结合一个具体的 html 测试报告实例。
内容提要:
- Dominate 简介
- 创建一个空的 html 文档
- streamline 流式添加 html 元素
- 添加/更改 attributes 属性
- 创建复杂结构的 html 元素
+= 操作
.add()
迭代器 - 添加 Comment 注释
- with 上下文管理器添加 html 元素
简单的 with 语句
嵌套的 with 语句
更改 属性
更改 text - Decorators 修饰器添加 html 元素
- 应用样式 style css
- 创建一个 html 测试报告实例
Dominate 简介
Dominate 是一个 Python 库,利用优雅的 DOM API 来创建和操作 HTML 文档。使用 Dominate 可以用简洁的纯 Pyhon 语句编写 HTML 页面。这消除了学习模板语言的需要,还可以充分利用 Python 的强大功能。
首先需要安装 Dominate 库,然后再导入对应的模块:
pip install donimate
from dominate.tags import *
import dominate
创建一个空的 html 文档
doc = dominate.document()
from dominate.tags import *
import dominate

doc = dominate.document(title='hello')
# save as html file
with open('test.html', 'w') as f:
    f.write(doc.render())
默认render() 将 html 内容按人类可读的形式输出,每个 html 元素一行,按2个空格的缩进。
生成的文档是这样的
DOCTYPE html>
<html>
  <head>
    <title>hellotitle>
  head>
  <body>body>
html>
如果 f.write(doc.render(pretty=False)),则输出:
DOCTYPE html>
<html><head><title>hellotitle>head><body>body>html>
最简单的 html 文档
doc = html()
就只生成 html tag
<html>html>
streamline 流式添加 html 元素
Dominate 最基本的特征就是 HTML 每个元素都是一个类,它的构造函数就是接受它的子元素,text 或 一些属性。注意这种形式通常是最后一层元素接受一些属性定义,其父类只能接收子元素。
print(html(body(h1('Hello, World!'))))
输出
<html>
  <body>
    <h1>Hello, World!h1>
  body>
html>
添加/更改 attributes 属性
Dominate 可以用关键字参数来添加 tag 的属性。大多数属性是直接从 HTML spec 拷贝过来,当然也有少数不一样。
添加属性
print(label('label text', cls='classname anothername', fr='someinput'))
输出:
<label class="classname anothername" for="someinput">label textlabel>
更改属性
当然也可以通过下面的方式去更改属性
from dominate.tags import *

header = div(id='header')
header['id'] = 'newHeader'
print(header)
输出:
<div id="newHeader">div>
更改 text
from dominate.tags import *

d = div('hello')
d[0] = 'ni hao'
print(d)
输出:
<div>ni haodiv>
应用属性实现表格 table 单元格合并
表格单元格的合并,可以通过属性 colspan 来实现
来实现一下面的 table 效果: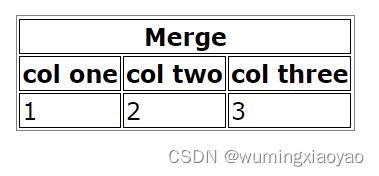
代码:
    style_str = 'border-style: solid;border-width: 1px;'
    with table(style=style_str).add(tbody()):
        tr((th("Merge", colspan='3', style=style_str)))
        with tr():
            th("col one",style=style_str)
            th("col two",style=style_str)
            th("col three",style=style_str)
        with tr():
            td("1",style=style_str)
            td("2",style=style_str)
            td("3",style=style_str)
生成的 HTML 标签:
<table style="border-style: solid;border-width: 1px;">
      <tbody>
        <tr>
          <th colspan="3" style="border-style: solid;border-width: 1px;">Mergeth>
        tr>
        <tr>
          <th style="border-style: solid;border-width: 1px;">col oneth>
          <th style="border-style: solid;border-width: 1px;">col twoth>
          <th style="border-style: solid;border-width: 1px;">col threeth>
        tr>
        <tr>
          <td style="border-style: solid;border-width: 1px;">1td>
          <td style="border-style: solid;border-width: 1px;">2td>
          <td style="border-style: solid;border-width: 1px;">3td>
        tr>
      tbody>
    table>
创建复杂结构的 html 元素
通过使用 += 操作和 .add() 方法,可以很容易地创建更复杂的结构。
+= 操作
from dominate.tags import *

list = ul()
for item in range(4):
    list += li('Item #', item)
print(list)
输出:
<ul>
  <li>Item #0li>
  <li>Item #1li>
  <li>Item #2li>
  <li>Item #3li>
ul>
迭代器
from dominate.tags import *

menu_items = {'Home':'/home', 'About':'/about', 'Download':'/download', 'Link':'link'}
print(ul(li(a(name, href=link), __pretty=False) for name, link in menu_items.items()))
输出:
<ul>
  <li><a href="/home">Homea>li>
  <li><a href="/about">Abouta>li>
  <li><a href="/download">Downloada>li>
  <li><a href="link">Linka>li>
ul>
.add() 方法
from dominate.tags import *
_html = html()
_body = _html.add(body())
header  = _body.add(div(id='header'))
content = _body.add(div(id='content'))
footer  = _body.add(div(id='footer'))
print(_html)
输出:
<html>
    <body>
        <div id="header">div>
        <div id="content">div>
        <div id="footer">div>
    body>
html>
添加 Comment 注释
from dominate.tags import *

print(comment('BEGIN HEADER'))
print(comment(p('Upgrade to newer IE!'), condition='lt IE9'))
with 上下文管理器添加 html 元素
可以用 Python 的 with 语句来添加子元素。
简单的 with 语句
from dominate.tags import *

h = ul()
with h:
    li('One')
    li('Two')
    li('Three')

print(h)
输出:
<ul>
    <li>Oneli>
    <li>Twoli>
    <li>Threeli>
ul>
嵌套的 with 语句
from dominate.tags import *

h = html()
with h.add(body()).add(div(id='content')):
    h1('Hello World!')
    p('Lorem ipsum ...')
    with table().add(tbody()):
        l = tr()
        l += td('One')
        l.add(td('Two'))
        with l:
            td('Three')

print(h)
输出:
<html>
  <body>
    <div id="content">
      <h1>Hello World!h1>
      <p>Lorem ipsum ...p>
      <table>
        <tbody>
          <tr>
            <td>Onetd>
            <td>Twotd>
            <td>Threetd>
          tr>
        tbody>
      table>
    div>
  body>
html>
更改属性
from dominate.tags import *

d = div(id='header')
with d:
  attr(id='newHeader')

print(d)
输出:
<div id="newHeader">div>
更改 text
需要导入 dominate.util.text 函数:
from dominate.tags import *
from dominate.util import text

para = p('hi,\n', pretty=False)
with para:
    text('Have a look at our ')
    a('other products', href='/products')

print(para)
输出:
<p>hi,
Have a look at our
  <a href="/products">other productsa>
p>
Decorators 修饰器添加 html 元素
可以用这种模式创建反复利用的小工具:
def widget(parameters):
    with tag() as t:
        ...
    return t
例如:
from dominate.tags import *

def greeting(name):
    with div() as d:
        p('Hello, %s' % name)
    return d

print(greeting('Bob'))
输出:
<div>
  <p>Hello, Bobp>
div>
用 tag 作为装饰器,也可以取到相同的效果
from dominate.tags import *

@div
def greeting(name):
    p('Hello %s' % name)
print(greeting('Bob'))
再来看一下例子:
from dominate.tags import *

@div(h2('Welcome'), cls='greeting')
def greeting(name):
    p('Hello %s' % name)

print(greeting('Bob'))
输出:
<div class="greeting">
  <h2>Welcomeh2>
  <p>Hello Bobp>
div>
应用样式 style css
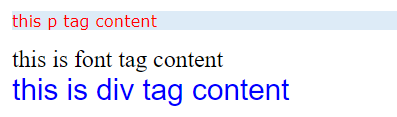
为了生成更漂亮的 html,我们会定义 html tag 的样式即 CSS,Dominate 怎样应用样式呢,很简单,跟生成 html 其它 tag 一样,只是样式就要应用到 style 添加到 head 部分。
如下,我们定义 html tag p 和 div 的样式(字体,颜色等等)。
from dominate.tags import *

style_applied = '''
p{
    font-family: verdana;
	font-size:11px;
    color:red;
    background-color: #DDEBF7;
	}
div{
	font-family: arial;
	font-size:20px;
    color:blue;
	}
'''
def generate_html():
    html_root = html()

    # html head
    with html_root.add(head()):
         style(style_applied, type='text/css')

    # html body
    with html_root.add(body()):
        p("this p tag content")
        font("this is font tag content")
        div("this is div tag content")

    # save as html file
    with open('css_test.html', 'w') as f:
        f.write(html_root.render())

if __name__ == "__main__":

   generate_html()
生成 html 效果:
<html>
  <head>
    <style type="text/css">
p{
    font-family: verdana;
	font-size:11px;
    color:red;
    background-color: #DDEBF7;
	}
div{
	font-family: arial;
	font-size:20px;
    color:blue;
	}
style>
  head>
  <body>
    <p>this p tag contentp>
    <font>this is font tag contentfont>
    <div>this is div tag contentdiv>
  body>
html>
创建一个 html 测试报告实例
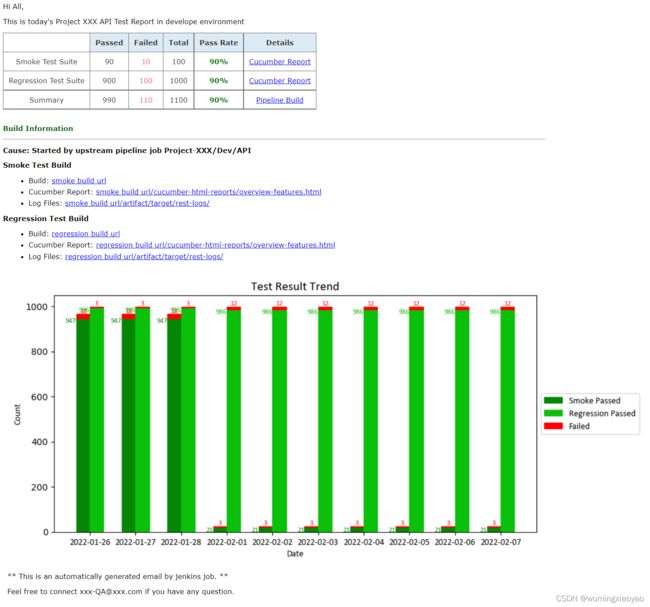
结合上面的知识点,我们来创建一个测试报告,数据是 mock 的,有关直方图的生成,请参考 Python 绘制直方图
效果如下:
完整代码:
from dominate.tags import *

style_applied = '''
        body{
			font-family: verdana,arial,sans-serif;
			font-size:11px;
		}
		table.gridtable {
			color: #333333;
			border-width: 1px;
			border-color: #666666;
			border-collapse: collapse;
            font-size:11px;
		}
		table.gridtable th {
			border-width: 1px;
			padding: 8px;
			border-style: solid;
			border-color: #666666;
			background-color: #DDEBF7;
		}
		table.gridtable td {
			border-width: 1px;
			padding: 8px;
			border-style: solid;
			border-color: #666666;
			background-color: #ffffff;
			text-align:center;
		}
		table.gridtable td.failed {
			color:#ED5F5F;
		}
		table.gridtable td.passrate {
			font-weight:bold;
			color:green;
		}
		li {
			margin-top:5px;
		}
        div{
            margin-top:10px;
        }
    '''

def set_Hello(env, project_type):
    hello_str = "This is today's " + project_type + " API Test Report in " + env
    hello_div = div(id='hello')
    hello_div.add(p('Hi All,'))
    hello_div.add(p(hello_str))

def set_table_head():
    with tr():
        th(style='background-color:white')
        th("Passed")
        th("Failed")
        th("Total")
        th("Pass Rate")
        th("Details")

def fill_table_data(data_type, passed_count, fail_count, pass_rate, link_text, link_url):
    data_tr = tr()
    data_tr += td(data_type)
    data_tr += td(passed_count)
    data_tr += td(fail_count, cls='failed')
    data_tr += td(passed_count + fail_count)
    data_tr += td(pass_rate, cls='passrate')
    link_td = td()
    link_td += a(link_text, href=link_url)
    data_tr += link_td

def generate_result_table():
    result_div = div(id='test case result')
    with result_div.add(table(cls='gridtable')).add(tbody()):
        set_table_head()
        fill_table_data('Smoke Test Suite', 90, 10, '90%', 'Cucumber Report', 'cucumber-html-reports/overview-features.html')
        fill_table_data('Regression Test Suite', 900, 100, '90%', 'Cucumber Report','cucumber-html-reports/overview-features.html')
        fill_table_data('Summary', 990, 110, '90%', 'Pipeline Build','trigger build')

def generate_build_cause(cause):
    br()
    div(b(font('Build Information' ,color='#0B610B')))
    div(hr(size=2, alignment='center', width='100%'))
    div((b(font('Cause: Started by upstream pipeline job ' + cause))))

def generate_list_link(category, href_link):
    with li(category + ':'):
        a(href_link, href=href_link)

def generate_build_info(build_type, build_url):
    build_type_div = div()
    build_type_fond = b()
    build_type_fond += font(build_type + ' Test Build')
    build_type_div += build_type_fond
    with ul():
        generate_list_link('Build', build_url)
        generate_list_link('Cucumber Report', build_url + '/cucumber-html-reports/overview-features.html')
        generate_list_link('Log Files', build_url + '/artifact/target/rest-logs/')

def generate_ending():
    br()
    p('** This is an automatically generated email by jenkins job. **')
    p('Feel free to connect [email protected] if you have any question.')

def insert_image():
    img(src='test_result_trend.png')

def generate_html_report():
    html_root = html()
    # html head
    with html_root.add(head()):
         style(style_applied, type='text/css')
    # html body
    with html_root.add(body()):
        set_Hello('develope environment', 'Project XXX')
        generate_result_table()
        generate_build_cause('Project-XXX/Dev/API')
        generate_build_info('Smoke', 'smoke build url')
        generate_build_info('Regression', 'regression build url')
        insert_image()
        generate_ending()
    # save as html file
    with open('email_report.html', 'w') as f:
        f.write(html_root.render())

if __name__ == "__main__":
   generate_html_report()