【机器学习】基于Pytorch和GoogleNet的海面舰船图像分类
文章目录
- 基于Pytorch和GoogleNet的海面舰船图像分类
-
- 1. 问题概述
- 2. 实验环境、依赖库与代码结构
- 3. GoogleNet网络架构
-
- 3.1 Inception结构
- 3.2 辅助分类器
- 4. GoogleNet网络特征提取说明
-
- 4.1 低层特征提取
- 4.2 Inception特征提取
- 4.3 分类器特征提取
- 5. 具体参数设计
- 6. 实际代码说明
- 7. 网络训练结果分析
基于Pytorch和GoogleNet的海面舰船图像分类
1. 问题概述
为了训练得到一个能够对海面船舶数据集进行二分类的网络模型(类别为:船舶/非船舶,数据集包括3000张海面图片和1000张舰船图片),我们有以下步骤:
- 整理数据集,按照要求更改数据格式;
- 对数据集进行合理的训练集/测试集划分;
- 编写、部署并调试好网络模型代码;
- 使用训练代码在训练集上训练模型,观察训练损失直到训练收敛;
- 训练完毕后,使用训练好的模型在测试集上测试网络性能;
- 分析测试结果。
2. 实验环境、依赖库与代码结构
由于本机不足以用作训练环境,为了完成模型的训练,我们在本地编写代码,并移植到Kaggle Kernel进行运行。实验使用Pytorch框架,依赖库名称、版本、功能如下所示:
| 依赖库名称 | 依赖库版本 | 依赖库功能 |
|---|---|---|
torch |
1.6.0 | 在GPU上计算张量 |
torchvision |
0.7.0 | 包含流行的数据集,模型结构和常用的图片转换工具 |
tqdm |
4.63.0 | 用于显示进度,创建、关闭进度条 |
Pillow |
8.4.0 | 包含图像的基本处理函数 |
Matplotlib |
8.1 | 绘制图片 |
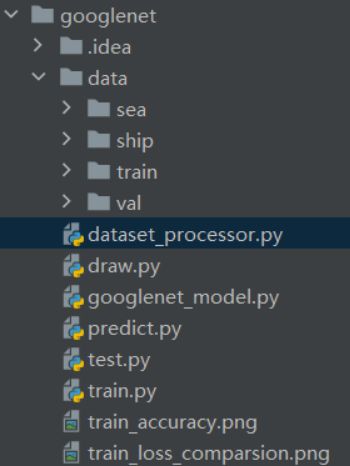
本地代码结构如下所示:
data文件夹:sea和ship文件夹用于存储原始数据,以及存储划分好的训练集(train文件夹)/测试集(val文件夹)数据;data_processor.py:对原始数据进行训练集/测试集划分;googlenet_model.py:定义了GoogleNet网络具体结构的代码;train.py:用于训练网络的代码,计算loss和accuracy,保存训练好的网络参数;test.py:用于测试网络性能、计算模型分类指标;predict.py:用自己的数据集进行分类测试draw.py:用于绘制损失函数曲线和准确度曲线;`
3. GoogleNet网络架构
GoogLeNet在2014年由Google团队提出, 斩获当年ImageNet(ILSVRC14)竞赛中Classification Task(分类任务)第一名,VGG获得了第二名。为了向“LeNet”致敬,因此取名为“GoogLeNet”。
GoogLeNet做了更加大胆的网络结构尝试,虽然深度只有22层,但大小却比AlexNet和VGG小很多。GoogleNet参数为500万个,AlexNet参数个数是GoogleNet的12倍,VGGNet参数又是AlexNet的3倍,因此在内存或计算资源有限时,GoogleNet是比较好的选择。而从模型结果来看,GoogLeNet的性能也更为优越。
GoogLeNet 总共有22层,由9个Inception v1模块、多个池化层以及其他一些卷积层和全连接层构成。该网络有3个输出层,其中的两个是辅助分类层,如下图所示:

GoogleNet的创新点在于:
- 采用了模块化的设计,方便层的添加与修改;
- 使用1x1的卷积核进行降维以及映射处理;
- 引入了Inception结构(融合不同尺度的特征信息);
- 部分丢弃全连接层,使用平均池化 average pooling 层,大大减少模型参数;
- 为了避免梯度消失,网络额外增加了2个辅助的
softmax用于向前传导梯度(辅助分类器)。辅助分类器是将中间某一层的输出用作分类,并按一个较小的权重 0.3 0.3 0.3 加到最终分类结果中,这样相当于做了模型融合,同时给网络增加了反向传播的梯度信号,也提供了额外的正则化,对于整个网络的训练很有裨益。在实际测试的时候,这两个额外的softmax会被去掉。
由于GoogLeNet的网络较深,因此将其网络结构按照模块进行划分进行分析。其结构由基础卷积结构、Inception结构、辅助分类器三个子结构构成。其中基础卷积结构由一个卷积层和一个ReLU激活函数组成。
3.1 Inception结构
GoogLeNet提出了一种并联结构——Inception网络结构。其主要思想是寻找密集成分来近似最优局部稀疏连接,通过构造一种“基础神经元”结构来搭建一个稀疏性、高计算性能的网络结构。论文中提出的inception v1结构如下图——Inception结构由4个分支组成,包括4个1x1基础卷积结构,1个3x3基础卷积结构,1个5x5基础卷积结构和1个最大池化层:

由四条并行路径组成的Inception块,可以融合不同尺度的特征信息——前三条路径使用窗口大小为1×1、3×3和5×5的卷积层,从不同空间大小中提取信息。中间的两条路径在输入上执行1×1卷积,以减少通道数、减少模型训练参数,从而降低模型的复杂性。第四条路径使用3×3最大池化层,然后使用1×1卷积层来改变通道数。这四条路径都使用合适的填充来使输入与输出的高和宽一致,以保证输出特征能在通道 channel 维度上进行拼接。最后将每条线路的输出在通道维度上连结,并构成Inception块的输出。Inception块的通道数分配之比,是在 ImageNet 数据集上通过大量的实验得来的。
可以总结出Inception结构与传统多通道卷积的不同之处:
- 使用了多个不同尺寸的卷积核,添加池化操作,将卷积和池化结果进行串联。
- 卷积之前有1×1的卷积操作,池化之后有1×1的卷积操作。1×1 的卷积操作将传统的线性模型变成非线性模型,将高相关性节点组合到了一起,具有更强的表达能力,同时减少了卷积参数个数。
每个分支的卷积核大小、stride和padding如下表所示:
| 卷积名称 | kernel | size | stride | padding |
|---|---|---|---|---|
| 1 × 1 | convolutions | 1 × 1 | 1 | 1 |
| 3 × 3 | convolutions | 3 × 3 | 1 | 1 |
| 5 × 5 | convolutions | 5 × 5 | 1 | 2 |
| 3 × 3 | max pooling | 3 × 3 | 1 | 1 |
3.2 辅助分类器
根据实验数据,研究员发现神经网络的中间层具有很强的识别能力,为了利用中间层抽象的特征,可在某些中间层中添加含有多层的分类器。GoogLeNet网络结构中有深层和浅层2个分类器,两个辅助分类器结构是一模一样的,输入分别来自Inception(4a)和Inception(4d)。其组成如下图所示—— 辅助分类器的第一层是一个平均池化下采样层,池化核大小为5x5,stride=3;第二层是基础卷积结构,卷积核大小为1x1,stride=1,卷积核个数是128;第三层是全连接层,节点个数是1024;第四层是全连接层,节点个数是1000(对应分类的类别个数)。

辅助分类器的具体参数如下所示。平均池化层和卷积层的参数如下表所示:
| kernel | size | stride | padding |
|---|---|---|---|
| convolutions | 5 × 5 | 3 | 0 |
| convolutions | 1 × 1 | 1 | 0 |
| 全连接层的参数如下表所示: |
| 层次名称 | 输入特征数目 | 输出特征数目 |
|---|---|---|
| FC1 | 2048 | 1024 |
| FC2 | 1024 | 1000 |
在模型训练时的损失函数按照 L o s s = L 0 + 0.3 × L 1 + 0.3 × L 2 Loss = L_0 + 0.3 \times L_1 + 0.3 \times L_2 Loss=L0+0.3×L1+0.3×L2 计算,其中 L 0 L_0 L0 是最后的分类损失。在测试阶段则去掉辅助分类器,只记最终的分类损失。
4. GoogleNet网络特征提取说明
4.1 低层特征提取
低层的特征提取需要分别经过3个基础卷积结构,2个最大池化层,2个LPN结构。其中LPN为局部响应归一化操作,增强了模型的泛化能力,在这里不做分析。低层结构:

假设在经过初始化操作后,输入图片的尺寸为(channel)3x(height)224x(weight)224。经过上图的层次结构,图片的大小变化如下。
- conv1 :输入 3 × 224 × 224 3\times 224\times 224 3×224×224 的图片,经过64个 7 × 7 7\times 7 7×7 的基础卷积结构以
stride=2, padding=3进行卷积计算,得到输出图片大小为 64 × 112 × 112 64\times 112\times 112 64×112×112 。 - maxpool1 :输入图片大小为 64 × 112 × 112 64\times 112\times 112 64×112×112 ,经 3 × 3 3\times 3 3×3 的池化单元,以
stride=2进行池化运算得到输出图片大小为 64 × 56 × 56 64\times 56\times 56 64×56×56 。 - conv2 :输入 64 × 56 × 56 64\times 56\times 56 64×56×56 的图片,经过64个 1 × 1 1\times 1 1×1 的基础卷积结构以
stride=1进行卷积计算,得到输出图片大小为 64 × 56 × 56 64\times 56\times 56 64×56×56 。 - conv3 :输入 64 × 56 × 56 64\times 56\times 56 64×56×56 的图片,经过192个 3 × 3 3\times 3 3×3 的基础卷积结构以
stride=1, padding=1进行卷积计算,得到输出图片大小为 192 × 56 × 56 192\times 56\times 56 192×56×56 。 - maxpool2 :输入图片大小为 192 × 56 × 56 192\times 56\times 56 192×56×56 ,经 3 × 3 3\times 3 3×3 的池化单元,以
stride=2进行池化运算,得到输出图片大小为 192 × 28 × 28 192\times 28\times 28 192×28×28 。
4.2 Inception特征提取
在Inception特征提取中,包括9个Inception结构,两个最大池化结构。Inception结构的卷积核的大小、stride、padding参数是固定的,因此在分析网络结构时,根据卷积计算公式以及参数,可以计算输入图片通道、高、宽的变化情况。
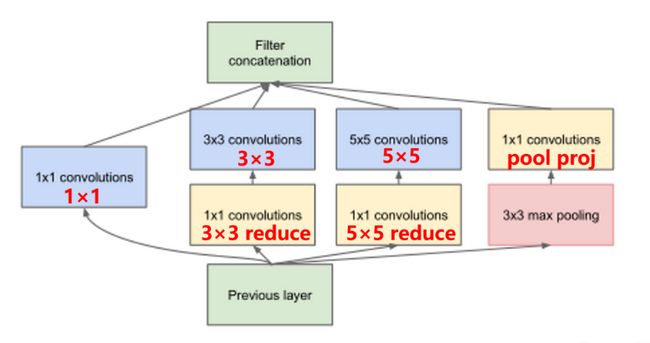
根据论文 Going Deeper with Convolutions 中GoogLeNet的Inception结构基础卷积结构参数表,可以得知9个Inception结构的具体卷积核数目如表:
| 层次名称 | 1×1 | 3×3 | 3×3 reduce | 5×5 | 5×5 reduce | pool proj |
|---|---|---|---|---|---|---|
| Inception3a | 64 | 96 | 128 | 16 | 32 | 32 |
| Inception3b | 128 | 128 | 192 | 32 | 96 | 64 |
| Inception4a | 192 | 96 | 208 | 16 | 48 | 64 |
| Inception4b | 160 | 112 | 224 | 24 | 64 | 64 |
| Inception4c | 128 | 128 | 256 | 24 | 64 | 64 |
| Inception4d | 112 | 144 | 288 | 32 | 64 | 64 |
| Inception4e | 256 | 160 | 320 | 32 | 128 | 128 |
| Inception5a | 256 | 160 | 320 | 32 | 128 | 128 |
| Inception5b | 384 | 192 | 384 | 48 | 128 | 128 |
- Inception3:输入 192 × 28 × 28 192\times 28\times 28 192×28×28 的图片,经过Inception3a卷积计算后得到 256 × 28 × 28 256\times 28\times 28 256×28×28 的图片,然后经过Inception3b卷积计算后得到输出图片大小为 480 × 28 × 28 480\times 28\times 28 480×28×28 。
- maxpool3:输入图片大小为 480 × 28 × 28 480\times 28\times 28 480×28×28 ,经 3 × 3 3\times 3 3×3 的池化单元,以
stride=2进行池化运算得到输出图片大小为 480 × 14 × 14 480\times 14\times 14 480×14×14 。 - Inception4:输入图片大小为 480 × 14 × 14 480\times 14\times 14 480×14×14 ,分别经过Inception4a,4b,4c,4d,4e后得到输出图片大小为 832 × 14 × 14 832\times 14\times 14 832×14×14 。具体图片变换如下所示:

- maxpool4:输入图片大小为 832 × 14 × 14 832\times 14\times 14 832×14×14 ,经 3 × 3 3\times 3 3×3 的池化单元,以
stride=2进行池化运算得到输出图片大小为 832 × 7 × 7 832\times 7\times 7 832×7×7 。 - Inception5:输入 832 × 7 × 7 832\times 7\times 7 832×7×7 的图片,经过Inception5a卷积计算后得到 832 × 7 × 7 832\times 7\times 7 832×7×7 的图片,然后经过Inception5b卷积计算后得到输出图片大小为 1024 × 7 × 7 1024\times 7\times 7 1024×7×7 。
4.3 分类器特征提取
GoogLeNet网络的分类器共有三个:2个辅助分类器和1个最终分类器。最终分类器由一个平均池化下采样层和一个全连接层组成。图片变换过程如下:
- avgpool1:输入图片大小为 1024 × 7 × 7 1024\times 7\times 7 1024×7×7 ,经 7 × 7 7\times 7 7×7 的池化单元,以
stride=1进行池化运算,得到输出图片大小为 1024 × 1 × 1 1024\times 1\times 1 1024×1×1 。然后将图片的特征向量进行展平操作,经过dropout结构使40%的神经元失活。 - fc1:输入图片大小为 1024 × 1 × 1 1024\times 1\times 1 1024×1×1 ,经过一层全连接结构,然后将结果通过
softmax结构,输出指定要求的预测结果数目。
5. 具体参数设计
对于GoogLeNet网络,首先设定其通用参数。总样本数为4000,训练集和测试集比例为3:1,划分训练集/测试集从原始数据集中采样时,必须保证随机从各个类别的数据中采样。批大小 batch_size(网络一次学习并计算损失的样本数量)一般设置在4~32之间,这里取32。

为对比不同参数下的GoogLeNet神经网络分类性能,对epoch数量(相当于不断迭代训练的回合数),学习率(梯度学习中的一个重要优化参数)进行调整,其参数如表所示。这里使用的是Adam优化器
,一种基于梯度优化方法的网络学习策略。
| 模型序号 | 学习率 | 优化器 | Epoch |
|---|---|---|---|
| GoogLeNet_v1 | 0.0003 | Adam | 15 |
| GoogLeNet_v2 | 0.003 | Adam | 30 |
| GoogLeNet_v3 | 0.001 | Adam | 50 |
6. 实际代码说明
根据上文描述的GoogleNet网络架构和参数说明,googlenet_model.py 实现了GoogleNet网络:
# -*- coding: utf-8 -*-
import torch
import torch.nn as nn
import torch.nn.functional as F

#  基础卷积层Conv2d+ReLu
class BasicConv2d(nn.Module):
    # init: c进行初始化,申明模型中各层的定义
    def __init__(self, in_channels, out_channels, **kwargs):
        super(BasicConv2d, self).__init__()
        self.conv2d = nn.Conv2d(in_channels=in_channels, out_channels=out_channels, **kwargs)
        # ReLU(inplace=True): 将tensor直接修改,不找变量做中间的传递,节省运算内存,不用多存储额外的变量
        self.relu = nn.ReLU(inplace=True)

    # 前向传播过程
    def forward(self, x):
        x = self.conv2d(x)
        x = self.relu(x)
        return x

# Inception结构
class Inception(nn.Module):
    def __init__(self, in_channels, ch1_1, ch3_3red, ch3_3, ch5_5red, ch5_5, pool_pro):
        super(Inception, self).__init__() # 1_1 => 1x1
        # 分支1,单1x1卷积层
        # input:[in_channels,height,weight],output:[ch1_1,height,weight]
        self.branch1 = BasicConv2d(in_channels=in_channels, out_channels=ch1_1, kernel_size=1, stride=1)
        # input:[in_channels,height,weight],output:[ch3_3,height,weight]
        # 分支2,1x1卷积层后接3x3卷积层
        self.branch2 = nn.Sequential(
            # input:[in_channels,height,weight],output:[ch3_3red,height,weight]
            BasicConv2d(in_channels=in_channels, out_channels=ch3_3red, kernel_size=1, stride=1),
            # input:[ch3_3red,height,weight],output:[ch3_3,height,weight]
            # 保证输出大小等于输入大小
            BasicConv2d(in_channels=ch3_3red, out_channels=ch3_3, kernel_size=3, stride=1, padding=1), # 保证输出大小等于输入大小
        )
        # 分支3,1x1卷积层后接5x5卷积层
        self.branch3 = nn.Sequential(
            # input:[in_channels,height,weight],output:[ch5_5red,height,weight]
            BasicConv2d(in_channels=in_channels, out_channels=ch5_5red, kernel_size=1, stride=1),
            # 在官方实现中是3x3kernel并不是5x5,具体参考issue——https://github.com/pytorch/vision/issues/906.
            # input:[ch5_5red,height,weight],output:[ch5_5,height,weight]
            # 保证输出大小等于输入大小
            BasicConv2d(in_channels=ch5_5red, out_channels=ch5_5, kernel_size=5, stride=1, padding=2), # 保证输出大小等于输入大小
        )
        # 分支4,3x3最大池化层后接1x1卷积层
        self.branch4 = nn.Sequential(
            # input:[in_channels,height,weight],output:[in_channels,height,weight]
            nn.MaxPool2d(kernel_size=3, stride=1, padding=1),
            # input:[in_channels,height,weight],output:[pool_pro,height,weight]
            BasicConv2d(in_channels=in_channels, out_channels=pool_pro, kernel_size=1, stride=1),
        )
    # forward: 定义前向传播过程,描述了各层之间的连接关系
    def forward(self, x):
        output1 = self.branch1(x)
        output2 = self.branch2(x)
        output3 = self.branch3(x)
        output4 = self.branch4(x)
        # 在通道维上连结输出
        # cat()在给定维度上对输入的张量序列进行连接操作
        return torch.cat([output1, output2, output3, output4], dim=1)

# 辅助分类器: 4e和4a输出
class InceptionAux(nn.Module):
    def __init__(self, in_channels, class_num=1000):
        super(InceptionAux, self).__init__()
        # 4a:input:[512,14,14];output:[512,4,4]
        self.averagePool = nn.AvgPool2d(kernel_size=5, stride=3)
        # 4a:input:[512,4,4];output:[128,4,4]
        self.conv2d = BasicConv2d(in_channels=in_channels, out_channels=128, kernel_size=1)
        # 上一层output[batch, 128, 4, 4],128X4X4=2048
        self.fc1 = nn.Linear(in_features=2048, out_features=1024)
        self.fc2 = nn.Linear(in_features=1024, out_features=class_num)

    # 前向传播过程
    def forward(self, x):
        # 输入:分类器1:Nx512x14x14,分类器2:Nx528x14x14
        x = self.averagePool(x)
        # 输入:分类器1:Nx512x14x14,分类器2:Nx528x14x14
        x = self.conv2d(x)
        # 输入:N x 128 x 4 x 4
        x = torch.flatten(x, 1)
        # 设置.train()时为训练模式,self.training=True
        x = F.dropout(x, p=0.5, training=self.training)
        # 输入:N x 2048
        x = self.fc1(x)
        x = F.relu(x, inplace=True)
        x = F.dropout(x, p=0.5, training=self.training)
        # 输入:N x 1024
        x = self.fc2(x)
        # 返回值:N*num_classes
        return x

# 定义GoogLeNet网络模型
class GoogLenet(nn.Module):
    # init: 进行初始化,申明模型中各层的定义
    # num_classes: 需要分类的类别个数
    # aux_logits: 训练过程是否使用辅助分类器
    # init_weights: 是否对网络进行权重初始化
    def __init__(self, num_classes=1000, aux_logits=True, init_weights=False):
        super(GoogLenet, self).__init__()
        # 是否选择辅助分类器
        self.aux_logits = aux_logits
        # 构建网络
        # input:[3,224,224],output:[64,112,112],padding自动忽略小数
        self.conv1 = BasicConv2d(in_channels=3, out_channels=64, kernel_size=7, stride=2, padding=3)
        # input:[64,112,112],output:[64,56,56](55.5->56)
        # ceil_mode=true时,将不够池化的数据自动补足NAN至kernel_size大小
        self.maxpool1 = nn.MaxPool2d(kernel_size=3, stride=2, ceil_mode=True)

        # input:[64,56,56],output:[64,56,56]
        self.conv2 = BasicConv2d(in_channels=64, out_channels=64, kernel_size=1, stride=1)
        # input:[192,56,56],output:[192,56,56]
        self.conv3 = BasicConv2d(in_channels=64, out_channels=192, kernel_size=3, stride=1, padding=1)

        # input:[192,56,56],output:[192,28,28](27.5->28)
        self.maxpool2 = nn.MaxPool2d(kernel_size=3, stride=2, ceil_mode=True)

        # input:[192,28,28],output:[256,28,28]
        self.inception3a = Inception(192, 64, 96, 128, 16, 32, 32)
        # input:[256,28,28],output:[480,28,28]
        self.inception3b = Inception(256, 128, 128, 192, 32, 96, 64)

        # input:[480,28,28],output:[480,14,14]
        self.maxpool3 = nn.MaxPool2d(kernel_size=3, stride=2, ceil_mode=True)
        # input:[480,14,14],output:[512,14,14]
        self.inception4a = Inception(480, 192, 96, 208, 16, 48, 64)
        # input:[512,14,14],output:[512,14,14]
        self.inception4b = Inception(512, 160, 112, 224, 24, 64, 64)
        # input:[512,14,14],output:[512,14,14]
        self.inception4c = Inception(512, 128, 128, 256, 24, 64, 64)
        # input:[512,14,14],output:[528,14,14]
        self.inception4d = Inception(512, 112, 144, 288, 32, 64, 64)
        # input:[528,14,14],output:[832,14,14]
        self.inception4e = Inception(528, 256, 160, 320, 32, 128, 128)

        # input:[832,14,14],output:[832,7,7]
        self.maxpool4 = nn.MaxPool2d(kernel_size=3, stride=2, ceil_mode=True)
        # input:[832,7,7],output:[832,7,7]
        self.inception5a = Inception(832, 256, 160, 320, 32, 128, 128)
        # input:[832,7,7],output:[1024,7,7]
        self.inception5b = Inception(832, 384, 192, 384, 48, 128, 128)

        # 如果为真,则使用辅助分类器
        if self.aux_logits:
            self.aux1 = InceptionAux(512, class_num=num_classes) # 4a输出
            self.aux2 = InceptionAux(528, class_num=num_classes) # 4d输出

        # AdaptiveAvgPool2d:自适应平均池化,指定输出(H,W)
        self.avgpool = nn.AdaptiveAvgPool2d((1, 1))
        self.dropout = nn.Dropout(0.4)
        self.fc1 = nn.Linear(in_features=1024, out_features=num_classes)
        # 如果为真,则对网络参数进行初始化
        if init_weights:
            self._initialize_weights()

    # forward() 定义前向传播过程,描述各层之间的连接关系
    def forward(self, x):
        # N x 3 x 224 x 224
        x = self.conv1(x)
        # N x 64 x 112 x 112
        x = self.maxpool1(x)
        # N x 64 x 56 x 56
        x = self.conv2(x)
        # N x 64 x 56 x 56
        x = self.conv3(x)
        # N x 192 x 56 x 56
        x = self.maxpool2(x)

        # N x 192 x 28 x 28
        x = self.inception3a(x)
        # N x 256 x 28 x 28
        x = self.inception3b(x)
        # N x 480 x 28 x 28
        x = self.maxpool3(x)
        # N x 480 x 14 x 14
        x = self.inception4a(x)
        # N x 512 x 14 x 14
        # 若存在辅助分类器
        if self.training and self.aux_logits: # eval model lose this layer
            aux1 = self.aux1(x)

        x = self.inception4b(x)
        # N x 512 x 14 x 14
        x = self.inception4c(x)
        # N x 512 x 14 x 14
        x = self.inception4d(x)
        # N x 528 x 14 x 14
        # 若存在辅助分类器
        if self.training and self.aux_logits: # eval model lose this layer
            aux2 = self.aux2(x)

        x = self.inception4e(x)
        # N x 832 x 14 x 14
        x = self.maxpool4(x)
        # N x 832 x 7 x 7
        x = self.inception5a(x)
        # N x 832 x 7 x 7
        x = self.inception5b(x)
        # N x 1024 x 7 x 7

        x = self.avgpool(x)
        # N x 1024 x 1 x 1
        x = torch.flatten(x, 1)
        # N x 1024
        x = F.dropout(x, p=0.4)
        x = self.fc1(x)
        # N x 1000 (num_classes)
        if self.aux_logits and self.training:
            return x, aux2, aux1
        return x

    # 网络结构参数初始化
    def _initialize_weights(self):
        # 遍历网络中的每一层
        for m in self.modules():
            # isinstance(object, type),如果指定的对象拥有指定的类型,则isinstance()函数返回True
            # 如果是卷积层
            if isinstance(m, nn.Conv2d):
                # Kaiming正态分布方式的权重初始化
                nn.init.kaiming_normal_(m.weight, mode="fan_out", nonlinearity="relu")
                # 如果偏置不是0,将偏置置成0,对偏置进行初始化
                if m.bias is not None:
                    # torch.nn.init.constant_(tensor, val),初始化整个矩阵为常数val
                    nn.init.constant_(m.bias, 0)
            # 如果是全连接层
            elif isinstance(m, nn.Linear):
                # init.normal_(tensor, mean=0.0, std=1.0),使用从正态分布中提取的值填充输入张量
                # 参数:tensor:一个n维Tensor,mean:正态分布的平均值,std:正态分布的标准差
                nn.init.uniform_(m.weight, 0, 0.01)
                nn.init.constant_(m.bias, 0)
dataset_processor.py 将数据集分为训练集(train文件夹)以及测试集(val文件夹)。这两个文件夹内部的图像依旧根据分类的不同,分为sea和ship两个文件夹,用于区别不同类型的数据。代码设计思路很简单:
- 获取船舶/非船舶类别中图像数据的总量;
- 每个类别的数据总量乘以0.8,即为该类别数据的训练数据量,剩下的数据均作为测试集;
- 根据以上获得的每个类别中训练集数量,随机从各个类别的数据中采样训练数据;
- 训练数据采样后,每个类中的剩下的数据即为测试集。将训练集和测试集单独存储起来;
- 新建存放训练集和测试集的文件夹,分别在这两个文件夹中再新建对应的类别文件夹;
- 将不同类别划分出来的训练集/测试集图像数据,分别复制到对应的文件夹中。
# -*- coding: utf-8 -*-
import os
import random
import shutil
from glob import glob
from pathlib import Path

# 这份代码用于将原始数据集进行划分,变为PyTorch接口可以直接使用的训练集和测试集
def processor(dataset_root: str, train_ratio: float = 0.8):
    """
    将原始数据集划分为训练集和测试集。在使用该函数前,需要保证所有的船舶分类图像数据已经存储在data目录下,
    并且按照类别分好类(data/sea/文件夹内有3000张非船舶图片,data/ship/文件夹内有1000张船舶图片)。

    划分数据集的结果是:data文件夹下新建两个文件夹,分别是train和val文件夹。这两个文件夹中都存放有sea和ship文件夹,
    理论上data/train/sea/中有2400张图片,data/train/ship/中有800张图片;
    同理,data/val/sea/中有600张图片,data/val/ship/中共有200张图片。

    :param dataset_root: data文件夹的路径.
    :param train_ratio: 训练集的占比。按照8:2划分数据集的话,这个参数应当设置为0.8.
    :return: None
    """
    # 确保所有输入的参数没有问题
    assert os.path.exists(dataset_root) and os.path.isdir(dataset_root), \
        'Invalid dataset root directory!'
    assert 0.5 < train_ratio < 1, 'Invalid trainset ratio!'

    # 获取所有的正负样本。正样本即船舶图像,负样本即非船舶图像
    neg_samples = glob(os.path.join(dataset_root, 'sea/*.png'), recursive=False)  # 获取所有负样本的相对路径
    random.shuffle(neg_samples)  # 打乱读取的负样本的顺序,增加随机性
    pos_samples = glob(os.path.join(dataset_root, 'ship/*.png'), recursive=False)  # 获取所有正样本的相对路径
    random.shuffle(pos_samples)  # 打乱读取的正样本的顺序,增加随机性
    num_neg_samples = len(neg_samples)  # 获取正负样本的数量
    num_pos_samples = len(pos_samples)
    # print(num_neg_samples, num_pos_samples) # 3000 1000

    # 根据训练集的比例,计算从负样本中抽取的、作为训练集的负样本数量
    # 根据这个数量,随机从负样本中采样作为训练集,然后剩余样本作为负样本的测试集
    num_neg_training_samples = round(num_neg_samples * train_ratio)  # 计算负样本用于训练的样本数量
    neg_training_samples = random.sample(neg_samples, num_neg_training_samples)  # 对负样本训练集进行随机采样
    neg_testing_samples = [x for x in neg_samples if x not in neg_training_samples]  # 剩下的负样本作为测试集

    # 同理对正样本做训练集和测试集的采样
    num_pos_training_samples = round(num_pos_samples * train_ratio)
    pos_training_samples = random.sample(pos_samples, num_pos_training_samples)
    pos_testing_samples = [x for x in pos_samples if x not in pos_training_samples]

    # 完成正负样本的训练集测试集采样后,我们需要将原始没有划分好的数据组织为一个划分好的结构
    # 首先组织训练集
    train_dir = os.path.join(dataset_root, 'train/')  # 在data文件夹下新建一个train文件夹
    if os.path.exists(train_dir):  # 保证这个文件夹是空的
        shutil.rmtree(train_dir)
    os.makedirs(os.path.join(train_dir, 'sea/'))  # 在train文件夹下新建两个代表不同类别的文件夹,用于存储两类图像数据
    os.makedirs(os.path.join(train_dir, 'ship/'))
    for neg_train_sample in neg_training_samples:  # 将非船舶类别的训练图像数据复制到训练集中的sea文件夹中
        shutil.copyfile(
            src=neg_train_sample,
            dst=os.path.join(dataset_root, f'train/sea/{Path(neg_train_sample).name}')
        )
    for pos_train_sample in pos_training_samples:  # 将船舶类别的训练图像数据复制到训练集中的ship文件夹中
         shutil.copyfile(
            src=pos_train_sample,
            dst=os.path.join(dataset_root, f'train/ship/{Path(pos_train_sample).name}')
        )

    # 完成对训练集的组织后,组织测试集
    test_dir = os.path.join(dataset_root, 'val/')  # 同样在data文件夹下新建一个val文件夹,用于存储测试集数据
    if os.path.exists(test_dir):  # 确保文件夹为空
        shutil.rmtree(test_dir)
    os.makedirs(os.path.join(test_dir, 'sea/'))  # 同样代表两个类的文件夹
    os.makedirs(os.path.join(test_dir, 'ship/'))
    for neg_test_sample in neg_testing_samples:
        shutil.copyfile(
            src=neg_test_sample,
            dst = os.path.join(dataset_root, f'val/sea/{Path(neg_test_sample).name}')
        )
    for pos_test_sample in pos_testing_samples:
        shutil.copyfile(
            src=pos_test_sample,
            dst=os.path.join(dataset_root, f'val/ship/{Path(pos_test_sample).name}')
        )
    # 数据集的划分任务即完成

if __name__ == "__main__":
    processor(dataset_root='data/')
train.py 是训练代码,训练代码主要由以下几部分组成:
- 加载组织好的训练数据
- 建立网络模型
- 初始化训练必要的优化器、损失函数和迭代器
- 根据迭代设计训练网络,保存网络权重文件
# -*- coding: utf-8 -*-
import os
import sys
import json
import torch
import torch.nn as nn
from torchvision import transforms, datasets
from torch import optim
from torch.utils.data import DataLoader
from tqdm import tqdm
from googlenet_model import GoogLenet, InceptionAux

# 设置gpu训练模型
# 如果有NVIDA显卡,转到GPU训练,否则用CPU
device = torch.device("cuda:0" if torch.cuda.is_available() else "cpu")
# print("using {} device.".format(device))
# 数据预处理
trans_dic = {
    # Compose():将多个transforms的操作整合在一起
    # 训练
    "train": transforms.Compose([
        # RandomResizedCrop(224):将给定图像随机裁剪为不同的大小和宽高比,然后缩放所裁剪得到的图像为给定大小
        transforms.RandomResizedCrop(224),
        # RandomVerticalFlip():以0.5的概率竖直翻转给定的PIL图像
        transforms.RandomHorizontalFlip(),
        # ToTensor():数据转化为Tensor格式
        transforms.ToTensor(),
        # Normalize():将图像的像素值归一化到[-1,1]之间,使模型更容易收敛
        transforms.Normalize((0.5, 0.5, 0.5), (0.5, 0.5, 0.5))
    ]),
    # 验证
    "val": transforms.Compose([
        transforms.Resize((224, 224)),
        transforms.ToTensor(),
        transforms.Normalize((0.5, 0.5, 0.5), (0.5, 0.5, 0.5))
    ])
}

# 读取数据
# 加载训练数据集
# ImageFolder:假设所有的文件按文件夹保存,每个文件夹下存储同一个类别的图片,文件夹名为类名,其构造函数如下:
# ImageFolder(root, transform=None, target_transform=None, loader=default_loader)
# root:在指定路径下寻找图片,transform:对PILImage进行的转换操作,输入是使用loader读取的图片
train_set = datasets.ImageFolder(
    root=r"/kaggle/input/seashiptrainandtest/data/train",
    transform=trans_dic["train"])
# 训练集长度
train_num = len(train_set)
# 一次训练载入32张图像
batch_size = 32
# 确定进程数
# min() 返回给定参数的最小值,参数可以为序列
# cpu_count() 返回一个整数值,表示系统中的CPU数量,如果不确定CPU的数量,则不返回任何内容
nw = min([os.cpu_count(), batch_size if batch_size > 1 else 0, 8])  # number of workers
print('Using {} dataloader workers every process'.format(nw))
# DataLoader 将读取的数据按照batch size大小封装给训练集
# dataset (Dataset) 输入的数据集
# batch_size (int, optional): 每个batch加载多少个样本,默认: 1
# shuffle (bool, optional): 设置为True时会在每个epoch重新打乱数据,默认: False
# num_workers(int, optional): 决定了有几个进程来处理,默认为0意味着所有的数据都会被load进主进程
train_loader = DataLoader(train_set, batch_size=batch_size, shuffle=True, num_workers=nw)

# 加载测试数据集
validate_set = datasets.ImageFolder(
    root=r"/kaggle/input/seashiptrainandtest/data/val",
    transform=trans_dic["val"])
# 测试集长度
validate_num = len(validate_set)
validate_loader = DataLoader(validate_set, batch_size=batch_size, shuffle=True, num_workers=nw)
print("using {} images for training, {} images for validation.".format(train_num, validate_num))

# 模型实例化,将模型转到device, 二分类
net = GoogLenet(num_classes=2, aux_logits=True, init_weights=True)
# model_weight_path = "/kaggle/working/googlenet-pre.pth"
# net.load_state_dict(torch.load(model_weight_path, map_location='cpu'), strict=False)
# net.fc1 = torch.nn.Linear(1024, 2)
# net.aux1 = InceptionAux(512, 2)
# net.aux2 = InceptionAux(528, 2)
net.to(device)
# 定义损失函数(交叉熵损失)
loss_function = nn.CrossEntropyLoss()
# 定义adam优化器
# params(iterable) 要训练的参数,一般传入的是model.parameters()
# lr(float): learning_rate学习率,也就是步长,默认:1e-3
# params = [p for p in net.parameters() if p.requires_grad]
optimizer = optim.Adam(net.parameters(), lr=0.0003)

# 用于判断最佳模型
best_acc = 0.0
# 迭代次数(训练次数)
epoches = 15
# 最佳模型保存地址
save_path = "/kaggle/working/googleNet1.pth"
train_step = len(train_loader)
loss_r, acc_r = [], []  # 记录训练时出现的损失以及分类准确度
# 开始训练
for epoch in range(epoches):
    net.train()
    running_loss = 0.0
    # tqdm 进度条显示
    train_bar = tqdm(train_loader, file=sys.stdout)
    # train_bar 传入数据(数据包括训练数据和标签)
    # enumerate() 将一个可遍历的数据对象(如列表、元组或字符串)组合为一个索引序列,同时列出数据和数据下标,一般用在for循环当中
    # enumerate返回值: 一个是序号,一个是数据(包含训练数据和标签)
    # x: 训练数据(inputs)(tensor类型的), y: 标签(labels)(tensor类型)
    for step, data in enumerate(train_bar):
        # 前向传播
        train_inputs, train_labels = data
        # 计算训练值
        train_outputs, aux_logits2, aux_logits1 = net(train_inputs.to(device))
        # GoogLeNet的网络输出loss有三个部分,分别是主干输出loss、两个辅助分类器输出loss(权重0.3)
        loss0 = loss_function(train_outputs, train_labels.to(device))
        loss1 = loss_function(aux_logits2, train_labels.to(device))
        loss2 = loss_function(aux_logits1, train_labels.to(device))
        loss = loss0 + loss1 * 0.3 + loss2 * 0.3

        # 反向传播
        # 清空过往梯度
        optimizer.zero_grad()
        # 反向传播,计算当前梯度
        loss.backward()
        # 根据梯度更新网络参数
        optimizer.step()
        # item():得到元素张量的元素值
        running_loss += loss.item()

        # 进度条的前缀
        # .3f:表示浮点数的精度为3(小数位保留3位)
        train_bar.desc = "train epoch [{}/{}] loss:{:.3f}".format(epoch + 1, epoches, loss)

    loss_r.append(running_loss)  # 该损失数值会被保存起来
    # 测试
    # eval():如果模型中Batch Normalization和Dropout,则不启用,以防改变权值
    net.eval()  # validate
    acc = 0.0
    # 清空历史梯度,与训练最大的区别是测试过程中取消了反向传播
    with torch.no_grad():
        test_bar = tqdm(validate_loader, file=sys.stdout)
        for data in test_bar:
            test_inputs, test_labels = data
            test_outputs = net(test_inputs.to(device))
            # torch.max(input, dim)函数
            # input是具体的tensor,dim是max函数索引的维度,0是每列的最大值,1是每行的最大值输出
            # 函数会返回两个tensor,第一个tensor是每行的最大值;第二个tensor是每行最大值的索引
            predict_y = torch.max(test_outputs, dim=1)[1]
            # 对两个张量Tensor进行逐元素的比较,若相同位置的两个元素相同,则返回True;若不同,返回False
            # .sum()对输入的tensor数据的某一维度求和
            acc += torch.eq(predict_y, test_labels.to(device)).sum().item()

        val_accurate = acc / validate_num
        if val_accurate > best_acc:
            best_acc = val_accurate
            torch.save(net.state_dict(), save_path)
        print("[epoch {}] train_loss:{:.3f}, val_accuracy:{:.3f} ".format(epoch + 1, running_loss / train_step, val_accurate))

    acc_r.append(val_accurate)  # 保存该准确度信息

with open('/kaggle/working/training_statistic_googlenet_v1.json', 'w+') as f:  # 保存训练过程的损失和准确度数据为一个json文件
    json.dump(dict(loss=loss_r, accuracy=acc_r), f, indent=4)

print("Finish training!")
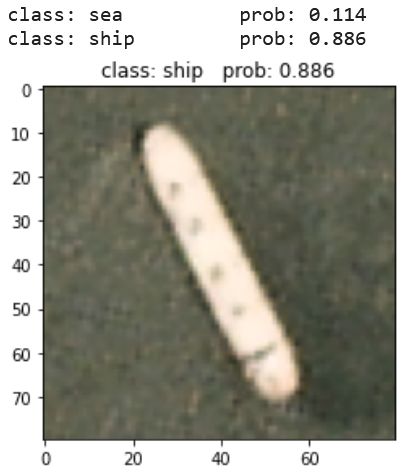
predict.py 对一张图片进行预测:
# -*- coding: utf-8 -*-
import os
import json
import torch
from torchvision import transforms
from PIL import Image
import matplotlib.pyplot as plt
from googlenet_model import GoogLenet
# 定义可以使用的设备
# 如果有NVIDA显卡,转到GPU训练,否则用CPU
device = torch.device("cuda:0" if torch.cuda.is_available() else "cpu")
# 图像数据转换
# data_transform = transforms.Compose(
#     [transforms.Resize(256),
#      transforms.CenterCrop(224),
#      transforms.ToTensor(),
#      transforms.Normalize([0.485, 0.456, 0.406], [0.229, 0.224, 0.225])])
data_transform = transforms.Compose(
    [transforms.Resize((224, 224)),
     transforms.ToTensor(),
     transforms.Normalize((0.5, 0.5, 0.5), (0.5, 0.5, 0.5))])

# 获取测试图像的路径
img_path = r"/kaggle/input/seashiptrainandtest/data/val/ship/ship__20170609_180756_103a__-122.33804952436104_37.737959994177224.png"
img = Image.open(img_path)
# imshow()对图像进行处理并显示其格式,show()则是将imshow()处理后的函数显示出来
plt.imshow(img)
# [C, H, W],转换图像格式
img = data_transform(img) # [N, C, H, W]
# [N, C, H, W],增加一个维度N
img = torch.unsqueeze(img, dim=0) # expand batch dimension

# class_indict = {"0": "sea", "1": "ship"}
# class_indict_reverse = {v: k for k, v in class_indict.items()}
class_indict = {"sea": '0', "ship": '1'}
class_indict_reverse = {v: k for k, v in class_indict.items()}

# 模型实例化,将模型转到device,结果类型有5种
# 实例化模型时不需要辅助分类器
model = GoogLenet(num_classes=2, aux_logits=False).to(device)
# 载入模型权重
weights_path = "/kaggle/working/googleNet2.pth"
# 在加载训练好的模型参数时,由于其中是包含有辅助分类器的,需要设置strict=False舍弃不需要的参数
missing_keys, unexpected_keys = model.load_state_dict(torch.load(weights_path, map_location=device), strict=False)
# 进入验证阶段
model.eval()
with torch.no_grad():
    # 预测类别
    # squeeze() 维度压缩,返回一个tensor(张量),其中input中大小为1的所有维都已删除
    output = torch.squeeze(model(img.to(device))).cpu()
    # softmax 归一化指数函数,将预测结果输入进行非负性和归一化处理,最后将某一维度值处理为0-1之内的分类概率
    predict = torch.softmax(output, dim=0)
    # argmax(input)返回指定维度最大值的序号
    # .numpy()把tensor转换成numpy的格式
    predict_class = torch.argmax(predict).numpy()

# 输出的预测值与真实值
print_res = "class: {}   prob: {:.3}".format(class_indict_reverse[str(predict_class)], predict[predict_class].numpy())
# 图片标题
plt.title(print_res)
for i in range(len(predict)):
    print("class: {:10}   prob: {:.3}".format(class_indict_reverse[str(i)], predict[i].numpy()))
plt.show()
test.py 对测试集的数据进行分类,并统计混淆矩阵的相关指标:
# -*- coding: utf-8 -*-
import os
import json
import torch
from PIL import Image
from torchvision import transforms
from glob import glob
from googlenet_model import GoogLenet, InceptionAux

# 定义可以使用的设备
# 如果有NVIDA显卡,转到GPU训练,否则用CPU
device = torch.device("cuda:0" if torch.cuda.is_available() else "cpu")
# 图像数据转换
data_transform = transforms.Compose(
    [transforms.Resize((224, 224)),
     transforms.ToTensor(),
     transforms.Normalize((0.5, 0.5, 0.5), (0.5, 0.5, 0.5))])

# 获取存放测试图像的路径
test_paths = r"/kaggle/input/seashiptrainandtest/data/val/*/*.png"
# 通过库函数glob读取指定路径下所有符合匹配条件的文件(图片)
img_path_list = glob(test_paths, recursive=True)

class_indict = {"0": "sea", "1": "ship"}
class_indict_reverse = {v: k for k, v in class_indict.items()}

ground_truths = [int(class_indict_reverse[x.split('/')[-2]]) for x in img_path_list]

# 构建Googlenet模型
model = GoogLenet(num_classes=2, aux_logits=False)
model_weight_path = "/kaggle/working/googleNet2.pth"
model.load_state_dict(torch.load(model_weight_path, map_location='cpu'), strict=False)
model.fc1 = torch.nn.Linear(1024, 2)
model.aux1 = InceptionAux(512, 2)
model.aux2 = InceptionAux(528, 2)
model.to(device)
# 每次预测时将多少张图片打包成一个batch
batch_size = 32
# 统计整个测试过程中的TP/TN/FP/FN样本的总数
TPs, TNs, FPs, FNs = 0, 0, 0, 0

with torch.no_grad():  # PyTorch框架在验证网络性能时常用,无需像训练过程中记录网络的梯度数据
    for ids in range(0, round(len(img_path_list) / batch_size)):  # 根据批的划分情况,分批向网络传送数据
        # img_path_list中的元素只是图像的地址,下面将一批图像地址逐一读取为图像
        img_list = []
        # 由于是一次读取一批数据,所以可能存在批大小划分无法刚好划分完全部数据的情况,所以要放置下标越界的错误出现
        start = ids * batch_size
        end = -1 if (ids + 1) * batch_size >= len(img_path_list) else (ids + 1) * batch_size
        for img_path in img_path_list[start: end]:
            img = Image.open(img_path)
            img = data_transform(img)
            img_list.append(img)
        batch_ground_truths = ground_truths[start: end]  # 获取该批大小对应图片的类别序号
        # img_list内部即是一个批大小的图像数据,但是在输入网络之前我们需要将列表类型的数据转换为PyTorch支持的张量数据
        batch_img = torch.stack(img_list, dim=0)

        # 将数据输入网络,获得分类结果
        output = model(batch_img.to(device)).cpu()
        predict = torch.softmax(output, dim=1)
        # print(predict)

        probs, classes = torch.max(predict, dim=1)
        # 打印这一个批大小的数据的分类信息
        # for idx, (pro, cla) in enumerate(zip(probs, classes)):
        #    print("image: {}  class: {}  prob: {:.3}".format(img_path_list[ids * batch_size + idx],
        #                                                     class_indict[str(cla.numpy())],
        #                                                     pro.numpy()))
        batch_predicted_clses = classes.numpy().tolist()  # 对网络预测结果的变量类型做改变,变为列表

        # 计算该批下数据的TP/TN/FP/FN样本数量。如果符合条件的话,就向列表中添加一个1,然后计算整个列表的和值即为样本量
        TP = sum([1 for g, p in zip(batch_ground_truths, batch_predicted_clses) if g == p == 1])
        TN = sum([1 for g, p in zip(batch_ground_truths, batch_predicted_clses) if g == p == 0])
        FP = sum([1 for g, p in zip(batch_ground_truths, batch_predicted_clses) if g == 0 and p == 1])
        FN = sum([1 for g, p in zip(batch_ground_truths, batch_predicted_clses) if g == 1 and p == 0])

        # 一个批的预测结果加到总数上
        TPs += TP
        TNs += TN
        FPs += FP
        FNs += FN

# 根据定义,计算总数的各项指标
print("TPs: {} TNs: {} FPs: {} FNs: {}".format(TPs, TNs, FPs, FNs))
accuracy = (TNs + TPs) / len(img_path_list)
precision = TPs / (TPs + FPs)
recall = TPs / (TPs + FNs)
f1 = 2 * precision * recall / (precision + recall)
print(f'Overall performance:\n'
      f'Accuracy: {accuracy:.6f}, Precision: {precision:.6f}, Recall: {recall:.6f}, F1: {f1:.6f}')
通过调整GoogLeNet网络的学习率和epoch,可以得到两个在海面舰船数据上的分类模型。draw.py 根据收集到的数据,绘制损失函数与验证集准确率随epoch的变化曲线。
# -*- coding: utf-8 -*-
import json
import matplotlib.pyplot as plt

loss_path1=r"/kaggle/working/training_statistic_googlenet_v1.json"
loss_path2=r"/kaggle/working/training_statistic_googlenet_v2.json"
loss_path3=r"/kaggle/working/training_statistic_googlenet_v3.json"
with open(loss_path1, 'r') as f:
    statistics1 = json.load(f)
with open(loss_path2, 'r') as f:
    statistics2 = json.load(f)
with open(loss_path3, 'r') as f:
    statistics3 = json.load(f)

loss1, accuracy1 = statistics1['loss'], statistics1['accuracy']
loss2, accuracy2 = statistics2['loss'], statistics2['accuracy']
loss3, accuracy3 = statistics3['loss'], statistics3['accuracy']

plt.figure(1)
plt.plot(range(len(loss1)), loss1, color="#F52A2A", linestyle="-", label="GoogLeNet_v1: adam+0.0003")
plt.plot(range(len(loss2)), loss2, color="#FFC000", linestyle="-", label="GoogLeNet_v2: adam+0.003")
plt.plot(range(len(loss3)), loss3, color="#FFC0F0", linestyle="-", label="GoogLeNet_v3: adam+0.001")
plt.legend()
plt.xlabel('Epoch')
plt.ylabel('Loss')
plt.title('Loss curve of training')
plt.savefig('train_loss_comparsion.png', dpi=600)
plt.show()
#
plt.figure(1)
plt.plot(range(len(accuracy1)), accuracy1, color="#F52A2A", linestyle="-", label="GoogLeNet_v1: adam+0.0003")
plt.plot(range(len(accuracy2)), accuracy2, color="#FFC000", linestyle="-", label="GoogLeNet_v2: adam+0.003")
plt.plot(range(len(accuracy3)), accuracy3, color="#FFC0F0", linestyle="-", label="GoogLeNet_v3: adam+0.001")
plt.legend()
plt.xlabel('Epoch')
plt.ylabel('Accuracy')
plt.title('Accuracy curve of training')
plt.savefig('train_accuracy.png', dpi=600)
plt.show()
7. 网络训练结果分析
Epoch为15,学习率为0.0003的训练结果如下。对应 googleNet1.pth 和 training_statistic_googlenet_v1.json :
Using 4 dataloader workers every process
using 3200 images for training, 800 images for validation.
train epoch [1/15] loss:0.799: 100%|██████████| 100/100 [07:11<00:00,  4.31s/it]
100%|██████████| 25/25 [00:44<00:00,  1.77s/it]
[epoch 1] train_loss:1.043, val_accuracy:0.751
train epoch [2/15] loss:0.402: 100%|██████████| 100/100 [07:13<00:00,  4.34s/it]
100%|██████████| 25/25 [00:44<00:00,  1.78s/it]
[epoch 2] train_loss:0.768, val_accuracy:0.838
train epoch [3/15] loss:0.649: 100%|██████████| 100/100 [07:13<00:00,  4.34s/it]
100%|██████████| 25/25 [00:45<00:00,  1.83s/it]
[epoch 3] train_loss:0.653, val_accuracy:0.762
train epoch [4/15] loss:0.346: 100%|██████████| 100/100 [07:17<00:00,  4.38s/it]
100%|██████████| 25/25 [00:46<00:00,  1.87s/it]
[epoch 4] train_loss:0.570, val_accuracy:0.800
train epoch [5/15] loss:1.117: 100%|██████████| 100/100 [07:12<00:00,  4.33s/it]
100%|██████████| 25/25 [00:44<00:00,  1.76s/it]
[epoch 5] train_loss:0.534, val_accuracy:0.887
train epoch [6/15] loss:0.608: 100%|██████████| 100/100 [07:16<00:00,  4.36s/it]
100%|██████████| 25/25 [00:46<00:00,  1.84s/it]
[epoch 6] train_loss:0.523, val_accuracy:0.934
train epoch [7/15] loss:0.627: 100%|██████████| 100/100 [07:21<00:00,  4.41s/it]
100%|██████████| 25/25 [00:44<00:00,  1.79s/it]
[epoch 7] train_loss:0.498, val_accuracy:0.873
train epoch [8/15] loss:0.193: 100%|██████████| 100/100 [07:19<00:00,  4.40s/it]
100%|██████████| 25/25 [00:45<00:00,  1.83s/it]
[epoch 8] train_loss:0.488, val_accuracy:0.814
train epoch [9/15] loss:0.239: 100%|██████████| 100/100 [07:23<00:00,  4.43s/it]
100%|██████████| 25/25 [00:45<00:00,  1.81s/it]
[epoch 9] train_loss:0.437, val_accuracy:0.927
train epoch [10/15] loss:0.156: 100%|██████████| 100/100 [07:19<00:00,  4.40s/it]
100%|██████████| 25/25 [00:45<00:00,  1.84s/it]
[epoch 10] train_loss:0.413, val_accuracy:0.897
train epoch [11/15] loss:0.657: 100%|██████████| 100/100 [07:24<00:00,  4.45s/it]
100%|██████████| 25/25 [00:45<00:00,  1.82s/it]
[epoch 11] train_loss:0.415, val_accuracy:0.927
train epoch [12/15] loss:0.277: 100%|██████████| 100/100 [07:18<00:00,  4.39s/it]
100%|██████████| 25/25 [00:44<00:00,  1.79s/it]
[epoch 12] train_loss:0.394, val_accuracy:0.934
train epoch [13/15] loss:0.294: 100%|██████████| 100/100 [07:14<00:00,  4.35s/it]
100%|██████████| 25/25 [00:45<00:00,  1.82s/it]
[epoch 13] train_loss:0.390, val_accuracy:0.926
train epoch [14/15] loss:0.739: 100%|██████████| 100/100 [07:20<00:00,  4.40s/it]
100%|██████████| 25/25 [00:45<00:00,  1.83s/it]
[epoch 14] train_loss:0.372, val_accuracy:0.943
train epoch [15/15] loss:0.374: 100%|██████████| 100/100 [07:18<00:00,  4.38s/it]
100%|██████████| 25/25 [00:43<00:00,  1.74s/it]
[epoch 15] train_loss:0.429, val_accuracy:0.949
Finish training!
Epoch为30,学习率为0.003的训练结果如下。对应 googleNet2.pth 和 training_statistic_googlenet_v2.json :
Using 4 dataloader workers every process
using 3200 images for training, 800 images for validation.
train epoch [1/30] loss:1.264: 100%|██████████| 100/100 [07:25<00:00,  4.45s/it]
100%|██████████| 25/25 [00:42<00:00,  1.71s/it]
[epoch 1] train_loss:14.530, val_accuracy:0.750
train epoch [2/30] loss:0.873: 100%|██████████| 100/100 [07:11<00:00,  4.31s/it]
100%|██████████| 25/25 [00:43<00:00,  1.75s/it]
[epoch 2] train_loss:0.957, val_accuracy:0.748
train epoch [3/30] loss:0.945: 100%|██████████| 100/100 [07:16<00:00,  4.37s/it]
100%|██████████| 25/25 [00:43<00:00,  1.75s/it]
[epoch 3] train_loss:0.929, val_accuracy:0.728
train epoch [4/30] loss:0.687: 100%|██████████| 100/100 [07:10<00:00,  4.31s/it]
100%|██████████| 25/25 [00:42<00:00,  1.69s/it]
[epoch 4] train_loss:0.840, val_accuracy:0.686
train epoch [5/30] loss:0.783: 100%|██████████| 100/100 [07:10<00:00,  4.30s/it]
100%|██████████| 25/25 [00:43<00:00,  1.75s/it]
[epoch 5] train_loss:0.809, val_accuracy:0.759
train epoch [6/30] loss:0.484: 100%|██████████| 100/100 [07:13<00:00,  4.34s/it]
100%|██████████| 25/25 [00:44<00:00,  1.80s/it]
[epoch 6] train_loss:0.704, val_accuracy:0.834
train epoch [7/30] loss:0.847: 100%|██████████| 100/100 [07:12<00:00,  4.33s/it]
100%|██████████| 25/25 [00:44<00:00,  1.76s/it]
[epoch 7] train_loss:0.637, val_accuracy:0.691
train epoch [8/30] loss:0.728: 100%|██████████| 100/100 [07:23<00:00,  4.43s/it]
100%|██████████| 25/25 [00:43<00:00,  1.74s/it]
[epoch 8] train_loss:0.621, val_accuracy:0.914
train epoch [9/30] loss:0.724: 100%|██████████| 100/100 [07:19<00:00,  4.40s/it]
100%|██████████| 25/25 [00:44<00:00,  1.78s/it]
[epoch 9] train_loss:0.567, val_accuracy:0.829
train epoch [10/30] loss:0.506: 100%|██████████| 100/100 [07:17<00:00,  4.37s/it]
100%|██████████| 25/25 [00:43<00:00,  1.75s/it]
[epoch 10] train_loss:0.573, val_accuracy:0.860
train epoch [11/30] loss:0.545: 100%|██████████| 100/100 [07:19<00:00,  4.39s/it]
100%|██████████| 25/25 [00:42<00:00,  1.70s/it]
[epoch 11] train_loss:0.512, val_accuracy:0.880
train epoch [12/30] loss:0.388: 100%|██████████| 100/100 [07:21<00:00,  4.41s/it]
100%|██████████| 25/25 [00:43<00:00,  1.72s/it]
[epoch 12] train_loss:0.541, val_accuracy:0.839
train epoch [13/30] loss:0.658: 100%|██████████| 100/100 [07:20<00:00,  4.40s/it]
100%|██████████| 25/25 [00:43<00:00,  1.75s/it]
[epoch 13] train_loss:0.486, val_accuracy:0.931
train epoch [14/30] loss:0.340: 100%|██████████| 100/100 [07:19<00:00,  4.40s/it]
100%|██████████| 25/25 [00:43<00:00,  1.73s/it]
[epoch 14] train_loss:0.503, val_accuracy:0.819
train epoch [15/30] loss:0.681: 100%|██████████| 100/100 [07:17<00:00,  4.37s/it]
100%|██████████| 25/25 [00:41<00:00,  1.64s/it]
[epoch 15] train_loss:0.477, val_accuracy:0.934
train epoch [16/30] loss:0.542: 100%|██████████| 100/100 [07:21<00:00,  4.41s/it]
100%|██████████| 25/25 [00:43<00:00,  1.75s/it]
[epoch 16] train_loss:0.479, val_accuracy:0.926
train epoch [17/30] loss:0.403: 100%|██████████| 100/100 [07:16<00:00,  4.36s/it]
100%|██████████| 25/25 [00:43<00:00,  1.73s/it]
[epoch 17] train_loss:0.498, val_accuracy:0.906
train epoch [18/30] loss:0.565: 100%|██████████| 100/100 [07:13<00:00,  4.33s/it]
100%|██████████| 25/25 [00:43<00:00,  1.74s/it]
[epoch 18] train_loss:0.460, val_accuracy:0.850
train epoch [19/30] loss:0.262: 100%|██████████| 100/100 [07:19<00:00,  4.40s/it]
100%|██████████| 25/25 [00:41<00:00,  1.68s/it]
[epoch 19] train_loss:0.436, val_accuracy:0.938
train epoch [20/30] loss:0.454: 100%|██████████| 100/100 [07:19<00:00,  4.39s/it]
100%|██████████| 25/25 [00:42<00:00,  1.68s/it]
[epoch 20] train_loss:0.443, val_accuracy:0.940
train epoch [21/30] loss:0.359: 100%|██████████| 100/100 [07:17<00:00,  4.37s/it]
100%|██████████| 25/25 [00:42<00:00,  1.70s/it]
[epoch 21] train_loss:0.512, val_accuracy:0.891
train epoch [22/30] loss:0.266: 100%|██████████| 100/100 [07:17<00:00,  4.37s/it]
100%|██████████| 25/25 [00:43<00:00,  1.75s/it]
[epoch 22] train_loss:0.464, val_accuracy:0.940
train epoch [23/30] loss:0.438: 100%|██████████| 100/100 [07:16<00:00,  4.36s/it]
100%|██████████| 25/25 [00:42<00:00,  1.69s/it]
[epoch 23] train_loss:0.458, val_accuracy:0.949
train epoch [24/30] loss:0.631: 100%|██████████| 100/100 [07:12<00:00,  4.33s/it]
100%|██████████| 25/25 [00:41<00:00,  1.66s/it]
[epoch 24] train_loss:0.423, val_accuracy:0.911
train epoch [25/30] loss:0.491: 100%|██████████| 100/100 [07:17<00:00,  4.37s/it]
100%|██████████| 25/25 [00:40<00:00,  1.61s/it]
[epoch 25] train_loss:0.463, val_accuracy:0.823
train epoch [26/30] loss:0.708: 100%|██████████| 100/100 [07:14<00:00,  4.34s/it]
100%|██████████| 25/25 [00:42<00:00,  1.70s/it]
[epoch 26] train_loss:0.450, val_accuracy:0.922
train epoch [27/30] loss:0.324: 100%|██████████| 100/100 [07:16<00:00,  4.37s/it]
100%|██████████| 25/25 [00:42<00:00,  1.69s/it]
[epoch 27] train_loss:0.433, val_accuracy:0.917
train epoch [28/30] loss:0.406: 100%|██████████| 100/100 [07:13<00:00,  4.34s/it]
100%|██████████| 25/25 [00:41<00:00,  1.68s/it]
[epoch 28] train_loss:0.427, val_accuracy:0.939
train epoch [29/30] loss:1.083: 100%|██████████| 100/100 [07:18<00:00,  4.38s/it]
100%|██████████| 25/25 [00:40<00:00,  1.61s/it]
[epoch 29] train_loss:0.423, val_accuracy:0.936
train epoch [30/30] loss:0.260: 100%|██████████| 100/100 [07:13<00:00,  4.34s/it]
100%|██████████| 25/25 [00:42<00:00,  1.71s/it]
[epoch 30] train_loss:0.403, val_accuracy:0.927
Finish training!
Epoch为50,学习率为0.001的训练结果如下。对应 googleNet3.pth 和 training_statistic_googlenet_v3.json(只展示部分):
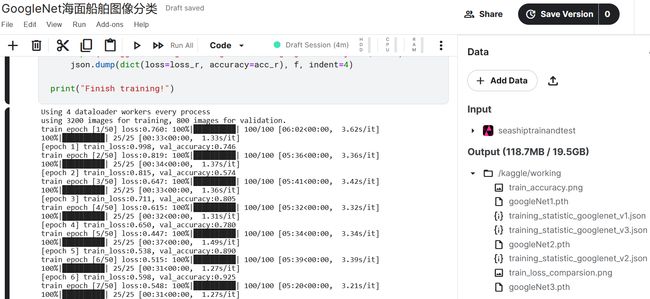
根据 train.py 运行过程中保存下来的数据,绘制损失曲线以及精确度曲线如下:

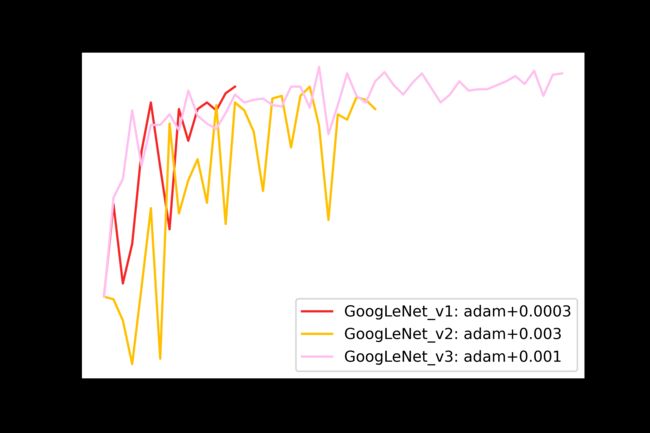
以可视化的角度来观察网络训练的过程,通过对比可以得到如下结论:
- GoogleNet的损失曲线在10个Epoch往后几乎重合;
- GoogleNet_v2在第23个Epoch时实现收敛,GoogleNet_v3在第35个Epoch处实现收敛。
test.py 中使用 googleNet1.pth ,对val文件夹进行分类,结果如下所示:

使用 googleNet2.pth ,对val文件夹下的图片进行分类,结果如下所示:

使用 googleNet3.pth ,对val文件夹下的图片进行分类,结果如下所示:

通过对比三个参数版本的GoogLeNet网络,分别计算其验证集上的网络分类性能指标——accuracy、precision、recall、F1,我们发现:使用Adam优化器在学习率为0.001条件下训练的GoogLeNet_v3网络的泛化能力最强,准确率最高。
