Person Search 学习 一
Joint Detection and Identification Feature Learning for Person Search
这篇是学习 Joint Detection and Identification Feature Learning for Person Search的代码的记录 。https://github.com/ShuangLI59/person_search
- 一、Caffe编译-cmake
cd caffe/
mkdir build && cd build
cmake .. -DUSE_MPI=ON -DCUDNN_INCLUDE=/usr/local/cuda/include -DCUDNN_LIBRARY=/usr/local/cuda/lib64/libcudnn.so
make -j8 && make install
cd ../..
cd lib && make && cd ..- 二、运行代码
按照github上网页进行操作,把代码与数据放入相应的文件夹,然后运行:
python2 tools/demo.py –gpu 0

- 三、代码阅读
先从上面运行的demo.py开始看。
用eclipse 运行程序的时候,路径一定要写成绝对路径,否则会报错。
import _init_paths  #_init_path里面是一些添加Caffe路径与lib的代码,如果在运行其他代码时,找不到 caffe,就 import _init_paths
import argparse  # 是python的一个命令行解析包,输入参数,同时会返回一个输出
#import argparse
#parser = argparse.ArgumentParser()
#parser.add_argument("square", help="display a square of a given number",type=int)
#args = parser.parse_args()
#print args.square**2
#python test1.py 4 会输出16
import time  #Python time time() 返回当前时间的时间戳
import os #这个模块主要是操作文件的一个模块,具体命令,见网址https://www.cnblogs.com/kaituorensheng/archive/2013/03/18/2965766.html
import sys #sys模块包含了与Python解释器和它的环境有关的函数。
import os.path as osp #查询文件路径的包
from glob import glob#glob是python自己带的一个文件操作相关模块,用它可以查找符合自己目的的文件,就类似于Windows下的文件搜索,
import numpy as np
import matplotlib as mpl
import matplotlib.pyplot as plt
import caffe
from mpi4py import MPI #Python环境下使用MPI接口在集群上进行多进程并行计算的方法。
#下面的几个文件是代码使用的rcnn的几个文件
from fast_rcnn.test_probe import demo_exfeat
from fast_rcnn.test_gallery import demo_detect
from fast_rcnn.config import cfg, cfg_from_file, cfg_from_list

def main(args):
    if args.cfg_file is not None:
        cfg_from_file(args.cfg_file)
    if args.set_cfgs is not None:
        cfg_from_list(args.set_cfgs)
'''下面的是 cfg_from_file 函数:
__C = edict()
def cfg_from_file(filename):
    """Load a config file and merge it into the default options."""
    import yaml #YAML它是一种直观的能够被电脑识别的数据序列化格式,是一个可读性高并且容易被人类阅读,容易和脚本语言交互,用来表达资料序列的编程语言。

    with open(filename, 'r') as f:
         yaml_cfg = edict(yaml.load(f))
    _merge_a_into_b(yaml_cfg, __C)

    #open/文件操作 f=open('/tmp/hello','r') #open(路径+文件名,读写模式),r是只读,网址https://www.cnblogs.com/dkblog/archive/2011/02/24/1980651.html
    #A merge with B 是说A和B合并在一起,成为一个整体
A merge into B 是说A合并成B.可以用成 A and B merge into C,很多东西合成一个.
    #yaml.load(f)下载文件
    #easydict和结构体差不多https://pypi.python.org/pypi/easydict/
    小程序太多,先学习整体的框架吧!!!
'''


    # Setup caffe,调用GPU
    if args.gpu >= 0:
        caffe.mpi_init()
        caffe.set_mode_gpu()
        caffe.set_device(cfg.GPU_ID)
    else:
        caffe.mpi_init()
        caffe.set_mode_cpu()

    # Get query image and roi
    query_img = 'demo/query.jpg'
    query_roi = [0, 0, 466, 943]  # [x1, y1, x2, y2]

    # Extract feature of the query person
    net = caffe.Net(args.probe_def, args.caffemodel, caffe.TEST) #构建net
    query_feat = demo_exfeat(net, query_img, query_roi) #提取嫌疑人的特征
    '''
    def demo_detect(net, filename, blob_name='feat', threshold=0.5):
        im = cv2.imread(filename)
        boxes, scores, feat_dic = _im_detect(net, im, None, [blob_name])#一个检测目标类的函数,返回检测框的坐标与中心;返回特征值
        j = 1  # only consider j = 1 (foreground class)
        inds = np.where(scores[:, j] > threshold)[0]
        cls_scores = scores[inds, j]
        cls_boxes = boxes[inds, j*4:(j+1)*4]
        boxes = np.hstack((cls_boxes, cls_scores[:, np.newaxis])).astype(np.float32)
        keep = nms(boxes, cfg.TEST.NMS)
        boxes = boxes[keep]
        features = feat_dic[blob_name][inds][keep]
        if boxes.shape[0] == 0:
            return None, None
        features = features.reshape(features.shape[0], -1)
        return boxes, features
'''
    del net  # Necessary to release cuDNN conv static workspace

    # Get gallery images
    gallery_imgs = sorted(glob('demo/gallery*.jpg'))

    # Detect and extract feature of persons in each gallery image
    net = caffe.Net(args.gallery_def, args.caffemodel, caffe.TEST)

    # Necessary to warm-up the net, otherwise the first image results are wrong
    # Don't know why. Possibly a bug in caffe's memory optimization.
    # Nevertheless, the results are correct after this warm-up.
    demo_detect(net, query_img) #作者说这个网络需要预热,不然第一幅图的结果会是错误的
    for gallery_img in gallery_imgs:  #分别对gallery_imgs的图像进行检测
        print gallery_img, '...'
        #/home/mmt/Desktop/person_search/demo/gallery-1.jpg ...
        boxes, features = demo_detect(net, gallery_img,
                                      threshold=args.det_thresh)
'''boxes:(框的坐标与得分值)ndarray: [[  9.00976990e+02   1.15154030e+02   1.22301392e+03   1.07562256e+03
    9.86511052e-01]
 [  2.95601501e+02   1.12586487e+02   5.85551697e+02   1.07900000e+03
    9.70531642e-01]
 [  1.31922742e+03   7.68123016e+01   1.62724524e+03   9.98467834e+02
    9.23337400e-01]]'''
        if boxes is None: #如果检测不到结果,那么进行下一个循环
            print gallery_img, 'no detections'
            continue
        # Compute pairwise cosine similarities,
        #   equals to inner-products, as features are already L2-normed
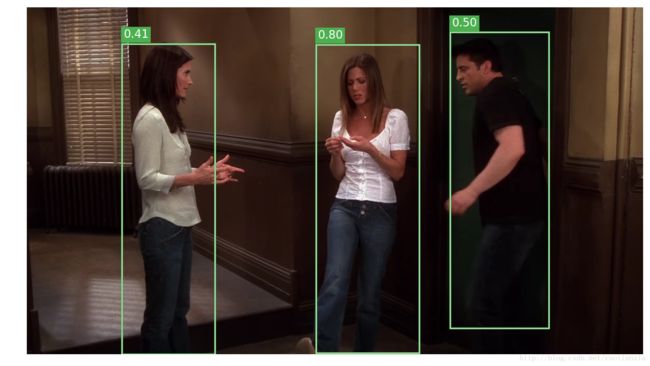
        similarities = features.dot(query_feat) #计算所检测人的特征与嫌疑人的相似性  【ndarray: [ 0.79530442  0.41088727  0.50463068]】

        # Visualize the results
        fig, ax = plt.subplots(figsize=(16, 9))
        ax.imshow(plt.imread(gallery_img))
        plt.axis('off')
        for box, sim in zip(boxes, similarities):#zip()函数在运算时,会以一个或多个序列做为参数,返回一个元组的列表。同时将这些序列中并排的元素配对。
            x1, y1, x2, y2, _ = box
            ax.add_patch(
                plt.Rectangle((x1, y1), x2 - x1, y2 - y1,
                              fill=False, edgecolor='#4CAF50', linewidth=3.5))  # 画框
            ax.add_patch(
                plt.Rectangle((x1, y1), x2 - x1, y2 - y1,
                              fill=False, edgecolor='white', linewidth=1))
            ax.text(x1 + 5, y1 - 18, '{:.2f}'.format(sim),
                    bbox=dict(facecolor='#4CAF50', linewidth=0),
                    fontsize=20, color='white')#添加文本框,显示得分值
        plt.tight_layout()
        fig.savefig(gallery_img.replace('gallery', 'result'))
        plt.show()
        plt.close(fig)
    del net

#利用 argparse包输入参数,设置GPU,文件的路径等
if __name__ == '__main__':
    parser = argparse.ArgumentParser(description='Person Search Demo')
    parser.add_argument('--gpu',
                        help='GPU id to be used, -1 for CPU. Default: 0',
                        type=int, default=0)
    parser.add_argument('--gallery_def',
                        help='prototxt file defining the gallery network',
                        default='models/psdb/resnet50/eval_gallery.prototxt')
    parser.add_argument('--probe_def',
                        help='prototxt file defining the probe network',
                        default='models/psdb/resnet50/eval_probe.prototxt')
    parser.add_argument('--net', dest='caffemodel',
                        help='path to trained caffemodel',
                        default='output/psdb_train/resnet50/resnet50_iter_50000.caffemodel')
    parser.add_argument('--det_thresh',
                        help="detection score threshold to be evaluated",
                        type=float, default=0.75)
    parser.add_argument('--cfg', dest='cfg_file',
                        help='optional config file',
                        default='experiments/cfgs/resnet50.yml')
    parser.add_argument('--set', dest='set_cfgs',
                        help='set config keys', default=None,
                        nargs=argparse.REMAINDER)
    args = parser.parse_args()
    main(args)#调用 main函数
Person search的整体框架就是这样,还有一些具体的子函数没有细看,太多了,后面再看。
- 四、训练时出错
AttributeError: ‘module’ object has no attribute ‘text_format’
解决方法1:
在 /lib/fast_rcnn/train.py加入一行
import google.protobuf.text_format
解决方法2:
重新装一个protobuf的版本
sudo pip install protobuf==2.5.0(版本号)