文字识别模型MNIST
目录
1 简介
2 数据集
3 设置神经元数量
4 设置正向传播函数
5 设置损失函数以及展示用参数
6 训练与展示
1 简介
MNIST是一个入门级的计算机视觉数据集,它包含各种从0到9的手写数字图片以及对应的标签,本篇使用了两层简单神经元来实现手写图片预测,主要目的在于熟悉Tensorflow的使用流程。
2 数据集
本篇使用MNIST数据集,首先导入包:
import numpy as np
import tensorflow as tf
import matplotlib.pyplot as plt
from tensorflow.examples.tutorials.mnist import input_data
然后获得数据集并查看数据格式:
print("Download and Extract MNIST dataset")
mnist = input_data.read_data_sets('data/', one_hot = True)
print
print(" type of 'mnist' is %s" % (type(mnist)))
print(" number of train data is %d" % (mnist.train.num_examples))
print(" number of test data is %d" % (mnist.test.num_examples))
from tensorflow.examples.tutorials.mnist import input_data
mnist = input_data.read_data_sets('data/', one_hot = True)以上两条语句会下载好MNIST数据
集到代码同文件夹下的data文件夹中,若网络不好,可以直接百度MNIST的数据集,通过国内网站下载下来放入data文件夹中。
MNIST数据集包含4个文件:
-
训练数据:
train-images-idx3-ubyte.gz -
训练标签:
train-labels-idx1-ubyte.gz -
测试数据:
t10k-images-idx3-ubyte.gz -
测试标签:
t10k-labels-idx1-ubyte.gz
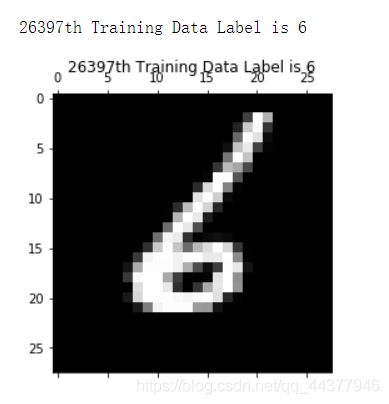
其中训练数据共55000个,测试数据10000个,每一个MNIST数据单元都由两部分组成:一张手写数字图片与一个对应的标签(即图片对应的数字);
每张手写图片包含28x28x1即784个像素点,标签为手写数字的结果。
我们可以查看一下数据集的实例:
print("How does the training data look like?")
nsample = 5
randidx = np.random.randint(trainimg.shape[0], size=nsample)
for i in randidx:
curr_img = np.reshape(trainimg[i, :], (28,28)) # 28 by 28 matrix
curr_label = np.argmax(trainlabel[i, :] ) # Label
plt.matshow(curr_img, cmap=plt.get_cmap('gray'))
plt.title("" + str(i) + "th Training Data "
+ "Label is " + str(curr_label))
print("" + str(i) + "th Training Data "
+ "Label is " + str(curr_label))
plt.show()3 设置神经元数量
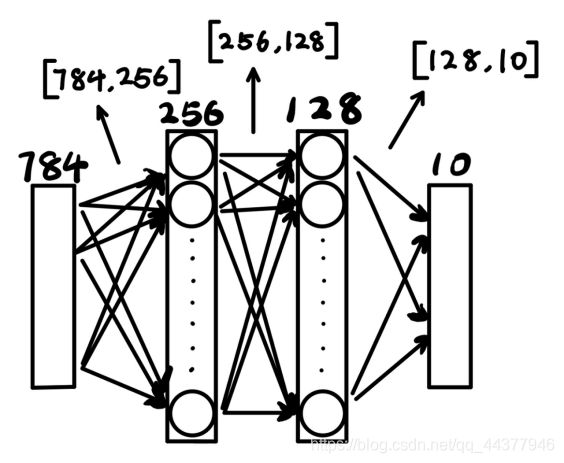
本次训练使用两层神经网络进行训练,第一层设置256个神经元,第二层设置128个神经元,输入为图片像素点数784,输出为预测的各数字的概率,即10;
故输入层与第一层神经元之间的权重w1为[784,256],偏置b1为[256];
第一层神经元与第二层神经元之间的权重w2为[256,128],偏置b2为[125];
第二层神经元与输出之间的权重out为[128,10],偏置out为[10]。
各权重与偏置都为自动生成的随机值,设置标准差为0.1。
# 神经元个数
n_input = 784
n_classes = 10
n_hidden_1 = 256
n_hidden_2 = 128
#输入与输出
x = tf.placeholder("float", [None, n_input]) # None表示任意值,
y = tf.placeholder("float", [None, n_classes]) # 实际是后面指定的batch值
# 权重与偏置
stddev = 0.1
weights = {
'w1': tf.Variable(tf.random_normal([n_input, n_hidden_1], stddev=stddev)),
'w2': tf.Variable(tf.random_normal([n_hidden_1, n_hidden_2], stddev=stddev)),
'out': tf.Variable(tf.random_normal([n_hidden_2, n_classes], stddev=stddev)),
}
biases = {
'b1': tf.Variable(tf.random_normal([n_hidden_1])),
'b2': tf.Variable(tf.random_normal([n_hidden_2])),
'out': tf.Variable(tf.random_normal([n_classes])),
}
print("Network Ready")4 设置正向传播函数
作矩阵乘法X · w ,然后加上偏置b,最后通过ReLU激活函数:
def multilayer_perception(_X, _weights, _biases):
    layer_1 = tf.nn.relu(tf.add(tf.matmul(_X, _weights['w1']),  _biases['b1'])) #y=x*w+b
    layer_2 = tf.nn.relu(tf.add(tf.matmul(layer_1, _weights['w2']), _biases['b2']))
    return(tf.add(tf.matmul(layer_2, _weights['out']), _biases['out']))
关于激活函数,因为对于矩阵乘法,A·B·C = A·(B·C),无论设置多少层神经网络,对A来说都是只乘了一个矩阵,即最终效果相当于只有一层神经网络。因此每过一层神经网络,都需要过一次激活函数,进行一次非线性变换,如此才可使得多层神经网络真正起到效果。
5 设置损失函数以及展示用参数
为了调整权重使得预测的精度更高,需要设置适当的损失函数,使模型向着损失值减小的方向迭代。
这里采用了预测值与标签值之间的交叉熵作为损失函数,使用梯度下降算法以0.001的学习率使损失值最小化。
# 预测值
pred = multilayer_perception(x, weights, biases)
# 损失值
cost = tf.reduce_mean(tf.nn.softmax_cross_entropy_with_logits(logits=pred, labels=y))
# 优化器
optm = tf.train.GradientDescentOptimizer(learning_rate=0.001).minimize(cost)
# 中途展示用数据
corr = tf.equal(tf.argmax(pred,1), tf.argmax(y,1)) #0到9的概率,最大的为预测结果
accr = tf.reduce_mean(tf.cast(corr, "float")) #平均精度
print("Functions Ready")通过验证预测结果与标签是否一致,判断此次预测是否成功,将多次验证的成功率作为展示用的平均精度。
6 训练与展示
设置批处理个数 batch_size 为100,每次读入100个MNIST数据,设置迭代轮数 training_epochs 为20,总计进行20轮数据集的迭代,每进行4轮展示一次当前模型的预测效果。
此处批处理的数据读入使用了数据集提供的 mnist.train.next_batch(batch_size)
training_epochs = 20
batch_size = 100
display_step = 4
# 初始化
init = tf.global_variables_initializer()
sess = tf.Session()
sess.run(init)
for epoch in range(training_epochs):
avg_cost = 0.
total_batch = int(mnist.train.num_examples/batch_size)
for i in range(total_batch):
batch_xs, batch_ys = mnist.train.next_batch(batch_size) #如果是自己数据集,需要自己写函数
feeds = {x: batch_xs, y: batch_ys}
sess.run(optm, feed_dict=feeds)
avg_cost += sess.run(cost, feed_dict=feeds)
avg_cost /= total_batch
# 展示
if(epoch+1) % display_step == 0:
print("Epoch: %03d/%03d cost: %.9f" %(epoch, training_epochs, avg_cost))
#训练样本的精度
feeds = {x: batch_xs, y: batch_ys}
train_acc = sess.run(accr, feed_dict=feeds)
print("Train Accuracy: %.3f" % (train_acc))
#测试集的精度
feeds = {x: mnist.test.images, y: mnist.test.labels}
test_acc = sess.run(accr, feed_dict=feeds)
print("Test Accuracy: %.3f" % (test_acc))
print("Optimization Finished")得到训练结果:
最后得到的预测准确率在90%左右,因本次训练采用的模型比较简单,所以准确率不高,若想继续提高准确率,可以采用其他一些比较经典的神经网络模型。


