在Windows环境下OpenVINO™(2022.2 edition)的安装与配置【For Python and Intel NCS2】
Notice:此次安装是完整版本安装包括优化器等,部署调用是基于Python环境,以及涉及到Intel NCS2神经网络计算棒二代的部署
一、基本准备
1.Python3基本解释器的准备,推荐Python3.8以上,如已有请忽略
2.硬件上至少得有一个USB3.0接口(有部署在 intel NCS2上需求的);以及一个CPU(Intel、AMD的都行)
二、环境搭建
Python环境配置
通过pip安装可参考官方:
https://www.intel.cn/content/www/cn/zh/developer/tools/openvino-toolkit/download.html![]() https://www.intel.cn/content/www/cn/zh/developer/tools/openvino-toolkit/download.html
https://www.intel.cn/content/www/cn/zh/developer/tools/openvino-toolkit/download.html
简单而言就是:
打开cmd,cd /d 切换到一个自定义路径,输入命令:
步骤 1: 创建和激活虚拟环境(强烈建议使用虚拟环境,不然把Python系统环境搞得乱七八糟各种冲突的很麻烦)
python -m venv openvino_env
python -m venv openvino_env openvino_env\Scripts\activate
步骤 2: 将 pip 升级至最新版本
python -m pip install --upgrade pip步骤 3: 下载并安装依赖库
pip install openvino-dev[ONNX]==2022.2.0完成以上步骤之后,通过pip list查看一下是否安装完全,但这个时候常常无法运行,因为系统驱动以及环境变量还未配置
系统驱动及环境变量配置
去Intel官方网站下载对应版本的安装包
https://www.intel.cn/content/www/cn/zh/developer/tools/openvino-toolkit/download.html![]() https://www.intel.cn/content/www/cn/zh/developer/tools/openvino-toolkit/download.html
https://www.intel.cn/content/www/cn/zh/developer/tools/openvino-toolkit/download.html
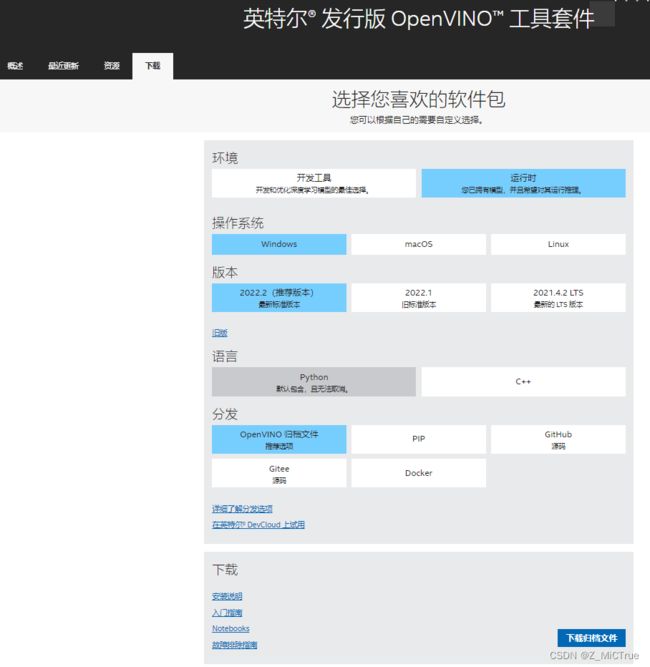
选择如下:
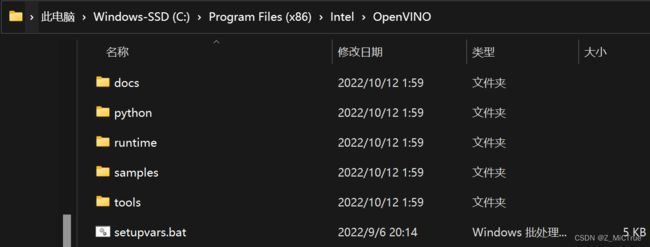
下载完成后会得到一个压缩包(个人觉得这是安装最方便的一个版本),解压到一个自定义路径,如 C:\Program Files (x86)\Intel\OpenVINO
得到类似于下图的目录:
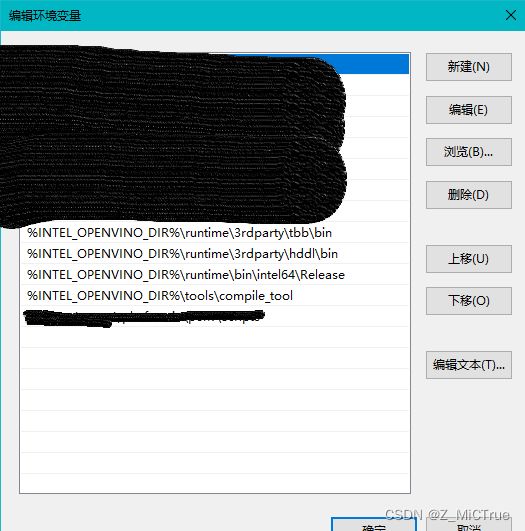
解压完成后添加如下环境变量:
set "INTEL_OPENVINO_DIR=C:\Program Files (x86)\Intel\OpenVINO\"

set "OPENVINO_LIB_PATHS=
%INTEL_OPENVINO_DIR%\runtime\bin\intel64\Release;
%INTEL_OPENVINO_DIR%\runtime\bin\intel64\Debug;
%INTEL_OPENVINO_DIR%\runtime\3rdparty\tbb\bin;
%INTEL_OPENVINO_DIR%\runtime\3rdparty\hddl\bin;"

set "PATH=
%INTEL_OPENVINO_DIR%\runtime\bin\intel64\Release;
%INTEL_OPENVINO_DIR%\runtime\bin\intel64\Debug;
%INTEL_OPENVINO_DIR%\runtime\3rdparty\tbb\bin;
%INTEL_OPENVINO_DIR%\runtime\3rdparty\hddl\bin;
%INTEL_OPENVINO_DIR%\tools\compile_tool;"
配置完成后类似于:
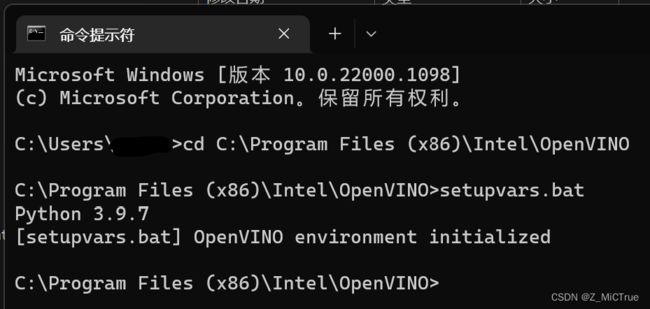
配置完成后最好还是重启一下PC,然后打开cmd输入cd C:\Program Files (x86)\Intel\OpenVINO,然后输入setupvars.bat后执行,如下:
这一步主要是连接一下系统驱动与Python环境,主要是针对NCS2这样的外置硬件,不然在运行时可能会出现NC_OUT_OF_MEMORY或者NC_ERROR这样的错误(出现这样的错误可能是因为驱动连接不上而超时误以为是内存过大而加载超时,而另一种可能是使用的USB2.0接口导致连接时间过长而超时)
综上,OpenVINO环境配置完毕
三、环境测试
安装完成后激活虚拟环境,之后可用如下脚本进行测试:
from openvino.inference_engine import IECore
from openvino.runtime import Core
import numpy as np


if __name__ == '__main__':
    # device
    ie_core = IECore()
    print('devices: ', ie_core.available_devices)
    # run
    core = Core()
    net_small = core.compile_model(model='test.onnx', device_name="MYRIAD")  # CPU GPU MYRIAD ...
    output = net_small([np.array([1], dtype=np.float32)])[next(iter(net_small.outputs))]
    print('small model work state: ', output)
    print('over')
若运行正常则会输出当前可用设备以及测试模型输出结果
测试模型可用如下脚本产生:
import torch
import torch.nn as nn
import torch.nn.functional as func


class ANN_Net(nn.Module):
    def __init__(self, IO_num):
        super(ANN_Net, self).__init__()
        self.layer_o = nn.Linear(IO_num, 1)

    def forward(self, x_in):
        # In
        x_out = func.relu(self.layer_o(x_in))
        return x_out


if __name__ == '__main__':
    x = torch.tensor([1]).to(torch.float32)
    net = ANN_Net(1)
    net.eval()
    # onnx导出
    torch.onnx.export(net, x, 'test.onnx',
                      verbose=True, keep_initializers_as_inputs=True, opset_version=11,
                      input_names=["input"], output_names=["output"])
    print("finished exporting onnx ")
    print(net(x))
四、关于使用OpenVINO优化模型
假如你已经有了一个训练好的模型“test.onnx”,激活虚拟环境然后输入命令
mo --input_model=test.onnx --model_name=test_fp16 --data_type=FP16 --enable_concat_optimization --progress关于优化参数的解释
--input_model INPUT_MODEL, -w INPUT_MODEL, -m INPUT_MODEL
    Tensorflow*: a file with a pre-trained model (binary or text .pb file after freezing). Caffe*: a model proto file with model weights
	Tensorflow *:具有预训练模型的文件(冻结后的二进制或文本.pb文件)。 Caffe *:具有模型权重的模型原型文件

--model_name MODEL_NAME, -n MODEL_NAME
	Model_name parameter passed to the final create_ir transform. This parameter is used to name a network in a generated IR and output .xml/.bin files.
	将Model_name参数传递给最终的create_ir转换。 此参数用于在生成的IR中命名网络并输出.xml / .bin文件。

--output_dir OUTPUT_DIR, -o OUTPUT_DIR
   Directory that stores the generated IR. By default, it  is the directory from where the Model Optimizer is launched.
   存储生成的IR的目录。 默认情况下,它是启动模型优化器的目录。

--input_shape INPUT_SHAPE
        Input shape(s) that should be fed to an input node(s) of the model. Shape is defined as a comma-separated  list of integer numbers enclosed in parentheses or  square brackets, for example [1,3,227,227] or (1,227,227,3), where the order of dimensions depends  on the framework input layout of the model. For  example, [N,C,H,W] is used for Caffe* models and  [N,H,W,C] for TensorFlow* models. Model Optimizer performs necessary transformations to convert the shape to the layout required by Inference Engine (N,C,H,W). The shape should not contain undefined  dimensions (? or -1) and should fit the dimensions defined in the input operation of the graph. If there  are multiple inputs in the model, --input_shape should contain definition of shape for each input separated  by a comma, for example: [1,3,227,227],[2,4] for a  model with two inputs with 4D and 2D shapes. Alternatively, specify shapes with the --input option.
    应输入模型的输入节点的输入形状。 形状定义为用逗号分隔的用括号或方括号括起来的整数列表,例如[1,3,227,227]或(1,227,227,3),其中尺寸顺序取决于模型的框架输入布局。 例如,[N,C,H,W]用于Caffe *模型,[N,H,W,C]用于TensorFlow *模型。 模型优化器执行必要的转换,以将形状转换为推理引擎所需的布局(N,C,H,W)。 形状不应包含未定义的尺寸(?或-1),并且应适合在图形的输入操作中定义的尺寸。 如果模型中有多个输入,则--input_shape应包含每个输入的形状定义,并用逗号分隔,例如:[1,3,227,227],[2,4]对于具有两个4D和2D形状的输入的模型 。 或者,使用--input选项指定形状。

--scale SCALE, -s SCALE
	All input values coming from original network inputs  will be divided by this value. When a list of inputs  is overridden by the --input parameter, this scale is  not applied for any input that does not match with the original input of the model.
	来自原始网络输入的所有输入值都将被该值除。 当输入列表被--input参数覆盖时,该比例不适用于与模型原始输入不匹配的任何输入。

--reverse_input_channels
 	Switch the input channels order from RGB to BGR (or vice versa). Applied to original inputs of the model  if and only if a number of channels equals 3. Applied  after application of --mean_values and --scale_values  options, so numbers in --mean_values and  --scale_values go in the order of channels used in the  original model.
 	将输入通道顺序从RGB切换到BGR(反之亦然)。 当且仅当通道数等于3时,才应用于模型的原始输入。在应用--mean_values和--scale_values选项后应用,因此--mean_values和--scale_values中的数字按通道中使用的通道顺序排列 原始模型。

--log_level 		  {CRITICAL,ERROR,WARN,WARNING,INFO,DEBUG,NOTSET}


--input INPUT
	Quoted list of comma-separated input nodes names with shapes, data types, and values for freezing. The shape  and value are specified as space-separated lists. The  data type of input node is specified in braces and can have one of the values: f64 (float64), f32 (float32),   f16 (float16), i64 (int64), i32 (int32), u8 (uint8), boolean. For example, use the following format to set   input port 0 of the node `node_name1` with the shape [3 4] as an input node and freeze output port 1 of the node `node_name2` with the value [20 15] of the int32 type and shape [2]: "0:node_name1[3 4],node_name2:1[2]{i32}->[20 15]".
	用逗号分隔的输入节点名称(带形状,数据类型和冻结值)的带引号的列表。 形状和值指定为以空格分隔的列表。 输入节点的数据类型以大括号指定,并且可以具有以下值之一:f64(float64),f32(float32),f16(float16),i64(int64),i32(int32),u8(uint8),布尔值。 例如,使用以下格式将形状为[3 4]的节点'node_name1'的输入端口0设置为输入节点,并冻结节点int32的值[20 15]的节点`node_name2`的输出端口1。 类型和形状[2]:“ 0:node_name1 [3 4],node_name2:1 [2] {i32}-> [20 15]”。

--output OUTPUT
	The name of the output operation of the model. For TensorFlow*, do not add :0 to this name.
	模型的输出操作的名称。 对于TensorFlow *,请勿在该名称上添加:0。

--mean_values MEAN_VALUES, -ms MEAN_VALUES
	Mean values to be used for the input image per channel. Values to be provided in the (R,G,B) or  [R,G,B] format. Can be defined for desired input of the model, for example: "--mean_values  data[255,255,255],info[255,255,255]". The exact  meaning and order of channels depend on how the original model was trained.
     每个通道用于输入图像的平均值。 以(R,G,B)或[R,G,B]格式提供的值。 可以为模型的所需输入定义,例如:“-mean_values data [255,255,255],info [255,255,255]”。 通道的确切含义和顺序取决于原始模型的训练方式。

--scale_values SCALE_VALUES
	Scale values to be used for the input image per  channel. Values are provided in the (R,G,B) or [R,G,B]  format. Can be defined for desired input of the model, for example: "--scale_values data[255,255,255],info[255,255,255]". The exact  meaning and order of channels depend on how the original model was trained.
	每个通道用于输入图像的比例值。 值以(R,G,B)或[R,G,B]格式提供。 可以为模型的所需输入定义,例如:“-scale_values data [255,255,255],info [255,255,255]”。 通道的确切含义和顺序取决于原始模型的训练方式。

--data_type {FP16,FP32,half,float}
	Data type for all intermediate tensors and weights. If  original model is in FP32 and --data_type=FP16 is specified, all model weights and biases are quantized  to FP16.
	所有中间张量和权重的数据类型。 如果原始模型位于FP32中,并且指定了--data_type = FP16,则所有模型权重和偏差都将量化为FP16。

--disable_fusing
	Turn off fusing of linear operations to Convolution
	关闭将线性运算与卷积的融合

--disable_resnet_optimization
    Turn off resnet optimization
    关闭Resnet优化

--finegrain_fusing FINEGRAIN_FUSING
    Regex for layers/operations that won't be fused. Example: --finegrain_fusing Convolution1,.*Scale.*
    正则表达式用于不会融合的层/操作。 示例:--finegrain_fusing卷积1,。* Scale。*

--disable_gfusing
  Turn off fusing of grouped convolutions
  关闭分组卷积的融合

--enable_concat_optimization
    Turn on Concat optimization.
    打开Concat优化。

--move_to_preprocess
  Move mean values to IR preprocess section
  将平均值移至IR预处理部分

--extensions EXTENSIONS
     Directory or a comma separated list of directories with extensions. To disable all extensions including
those that are placed at the default location, pass an empty string.
	目录或以逗号分隔的带有扩展名的目录列表。 要禁用所有扩展名,包括放置在默认位置的扩展名,请传递一个空字符串。

--batch BATCH, -b BATCH
     Input batch size
     输入批量

--version
	Version of Model Optimizer
	模型优化器的版本

--silent
	Prevent any output messages except those that correspond to log level equals ERROR, that can be set with the following option: --log_level. By default,log level is already ERROR.
	防止使用与以下日志选项对应的输出消息(与日志级别对应的消息等于ERROR除外)进行设置:--log_level。 默认情况下,日志级别已为ERROR。

--freeze_placeholder_with_value 		 fREEZE_PLACEHOLDER_WITH_VALUE Replaces input layer with constant node with provided value, for example: "node_name->True". It will be DEPRECATED in future releases. Use --input option to specify a value for freezing.
	FREEZE_PLACEHOLDER_WITH_VALUE用具有提供值的恒定节点替换输入层,例如:“ node_name-> True”。 在将来的版本中将不再使用。 使用--input选项指定冻结值。

--generate_deprecated_IR_V7
    Force to generate deprecated IR V7 with layers from old IR specification.
    强制生成具有旧IR规范中的图层的已弃用的IR V7。

--static_shape
	Enables IR generation for fixed input shape (folding `ShapeOf` operations and shape-calculating sub-graphs to `Constant`). Changing model input shape using the Inference Engine API in runtime may fail for such an IR.
	为固定的输入形状启用IR生成(将“ ShapeOf”操作和形状计算子图折叠为“ Constant”)。 对于此类IR,在运行时使用Inference Engine API更改模型输入形状可能会失败

--keep_shape_ops
  The option is ignored. Expected behavior is enabled by default.
  该选项被忽略。 默认情况下启用预期行为。

--disable_weights_compression
      Disable compression and store weights with original precision.
      禁用压缩并以原始精度存储重量

--progress
  Enable model conversion progress display.
  启用模型转换进度显示

--stream_output
   Switch model conversion progress display to a multiline mode.
   将模型转换进度显示切换到多行模式

--transformations_config
	TRANSFORMATIONS_CONFIG Use the configuration file with transformations description.
	TRANSFORMATIONS_CONFIG将配置文件与转换说明一起使用
最终将得到优化后的IR模型,包含三个文件
这里在NCS2上的部署代码以NanoDet为例:
import cv2
import numpy as np

from post_process import (img_resize, use_NMS)


class OpenVINO_Forward:
    def __init__(self, net_path):
        if type(net_path) == str:
            from openvino.runtime import Core
            ie = Core()
            use_device = "CPU"  # CPU MYRIAD
            self.net = ie.compile_model(model=net_path, device_name=use_device)
            self.input_net = None
        else:
            from openvino.inference_engine import IECore
            ie = IECore()
            use_device = "MYRIAD"  # CPU MYRIAD
            IR_net = ie.read_network(model=net_path[0], weights=net_path[1])
            self.net = ie.load_network(network=IR_net, device_name=use_device)
            self.input_net = next(iter(self.net.input_info))
        self.output_net = next(iter(self.net.outputs))

    def forward(self, img, normalize=None, score_min=0.5):
        img = np.ascontiguousarray(img)
        if normalize is not None:
            img = (img - normalize[0]) / normalize[1]
        if self.input_net is None:
            img = np.transpose(np.expand_dims(img, axis=0), (0, 3, 1, 2)).astype(np.float32)
            output = self.net([img])[self.output_net]
        else:
            img = np.transpose(np.expand_dims(img, axis=0), (0, 3, 1, 2)).astype(np.float16)
            output = self.net.infer(inputs={self.input_net: img})[self.output_net]
        output = output[np.max(output[:, 4:], axis=1) >= score_min]
        return output


class Options:
    def __init__(self):
        # ---base--- #
        self.input_size = (320, 320)  # w, h
        self.classes_name = ['R3', 'B3', 'R0', 'B0', 'R4', 'B4', 'land']
        self.score_min = 0.3
        self.IoU_max = 0.35
        data_mean = np.array([103.53, 116.28, 123.675])
        data_std = np.array([57.375, 57.12, 58.395])
        # ---auto--- #
        self.normalize = [data_mean, data_std]


if __name__ == '__main__':
    options = Options()
    # 使用IR模型
    openvino_model = OpenVINO_Forward(('nets/nanodet_fp16.xml', 'nets/nanodet_fp16.bin'))
    # 使用ONNX模型
    # openvino_model = OpenVINO_Forward('nets/nanodet.onnx')

    frame = cv2.imread('test.jpg', 1)
    frame = img_resize(frame, options.input_size, keep_ratio=True)
    # 推理+解码
    predicts = openvino_model.forward(frame, options.normalize, score_min=options.score_min)
    # 非极大值抑制
    res_bbox = use_NMS(predicts, IoU_max=options.IoU_max)
    # 显示
    for each_bbox in res_bbox:
    # 画框
        cv2.rectangle(frame, tuple(each_bbox[:2].astype(np.int16)), tuple(each_bbox[2: 4].astype(np.int16)),
                          (255, 0, 0))
        # 获得最大概率类别索引
        class_index = int(np.argmax(each_bbox[4:]))
        # 获得最大概率类别概率值
        class_possible = str(np.round(each_bbox[4:][class_index], 4))
        cv2.putText(frame, options.classes_name[class_index] + ' ' + class_possible,
                    tuple(each_bbox[:2].astype(np.int16)),
                    cv2.FONT_HERSHEY_SIMPLEX, 0.3, (22, 7, 207))
    cv2.imshow('frame', frame)
    cv2.waitKey()
Thanks for reading


