基于残差神经网络的交通标志识别算法研究与应用实现
问题:
从图像中识别交通标志对于自动驾驶至关重要。要想实现自动驾驶,车辆必须了解并遵守所有交通规则。当前,特斯拉、谷歌、梅赛德斯-奔驰、丰田、福特、奥迪等许多大公司都在研究自动驾驶。因此,为了实现这项技术的准确性,车辆应该能够解释交通标志并做出相应的决定。
摘要
在本项目项目中,我们将构建一个深度神经网络模型,并将其命名为residual_attention_network,即在残差网络的基础上引入注意力机制,并在 GTSRB交通标志数据集上进行实验,实验结果 表明改进后的残差网络在识别准确率上有明显提高,该模型经过训练可以将图像中存在的交通标志分类为不同的类别。有了这个模型,我们能够设计实现一个GUI识别上传的交通标志,这对自动驾驶汽车来说是一项非常有意义的任务。
什么是交通标志识别?
目前道路中有几种不同类型的交通标志,如限速、禁止进入、交通信号、左转或右转、儿童过马路、重型车辆禁止通过等。交通标志分类是识别交通标志属于哪一类的重要过程和解决方式。
交通标志自动识别是高级驾驶员辅助系统( Advanced Driver Assistance System,ADAS) 和自动驾驶领域的一个重要的研究方向。由于近年来驾驶者对汽车的智能化要求不断提高,交通标志自动识别功能逐渐被各个汽车厂商所重视。因此,越来越多相关领域的研究人员开始致力于交通标志自动识别的研究。在驾驶过程中,驾驶者可能会因为注意力不集中等原因忽视部分交通标志的提示信息,若 ADAS能及时地识别出相关的交通标志并给予驾驶者相关提示,则能够大大提升行车安全性。而在将驾驶任务完全交给行车电脑的自动驾驶领域,准确地识别道路交通标志更是一项对乘客和道路交通安全有着重大影响的任务,因此对交通标志的识别准确率要求极高。
数据集介绍
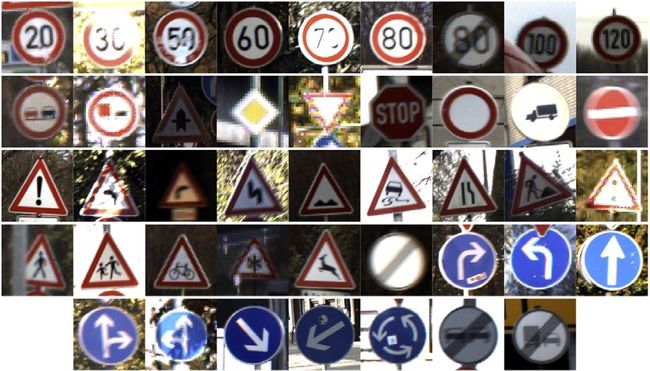
这次实验所使用的数据集是GTSRB,包括了各种气候条件下,各种各样的交通标志图像。GTSRB 数据集由 43 类交通标志组成,共有 39209 张 训练样本和 12630 张测试样本,样本像素的尺寸范围 大多为 15 × 15 到 250 × 250 之间。部分样本图像如图 4所示
该项目需要 Keras、Matplotlib、Scikit-learn、Pandas、PIL 和图像分类的代码包。
模型设计与实现
读入数据:
我们的“train”文件夹包含 43 个文件夹,每个文件夹代表一个不同的类别。文件夹的范围是从 0 到 42。在 OS 模块的帮助下,我们遍历所有类并将图像及其各自的标签附加到数据和标签列表中。
#Retrieving the images and their labels
for i in range(classes):
    path = os.path.join(cur_path,'train',str(i))
    images = os.listdir(path)
    for a in images:
        try:
            image = Image.open(path + '\\'+ a)
            image = image.resize((30,30))
            image = np.array(image)
            #sim = Image.fromarray(image)
            data.append(image)
            labels.append(i)
        except:
            print("Error loading image")
#Converting lists into numpy arrays
data = np.array(data)
labels = np.array(labels)
上述过程,我们将所有图像及其标签存储到列表(数据和标签)中。但是,我们需要将列表转换为 numpy 数组以提供给模型。数据的形状是 (39209, 30, 30, 3) 这意味着有 39209 张大小为 30×30 像素的图像,最后 3 意味着数据包含彩色图像(RGB 值)。
在 sklearn 包中,我们使用 train_test_split() 方法来拆分训练和测试数据。并使用 to_categorical 方法将 y_train 和 t_test 中存在的标签转换为单热编码。
X_train, X_test, y_train, y_test = train_test_split(data, labels, test_size=0.2, random_state=42)
#Converting the labels into one hot encoding
y_train = to_categorical(y_train, 43)
y_test = to_categorical(y_test, 43)
基本CNN 模型构建
def cnn_model():
    model = Sequential()

    model.add(Conv2D(32, (3, 3), padding='same',
                     input_shape=(3, IMG_SIZE, IMG_SIZE),
                     activation='relu'))
    model.add(Conv2D(32, (3, 3), activation='relu'))
    model.add(MaxPooling2D(pool_size=(2, 2)))
    model.add(Dropout(0.2))

    model.add(Conv2D(64, (3, 3), padding='same',
                     activation='relu'))
    model.add(Conv2D(64, (3, 3), activation='relu'))
    model.add(MaxPooling2D(pool_size=(2, 2)))
    model.add(Dropout(0.2))

    model.add(Conv2D(128, (3, 3), padding='same',
                     activation='relu'))
    model.add(Conv2D(128, (3, 3), activation='relu'))
    model.add(MaxPooling2D(pool_size=(2, 2)))
    model.add(Dropout(0.2))

    model.add(Flatten())
    model.add(Dense(512, activation='relu'))
    model.add(Dropout(0.5))
    model.add(Dense(NUM_CLASSES, activation='softmax'))
return modelloss:我们要优化的损失函数。选择categorical_crossentropyoptimizer:我们使用带有 Nesterov 动量的标准随机梯度下降。metric:由于我们正在处理分类问题,因此我们的指标是准确性。
构建residual_attention_network模型
模型结构如下:

该部分完整代码和相关数据集可以在此处下载:
https://download.csdn.net/download/weixin_40651515/87358141
from keras.layers import Input, Conv2D, Lambda, MaxPool2D, UpSampling2D, AveragePooling2D, ZeroPadding2D
from keras.layers import Activation, Flatten, Dense, Add, Multiply, BatchNormalization, Dropout
from keras.models import Model
# Todo: Make scalable/all-encompassing
class ResidualAttentionNetwork():

    def __init__(self, input_shape, n_classes, activation, p=1, t=2, r=1): self.input_shape = input_shape
        self.n_classes = n_classes
        self.activation = activation
        self.p = p
        self.t = t
        self.r = r

    def build_model(self):
         # Initialize a Keras Tensor of input_shape
        input_data = Input(shape=self.input_shape)

        # Initial Layers before Attention Module

        # Doing padding because I'm having trouble with img dims that are <= 28
        if self.input_shape[0] <= 28 or self.input_shape[1] <= 28:
            x_dim_inc = (32 - self.input_shape[0]) // 2
            y_dim_inc = (32 - self.input_shape[1]) // 2

            # Pad the input data to 32x32
            padded_input_data = ZeroPadding2D( (x_dim_inc, y_dim_inc) )(input_data)
            conv_layer_1 = Conv2D(filters=32,
                             kernel_size=(3,3),
                             strides=(1,1),
                             padding='same')(padded_input_data)
        else:
            conv_layer_1 = Conv2D(filters=32,
                             kernel_size=(3,3),
                             strides=(1,1),
                             padding='same')(input_data)

        max_pool_layer_1 = MaxPool2D(pool_size=(2, 2),
                                     strides=(2, 2),
                                     padding='same')(conv_layer_1)

        # Residual Unit then Attention Module #1
        res_unit_1 = self.residual_unit(max_pool_layer_1, filters=[32, 64, 128])
        att_mod_1 = self.attention_module(res_unit_1, filters=[32, 64, 128])

        # Residual Unit then Attention Module #2
        res_unit_2 = self.residual_unit(att_mod_1, filters=[32, 64, 128])
        att_mod_2 = self.attention_module(res_unit_2, filters=[32, 64, 128])

        # Residual Unit then Attention Module #3
        res_unit_3 = self.residual_unit(att_mod_2, filters=[32, 64, 128])
        att_mod_3 = self.attention_module(res_unit_3, filters=[32, 64, 128])
        res_unit_end_1 = self.residual_unit(att_mod_3, filters=[32, 32, 64])
        res_unit_end_2 = self.residual_unit(res_unit_end_1, filters=[32, 32, 64])
        res_unit_end_3 = self.residual_unit(res_unit_end_2, filters=[32, 32, 64])
        res_unit_end_4 = self.residual_unit(res_unit_end_3, filters=[32, 32, 64])
        avg_pool_layer = AveragePooling2D(pool_size=(2, 2), strides=(2, 2))(res_unit_end_4)

        # Flatten the data
        flatten_op = Flatten()(avg_pool_layer)
        # FC Layers for prediction
        fully_connected_layer_1 = Dense(256, activation='relu')(flatten_op)
        dropout_layer_1 = Dropout(0.5)(fully_connected_layer_1)
        fully_connected_layer_2 = Dense(256, activation='relu')(dropout_layer_1)
        dropout_layer_2 = Dropout(0.5)(fully_connected_layer_2)
        fully_connected_layer_3 = Dense(256, activation='relu')(dropout_layer_2)
        dropout_layer_3 = Dropout(0.5)(fully_connected_layer_3)
        fully_connected_layer_last = Dense(self.n_classes, activation=self.activation)(dropout_layer_3)

        # Fully constructed model
        model = Model(inputs=input_data, outputs=fully_connected_layer_last)

        return model

    # Pre-Activation Identity ResUnit Bottleneck Architecture
    def residual_unit(self, residual_input_data, filters):
        # Hold input_x here for later processing
        identity_x = residual_input_data
        filter1,filter2,filter3 = filters
        # Layer 1
        batch_norm_op_1 = BatchNormalization()(residual_input_data)
        activation_op_1 = Activation('relu')(batch_norm_op_1)
        conv_op_1 = Conv2D(filters=filter1,
                         kernel_size=(1,1),
                         strides=(1,1),
                         padding='same')(activation_op_1)
        # Layer 2
        batch_norm_op_2 = BatchNormalization()(conv_op_1)
        activation_op_2 = Activation('relu')(batch_norm_op_2)
        conv_op_2 = Conv2D(filters=filter2,
                         kernel_size=(3,3),
                         strides=(1,1),
                         padding='same')(activation_op_2)
        # Layer 3
        batch_norm_op_3 = BatchNormalization()(conv_op_2)
        activation_op_3 = Activation('relu')(batch_norm_op_3)
        conv_op_3 = Conv2D(filters=filter3,
                         kernel_size=(1,1),
                         strides=(1,1),
                         padding='same')(activation_op_3)
        # Element-wise Addition
        if identity_x.shape[-1].value != conv_op_3.shape[-1].value:
            filter_n = conv_op_3.shape[-1].value

            identity_x = Conv2D(filters=filter_n,
                             kernel_size=(1,1),
                             strides=(1,1),
                             padding='same')(identity_x)
        output = Add()([identity_x, conv_op_3])
        return output

    def attention_module(self, attention_input_data, filters):
        # Send input_x through #p residual_units
        p_res_unit_op_1 = attention_input_data
        for _ in range(self.p):
            p_res_unit_op_1 = self.residual_unit(p_res_unit_op_1, filters=filters)
        # Perform Trunk Branch Operation
        trunk_branch_op = self.trunk_branch(trunk_input_data=p_res_unit_op_1, filters=filters)
        # Perform Mask Branch Operation
        mask_branch_op = self.mask_branch(mask_input_data=p_res_unit_op_1, filters=filters)
        # Perform Attention Residual Learning: Combine Trunk and Mask branch results
        ar_learning_op = self.attention_residual_learning(mask_input=mask_branch_op, trunk_input=trunk_branch_op)
        # Send branch results through #p residual_units
        p_res_unit_op_2 = ar_learning_op
        for _ in range(self.p):
            p_res_unit_op_2 = self.residual_unit(p_res_unit_op_2, filters=filters)
        return p_res_unit_op_2
    def trunk_branch(self, trunk_input_data, filters):
        # sequence of residual units, default=2
        t_res_unit_op = trunk_input_data
        for _ in range(self.t):
            t_res_unit_op = self.residual_unit(t_res_unit_op, filters=filters)
        return t_res_unit_op

    def mask_branch(self, mask_input_data, filters, m=3):
        downsampling = MaxPool2D(pool_size=(2, 2),
                                     strides=(2, 2),
                                     padding='same')(mask_input_data)

        for _ in range(m):
            # Perform residual units ops r times between adjacent pooling layers
            for j in range(self.r):
                downsampling = self.residual_unit(residual_input_data=downsampling, filters=filters)

            # Last pooling step before middle step - Bottom
            downsampling = MaxPool2D(pool_size=(2, 2),
                                         strides=(2, 2),
                                         padding='same')(downsampling)

        # Upsampling Step Initialization - Top
        upsampling = UpSampling2D(size=(2, 2))(middleware)

        for _ in range(m):
            # Perform residual units ops r times between adjacent pooling layers
            for j in range(self.r):
                upsampling = self.residual_unit(residual_input_data=upsampling, filters=filters)

            # Last interpolation step - Bottom
            upsampling = UpSampling2D(size=(2, 2))(upsampling)

        conv_filter = upsampling.shape[-1].value

        conv1 = Conv2D(filters=conv_filter, kernel_size=(1,1),strides=(1,1), padding='same')(upsampling)

        conv2 = Conv2D(filters=conv_filter,kernel_size=(1,1),strides=(1,1),padding='same')(conv1)

        sigmoid = Activation('sigmoid')(conv2)

        return sigmoid

    def attention_residual_learning(self, mask_input, trunk_input):
        # https://stackoverflow.com/a/53361303/9221241
        Mx = Lambda(lambda x: 1 + x)(mask_input) # 1 + mask
        return Multiply()([Mx, trunk_input]) # M(x) * T(x)
调用:
model = ResidualAttentionNetwork((32, 32, 3),43, activation='softmax').build_model()
model.compile(optimizer=optimizers.Adam(lr=0.0001),loss='categorical_crossentropy',metrics=['accuracy'])
history = model.fit(X_train, y_train, batch_size=32, epochs=epochs, validation_data=(X_test, y_test))
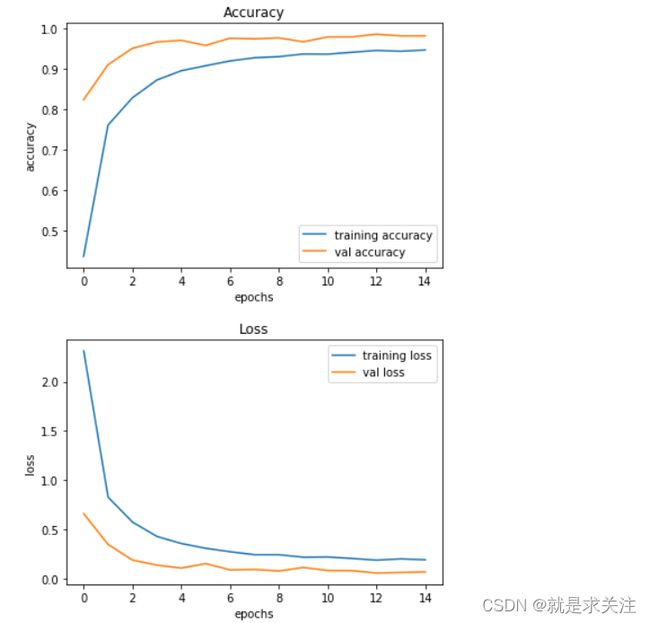
构建模型架构后,我们使用 model.fit() 训练模型。我尝试了批大小 32 和 64。我们的模型在批大小为 64 时表现更好。并且在 15 个 epoch 之后精度稳定。实验结果:
基本CNN 模型构建
交通标志分类器 GUI
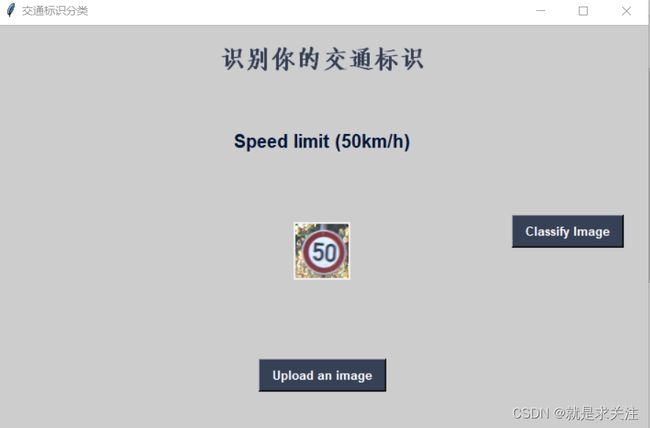
现在我们将使用 Tkinter 为我们的交通标志分类器构建一个图形用户界面。Tkinter 是标准 python 库中的一个 GUI 工具包。在项目文件夹中创建一个新文件并复制以下代码。将其保存为 gui.py,您可以通过在命令行中键入 python gui.py 来运行代码。在此文件中,我们首先使用 Keras 加载了经过训练的模型“traffic_classifier.h5”。然后我们构建用于上传图像的 GUI,并使用一个按钮进行分类,调用 classify() 函数。classify() 函数将图像转换为形状维度 (1, 30, 30, 3)。这是因为要预测交通标志,我们必须提供与构建模型时相同的维度。然后我们预测类model.predict_classes(image) 返回一个介于 (0-42) 之间的数字,代表它所属的类别。我们使用字典来获取有关类的信息。这是 gui.py 文件的代码。

结论
本文在 ResNet 网络基础上引入注意力机制。首先通过注意力机制来使 模型在特征提取过程中,更加关注图像中包含重要特征的区域。实验表明,改进后的 ResNet 模型识别准 确率有明显提高,能够更好地满足交通标志识别任务 的高准确率要求。所提出的方法虽然有效地提升了交通标志自动识别的准确率,但是依然存在一些问 题,如增加了模型复杂度,计算量有一定增加,实时性方面有一定局限性。因此,如何在保证识别准确率的 前提下,降低模型复杂度,减少算法所需时间和计算 资源,更好地满足实时性应用和需求,将是下一步的研究方向。
var code = "483094a5-d455-402d-9eb5-73d1381f55ae"